


Hassle free, 2-Year Warranty
Fast, Free Shipping on Orders $35+
Lifetime Technical Support
30-Day Money Back Guarantee
Plugable USB Data Transfer Cable with USB-C Adapters, 6.6ft
$44.95 USD
SKU: USBC-TRANAmazon Rating : (220 Reviews)
機能
- File Transfer— Transfer files to new computer from old computer at up to 5Gbps. The included 2m (6.6ft) hybrid USB-C and USB transfer cable and Easy Computer Sync software ensures a fast, simple experience
- Secure Transfer— With this data transfer cable pc to pc transfers aren’t just fast, they’re secure, too. Move your data directly from one computer to another without ever sending info to the cloud, external hard drives, or third-party services
- Complete Package— The USBC-TRAN includes a 2m (6.6ft) transfer cable and a full-use license for Easy Computer Sync from Bravura (PC to PC transfer software), allowing unlimited data transfers across an unlimited number of Windows computers with an unlimited number of activations
- Compatibility— The Plugable USBC-TRAN is compatible with, and allows users to transfer data from PC to PC between any combination of USB, USB-C, Thunderbolt, and USB4 systems running Windows XP, Vista, 7, 8.x, 10, 11, and newer
- 2-Year Coverage, Lifetime Support— Every Plugable product, including this USB data transfer cable, is covered against defects for 2 years and comes with lifetime support. If you ever have questions, contact our North American-based team - even before purchase
For volume orders or business inquiries contact sales@plugable.com
Free 3-Day Continental U.S. Shipping When Buying Direct!


技術仕様
| File Transfer | Transfer files from one Windows PC to another at up to 5Gbps using the included 2m (6.6ft) hybrid USB-C and USB transfer cable. Easy Computer Sync software ensures a fast and seamless experience. |
| Broad Compatibility | The Plugable USBC-TRAN is compatible with and allows users to transfer data from PC to PC between any combination of USB, USB-C, Thunderbolt, and USB4 systems running Windows XP, Vista, 7, 8.x, 10, 11, and newer. |
| Easy-to-use | Supports drag-and-drop file transfers for an intuitive and user-friendly experience. |
| Easy Sync Software | Includes Easy Computer Sync software from Bravura, for unlimited software activations. The activation key is conveniently located on a label on the cable. |
A: The included transfer cable is 2 meters (6.6 feet) long, providing ample length for convenient connections between computers.
A: Yes, the USBC-TRAN supports drag-and-drop file transfers when paired with the included software, making it user-friendly and intuitive for transferring files between computers.
A: The USBC-TRAN can transfer data at speeds up to 5Gbps, allowing you to move 20GB of data between computers in minutes, much faster than traditional hard drives, flash drives, or cloud services.
A: Yes, the USBC-TRAN can be used with no active network connection, ensuring secure file transfers.
A: Yes, the USBC-TRAN can be used to transfer data between different versions of Windows operating systems, from Windows XP to the latest versions, supporting both 32-bit and 64-bit systems.
 |
 |
 |
 |
|
|---|---|---|---|---|
Link Speed |
5Gbps |
10Gbps |
5Gbps |
5Gbps |
Approximate 20Gb Transfer Time |
4min 57sec |
42sec |
4min 57sec |
4min 57sec |
Software Included |
||||
ケーブル長 |
6.6ft (2m) |
6.6ft (2m) |
6.6ft (2m) |
6.6ft (2m) |
ホスト接続タイプ |
USB 3.0 または USB-C |
Thunderbolt |
USB 3.0 |
USB 3.0 |
互換性 |
Windows XP to 11 and newer |
Windows 10, 11, and newer |
Windows XP to 11 and newer |
Windows XP to 11 and newer |
Step-By-Step Instructions
- Install Easy Computer Sync software on both computers. You can find the software download link and get further info in the Downloads tab
- Give both computers a restart to ensure the software installation process has finalized
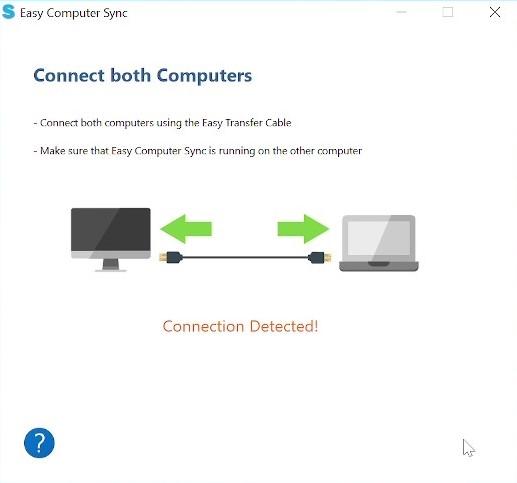
- Connect the Transfer Cable, and start the software on both computers to initiate the connection
- At this point, you can register the software with the included 16 character Product Key
- Now, pick the transfer mode you want to use and begin transferring
Product Overview Video
The video below provides complete feature overview of the USBC-TRAN Data Tansfer Cable.

Filter Help Articles and Frequent Questions by Category
Choose one or more filters within each category to narrow down the articles. Each selection will result in only displaying articles that include all of your choices.
Articles
Well how about that, it looks like we don't have any articles matching your filters! Try removing one of your choices or clear the filters to show all articles.
You can always contact support if you need help too!
How to - Install Easy Computer Sync Software
This guide will help you install Bravura Easy Computer Sync software onto your Windows computers for use with our Easy Transfer Cables. Click the link below to download the latest version of Easy Computer Sync. A window will open for you to save You can use your default Downloads folder, or pick another folder that works for you. Once you've picked a folder, click Save, to start the download.
Easy Computer Sync v3.0.0.3.zip
Follow the ordered steps below after you've downloaded the software installation package.
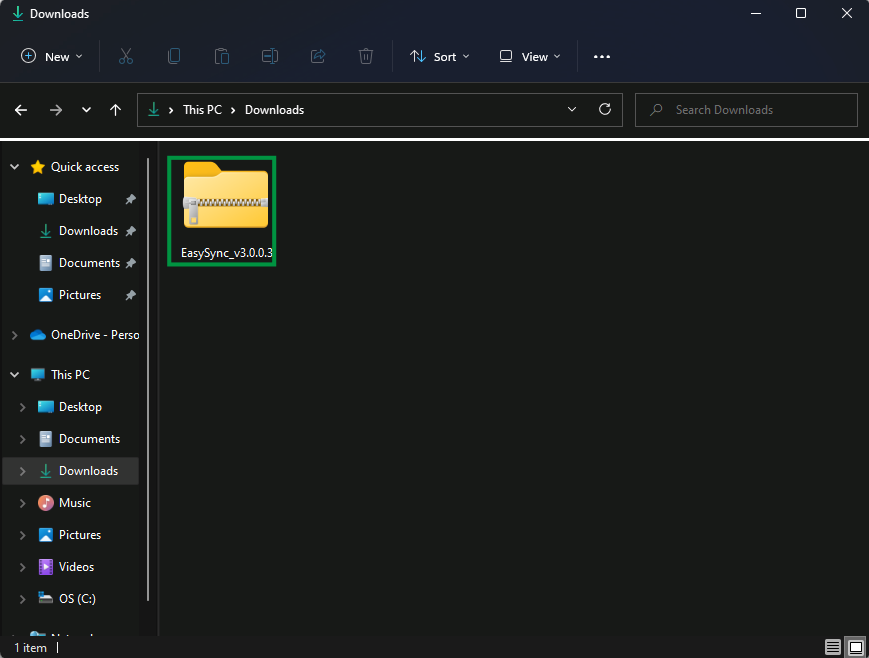
- When the download finishes, go into the folder you picked and double-click on the EasySync_v3.0.0.3.zip file to open the archive
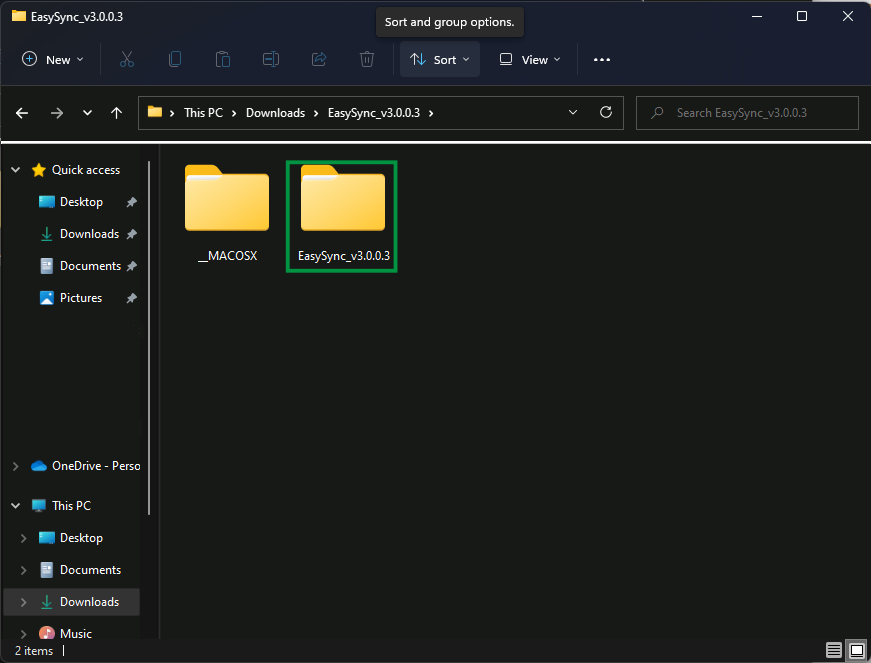
- Next, double-click on the EasySync_v3.0.0.3 folder which is inside the archive to open it
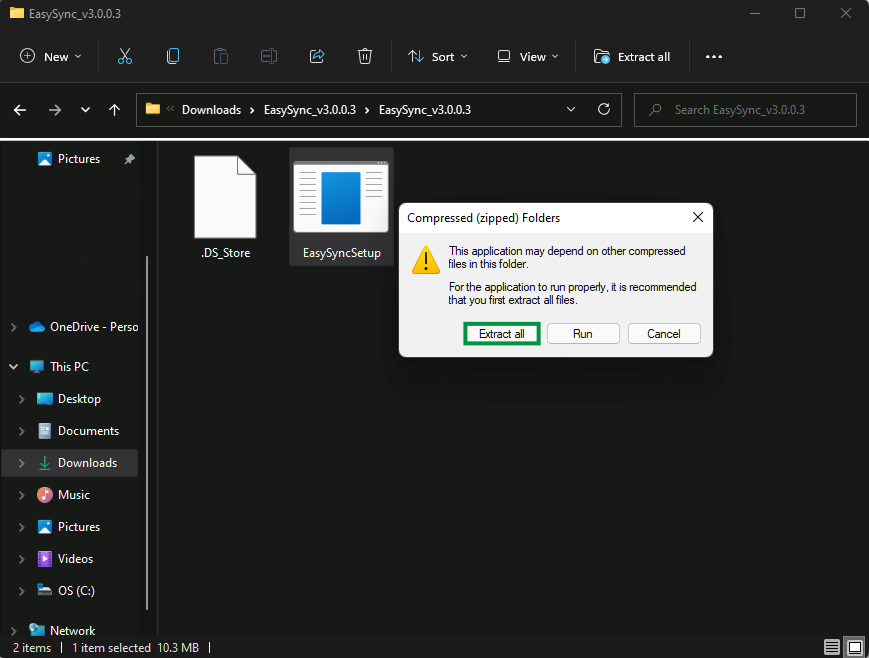
- Double-click on the EasySyncSetup application to start. A message will pop up stating that it is recommended for the application to be extracted. Let's take that recommendation, and click Extract All
- Here we can click Browse to pick a new location, and we can click Extract to extract the files

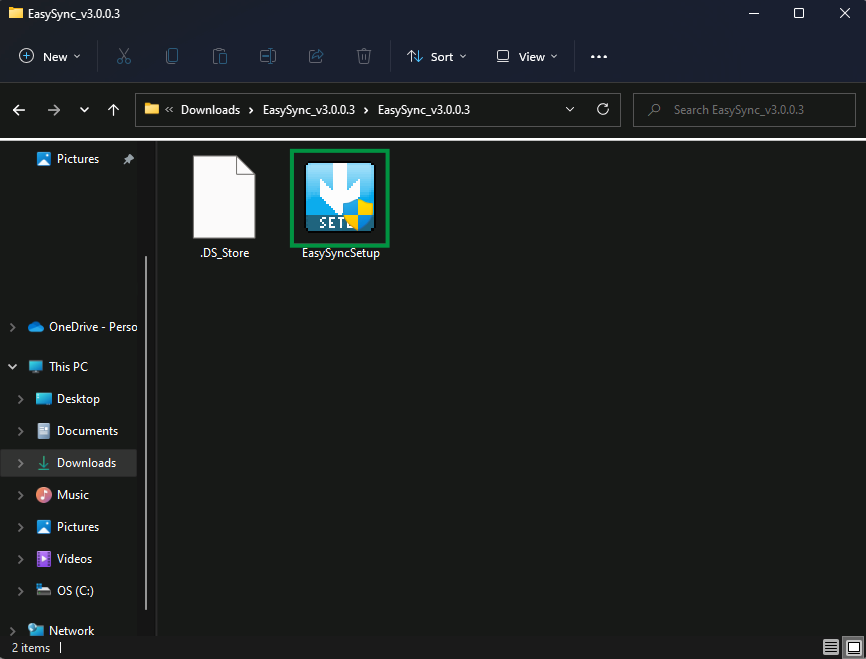
- A new window should automatically open with the extracted folder inside. But if it doesn't, you may need to navigate there yourself. Click on the EasySyncSetup application in the extracted folder to start the installation process. Note - Windows User Account Control (UAC), may pop up and ask you for permission to run the application. If it does, click Yes to allow the changes
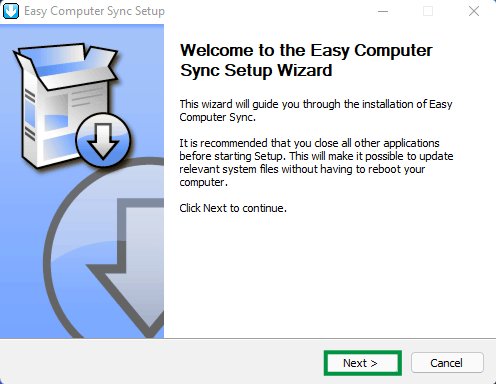
- You'll be greeted by the software welcome screen. Click Next > to continue
- Now we come to the License Agreement. Feel free to take your time to read through the license information, and click I Agree when you're ready to move on

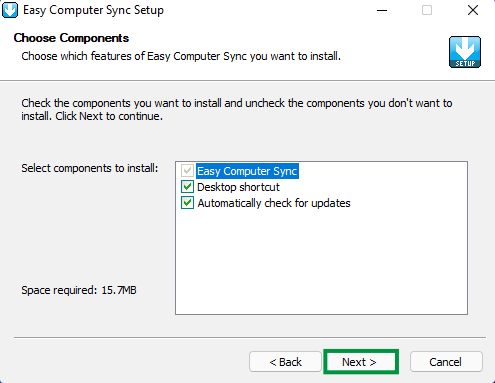
- Choose the components to install. Let's leave the default settings alone for easy operation. Click Next > to move on
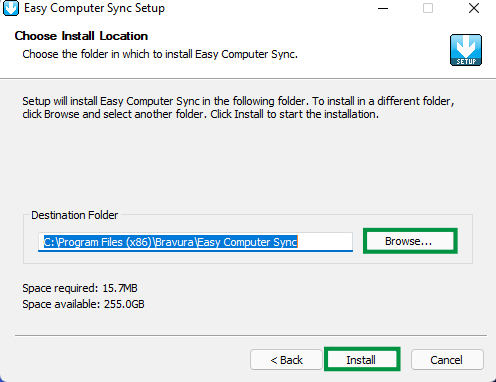
- We need to choose the location for installation. The software uses C:\Program Files (x86)\Bravura\Easy Computer Sync\ as the default folder. But, you can click Browse to pick a new folder if you'd like. Click Install once you've made your decision and the installation will start
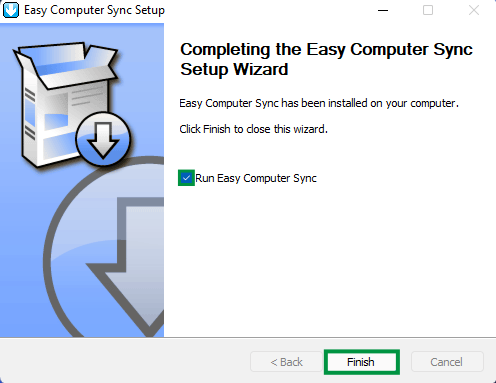
- Great! The installation is complete. Let's restart both computers for good measure after installing the software. Click the box to uncheck the option to Run Easy Computer Sync, and then click Finish to exit the installer and then restart your computers
There we have it! The software is installed, and ready to use! Plug the cable in, start the software and make the connection, then choose the transfer mode that works for you.
We hope this was helpful! Feel free to reach out to us directly at: support@plugable.com if you have any questions or concerns.
The Bravura Easy Computer Sync software is asking me for a Product Key. Where do I find my Product Key?
The Product Key is a 16-character alphanumeric code and is unique to each order. Since 12/01/2017, Product Keys are printed on a tag and are physically tied to our Plugable Transfer Cables like this:
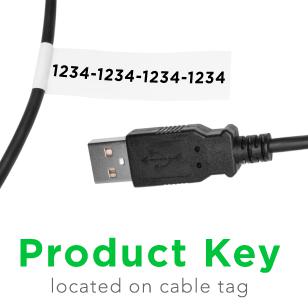
Our Product Keys:
- Use letters A-F only
- Use the number zero 0, and not the letter O.
- Do not expire
- Can be used to register as many computers as you need
If you purchased your Transfer Cable before 12/01/2017, you should have received an email containing the Product Key. Please reach out to us directly at: support@plugable.com with your Amazon order number for help with your Product Key, or if you have any questions.
I’ve installed the Bravura Easy Computer Sync software on both systems, and instead of starting the transfer process both systems say “Waiting for Connection” indefinitely. What’s going on, and how can I get the connection to work?
We can help!
First, we'd suggest downloading and installing the latest version of Bravura Easy Computer Sync onto both computers. You can download the latest version of Easy Computer Sync directly from this link: Download Easy Computer Sync . This latest software version improves compatibility and stability and should take care of any connection issues.
I downloaded and installed the latest software from the link above, but I'm still having trouble. What do I do?
Downloading and installing the latest software from the link above should take care of any connection issues. But, if you're still having trouble after that, give these steps a try:
- Give both computers a restart. This is a basic first step, but, it's always a good practice to restart your computer after installing software to allow the installation and changes to complete.
- Try plugging the cable into different ports on both computers, and let's swap the cable ends around as well to see if that gets the connection to go through.
- Try running the program as an administrator. You can do this by right-clicking the application, and choosing Run as administrator. The transfer program grants direct access to files, so Windows User Account Control may flag it, and keep it from running.
- Finally, if these steps don’t work, let’s try temporarily disabling any antivirus/firewall/security software on both computers. The software can definitely be re-enabled again, and if the connection works properly, you may need to just add an exception for the Transfer Software to your security program.
We hope this was helpful! Feel free to reach out to us directly at support@plugable.com, if you still need help with the connection or have any questions and we'll be glad to help you!
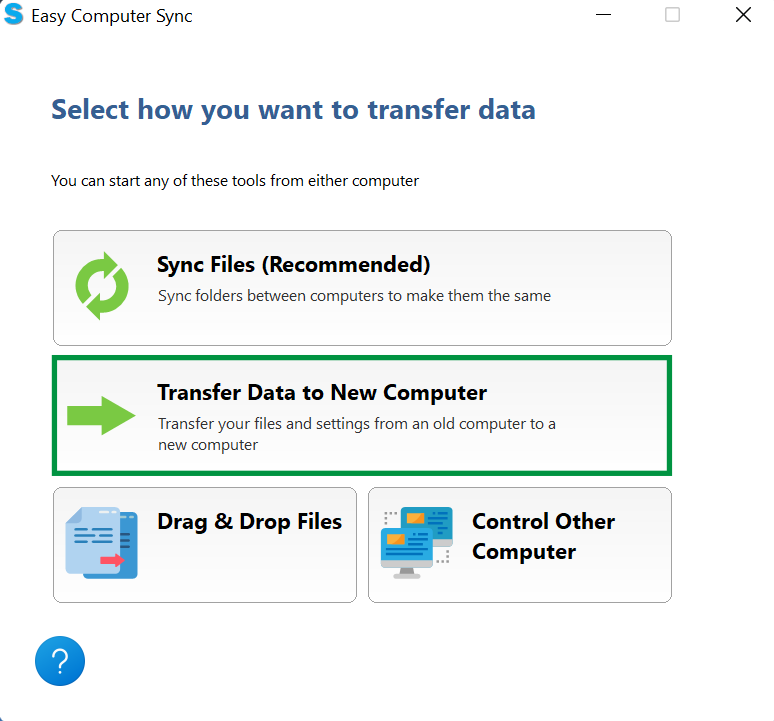
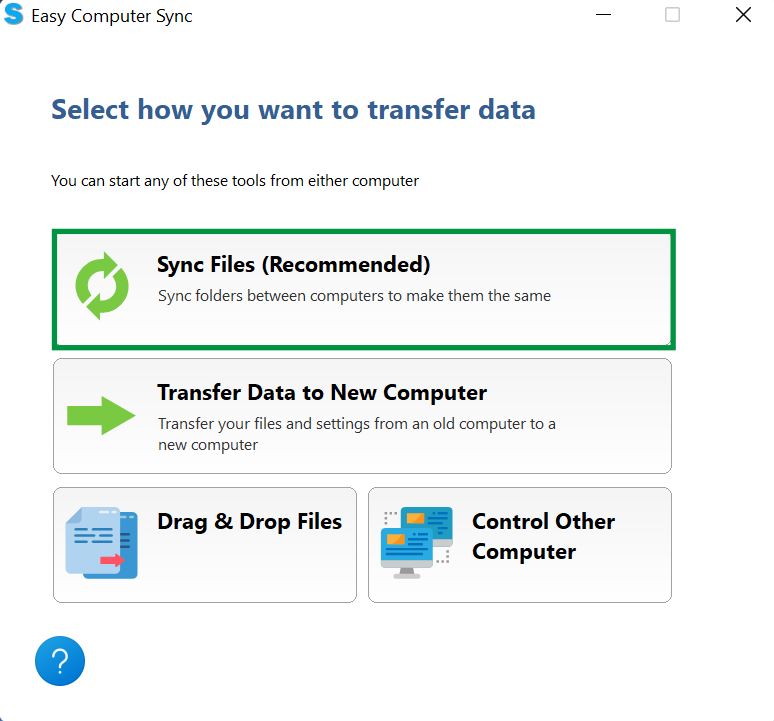
How to - Use the Transfer Data to New Computer mode
What is the Transfer to New Computer Mode?
The Transfer Data to New Computer mode is one of the three main Transfer Modes available in Easy Computer Sync. This mode is designed for one-way transfers, and files should transfer between folders with the same name. For example, if we pick the Pictures folder on the first computer the files transfer to the Pictures folder on the second computer. Let's look at the steps:
- Click the Transfer Data to New Computer button on the main menu after you've made the connection
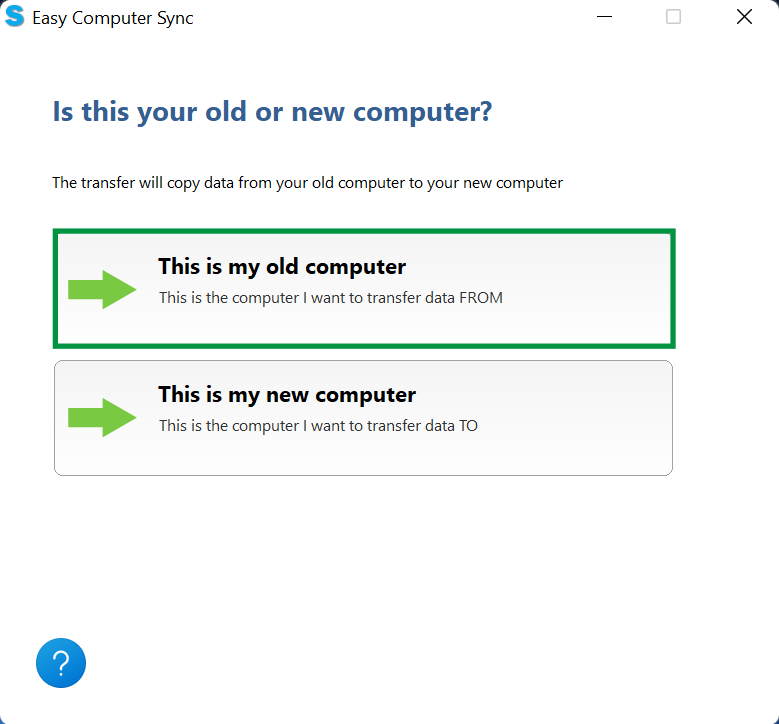
- We can pick which computer we're transferring from, and which computer you're transferring to. Typically this is mode is used to transfer from an older machine to a newer one, which is what we're doing here. So, we'll click This is my old computer
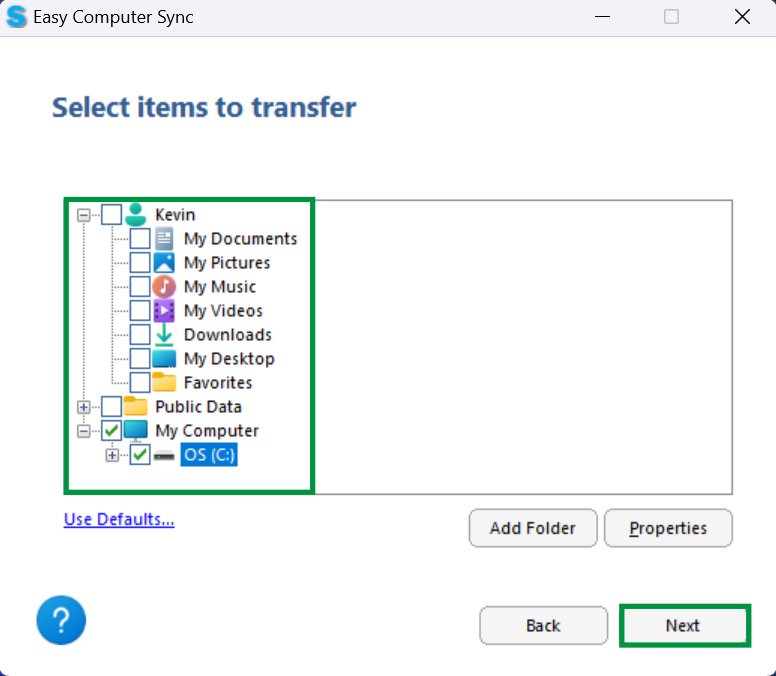
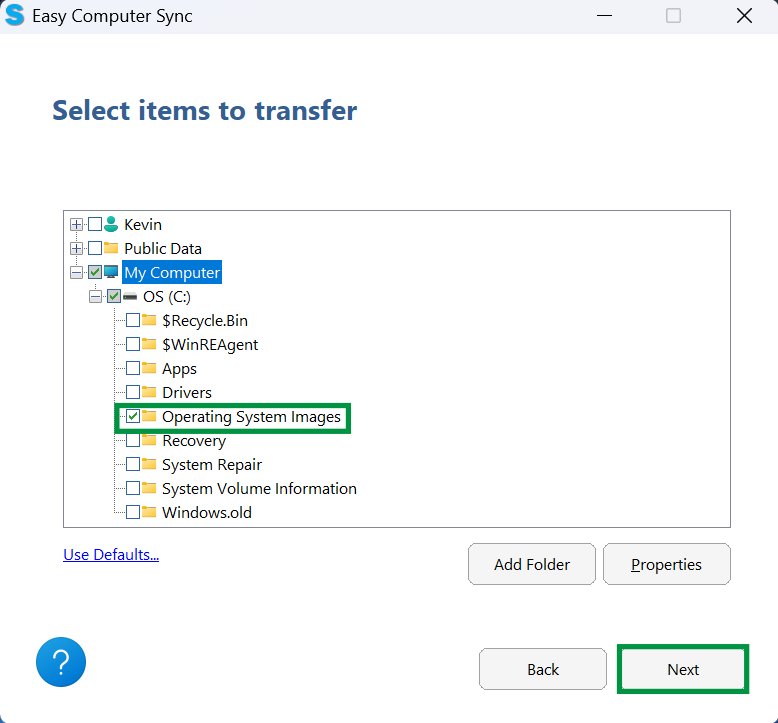
- In the top-left corner of the page we'll see the main folders where files are kept in Windows. We can click the boxes to pick folders. Please note, clicking these boxes will select all content in the folder. At this point we could:
- Click Next to start transferring
- Click Add Folder, to look for specific folders to transfer
In this example, we're going to look for specific folders transfer, so let's click Add Folder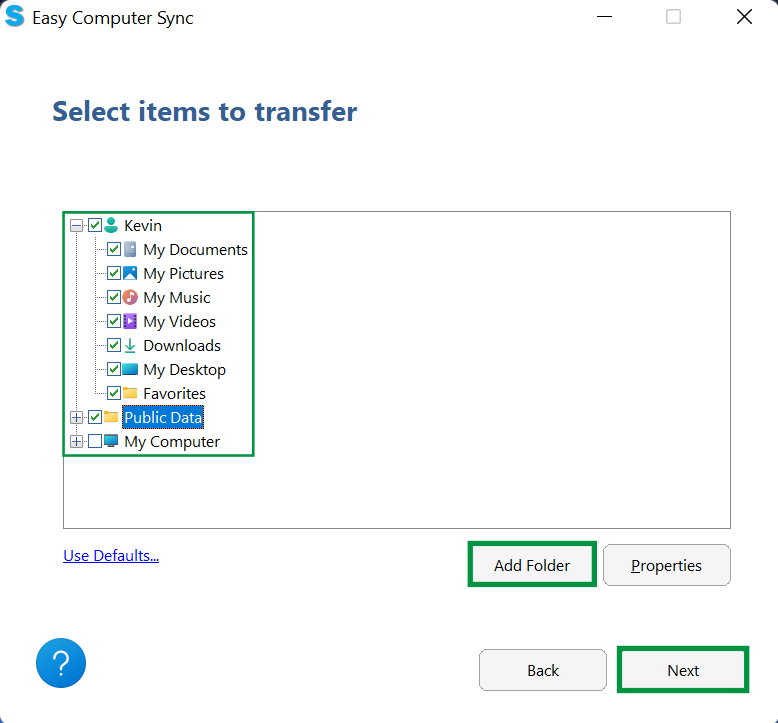
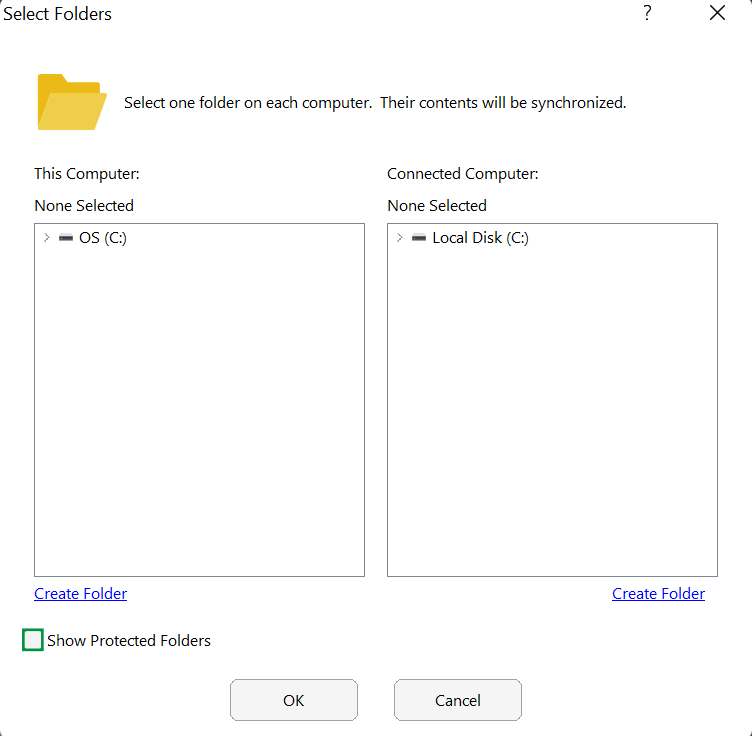
- Now, we see a screen with the first computer we're using on the left, and the second computer on the right. As a precaution, folders such as Users, Program Files, Documents, Pictures and more aren't available when the software is started. Click the box in the bottom-left of the screen that says Show Protected Folders, and we can get further access to files and folders
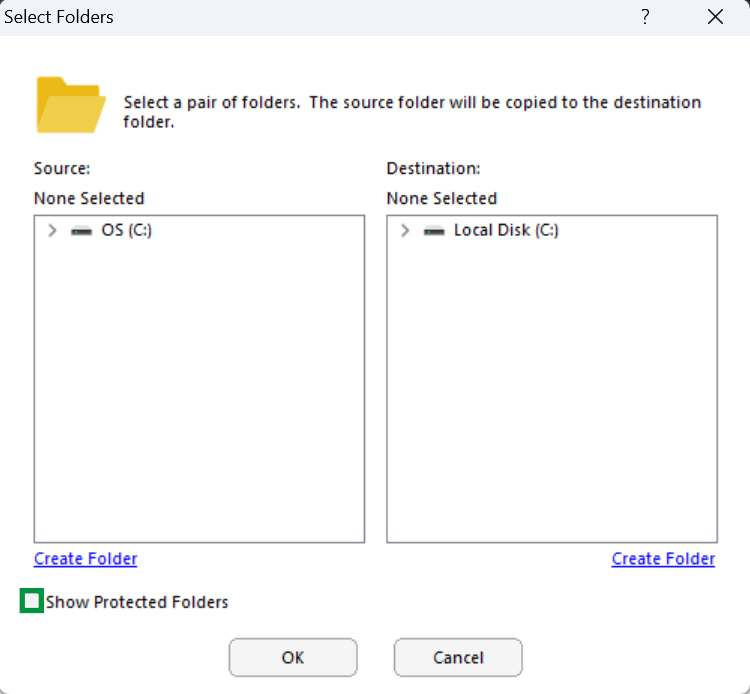
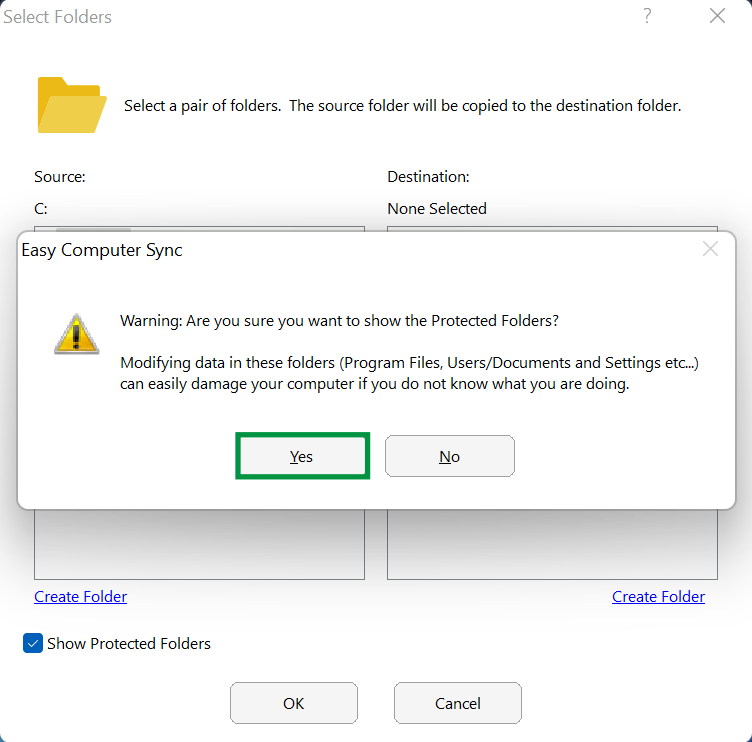
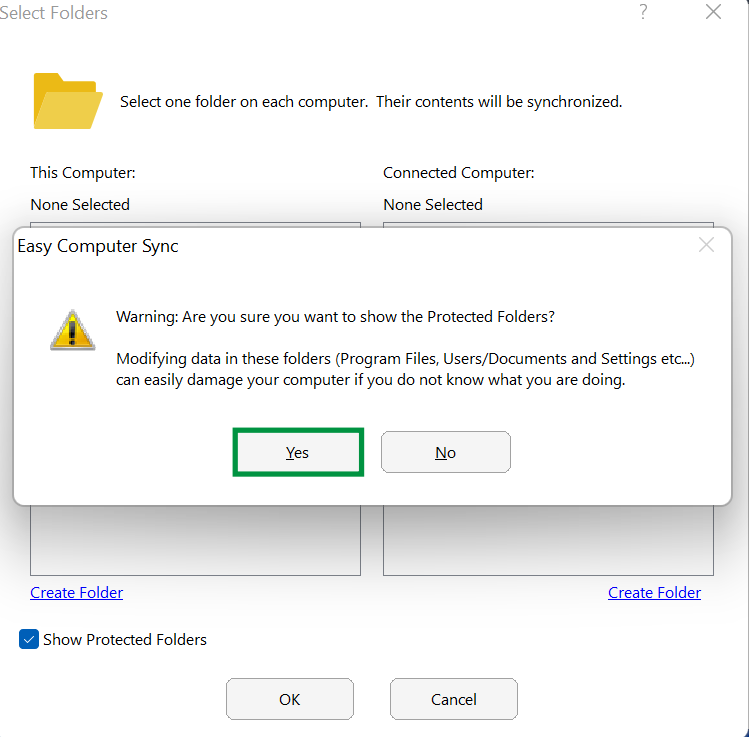
- A message will pop up with information about viewing Protected Files. Click Yes to begin
- We can click the arrows here that are next to drives and folders to expand them out, and see the content inside. Once we've found the folders needed, click OK
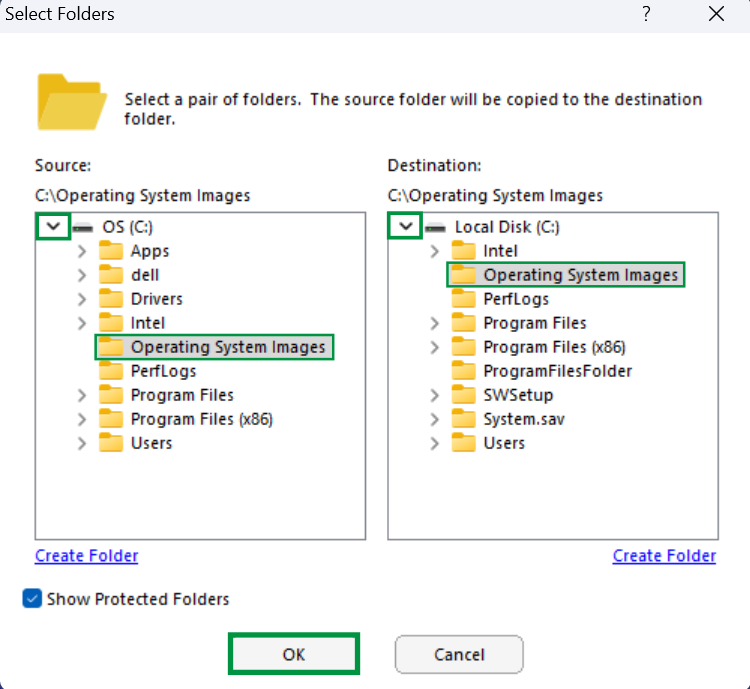
- Now, we have the folders we've selected ready, and can click Next, to start the transfer
- We see the folder ready for transfer. Click Next to begin
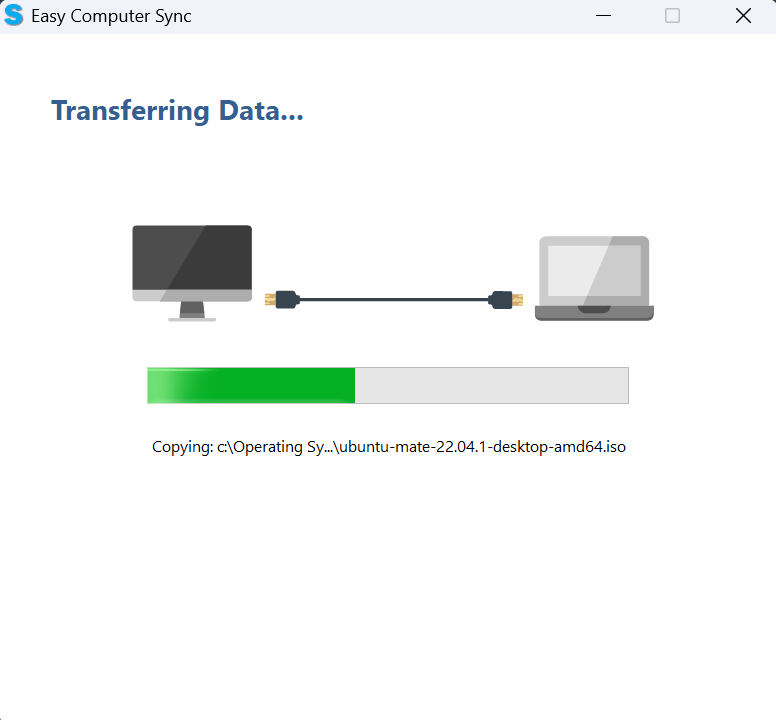
- The progress bar will fill up green as files are transferred
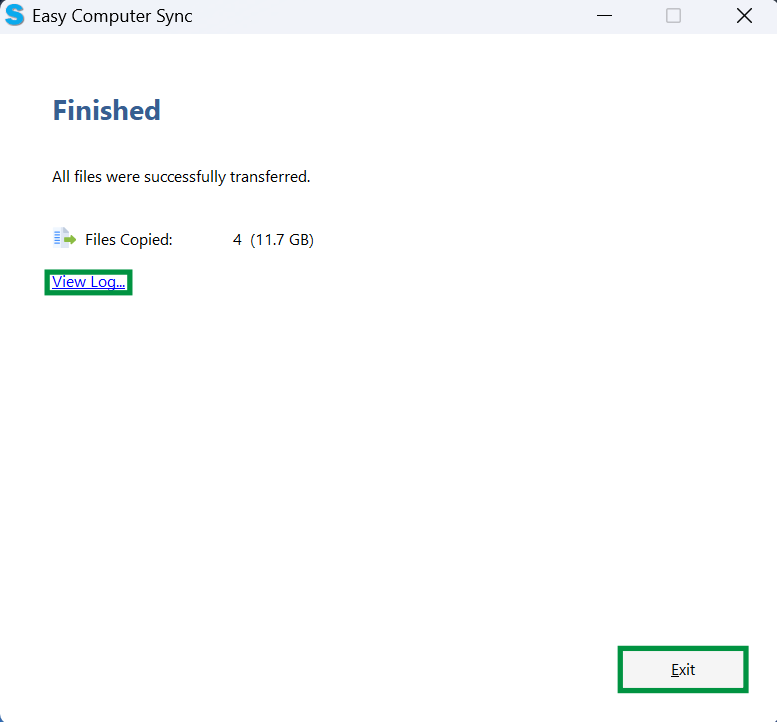
- Finished, great! At the end we'll get information about the number of files sent, and the amount of data transferred. We can click View Log, to see a log with further information, and click Exit, when finished
We hope this was helpful! Feel free to reach out to us directly at: support@plugable.com with any questions or concerns.
How to - Use the Drag & Drop mode
What is the Drag & Drop Mode?
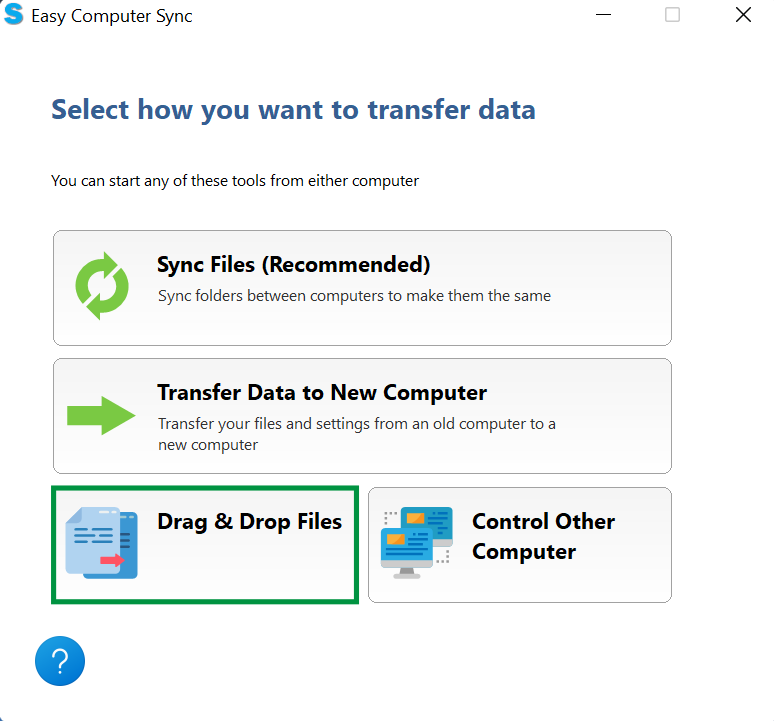
The Drag & Drop mode is one of the three main Transfer Modes available in Easy Computer Sync. This is great for accessing specific files and folders, and let's us manually drag and drop files and folders between our computers.
- Click the Drag & Drop button on the main menu after you've made the connection
- A screen will pop up with some further information about the Drag & Drop Mode. Click OK to begin

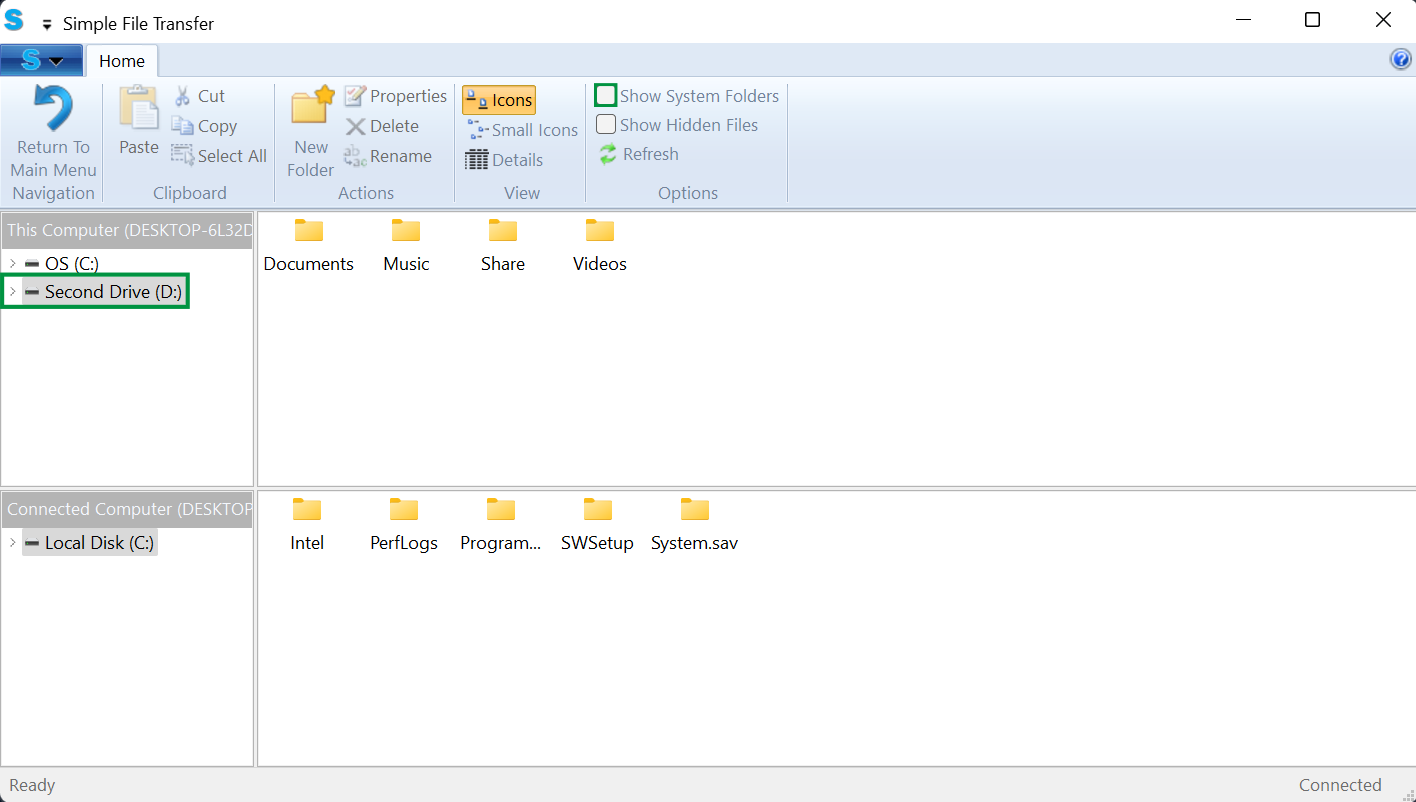
- Now, we get to the main screen of the Drag & Drop mode. Here, we can see the computer we're currently using in the top of the screen and the connected computer below. We can also see any additional hard drives automatically, like this Second Drive. Some folders aren't accessible right away, and we may need to click the Show System Folders button to get access to certain items
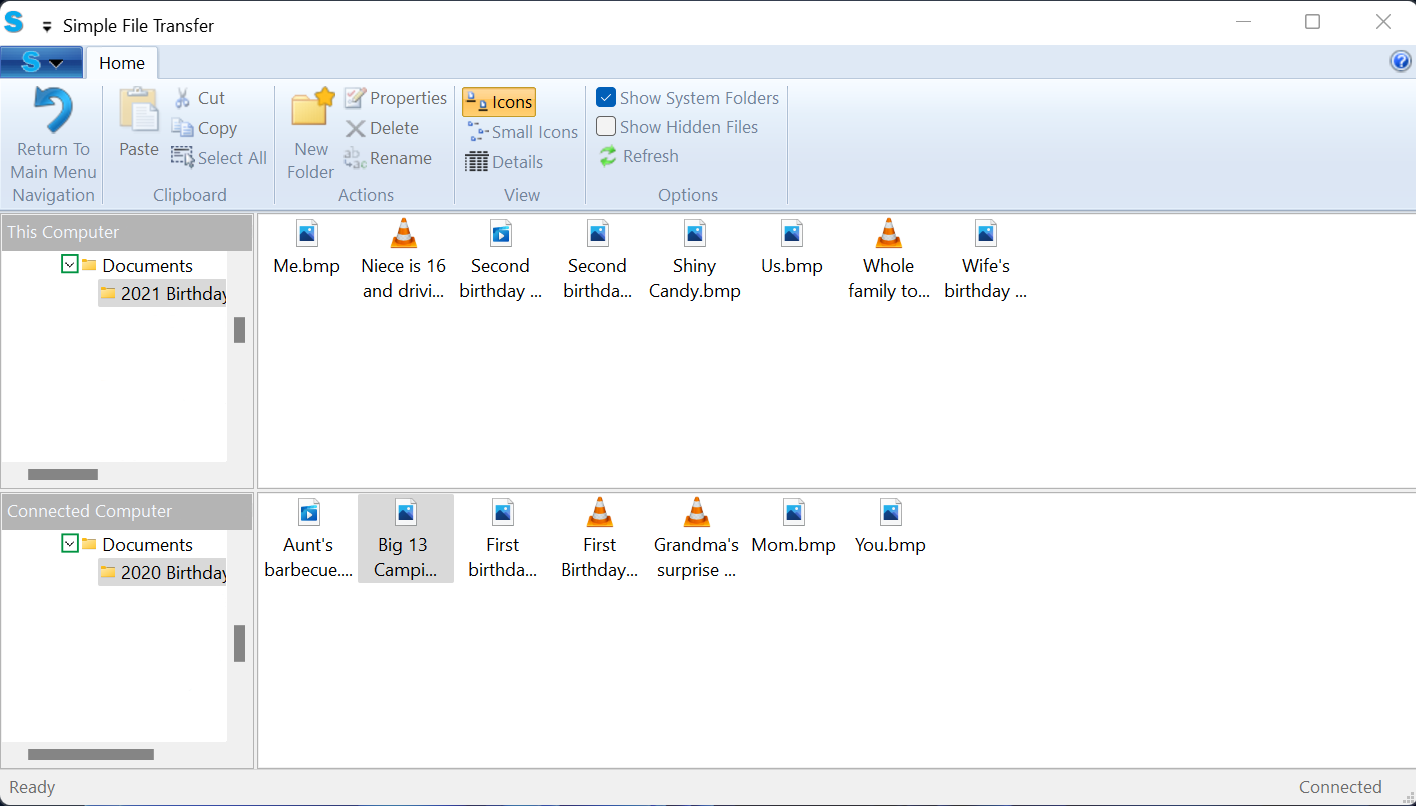
- We can click the arrows that are next to drives and folders to expand them out, and see the content inside. Now, we can see into the folders and get the content we need. Simply click, and drag files between computers to drop them to start a transfer
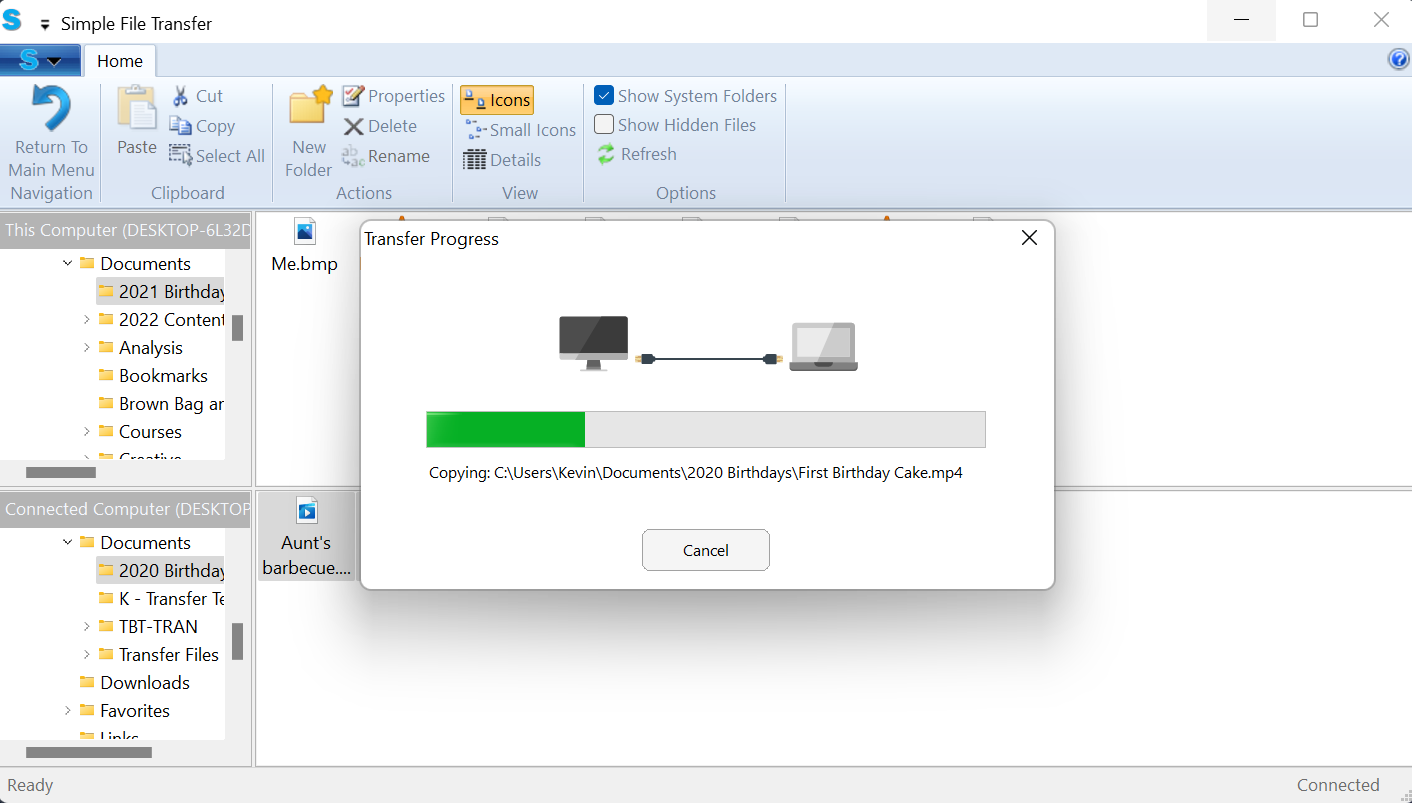
- A green progress bar will fill up a files transfer
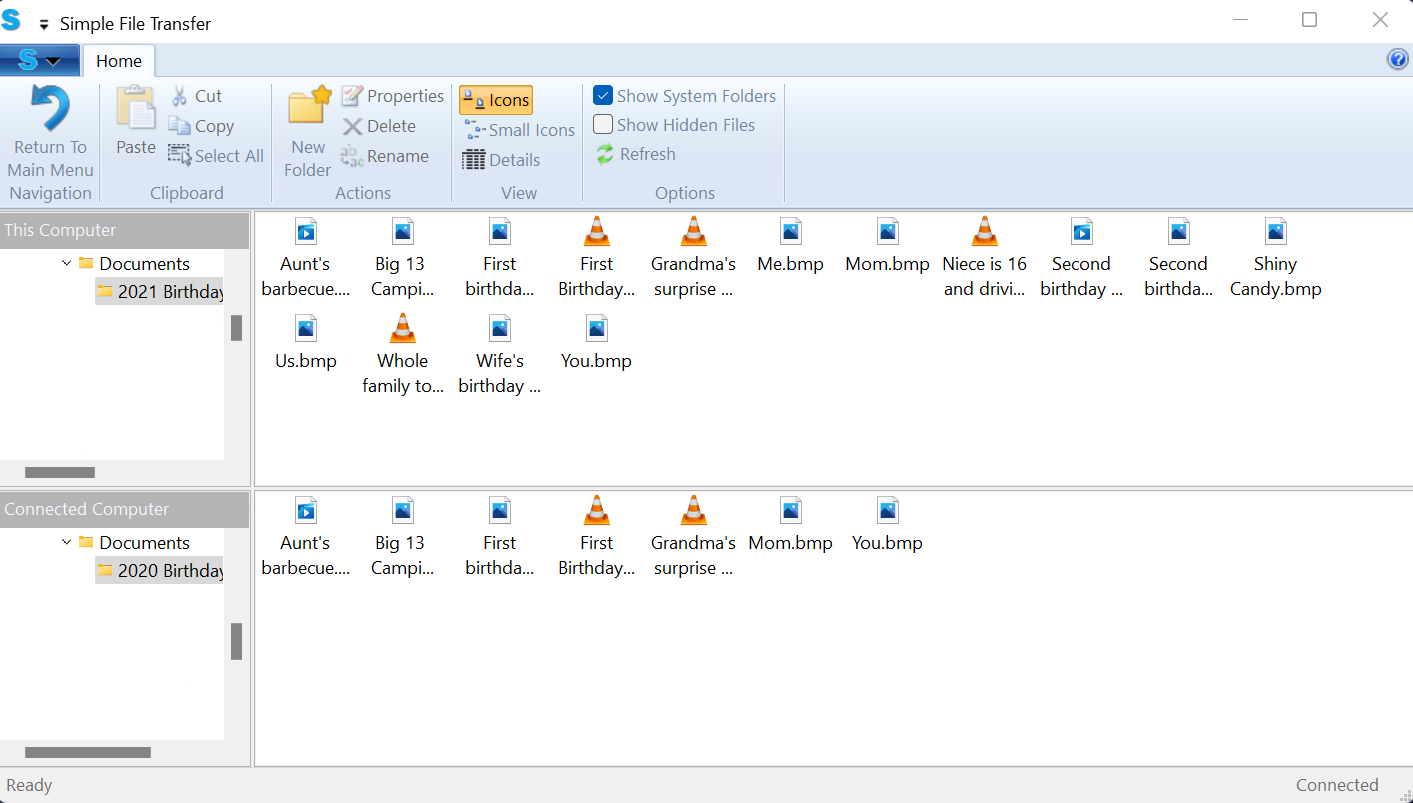
- Great! Now we have all of the items on the top computer
We hope this was helpful! Feel free to reach out to us directly at: support@plugable.com with any questions or concerns.
How to - Use the Sync Files mode
What is the Sync Files Mode?
The Sync Files mode is one of the three main Transfer Modes available in Easy Computer Sync. Let's say we have photos from 2021 on the first computer, and photos from 2020 on the second computer. We want to sync the computers up, and get all of the photos on both computers. That's where the Sync Files mode comes into play, and here's what we need to do:
- Click the Sync Files Button on the main menu after we've made the connection
- In the top-left corner of the page we'll see the main folders where files are kept in Windows. We can click the boxes to pick folders. Please note, clicking these boxes will select all content in the folder. At this point we could:
- Click Next, to start syncing
- Click Add Folder, to look for specific folders to sync up
In this example, we're going to look for specific folders to sync up, so let's click Add Folder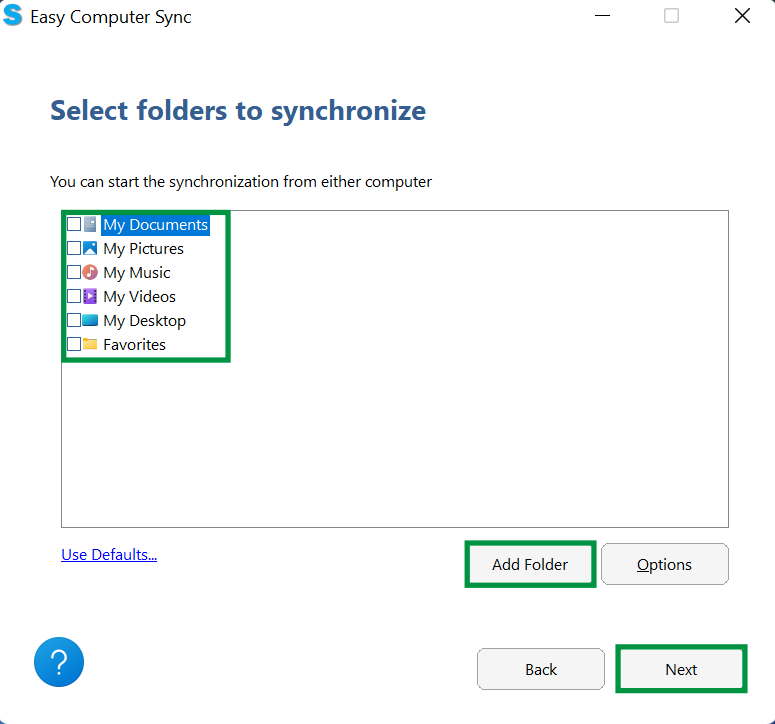
- Now, we see a screen with the first computer we're using on the left, and the second computer on the right. As a precaution, folders such as Users, Program Files, Documents, Pictures and more aren't available when the software is started. Click the box in the bottom-left of the screen that says Show Protected Folders, and we can get further access to files and folders
- A screen will pop up with some information about accessing files. Click Yes, when ready to move on
- We can click the arrows here that are next to drives and folders to expand them out, and see the content inside. Once we've found the folders needed, click OK
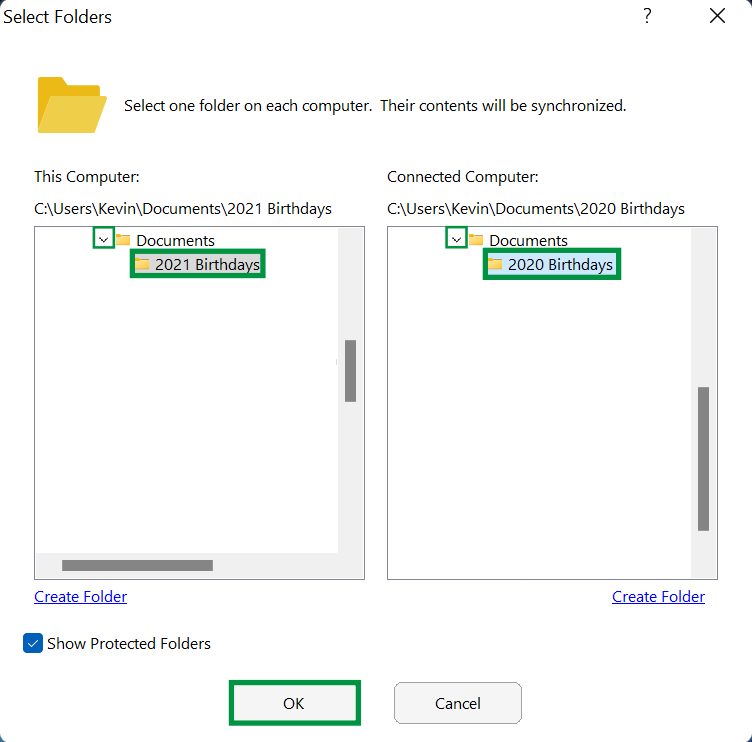
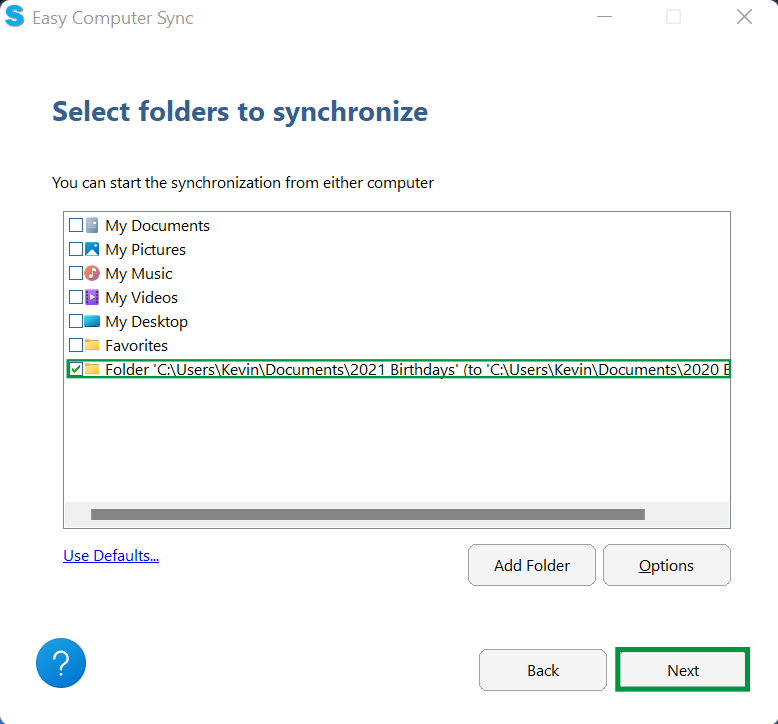
- Now, we can see that the folders we've selected are ready to be synchronized. Click Next, to begin
- The Progress bar will fill up green as files are synced up
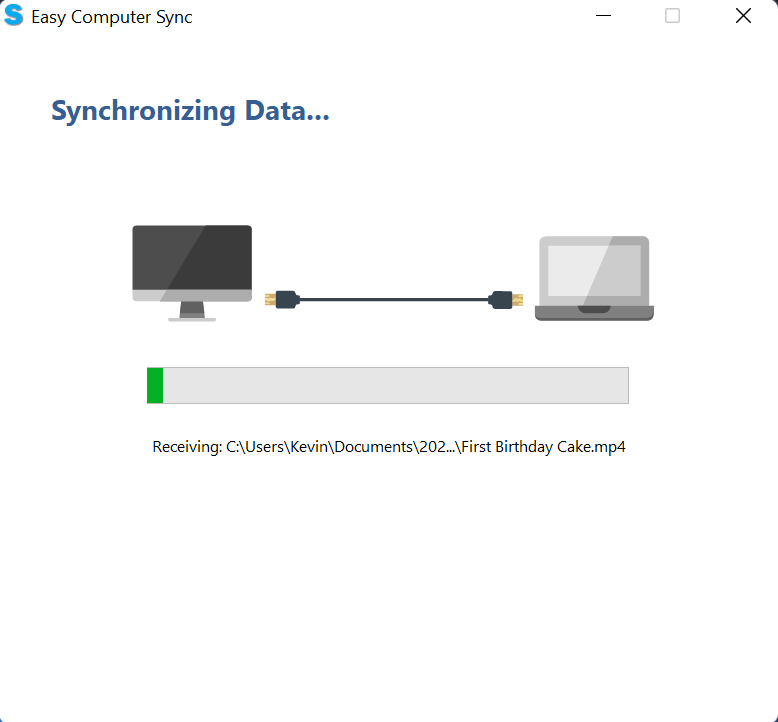
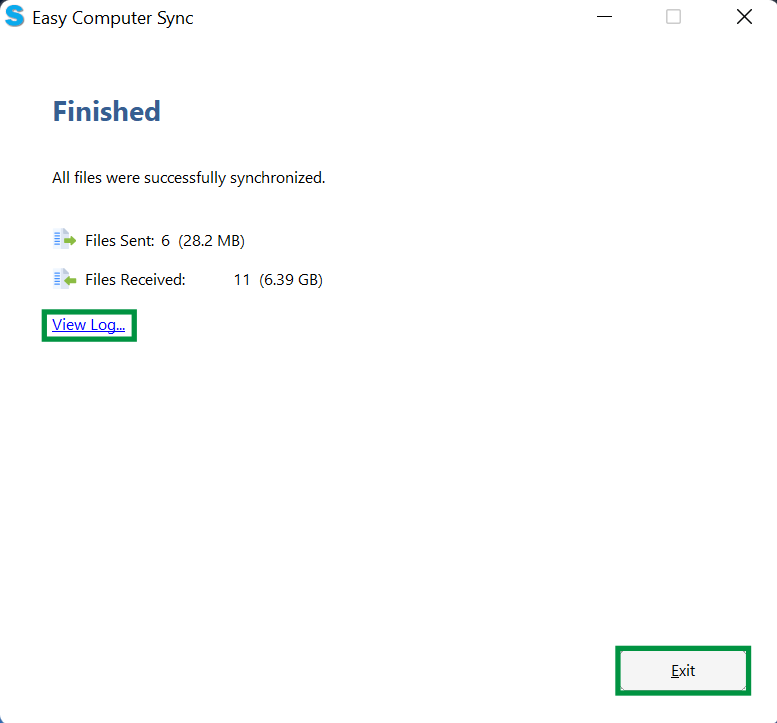
-
Finished! At the end, we can see the number of files sent and received and the amount of data transferred. We can click View Log, to see a log with further information, and click Exit, when finished
We hope this was helpful! Feel free to reach out to us directly at: support@plugable.com with any questions or concerns.
How to - Use the Control Other Computer Mode
What is the 'Control Other Computer' Mode?
We've talked before about the different Transfer Modes available for use between computers using Easy Computer Sync, but, did you know the software is capable of remotely controlling another computer?
With the ability to reach speeds up to 10gbps, our TBT-TRAN Easy Transfer Cable is the perfect fit for the Control Other Computer mode, which allows us to remotely control one computer from another.
This is a valuable tool to have in your belt whether you're maintaining computers at the office, home, or really anywhere because of the direct Thunderbolt-to-Thunderbolt connection!
The TBT-TRAN is Compatible with Windows 10 and Windows 11, and systems must have at least one free Thunderbolt 3, Thunderbolt 4, or USB4 port to plug the cable into. See the quick steps below to get started:
The Control Other Computer mode can be used with our USB-EASY-TRAN (USB 2.0), and USB3-TRAN (USB 3.0) Transfer Cables. But, functionality and speed will be limited to the respective speeds of USB 2.0 and 3.0
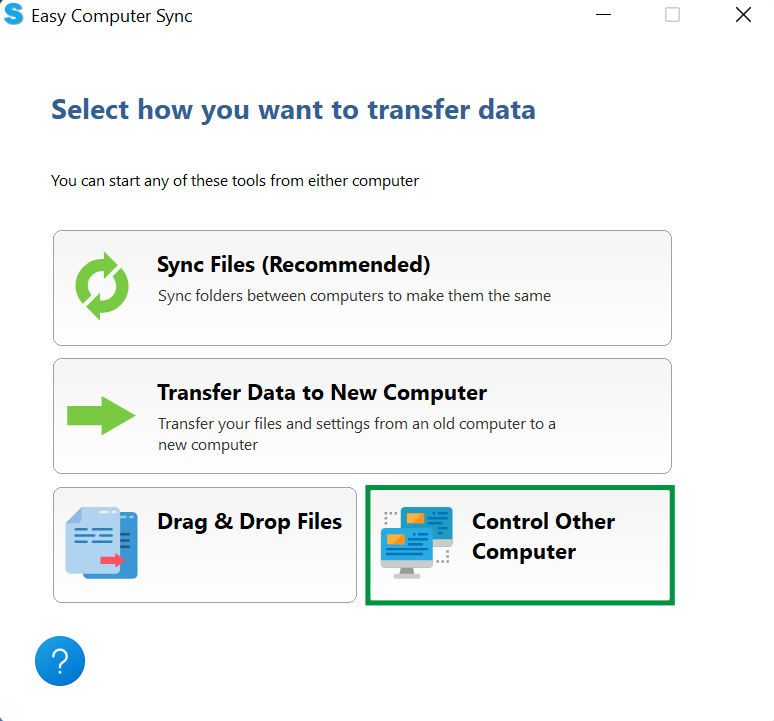
- Using the computer you want connect from, click the Control Other Computer button on the main menu after you've made the connection to start the mode.
- Now, we'll see a remote image of the connected host computer's desktop. The icons here are just as they are on the host system, which can make software a breeze. This can be particularly useful for systems that are kept offline to restrict access, like this one we're using for this example. (Please note, the background is meant to be blank for minimal resource usage.)
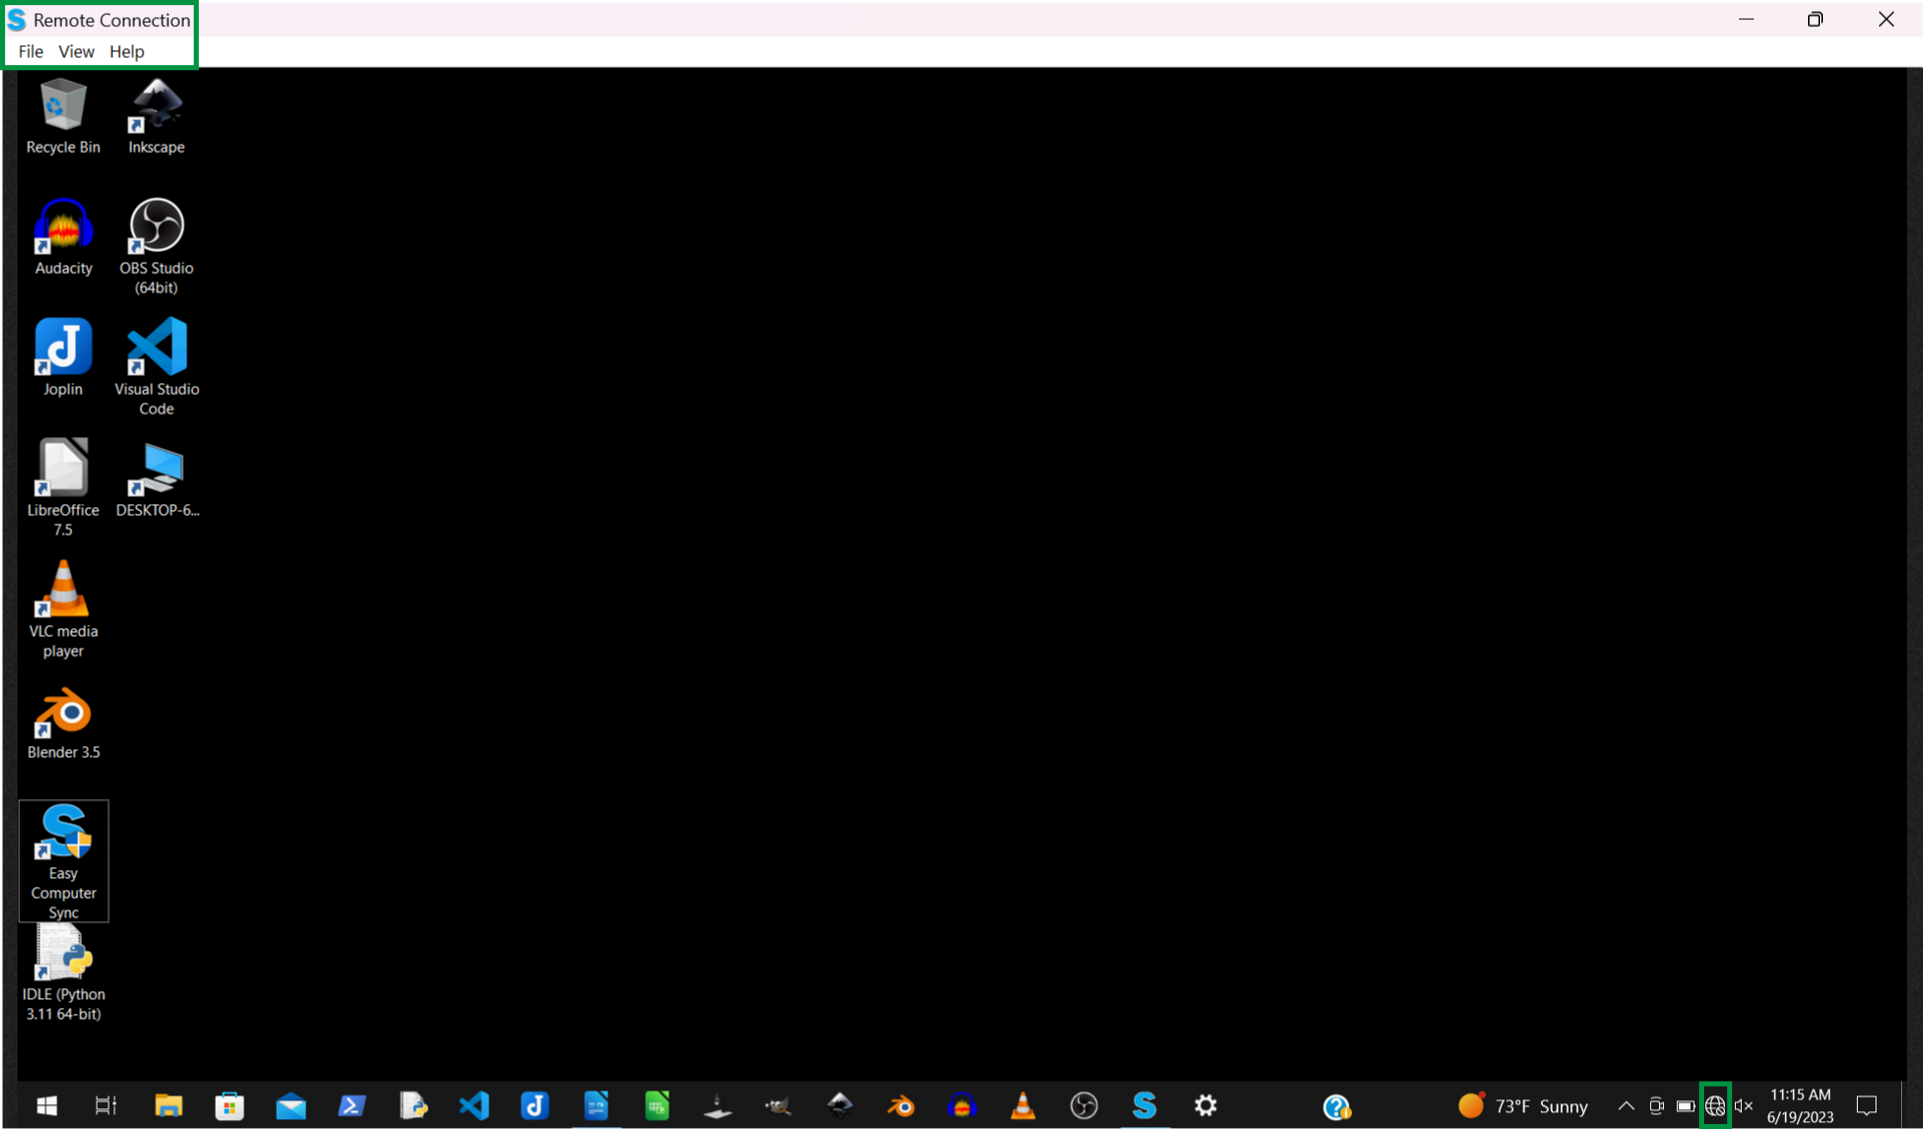
- We can navigate folders and access files just as we would on the machine itself. This network disconnected system is now a great local resource for shared files and tools!

- We can open files using programs installed on the host computer. Here, we have a Word Processing document open

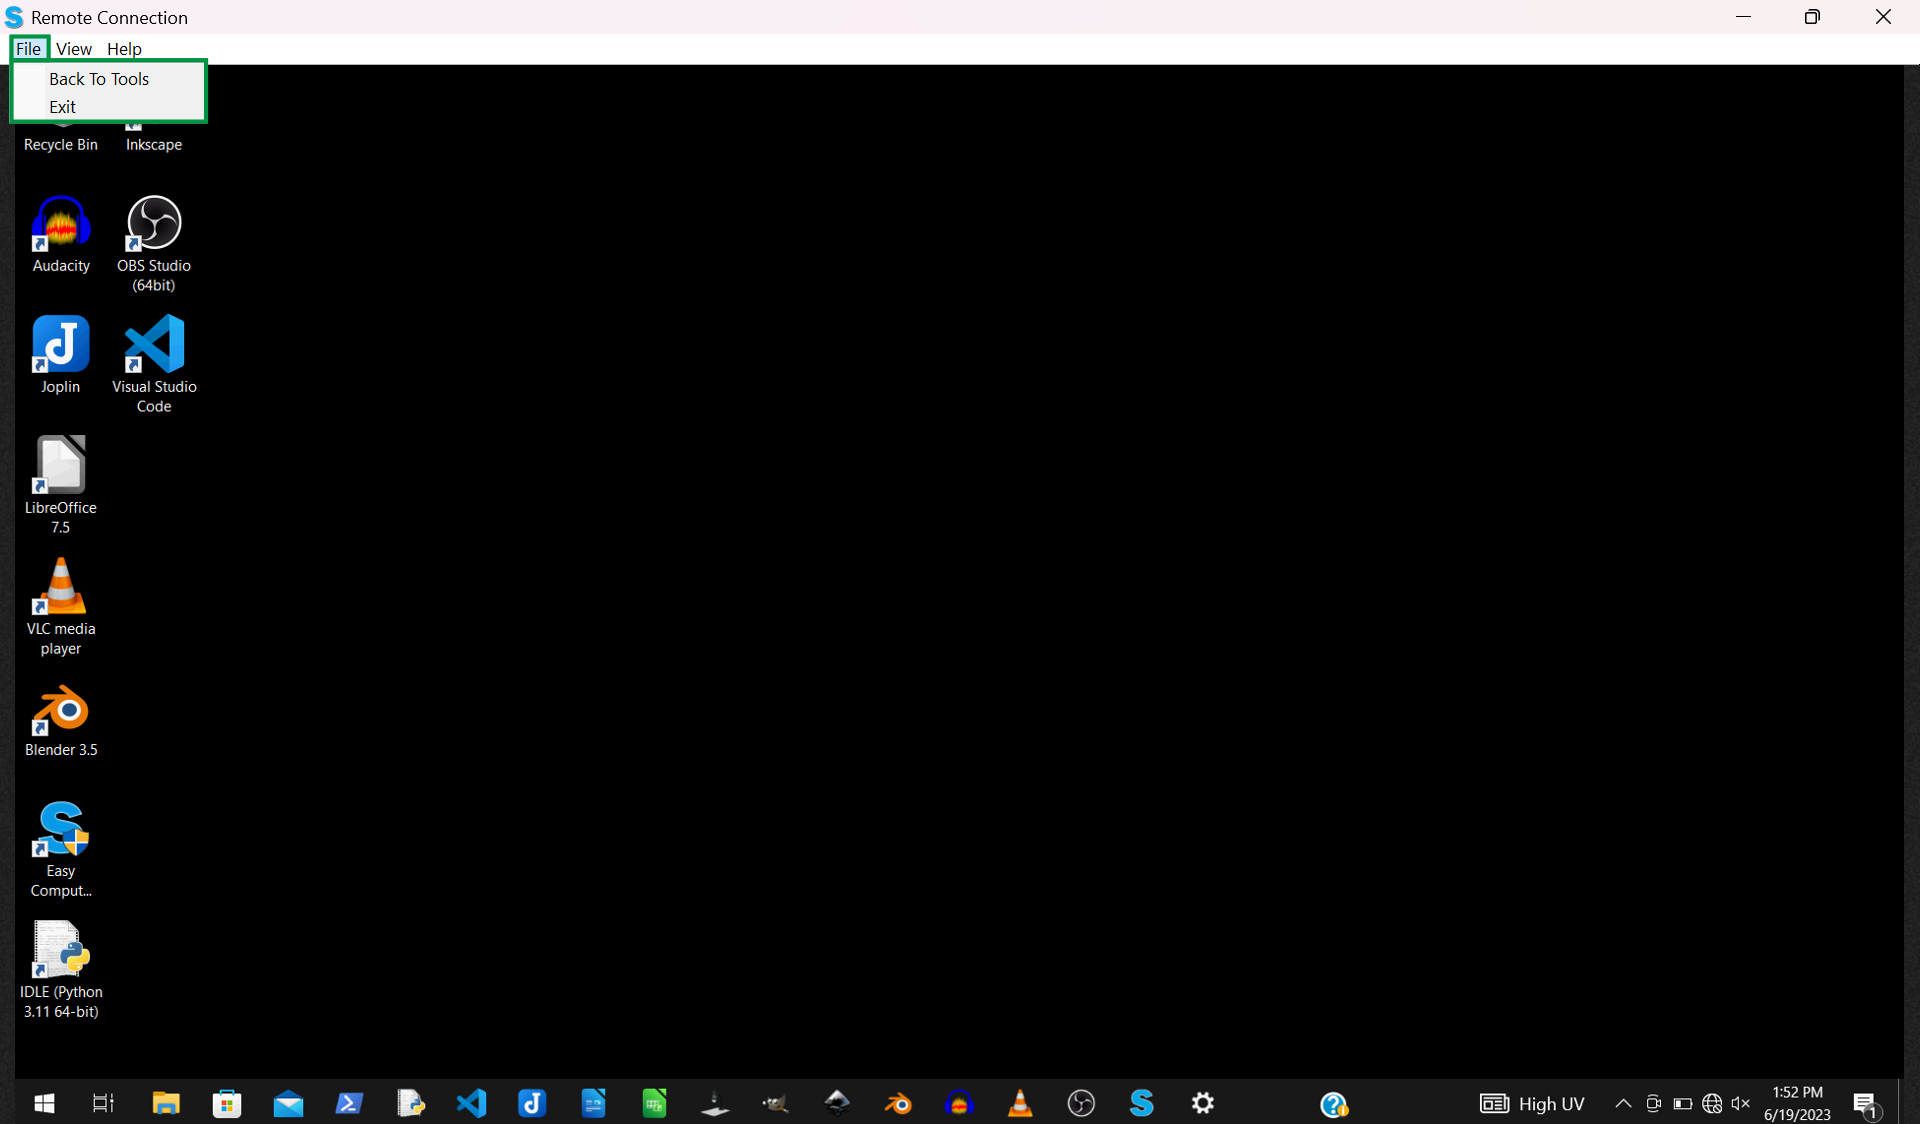
- Once you've finished, it's easy to close the Remote Connection! Click File > Exit to finish, or Back To Tools, if you have other tasks to do
There we have it. This is another great tool included with Easy Computer Sync software that can make the task of setting up a remote connection easy!
Next Steps:
With our Transfer Cables and Easy Computer Sync software you can:
- Use the Sync Files mode. This mode is designed to sync two folders up between computers, making them have the same files and items. Click the following link for more information: How to - Use the Sync Files mode
- Use the Transfer Data to New Computer transfer mode. This mode is designed for one way transfer between computers. Click following link for more information: How to - Use the Transfer Data to New Computer mode
- Use the Drag & Drop mode. This mode gives you manual access to individual files and folders. Click the following link for more information: How to - Use the Drag & Drop mode
We hope this was helpful! Feel free to reach out to us directly at: support@plugable.com with any questions or concerns!
Will this transfer my programs and games?
No.
Programs and games must be installed using the original discs, installation files, or installed from the original service platforms like Steam, and Adobe for example.
Does each computer need a monitor, keyboard, and mouse attached?
Our Transfer Cables and Bravura Easy Computer Sync software are designed for use with two monitors (one monitor, mouse, and keyboard for each computer which is the most convenient) but, we realize this isn't always possible.
You can set up the transfer with one monitor, but you will need to either physically unplug and plug in each monitor, or switch over to a different input if your monitor supports this. Here's a basic summary of the steps you'll need to take to set up and perform transfers:
- Plug the Transfer Cable in between both computers.
- Connect one computer to the monitor, start the Easy Computer Sync software, and get the software to the point where it is waiting for the connection from the other computer.
- Unplug the current computer from the monitor, and plug the other one in. (Or, switch inputs over if your monitor supports it).
- Start the software on the other computer, and complete the connection.
- Once the connection is made between the computers you can control the transfer process from one computer.
We hope this was helpful. Feel free to reach out to us directly at: support@plugable.com, if you have any further questions or concerns.
Thank you!
My old computer won't turn on. Can I use this to transfer content to my new computer?
No. Computers must be in full working order to both install, and run the Bravura Easy Computer Sync software to perform transfers. We would suggest finding a local and trusted technician to see about data recovery if your computer cannot turn on.
My laptop turns on, but the screen is broken and I can't see anything. Can I still transfer?
Possibly. Are you able to to connect the laptop to an external monitor or TV with an HDMI or other compatible video cable and see your computer screen? If you can, it should be possible to transfer. Ultimately, it may be your best bet to take the computer to a trusted technician for further help, especially if this doesn't work.
Feel free to reach out to us directly at support@plugable.com with any questions or concerns, and we'll be glad to help you!
Are Plugable Transfer Cables compatible with macOS?
No. Our Transfer Cables are not compatible with any macOS version, Linux, Chrome OS, iOS, Android, or any other operating systems. Our Transfer Cables are compatible with:
- Windows 11 and 10 - (Please note, this is not compatible with Windows S mode. Please see this official FAQ from Microsoft for more information: Official S mode FAQ)
- Windows 8.x
- Windows 7
- Windows Vista
- Windows XP
Please note: Thunderbolt transfer cables are only compatible with Windows 10 and newer. For macOS systems, any of our Thunderbolt cables will work with Apple's macOS Migration Assistant without additional software.
We hope this was helpful! Please reach out to us directly at: support@plugable.com if you have any questions or concerns.
Why do my files have a red X in File Explorer after doing a Easy Computer Sync transfer?
If you happen to see a red X after transferring files using the Bravura Easy Computer Sync software, this means that Windows is detecting a syncing issue exists with its file related to its OneDrive cloud storage service.
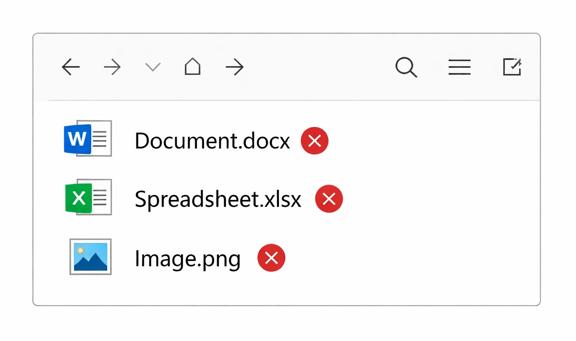
That usually means Windows thinks those files aren’t available on the not synced to their online storage service, it is not a problem with the cable itself.
Generally this can be resolved by giving OneDrive some time to upload those newly transferred files or restarting the OneDrive from closing it from the Windows taskbar then restarting it can resolve upload issues and it should also remove the red X from these files.
Can I use my Plugable Transfer Cable and software more then once?
Yes!
With our Plugable Transfer Cables you have the power to:
- Transfer more than once
- Transfer whenever you want, and transfer as much data as your want
- Install the Bravura Easy Computer Sync software on as many computers as you need
- Register the software on those computers with your unique Product Key
We hope this was helpful! Feel free to reach out to us directly at: support@plugable.com, and you can find our other support resources by clicking here.
Is this compatible with Windows 11?
Yes!
Our Plugable Transfer cables and Bravura Easy Computer Sync software are compatible with Windows 11. We have a Product Overview video available with step-by-step instructions which you can find at this link: Product Overview and Instructions .
Please note, the video was produced before Windows 11 was released, so it is not mentioned.
We hope this was helpful! Feel free to reach out to us directly at support@plugable.com if you have any further questions.
Updating the Easy Computer Sync Software
The Bravura Easy Computer Sync software comes bundled with a software update tool in its programs folder. If you ever find yourself stuck on a “waiting for connection” screen on both your PCs it may be time to update the software so we can be sure they are on the same version.
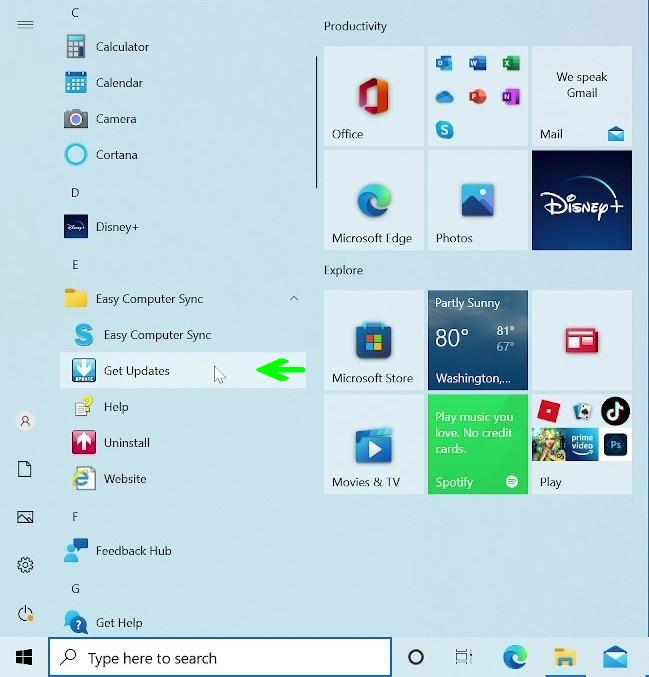
For Windows 10 to check for updates, go to:
The Windows Start Menu > Programs > Easy Computer Sync > Get Updates
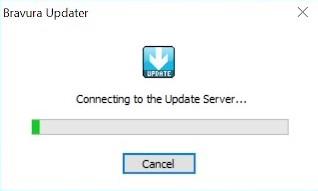
If an update is available the following download window will appear
At this point close Easy Computer Sync on both PCs and open again to establish a connection.
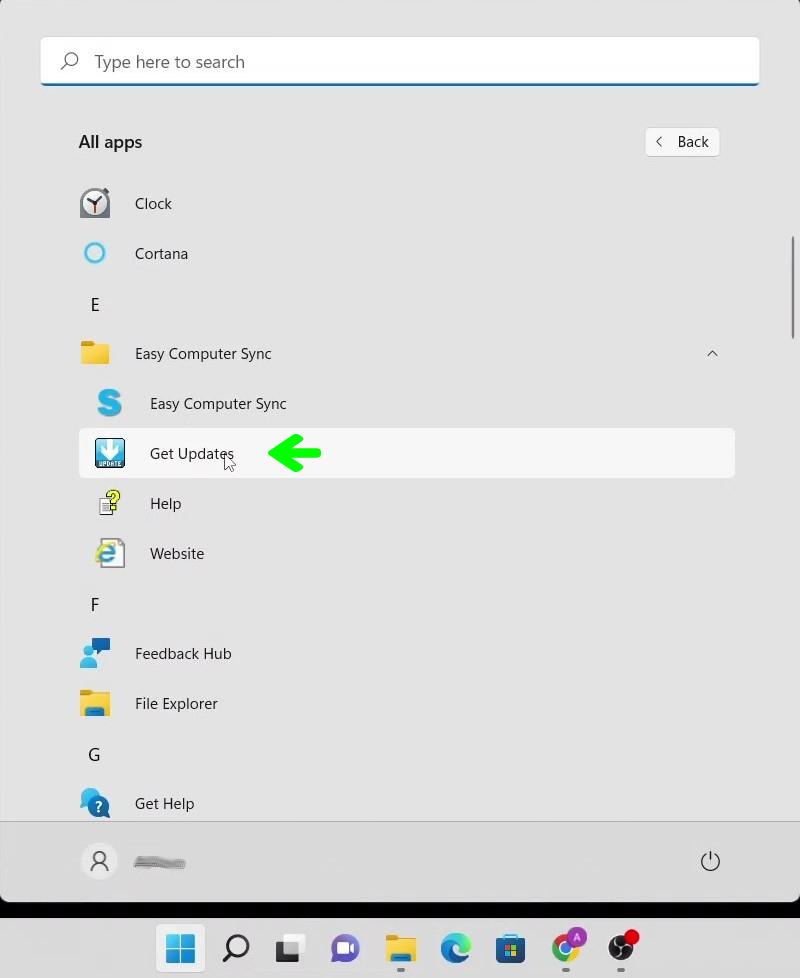
For Windows 11 to check for updates the navigation is slightly different. Go to: The Windows Start Menu > All Apps >
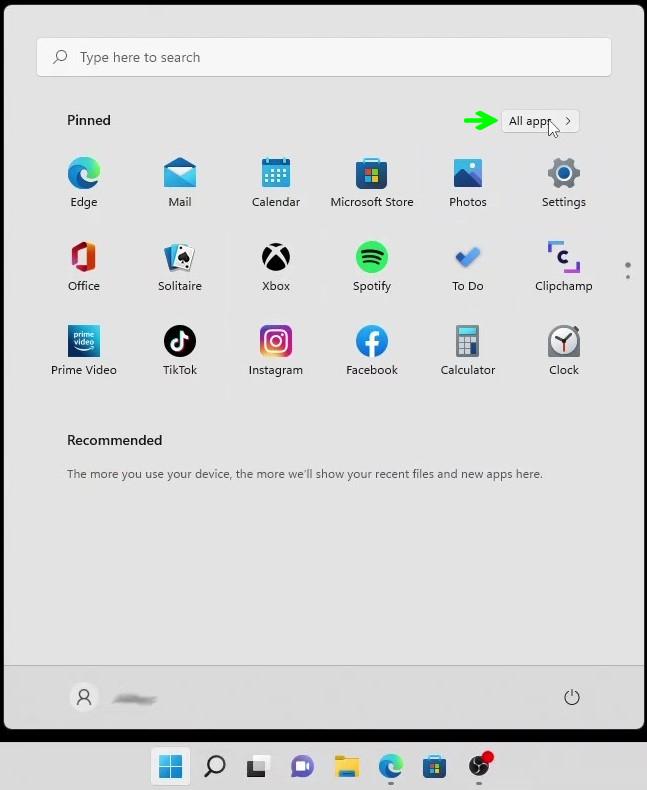
Navigate to Easy Computer Sync > Get Updates
At this point close Easy Computer Sync on both PCs and open again to establish a connection.
Also, assuming the “Automatically check for updates” option was selected during the installation, Easy computer Sync will periodically check for updates each time it launches, and notify you if one is available at the Welcome Screen.
Can I connect this product to a computer's Thunderbolt/Thunderbolt 2 port?
Many users assume that USB-C devices can work with older Thunderbolt 2 Macs if they use a Thunderbolt 3 to Thunderbolt 2 adapter, such as the one made by Apple. However, this is not the case. These adapters are specifically designed to support Thunderbolt devices only - not standard USB-C peripherals.
While Thunderbolt 3 and USB-C share the same connector type, they use different underlying data protocols. Non-Thunderbolt USB-C devices, rely on USB standards for data and power. The Thunderbolt 3 to Thunderbolt 2 adapter does not carry USB signals; it only passes Thunderbolt data. Because of this, plugging a USB-C device into a Thunderbolt 2 Mac using this adapter will not work - the computer will not detect or communicate with the device.
If you need to connect peripherals to a Thunderbolt 2 system, we recommend using a USB-A dock or hub (if available on your system). This ensures compatibility without relying on unsupported adapter chains.
In short, even though the connectors may fit, USB-C devices are not compatible with Thunderbolt 2 Macs via Thunderbolt adapters - only Thunderbolt devices will work in that setup.
Are Plugable Transfer Cables Compatible With Windows S Mode?
Short answer: No. Plugable Transfer Cables are not compatible with Windows running in S Mode.
This is a limitation of Windows S Mode, not a defect with the cable.
What Is Windows S Mode?
Windows S Mode is a restricted version of Windows 10 or Windows 11 designed for improved security and performance.
When a system is in S Mode:
- Only apps from the Microsoft Store can be installed
- Traditional desktop applications (.exe, .msi) are blocked
- Kernel-level drivers and background services are restricted
S Mode is commonly found on entry-level laptops, education devices, and systems focused on security or manageability.
Why Plugable Transfer Cables Are Not Compatible
Plugable Transfer Cables require installing the desktop application, Bravura Easy Computer Sync, and a device driver to function correctly.
These components are required to:
- Establish a direct PC to PC data connection
- Manage file system access between both systems
- Enable high-speed data transfer over USB
Because Windows S Mode blocks:
- Installation of non-store desktop applications
- Installation of third-party drivers
The Bravura Easy Computer Sync software cannot be installed or executed while S Mode is enabled.
How Can I Circumvent This Limitation?
Option 1: Switch Out of Windows S Mode
You can permanently switch your system out of S Mode to enable full Windows functionality. More information regarding this process can be found on Microsoft's official Windows 10 and Windows 11 in S mode FAQ.
Important notes:
- Switching out of S Mode is free
- The change is permanent and cannot be reversed
- No data is lost during the switch
Steps:
- Open Settings
- Go to System, Activation
- Under Switch out of S Mode, select Go to the Store
- Click Get to disable S Mode
Once S Mode is disabled, you can install Bravura Easy Computer Sync and use the Plugable Transfer Cable.
Option 2: Use an Alternative Transfer Method
If you must remain in S Mode, consider one of these alternatives:
- Cloud storage services such as OneDrive or Google Drive
- External USB storage devices like flash drives or external SSDs
- Network-based file transfer over a local network
These options do not require third-party drivers or desktop installers.

