





Hassle free, 2-Year Warranty
Fast, Free Shipping on Orders $35+
Lifetime Technical Support
30-Day Money Back Guarantee
Plugable 250x Digital USB Microscope with Observation Stand
$59.95 USD
SKU: USB2-MICRO-250XAmazon Rating : (6584 Reviews)
Features
- Hobby Focused— Useful and fun for educators, collectors, testers, and anyone interested in exploring the microscopic world. Use as an electronics microscope, soldering microscope, USB coin microscope and more.
- Perfect for Grab and Go Examination— Use with laptop or tablet, or focused sessions with desktop. Included flexible arm stand and observation pad can be used for measurement, or use as handheld microscope
- Broad Compatibility— our USB microscope uses a webcam chipset and sensor to support nearly any operating system using standard webcam software. Includes connectors for USB and USB-C/Thunderbolt ports for seamless connectivity. ChromeOS 108 or above is required.
- High Definition Microscope With Built-in Lighting— 2.0 Megapixels, 60x to 250x magnification. LED halo light with brightness control. Features 7000K color temperature, 0-38lumen for optimal light and clarity
- 2-Year Coverage, Lifetime Support— Every Plugable product, including this digital microscope, is covered against defects for 2 years and comes with lifetime support. If you ever have questions, contact our North American-based team - even before purchase
For volume orders or business inquiries contact sales@plugable.com
Free 3-Day Continental U.S. Shipping When Buying Direct!





Discover the Microscopic World with Plugable’s Digital USB Microscope

The Plugable 250x USB 2.0 Digital Microscope (USB2-MICRO-250X) is a versatile and easy-to-use tool for hobbyists, collectors, and professionals who want to take a closer look at the world around them. Perfect for examining coins, stamps, plants, circuit boards, jewelry, and other small objects, it makes close-up observation engaging and straightforward.
Use the included stand for steady viewing, hold it in your hand for quick spot checks, or place it directly on a surface for maximum magnification. The durable body and lightweight design make it ideal for use at home, in the workshop, or out in the field.
Pack the microscope with your gear for your next project or exploration. Whether you’re studying intricate craftsmanship, checking fine details in electronics, or observing natural textures and materials, this compact microscope turns curiosity into discovery wherever you go.


Tech Specs
| Magnification | Approx. 60x to 250x: Magnification is achieved through focus and working distance, not through a button-based zoom system. |
| Works Like A USB Camera | Open a camera app, select “Digital Microscope,” and start viewing or recording. |
| Lighting | The built-in LEDs turn on when the microscope is active inside a camera app. |
| Best-Fit Use Cases | Coins, soldering, rocks, plants, stamps, and other close-up inspection tasks. |
| Compatibility | Win/Mac/ChromeOS/Linux/Android/iPad; 3rd-party apps req'd on Android/iPad |
A: The USB2-MICRO-250X is designed to work with Windows, macOS, ChromeOS, Linux, and Android using compatible camera software. It can also work with USB-C iPads running iPadOS 17 or later when used with a compatible camera app.
A: It works with USB-C iPads running iPadOS 17 or later using a compatible app like CamX or USB Camera. iPhones are not supported, as they do not allow third-party USB camera devices.
A: No. This microscope does not have a push-button or automatic zoom. Magnification is adjusted by moving the microscope closer to the subject and using the focus wheel.
A: The microscope is plug-and-play and works with built-in apps like Photo Booth and QuickTime on macOS, and the Camera app on Windows, or any UVC-compatible software. Android devices and USB-C iPads require third-party apps.
A: The LED ring does not turn on automatically when plugged in. The microscope needs to be active inside a camera or viewer app first, and the LED brightness wheel may need to be turned up for indoor use.
Filter Help Articles and Frequent Questions by Category
Choose one or more filters within each category to narrow down the articles. Each selection will result in only displaying articles that include all of your choices.
Articles
Well how about that, it looks like we don't have any articles matching your filters! Try removing one of your choices or clear the filters to show all articles.
You can always contact support if you need help too!
Why can't I drive two external extended displays with my Google Pixel phone?
Google Pixel phones support USB-C DisplayPort Alternate Mode for wired video output, but due to Android OS limitations, they cannot produce two extended external displays using MST, DisplayLink, or Thunderbolt docking technologies. This is a platform constraint, not a hardware or dock issue.
Understanding the Limitation
Google Pixel phones are limited by the Android operating system’s handling of external displays. While many Pixel models (such as the Pixel 7 and Pixel 8 series) support USB-C DisplayPort Alternate Mode, they can only output to a single external display at a time. Android is designed primarily for screen mirroring, and extended display support is extremely limited across Android phones.
Key Point:
Android OS currently restricts Pixel phones to one external display, regardless of the dock or adapter used.
Dock Behavior with Pixel Phones
MST Docks (e.g., Plugable UD-MSTH2)
MST (Multi-Stream Transport) requires the host device to support splitting one DisplayPort signal into multiple independent video streams. While common on Windows and many Chromebooks, Pixel phones do not support MST for extended displays.
When using an MST dock, a Pixel phone will:
- Output to one external display only, or
- Mirror the same content to two connected monitors
- Dual extended desktops are not supported
DisplayLink Docks
DisplayLink technology works on Android through a companion app (e.g., DisplayLink Presenter). However:
- Android only supports a single external display via DisplayLink
- DisplayLink docks cannot be used to achieve multiple extended monitors from a Pixel device
- DisplayLink is not recommended for dual display use on Android
Thunderbolt Docks
Google Pixel phones are not Thunderbolt-certified hosts. When connected to a Thunderbolt dock:
- They revert to basic USB-C DisplayPort Alternate Mode
- Only a single mirrored display is possible
Visual Summary
| Dock Type | Extended Displays | Mirroring | Notes |
|---|---|---|---|
| MST Dock | ❌ | ✅ | No MST support on Android |
| DisplayLink Dock | ❌ | ✅ | Requires DisplayLink app |
| Thunderbolt Dock | ❌ | ✅ | Functions as USB-C only |
Recommended Alternatives
If your goal is to use two independent external displays, consider the following instead:
- Windows laptops with DisplayPort MST support
- Chromebooks that support MST
Frequently Asked Questions
Q: Can I extend my Pixel’s screen to two monitors using any method?
A: No. As of now, Android does not support multiple extended displays. Only mirroring to one display is possible.
Q: Does DisplayLink allow multiple displays on Android?
A: No. Even with DisplayLink’s Android app, you are limited to one external display.
Q: Why do Windows and ChromeOS devices work with MST but not Android?
A: Android lacks support for DisplayPort MST and advanced GPU capabilities required for multiple display outputs. This is a software/platform-level limitation.
Conclusion
While Google Pixel phones are capable of driving a single external display, dual extended monitors are not possible due to Android OS restrictions. This applies across all dock types, including MST, DisplayLink, and Thunderbolt. For users requiring robust multi-display setups, we recommend using a Windows or Chromebook device that supports MST alongside a compatible docking station like the Plugable UD-MSTH2.
If you have any questions or need help selecting a compatible dock, reach out to our support team at support@plugable.com.
"Camera Being Used" Error or No Image in Preview Window
Applicable To
- USB2-MICRO-250X
If the microscope is connected but no image appears, or you receive a message that another application is using the camera, the issue may be related to camera permissions or another application currently accessing the camera.
Troubleshooting Steps
- Close other applications that may be using a camera.
Completely close video conferencing applications, camera applications, browser tabs, or other software that may be accessing a camera.
After closing these applications, reopen the application you want to use with the microscope.
- Disconnect and reconnect the microscope.
Disconnect the USB2-MICRO-250X from the computer, wait a few seconds, and reconnect it.
When possible, connect the microscope directly to a USB port on the computer rather than through a USB hub while troubleshooting.
- Confirm camera access in Windows 11.
In Windows 11, open:
Settings > Privacy & security > Camera
Confirm that the following options are enabled:
- Camera access
- Let apps access your camera
- Let desktop apps access your camera, if you are using a desktop application
Microsoft provides additional information about camera privacy settings here:
https://support.microsoft.com/en-us/windows/privacy/windows-camera-microphone-and-privacy
- Confirm camera access in macOS.
On macOS, open:
System Settings > Privacy & Security > Camera
If you are using a third-party application, confirm that camera access is enabled for that application. You may need to quit and reopen the application after changing the permission.
Apple provides additional information about camera permissions here:
https://support.apple.com/guide/mac-help/control-access-to-the-camera-on-mac-mchlf6d108da/mac
- Confirm that the operating system detects the microscope.
On Windows 11, open Device Manager and expand Cameras. Look for the microscope in the list of connected camera devices.
On macOS, open System Information, select USB, and look for a device listed as Digital Microscope.
- Test the microscope in another camera-capable application.
If the microscope works in another application, the USB connection and microscope hardware are functioning, and the issue is likely specific to the original application's camera selection or permissions.
- Restart the computer.
If another application or background process is still holding access to the camera, restarting the computer can release that connection and allow the microscope to be accessed again.
Expected Result
The operating system should detect the microscope and display a live image when selected in a compatible camera application.
If the Issue Persists
If the operating system detects the microscope but it still doesn't display an image in multiple camera applications, contact Plugable Support at support@plugable.com.
If the operating system does not detect the microscope at all, the issue may be related to the USB connection, USB port, adapter, or microscope hardware.
Microscope LEDs Do Not Come On and No Image Is Visible
Applicable To
- USB2-MICRO-250X
The LEDs on the USB2-MICRO-250X do not turn on automatically when you connect the microscope to your computer. The microscope must be active in a camera or viewing application, and the grey light-control wheel may also need to be turned up before an image is visible.
Troubleshooting Steps
- Connect the USB2-MICRO-250X to a USB port that supports data transfer.
- Open a compatible camera or viewing app, such as Photo Booth (macOS) or the Windows Camera app.
- Select Digital Microscope or Plugable Microscope as the camera source if the application does not select it automatically.
- Adjust the grey light-control wheel on the microscope to turn on the LEDs and increase their brightness.
- If prompted by your operating system, confirm that the camera application has permission to access the microscope.
Expected Result
The microscope LEDs should illuminate while the microscope is active in the camera application, and the live microscope image should appear.
The LED control is set to the off position from the factory, so you may need to adjust the brightness wheel before the LEDs become visible.
If the Issue Persists
If the LEDs remain off or no image appears, confirm the operating system detects the microscope and that the correct camera source is selected.
For general setup instructions:
If the issue continues, contact Plugable Support at support@plugable.com.
Digital Viewer Preview Shows Output From My Other Webcam
Applicable To
USB2-MICRO-250X, Digital Viewer Application
First, make sure that the microscope is set as the default device in the Settings menu. The Settings menu can be opened by clicking the grey gear-shaped icon in the upper-left corner of the Digital Viewer window.
In some cases, the devices in this menu have incorrect names. If you have the microscope selected in this menu and still see output from another webcam, try selecting each device in this menu until the preview window shows the microscope's output.
Windows Camera Mix-up Issues
Windows has a specific issue that can pop up with the microscope. The microscope uses the same USB Video Class drivers as most built-in and external cameras, which can cause Windows to mix up the listing.
If you set the microscope as the default device but see your other camera, it's likely that the listing was mixed up. To check if the listing was mixed up, try picking your other camera from the drop-down menu, and see if the microscope view shows up instead.
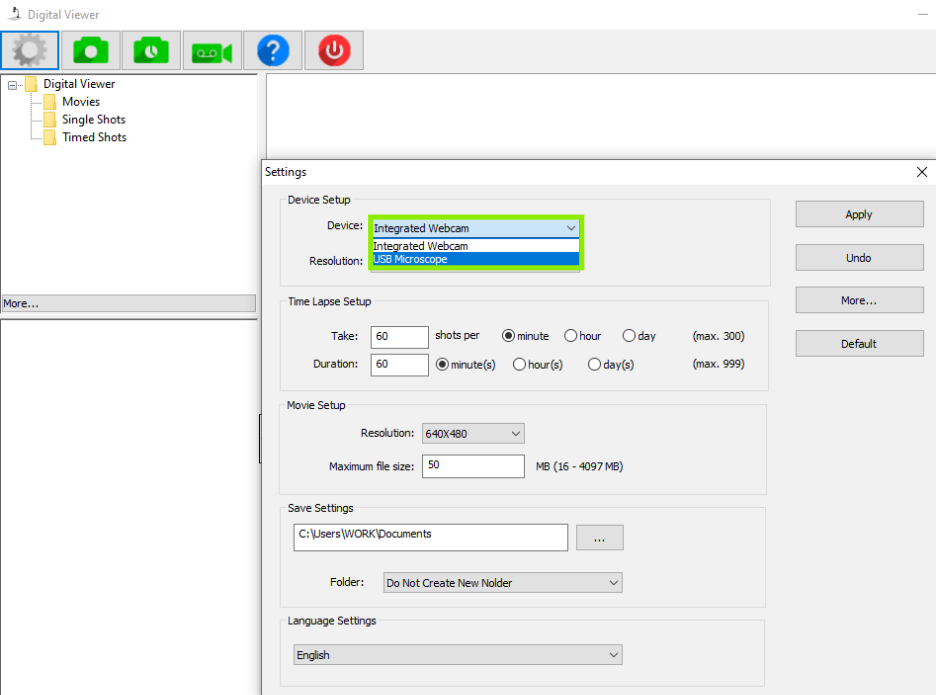
If the microscope view appears on your monitor after selecting your other camera, the listing was mixed up. There are steps that we could try to see if we can fix the listing. Please note that, as this is a Windows issue, it may recur with Windows Updates and other events. Let's give these steps a try to see if it clears up the listing:
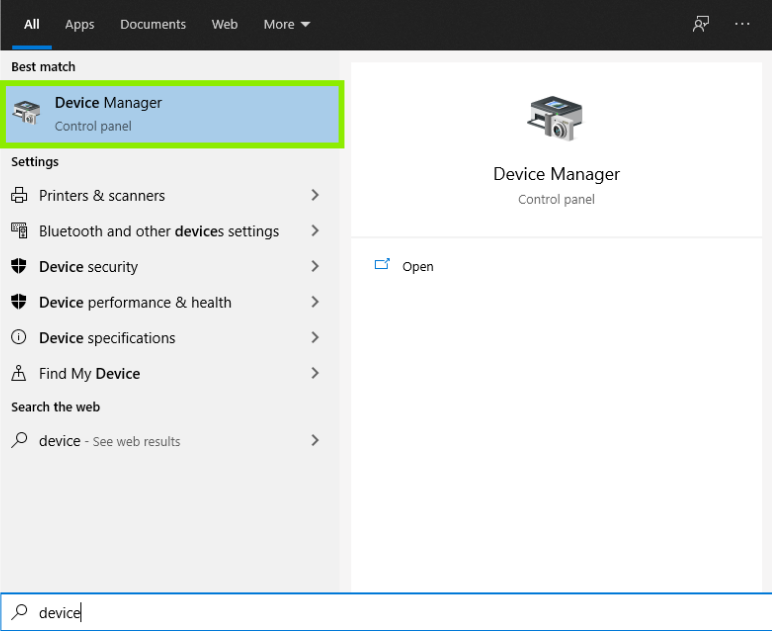
- Press the Windows Key, and type in Device Manager. You should see a listing for Device Manager in the search results. Click on it to open the Device Manager
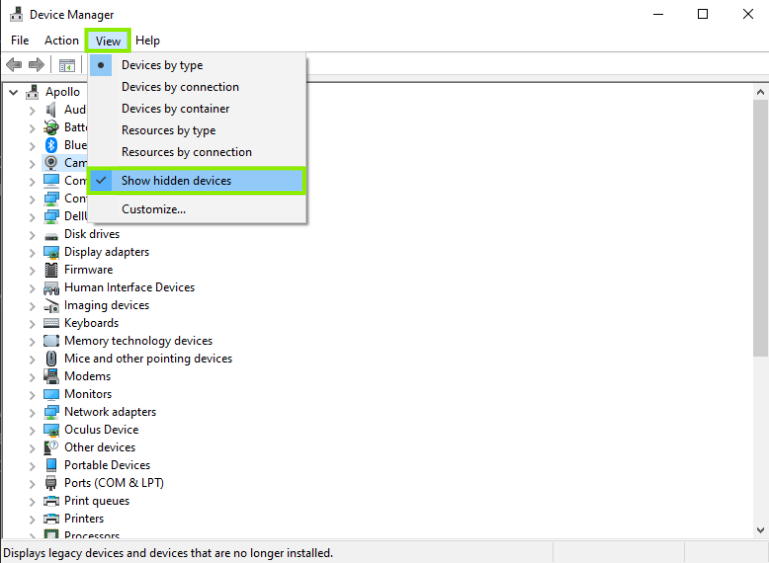
- Now that we have the Device Manager open, click on View, and choose Show Hidden Devices. We want to be sure to remove all entries related to the microscope
- The microscope should appear in the Cameras section, but it may also appear in Imaging Devices. Click the little arrow on these sections to expand the listings, and find the "USB Microscope/Digital Microscope" Listing (In the picture below, mine is right next to the on-board camera Windows is confusing it with.) You may see other listings that appear faint, or grayed out, which is why we checked for Hidden Devices
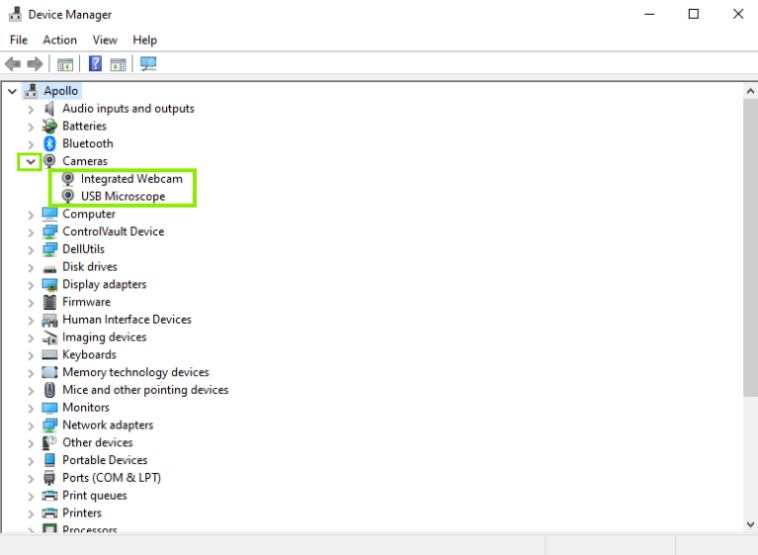
Once you've found the listing(s), try these steps:
- Right-click on the USB Microscope/Digital Microscope, and click to Uninstall Device for each listing you see
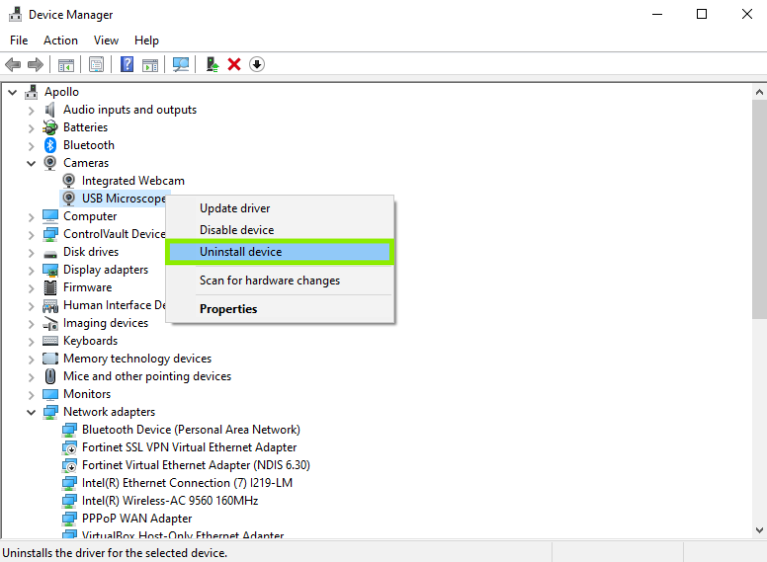
- A message will pop up telling you that you're about to uninstall the device from your computer. Click Uninstall to proceed
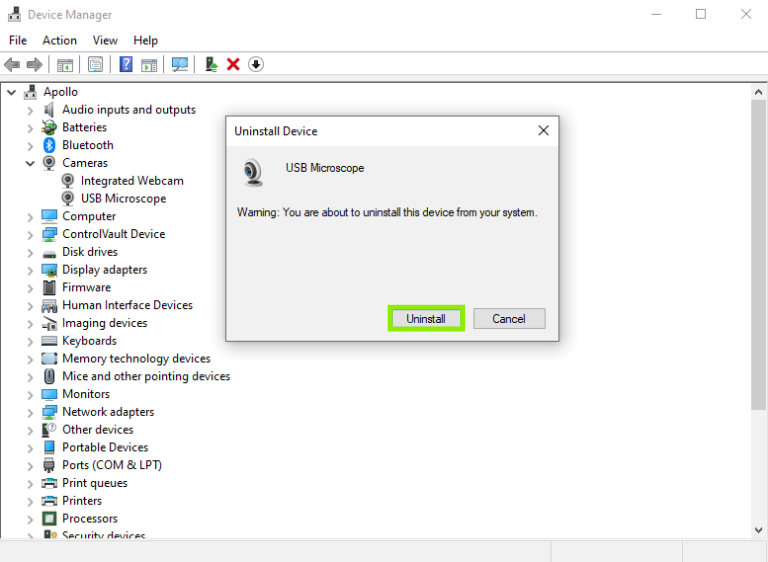
- Restart the computer after the microscope has been uninstalled. After you restart, open only the Digital Viewer software and check whether the microscope appears when you set it as the Default Device.
If the Issue Persists
If the microscope still displays output from another webcam or the listing mix-up reoccurs, please reach out to us directly at support@plugable.com.
Why Is My Microscope Not Working on an iOS Device?
Regrettably, no iOS device, such as an iPhone, will work with any USB camera.
Why USB Cameras Do Not Work on iOS
The iOS operating system natively does not support external USB cameras.
Applicable To
USB2-MICRO-250X
How Do I Find and Launch Digital Viewer?
Instructions
Windows
-
Open the Start Menu
. -
Navigate to Programs and select Plugable Technologies to locate the shortcut
. -
Alternatively, search for "Digital Viewer" directly within the Start Menu
.
macOS
-
Open the Applications folder to locate the program
. -
Alternatively, press Command + Space on the keyboard to open the search tool
. -
Type "Digital Viewer" into the search bar to launch the application
.
Applicable To
- USB2-MICRO-250X
Can I Use Plugable Microscopes With My Android Phone or Tablet?
It depends on the specific Android phone or tablet you are using. Not all Android devices are compatible with Plugable microscopes.
Why Android Compatibility Varies for Plugable Microscopes
Plugable microscopes are recognized by host systems as standard webcams. To work with a Plugable microscope, an Android device must meet two criteria:
- The operating system must include and activate an active USB Video Class (UVC) driver.
- The device manufacturer must allow the use of external webcams.
Because external webcam support varies by manufacturer and model, and is rarely documented in official specifications, you may need to contact your device manufacturer to confirm if external webcams are supported.
How to Use a Plugable Microscope With Compatible Android Devices
If your Android device supports external webcams, connect the microscope and open a compatible third-party camera app, such as "USB Camera". Plugable does not provide dedicated webcam software for Android.
Applicable To
- USB2-MICRO-250X
- Android phones and tablets
When I Plug in the Microscope, It Is Only Listed as an Audio Device and I Have an Oculus Rift
Applicable To
- USB2-MICRO-250X
The Plugable microscope uses hardware that Windows can incorrectly identify as an Oculus Rift DK2 sensor when Oculus software or devices are present. When this happens, Windows may assign the wrong driver instead of recognizing it as a USB camera.
The steps below change the microscope back to the standard USB Video Device driver.
Troubleshooting Steps
- Disconnect all Oculus Rift devices from the computer.
- Connect the Plugable microscope.
- Press Windows Key + R to open the Run dialog.
-
Type
devmgmt.mscand select OK to open Device Manager. - Look for the microscope in Device Manager. It will likely appear as Rift DK2 Sensor under Oculus VR Devices.
- If you are unsure which device is the microscope, disconnect the microscope and confirm that the suspected entry disappears.
- Reconnect the microscope and confirm that the same entry returns.
- Right-click the microscope entry and select Update driver.
- Select Browse my computer for drivers.
- Select Let me pick from a list of available drivers on my computer.
- Select USB Video Device.
- Select Next to install the USB Video Device driver.
Expected Result
Windows should now recognize the microscope as a camera using the standard USB Video Device driver, allowing it to work with Plugable Digital Viewer and other compatible camera applications.
Depending on your Windows and driver configuration, the microscope may still appear as Rift DK2 Sensor. If so, select Rift DK2 Sensor as the camera source in Plugable Digital Viewer or your preferred camera application.
If the Issue Persists
If the microscope still isn't recognized as a camera after selecting the USB Video Device driver, confirm it appears under Cameras or Imaging Devices in Device Manager.
If the microscope is still not functioning correctly, contact Plugable Support at support@plugable.com.
Why Do I Only See a Black Screen With No Image?
This typically occurs because the microscope's LED lights are turned off or the viewing software lacks permission to access the device. You can resolve this by rotating the light control wheel to turn on the LEDs, or by adjusting your operating system's security settings.
How to Fix a Black Screen Issue
- Turn the LEDs on by rotating the grey light control wheel, as the LED control is in the off position from the factory and requires illumination for most indoor lighting conditions.
- Modify your operating system's security settings to grant the software permission to access the microscope.
Applicable To
- USB2-MICRO-250X
How Do I Use the Microscope With My iPad?
To use the Plugable USB2-MICRO-250X microscope with an iPad, the iPad must have a USB-C port and run iPadOS version 17.x or later. You will also need to download and install a compatible third-party camera application, such as CamX or USB Camera, to view the live video feed.
How to Use the USB2-MICRO-250X Microscope With an iPad
-
Verify that your iPad has a USB-C port and is running iPadOS version 17.x or higher.
-
Download a compatible external camera application, such as CamX or USB Camera, from the App Store.
-
Plug the microscope into the iPad's USB-C port and launch the downloaded application.
-
Open the camera application's internal settings menu and manually set the microscope as the default camera if the image stream does not appear automatically.
Note: We've tested and confirmed compatibility with the apps listed above, but there are surely other compatible apps as well.
Applicable To
- USB2-MICRO-250X
- iPads with a USB-C port running iPadOS 17.x or higher
Achieving the Maximum File Size Limit in Plugable Digital Viewer
Applicable To
- USB2-MICRO-250X, Plugable Digital Viewer for Windows
When configuring the maximum video file size in Plugable Digital Viewer, entering 4097 MB as shown in the software results in the error message "Video size setting is incorrect; out of range." This is caused by a typo in the displayed limit, and the maximum supported file size is 4096 MB.
Troubleshooting Steps
- Open Plugable Digital Viewer.
- Open the Settings menu.
- Locate the Movie Setup section.
- Enter 4096 MB or lower in the Maximum File Size field.
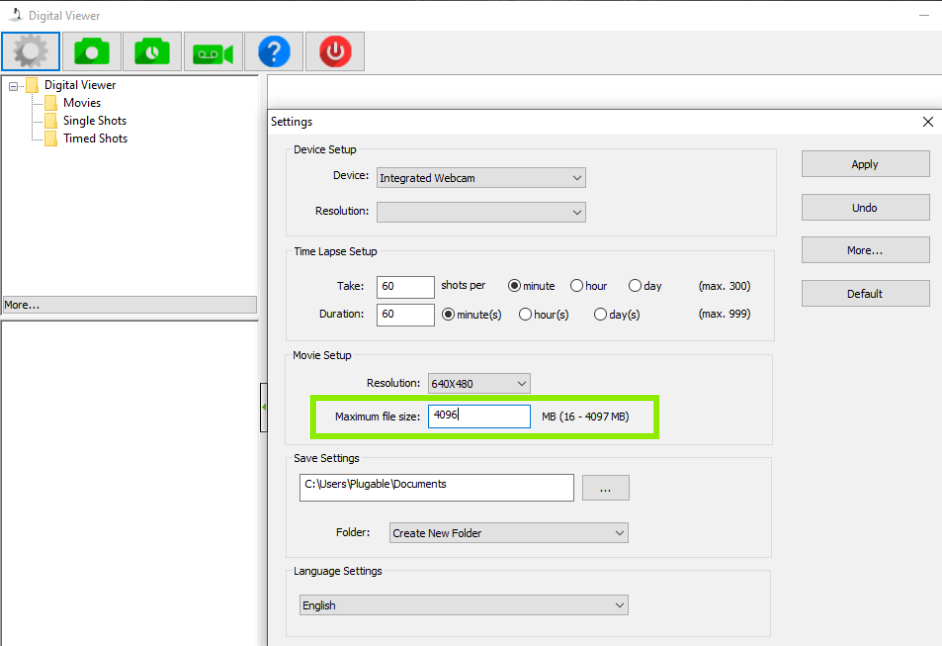
- Select Apply to save the change.
Expected Result
Plugable Digital Viewer should accept the maximum file size setting without displaying the "Video size setting is incorrect; out of range" error. The maximum supported setting is 4096 MB.
If the Issue Persists
If Plugable Digital Viewer continues to display an error after setting the maximum file size to 4096 MB or lower, contact Plugable Support at support@plugable.com.
Why Is My USB Microscope Not Working on a Chromebook?
A USB microscope may not work on a Chromebook if the operating system is out of date or if the external camera has not been manually selected. Updating Chrome OS and toggling the camera view within the system app will usually resolve this issue.
How to Set Up the USB Microscope on a Chromebook
- Go to Settings > About Chrome OS > Check for updates. Click here, for official information from Google about updating.)
- If an update is available, please let it run.
- Plug in the USB microscope.
- Press the Search/Launcher key (the magnifying glass or circle icon) on your keyboard.
- Type "Camera" and open the built-in system app.
- Toggle the camera view to the external camera.
Applicable To
USB2-MICRO-250X
The Digital Viewer Program Keeps Taking Pictures and Won't Stop! What Do I Do?
Applicable To
- USB2-MICRO-250X
If Digital Viewer continually takes pictures at regular intervals, the Time Lapse mode is most likely enabled. Turning off Time Lapse should stop the automatic image capture.
Troubleshooting Steps
- Open the Digital Viewer software.
-
Hover your mouse over the camera icon with a clock inside it and check whether the message Stop Time Lapse appears.
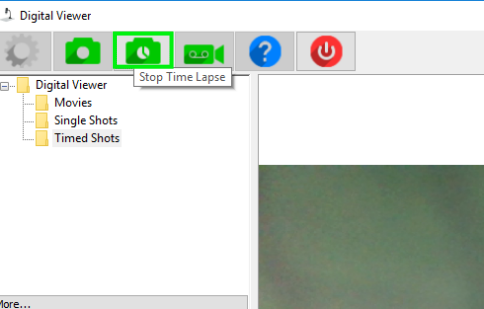
- Select the Stop Time Lapse button.
Expected Result
Digital Viewer should stop taking pictures automatically. You can continue using the microscope and manually capture images as needed.
If the Issue Persists
If Digital Viewer continues taking pictures after you stop Time Lapse, close and reopen the Digital Viewer application, then check the Time Lapse setting again.
If the issue continues, contact Plugable Support at support@plugable.com.
Magnification and Focus Functionality of the USB2-MICRO-250X Microscope
The USB2-MICRO-250X provides about 60x to 250x magnification, but it doesn't have a traditional zoom control. Magnification depends on both the distance between the microscope and the object and the focus wheel position.
At very close working distances, including when the clear shield is resting directly against the object, the focus wheel can bring the image into focus at two separate magnification levels.
How Do Magnification and Focus Work?
The focus wheel is not a traditional zoom wheel. Instead, you use the microscope's working distance together with the focus wheel to achieve different magnification levels.
- Position the microscope closer to or farther away from the object to adjust the working distance.
- Rotate the focus wheel slowly while watching the live preview in your camera application.
- Stop rotating when the object comes into sharp focus.
At the closest working distance, with the clear shield resting directly against the object, there are two separate focal points:
- The first focal point provides approximately 60x magnification.
- If you continue rotating the focus wheel, the image will become blurry again.
- Continue rotating the focus wheel, and the image will come back into focus at a second, much higher magnification level, up to approximately 250x.
The image becoming blurry between these two focal points is normal. The microscope is moving between two different focus positions rather than smoothly zooming from 60x to 250x.
Because magnification depends on both working distance and focus position, the microscope does not provide a calibrated control for selecting an exact magnification such as 100x or 200x. Plugable specifies the microscope's overall magnification range as approximately 60x to 250x.
Applicable To
- USB2-MICRO-250X
Using the Microscope With the Windows Camera App
The USB2-MICRO-250X can be used with the built-in Windows Camera app. Before opening the Camera app, first confirm that Windows is correctly detecting the microscope.
How Do I Use the Microscope With the Windows Camera App?
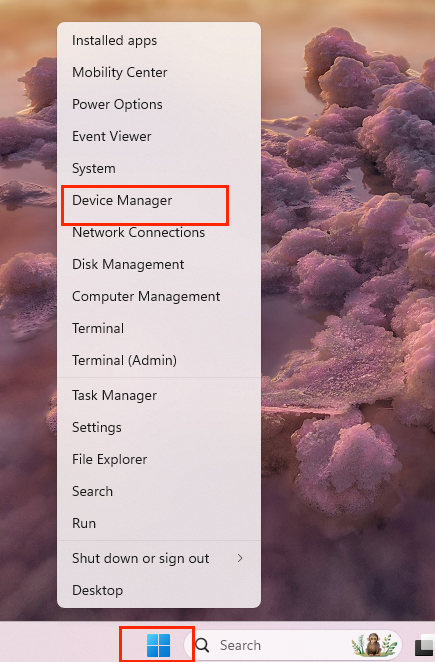
- Right-click the Windows Start button and select Device Manager.
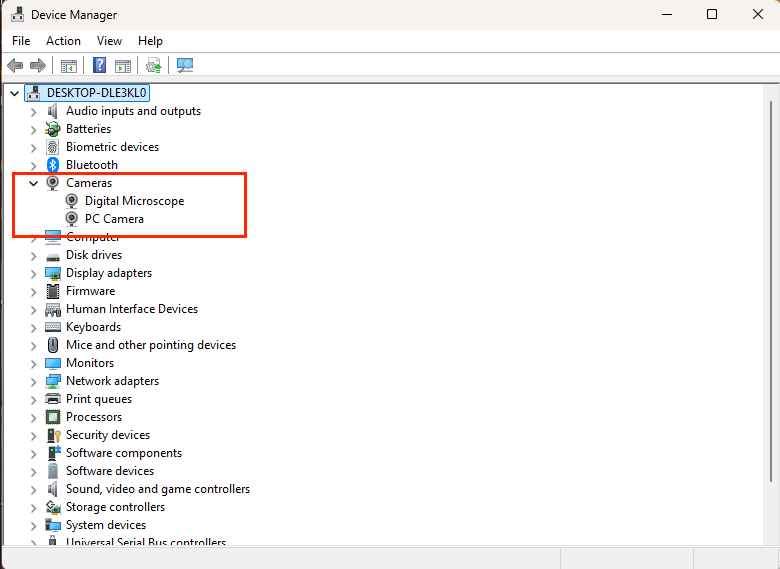
- Expand the Cameras category and look for Digital Microscope or Plugable Microscope.
If the microscope appears here, Windows is correctly detecting it.
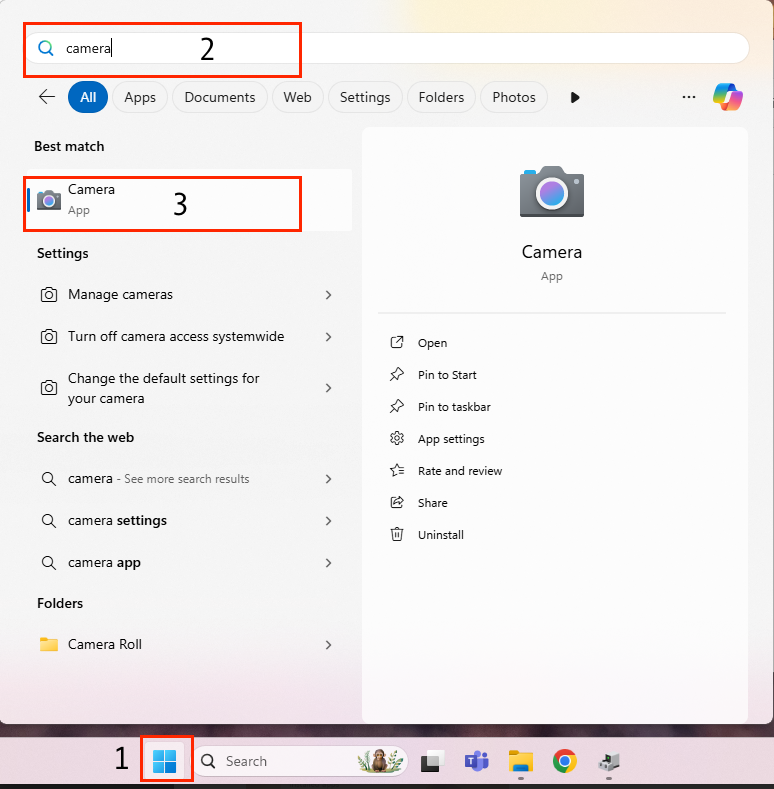
- Open the Start Menu, type Camera, and select the Camera app.
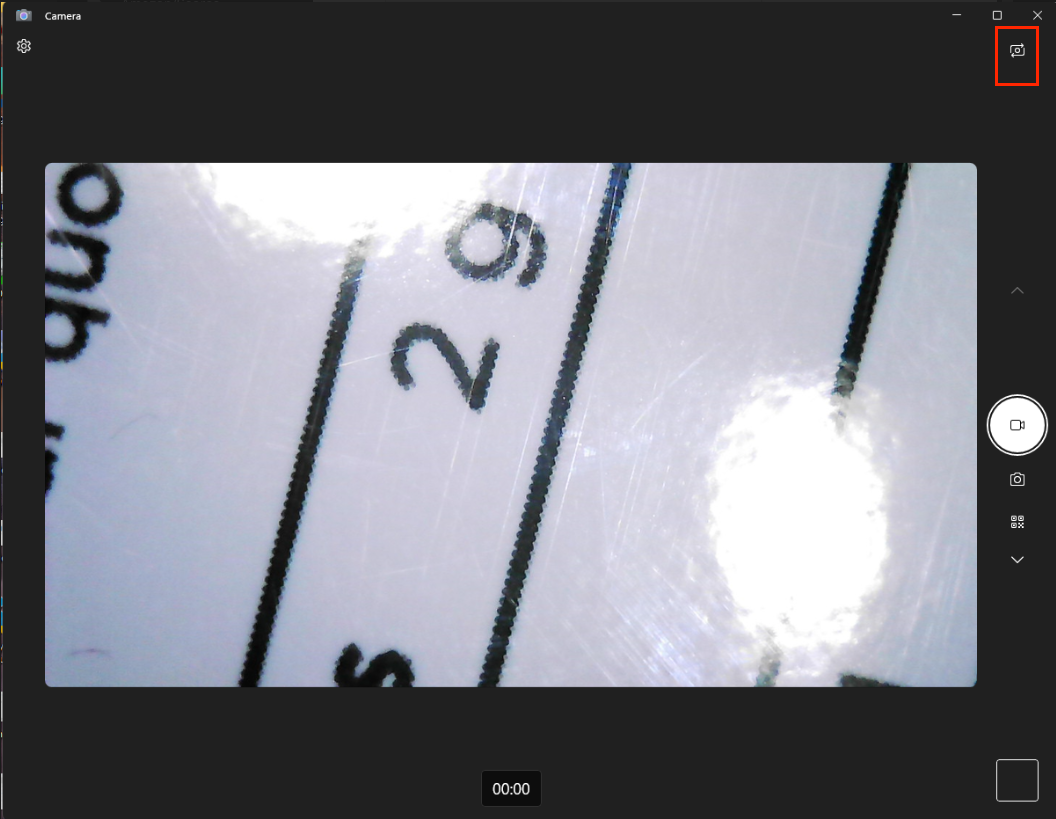
- If your computer has more than one camera, use the Change camera button to cycle through the available cameras until the microscope image appears.
On Windows 11, the Change camera button is typically located in the upper-right corner of the Camera app.
- If the microscope image is very dark or appears black, rotate the light-control wheel on the microscope to increase the LED brightness.
Applicable To
- USB2-MICRO-250X
How to Use the Plugable USB2-MICRO-250X on macOS With Photo Booth
The Plugable USB2-MICRO-250X digital microscope is compatible with macOS using the built-in Photo Booth application. No additional drivers are required.
This article walks through connecting the microscope, confirming that macOS detects it, and viewing the live microscope image using Photo Booth.
What You Will Need
- Plugable USB2-MICRO-250X microscope
- A Mac with a USB-A port, or a compatible USB-C to USB-A adapter
- Photo Booth, included with macOS
How to Use the Microscope With Photo Booth
- Connect the microscope.
Connect the USB2-MICRO-250X directly to your Mac, or through a compatible USB adapter if required. Allow a few seconds for macOS to recognize the device.
The microscope LEDs do not turn on simply because the microscope is connected. The microscope must be active in a camera application, and the grey light-control wheel may need to be turned up.
- Confirm that macOS detects the microscope.
Click the Apple menu while holding the Option key, then select System Information.
Select USB in the left-hand column and look for a device listed as Digital Microscope.
If the microscope appears in the USB device list, macOS is correctly detecting it.

- Open Photo Booth.
Open Photo Booth from the Applications folder, or press Command + Space and search for Photo Booth.
Photo Booth may initially display the image from your Mac's built-in camera.
- Select the microscope as the camera source.
In Photo Booth, select Camera from the menu bar, then select Digital Microscope.
The live view should switch to the microscope image.

To switch between taking photos and recording video, use the controls in the lower-left corner of the Photo Booth window.

- Adjust the focus and lighting.
- Rotate the focus wheel on the microscope until the image becomes sharp.
- Use the grey inline light-control wheel to turn on the microscope LEDs and adjust their brightness.
- Move the microscope closer to or farther from the subject as needed.
Expected Result
Photo Booth should display a live image from the USB2-MICRO-250X. You can then adjust the microscope's focus, lighting, and distance from the subject before capturing photos or video.
If the Issue Persists
If the microscope does not appear in Photo Booth or no image is displayed:
- Quit and reopen Photo Booth.
- Confirm that Digital Microscope is selected from the Camera menu.
- Connect the microscope directly to the Mac instead of through a USB hub, if possible.
- Confirm that the microscope appears under System Information > USB.
- Adjust the grey light-control wheel to ensure the microscope LEDs are turned on.
- Restart the Mac if the microscope is not detected.
If the issue continues, contact Plugable Support at support@plugable.com.
Applicable To
- USB2-MICRO-250X, macOS, Photo Booth


