


Hassle free, 2-Year Warranty
Fast, Free Shipping on Orders $35+
Lifetime Technical Support
30-Day Money Back Guarantee
Plugable USB-C Docking Station with VESA Mount, 85W Laptop Charging
$144.95 USD
SKU: UD-CAMAmazon Rating : (345 Reviews)
機能
- Powerful USB-C Dock— Power up your productivity with a 4K HDMI port, Ethernet, audio input/output, and 4 USB ports while providing up to 85W of power to charge your attached USB-C or Thunderbolt 4/3 system
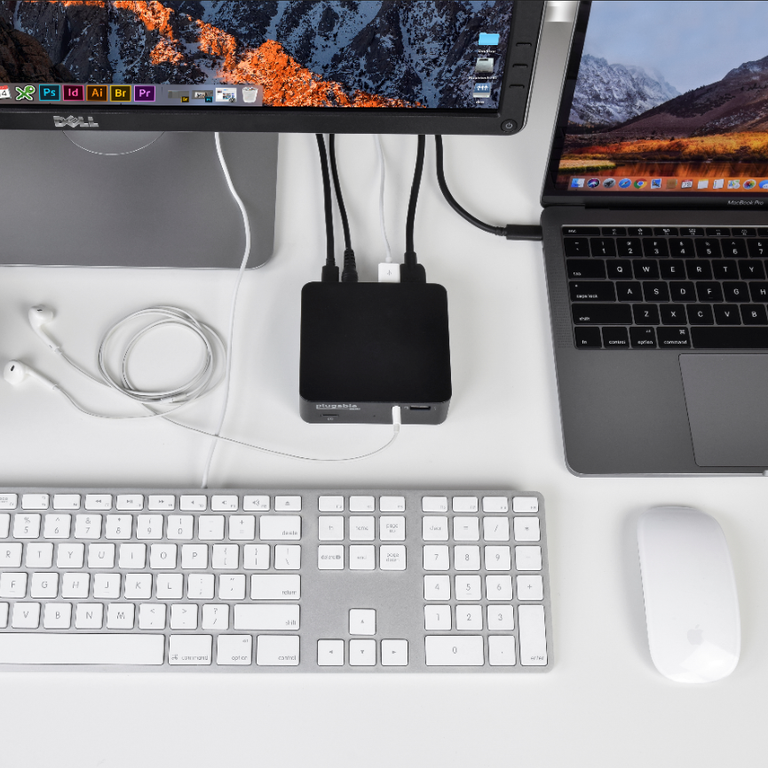
- Compact and VESA Mountable— This USB Type C docking station hdmi offers a sleek and minimal form factor which means saving valuable desk space and avoiding a clutter of electronics and cables. Includes a VESA mount to tuck the dock behind a monitor for an even lower profile at your workstation, perfect for a laptop dock setup
- 4K Performance— With DP Alt Mode, the usb c docking station vesa mount establishes a direct pipeline to your host graphics processor. Enjoy native-level display performances up to the host system's GPU capabilities
- Compatibility— This USB-C Dock is compatible with Windows 10 and newer, macOS 11+, and ChromeOS. Basically anything with a Thunderbolt 4/3, USB4, or a full-featured USB-C port with plug and play functionality (no software or driver installation needed)
- 2-Year Coverage, Lifetime Support— Every Plugable product, including this USB C dock VESA mount compact, is covered against defects for 2 years and comes with lifetime support. If you ever have questions, contact our North American-based team - even before purchase
For volume orders or business inquiries contact sales@plugable.com
Free 3-Day Continental U.S. Shipping When Buying Direct!


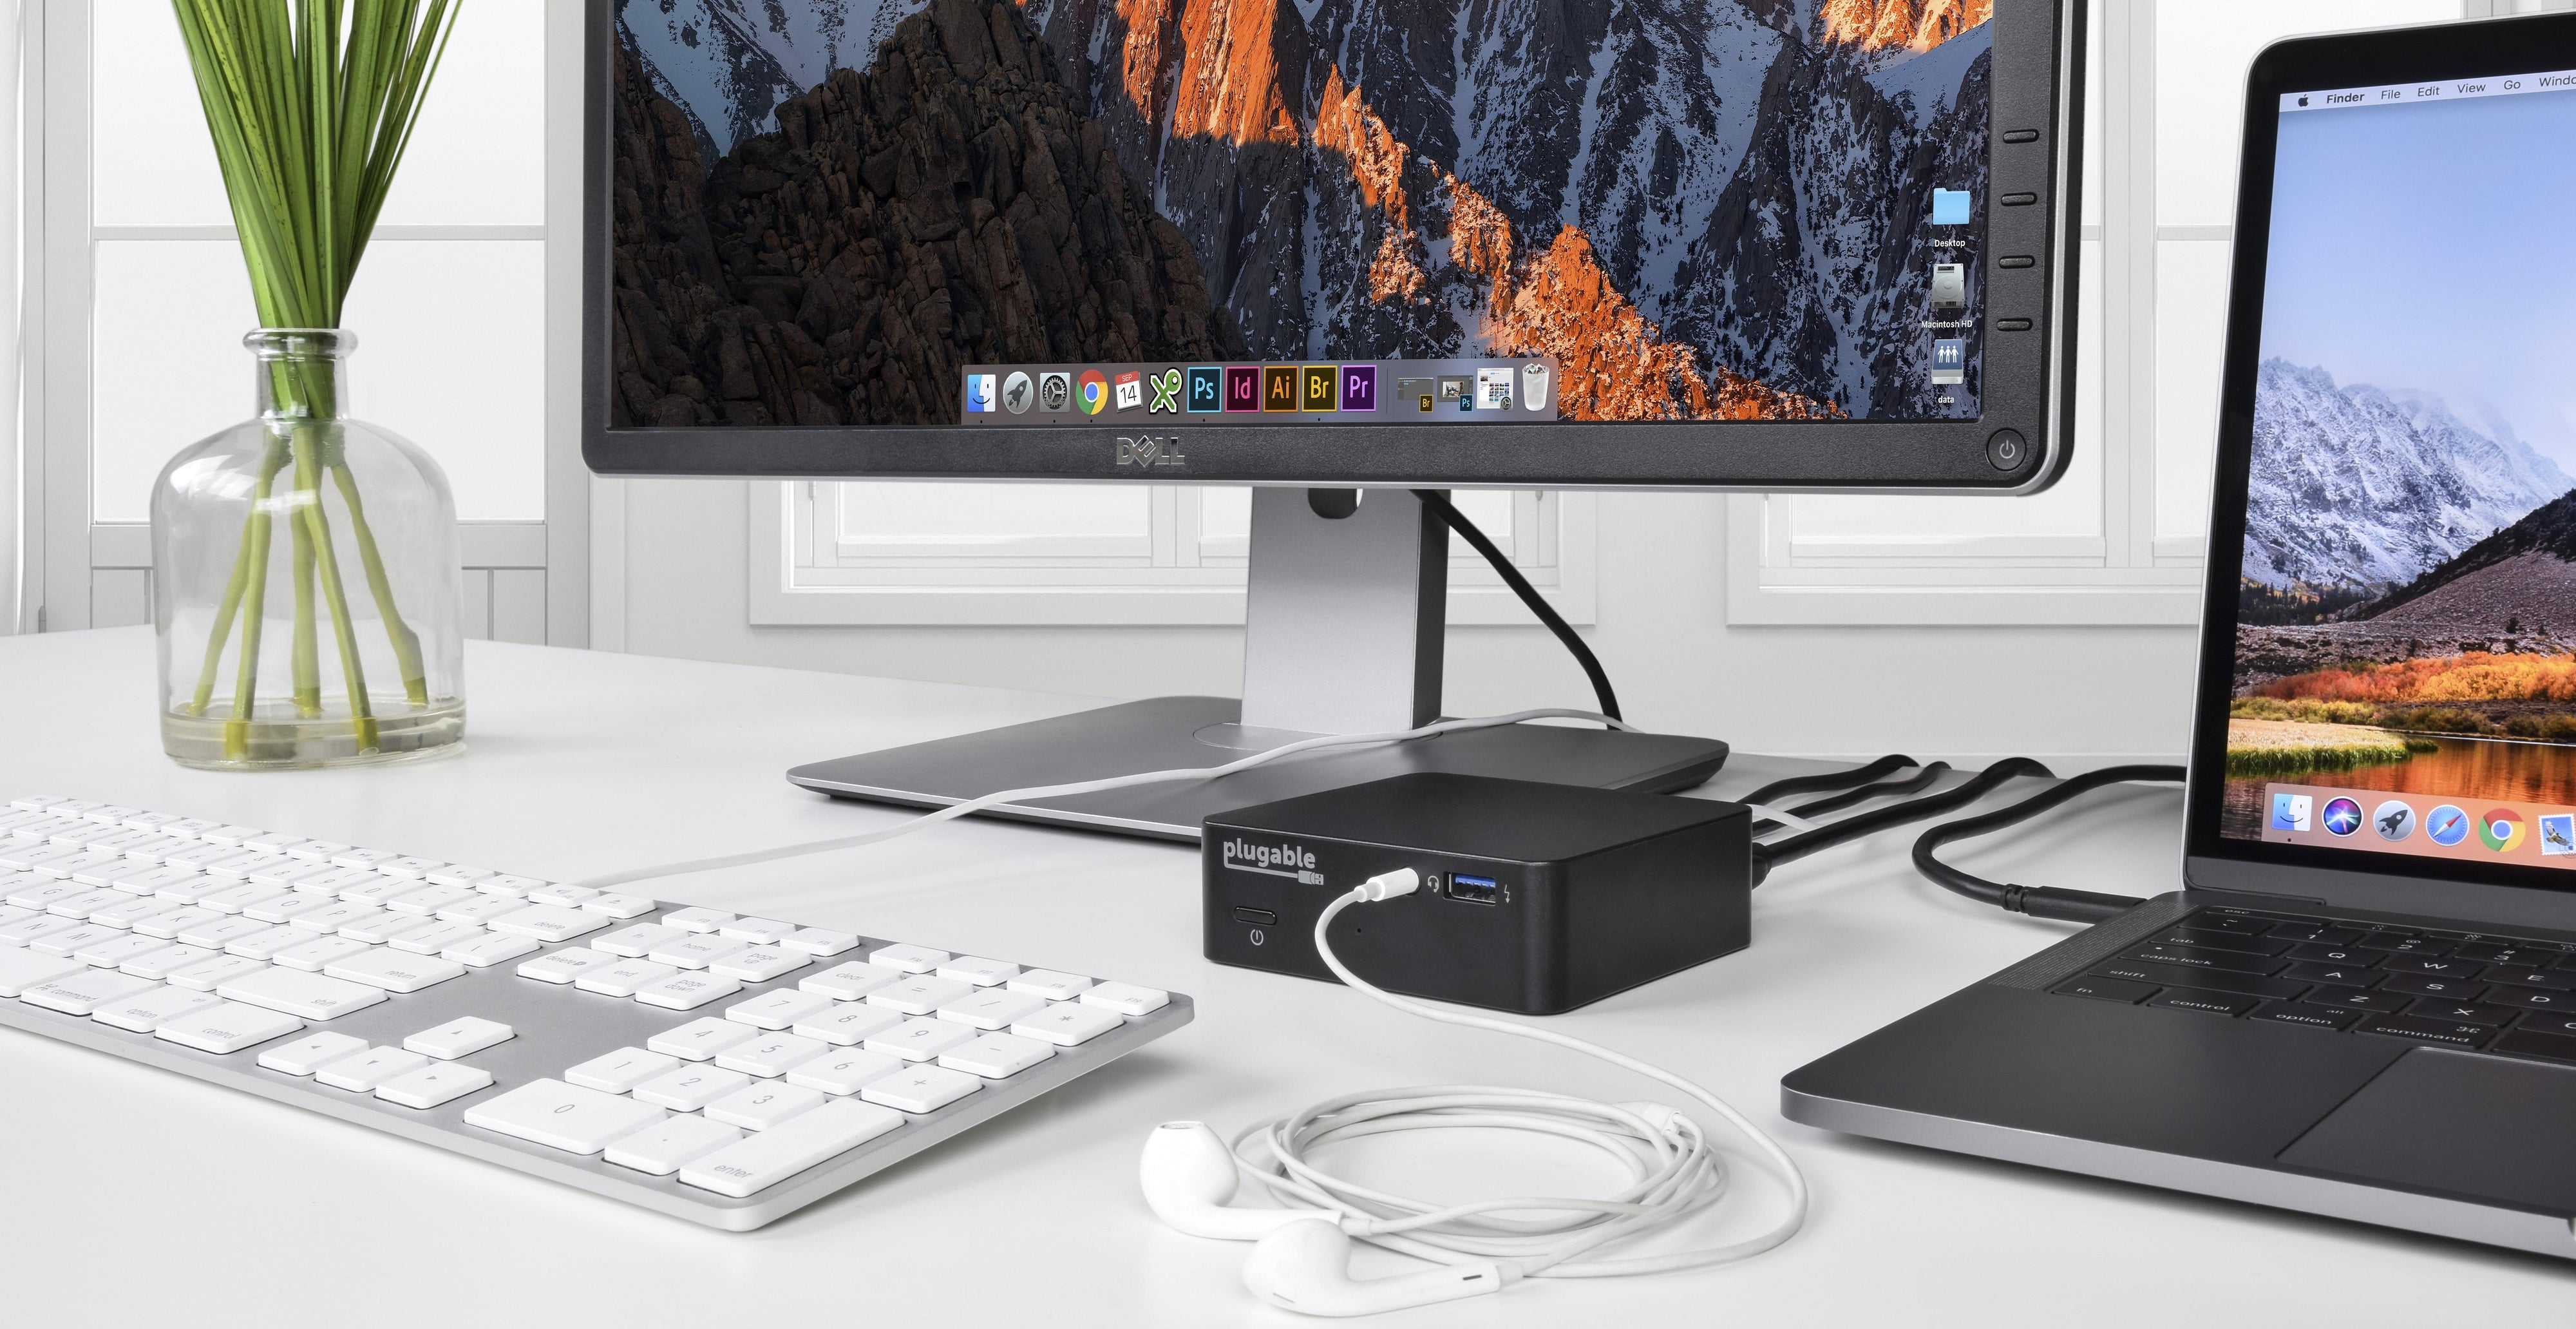
Taking advantage of the latest USB-C standards, this dock uses Alt Mode to achieve native performance matching the capabilities of your graphics processor. With its compact size and support for 85W Power Delivery, the Plugable USB-C Mini charging dock for computer (UD-CAM) remains one of Plugable's smallest yet most powerful USB-C docks available.This dock helps to expand the capabilities any Windows, Mac, or ChromeOS laptop, 2-in-1, or tablet connected to it with just one connection cable.
様々な機能
表示および充電機能
- HDMI 1.4 x 1 (代替モード)
- USB PD 充電規格対応(最大85W)
HDMI モニタを 1 台接続し、拡張または複製デスクトップとして構成できます。最大4K@30Hz まで対応します(2560x1600以下は60Hzに対応)。
Note: DisplayPort (DP) monitors are not supported. If your device supports USB Power Delivery (USB PD), this dock supports up to 85W of charging to your host device.
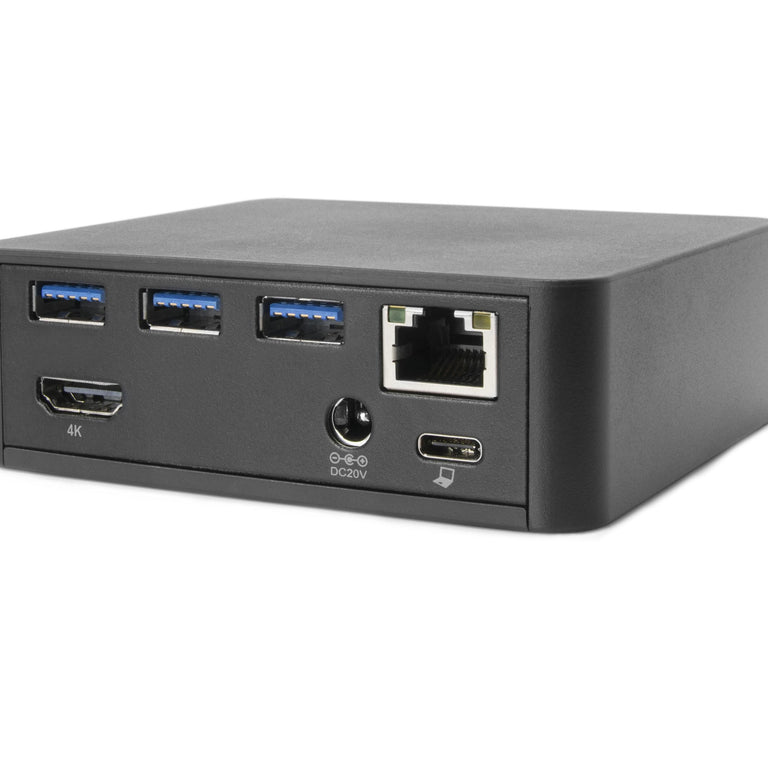
その他の周辺機器用ポート
- 4x USB 3.0 Ports
- ギガビットイーサネット x 1
- 1x 3.5mm TRRS オーディオ ジャック(ヘッドフォンおよびマイクロフォン用)
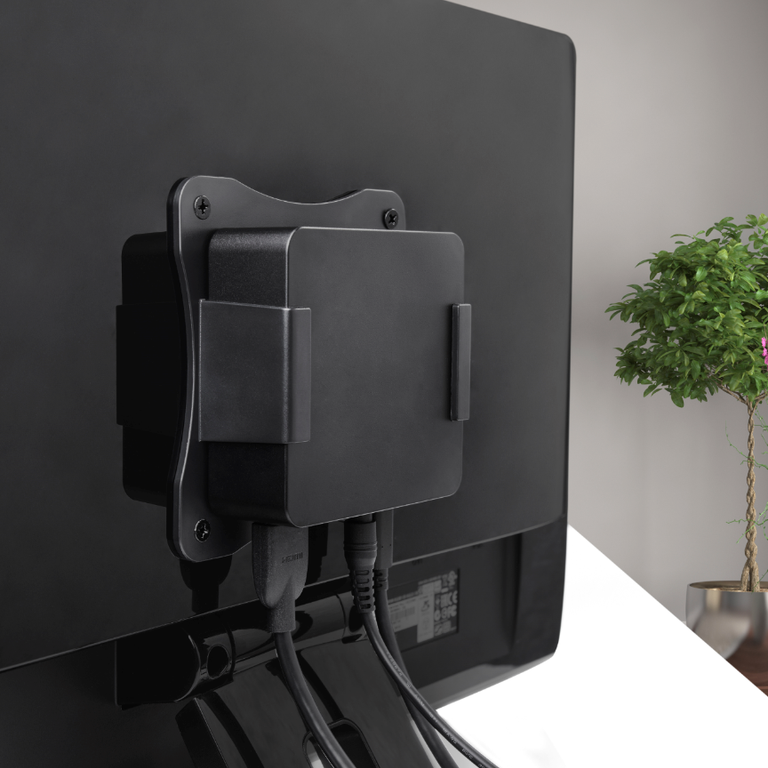
VESA 規格対応マウント
- VESAマウント+ネジ 1セット
このドッキングステーションは非常にコンパクトなため、作業スペースを圧迫することがありません。
付属の VESA 規格ねじを使用して簡単にモニターの背面に取り付けることもできます。
Benefits of the Compact Dock Form Factor
With its tiny dimensions and VESA compatibility, the UD-CAM functions as a full driverless docking station for mac and saves valuable desk space by eliminating clutter. This Plugable dock helps users streamline their work-spaces and free up more desk space than a traditional laptop hub, and it is a convenient option for hot-desking or hoteling due to its great portability and compact size. When mounted via the included VESA bracket, the UD-CAM be attached to desks, carts, or other mobile workspaces, keeping your cables out of the way.
Filter Help Articles and Frequent Questions by Category
Choose one or more filters within each category to narrow down the articles. Each selection will result in only displaying articles that include all of your choices.
Articles
Well how about that, it looks like we don't have any articles matching your filters! Try removing one of your choices or clear the filters to show all articles.
You can always contact support if you need help too!
USB Port Types
USB-A

pietz, CC BY-SA 3.0 , via Wikimedia Commons
This is the standard USB connection that most computers offered prior to the introduction of USB Type-C (USB-C). Even after the introduction of USB Type-C, this is still quite common.
It can provide data transfer rates up to the USB 3.1 Gen 2 (10 gbps) specification depending on the host and device, but does not directly support video in the way that USB-C Alternate Mode does. This limitation makes DisplayLink USB graphics adapters and docking stations ideal on systems that do not have USB-C, or in instances where more displays are needed beyond available video outputs of a PC.
USB-B

Fred the Oyster, CC BY-SA 4.0 , via Wikimedia Commons

IngenieroLoco, CC BY-SA 4.0, via Wikimedia Commons
This type of connection comes in a couple different styles depending on whether USB 3.0 and higher transfer rates are supported (bottom graphic). Usually this type of connection is used to plug into USB devices that do not have a fixed cable connected, such as USB docking stations, USB hubs, printers, and others.
USB Mini-B

Fred the Oyster, CC BY-SA 4.0 , via Wikimedia Commons
One of the first connectors for charging a smartphone, wireless game controller (such as the Sixaxis and DualShock 3), and other small devices such as external hard drives. Not commonly used today, but is still used in some cases. Most devices using USB Mini B are using USB 2.0, though a USB 3.0 variant does exist. This specification also added USB On-The-Go (OTG) functionality, though it is more commonly implemented with Micro USB.
USB Micro-B

Fred the Oyster, CC BY-SA 4.0, via Wikimedia Commons

IngenieroLoco, CC BY-SA 4.0 , via Wikimedia Commons
A smaller connector that serves many of the same uses as the Mini B connector, with added optional features such as Mobile High-Definition Link (MHL) to allow devices like smartphones to output video to larger displays without requiring a dedicated port for video output.
The larger variant of USB-B is most commonly used for external hard drives for higher 5Gbps transfer rates.
USB-C, Thunderbolt™ 3, and Thunderbolt™ 4
Niridya , CC0, via Wikimedia Commons
The most recent USB connection, USB Type-C (USB-C), represents a major change in what USB can do. The connector is smaller, can be connected in two orientations, is able to carry substantially more power and data, and can directly carry video signals of multiple types (HDMI, DisplayPort, etc.) Intel has also adapted the USB-C connector for use with Thunderbolt 3 and Thunderbolt 4.
It is important to note that while all Thunderbolt 3 and Thunderbolt 4 connections are USB-C, not all USB-C connections can be used with Thunderbolt 3 or Thunderbolt 4 devices.
More details regarding physical USB connections can be found on Wikipedia . The graphics depicted here are adapted from Wikimedia Commons by various artists under the Creative Commons Attribution-Share Alike 3.0 Unported license.
Does the HDMI Port Support 4K Resolution at 60Hz?
Yes, the USBC-MD103's HDMI port will support 4K at 60Hz if your host device supports DisplayPort 1.4.
Can I Connect a DisplayPort (DP) Monitor to the HDMI Port on This Device Using an Adapter or Cable?
No. Most DisplayPort to HDMI cables and adapters are one-way adapters from a DisplayPort Source (computer or docking station) to a HDMI Sink (television, computer monitor, or projector). These cables do not work in reverse.
Why is DisplayPort to HDMI often a one-way conversion?
DisplayPort uses packet-based data transmission, breaking the video stream into individual packets of data allows for longer cable runs, use in both copper and fiber-optic cables, and allows for higher bandwidth than other video formats. It is relatively easy to convert from DisplayPort to HDMI (computers with HDMI output ports already do this internally) and dual-mode DisplayPort outputs (DP++) have built-in adapters to output a HDMI signal for use with passive DisplayPort to HDMI adapters.
HDMI historically uses a Transmission-Minimized Differential Signaling (TDMS) video signal originally based on DVI's signal, this requires more power to operate at the same cable lengths as DisplayPort and requires significantly more processing power to convert from HDMI to DisplayPort packet-based data. The latest HDMI specifications enable the new Fixed Rate Link (FRL) which is packet based similar to but not directly compatible with DisplayPort.
Externally powered HDMI to DisplayPort adapters do exist, these generally have a USB or small barrel plug for power, and can convert from a HDMI Source to DisplayPort Sink. In most cases they have reduced resolution or refresh rates compared to modern signal sources and can introduce delay in the data connection between the display and computer potentially causing reduced connectivity or display performance problems.
We do not currently recommend using HDMI to DisplayPort adapter with our docking stations. In our testing they have been unreliable compared to a native DisplayPort connection. Many of our newer docking stations include both HDMI and DisplayPort outputs to reduce the need for additional adapters or adapter cables.
If you have any questions please feel free to contact us at support@plugable.com and we'll be happy to help!
Is my ethernet adapter compatible with iPhone?
Our Plugable ethernet adapters are compatible with USB-C iPhone 15 and 16 / Pro / Pro Max running iOS 17 or newer. Our ethernet adapters are plug-and-play on iPhone, and ethernet connection is identified in the iOS settings app.
These following ethernet adapters from Plugable have been tested and verified to work with iPhone:
Understanding and Troubleshooting Network Performance
Computer networking is a complex topic. In this article, we'll be taking a deep dive on the nuances of network performance for those who need some additional explanation while striving to be concise, and to educate users of various experience levels relating computer hardware and computer networking.
If you just need to know how to perform a network performance test/benchmark, jump down to configuring iPerf.
Core Network Concepts
LAN vs WAN
With regards to network performance, it is crucial to first separate whether an issue is with Wide Area Network (WAN) performance, or if the issue is with Local Area Network (LAN) performance.
Your LAN is essentially the network inside your home or business. Many homes use a combination modem/router device provided by their Internet Service Provider (ISP). In some cases, especially in businesses, you may have a separate modem and router, along with other equipment connecting to the router such as a network switch.
Your modem, and the connection it establishes to your ISP—whether through coaxial cable, fiber, phone lines, or long-range wireless—essentially marks the point between the WAN and the LAN. The connection your modem makes to your ISP is the WAN, and any devices you connect through your router behind that modem belong to the LAN.
Link Rate
Almost every type of connection your computer makes to any piece of hardware will have a link rate of some kind. The link rate establishes how fast data can possibly be transferred across any given connection, but it does not guarantee how fast the hardware on either end of the connection will actually transfer data.
The concept of link rates, and their related bottlenecks, is likely best conveyed by giving an example of what connections might be involved in transferring a file from one computer on your LAN to another.
- 800Mbps—The file source is a USB 3.0 thumb drive capable of 100MB/s (800Mbps) read/write.
- 480Mbps—The USB 3.0 thumb drive is plugged into a USB 2.0 port on the PC, which has a maximum throughput of 480Mbps
- 1000Mbps—PC1's Ethernet connection establishes 1Gbps (1000Mbps) link to the router via Ethernet
- 300Mbps—The router connects to a second PC (we'll refer to this as PC2) via Wi-Fi, and it has established a 300Mbps link to the Wi-Fi adapter on PC2
- 480Mbps—The Wi-Fi adapter on PC2 is connected via a USB 2.0 port. The link rate of the USB connection to PC2 is at 480Mbps
- 6000Mbps—PC2 is going to store the file on an internal hard drive with a link rate of 6Gbps
- 1600Mbps—File Destination: SATA hard drive capable of 200MB/s (1600Mbps) read/write.
Following this chain, we see that 300Mbps is the slowest link rate established. This means that, regardless of the link rates established elsewhere, the absolute maximum the data can possibly be transferred is 300Mbps.
if we were to change the Wi-Fi connection to a wired Ethernet connection capable of 1Gbps, our performance bottleneck would then become the USB 2.0 connection to the USB drive where the file is stored.
Ports and Interfaces
Interfaces
A network interface represents connections, whether wired or wireless, that are made to form a network between devices.
Ports
Some may refer to physical hardware connections as "ports". For the purposes of networking, ports are logical constructs that can also be referred to as "network ports". Each network interface has 65,535 of these logical ports. Each port on a network interface is a separate data connection.
Benchmarking Network Adapter Performance
To properly benchmark network adapter performance, we need to:
- Use a simple LAN configuration
- Eliminate bottlenecks, especially link rate bottlenecks
Websites like speedtest.net, fast.com, and other performance tools in your web browser are going to use your WAN connection, and are not appropriate for determining if a network adapter is working well.
Transferring files from one computer to another on your LAN is typically not the best way to benchmark a network adapter. File transfers are bottlenecked by a number of things, including performance limitations of the disk the data is on, and often times a lack of establishing parallel network connections to perform the task.
One of the most accurate ways to benchmark network performance on a LAN is by using iPerf . To more effectively benchmark network adapter performance, it is best to establish a point-to-point connection between two PCs, rather than connecting through a router or switch.
Configuring iPerf
To test a connection using iPerf, you'll need at least two network interfaces, and preferably two computers. You'll also need to know the IP (Internet Protocol) address assigned to each network interface . One network interface will function as an iPerf server, and the other network interface will function as an iPerf client. Lastly, you'll need to download the version of iPerf 3.x that's appropriate for your computer's operating system and extract/install it .
Windows
- Make sure the drivers for both network interfaces involved in the test are using up-to-date drivers. Drivers for Plugable products can be found here.
- Download and extract iPerf for Windows
- Open Command Prompt
- Press Windows Key + R or + R, then enter
cmdin the window that appears - Search the Start Menu for
Command Prompt, and open it
- Press Windows Key + R or + R, then enter
- Navigate Command Prompt to the directory the directory where iPerf is located
- The
cdcommand is for 'change directory'- If you have a folder named 'iperf' on your Windows desktop, you can reach it in command prompt with the command
cd %USERPROFILE%\Desktop\iperf
- If you have a folder named 'iperf' on your Windows desktop, you can reach it in command prompt with the command
- The
- Run iperf in server mode via Command Prompt
iperf3.exe -s
macOS
- Usually it is best to install iperf on macOS using brew in Terminal
- Make sure the drivers for both network interfaces involved in the test are using up-to-date drivers
- Open Terminal
- Run iPerf in server mode
iperf3 -s
Linux
- Usually it is best to install iperf using the package manager in your Linux distro. For example, in Ubuntu, use
apt: sudo apt install iperf3
- Make sure the drivers for both network interfaces involved in the test are using up-to-date Drivers
- Open Terminal
- Run iPerf in server mode
iperf3 -s
Next, you'll need to run iPerf in client mode, targeting the IP address of the server/interface where iPerf is running in server mode. Additionally, we'll run the test for 30 seconds using -t 30 and with four parallel connections using -P 4. Running 4 parallel connections is optimal for saturating a network link.
Windows
- Open Command Prompt
- Press Windows Key + R or + R, then enter
cmdin the window that appears - Search the Start Menu for
Command Prompt, and open it
- Press Windows Key + R or + R, then enter
- Navigate Command Prompt to the directory the directory where iPerf is located
- The
cdcommand is for 'change directory'- If you have a folder named 'iperf' on your Windows desktop, you can reach it in command prompt with the command
cd %USERPROFILE%\Desktop\iperf
- If you have a folder named 'iperf' on your Windows desktop, you can reach it in command prompt with the command
- The
- Run iperf in client mode via Command Prompt (replace 192.168.0.200 with the IP address of the server/interface where iPerf is running in server mode)
iperf3.exe -c 192.168.0.200 -t 30 -P 4
macOS / Linux
- Open Terminal
- Run iPerf in client mode (replace 192.168.0.200 with the IP address of the server/interface where iPerf is running in server mode)
iperf3 -c 192.168.0.200 -t 30 -P 4
iPerf should start performing a network performance test. If the test fails to start, make sure that iPerf is not being blocked by your PC's/Mac's firewall.
Why iPerf is Ideal for Benchmarking
Unlike a file transfer, iPerf runs in memory on the PC and generates data to send using the CPU directly. This alleviates potential bottlenecks generated by storage devices, and allows you to explicitly control how many parallel connections are being used to transfer data rather than being unsure if parallel network connections are being used by other means.
Conclusion
There's a lot more to networking that isn't covered in this article, but we hope this helps explain enough to get an accurate measure of your network performance.
If you need assistance with your Plugable product that features network connectivity, please contact us for further assistance.
No Sound? How to Change Your Default Audio Device to Your Plugable Product
Whether you're on Windows, macOS, or Linux, it's common to add new audio devices to your computer.
Some examples of additional audio devices you may want to switch to include:
- Bluetooth headsets, headphones, and speakers
- Speakers built into a display, such as a TV or monitor
- A USB sound card, digital audio converter (DAC), or analog to digital converter (ADC)
- USB microphones
- Audio jacks on a docking station
These steps don't apply to the Plugable Performance NIX HDMI Capture Card (USBC-CAP60).
Here are the steps that you need to set a new default audio recording or output device on different operating systems.
Set Audio Output Device
Set Audio Recording Device
Set Default Playback Device in Windows
- Check that your device is properly connected, and that any necessary drivers are installed
- It is also a good idea to make sure that your sound device is turned on, and that the device's volume control is not at the absolute minimum setting
- Right-click on the speaker symbol in the Windows taskbar/system tray
-
Windows 7/8.x—Select Playback Devices. The Sound window will open with the Playback tab highlighted
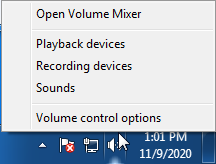
-
Windows 10/11—Select Open Sound Settings then click the link under 'Related Settings' for Sound Control Panel, then click the Playback tab
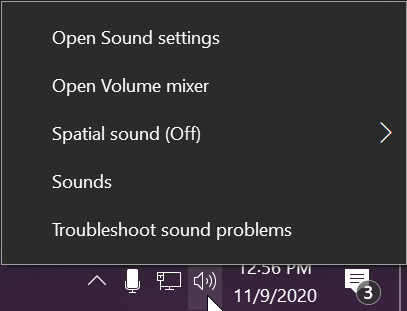
- Alternatively, after selecting Open Sound Settings, use the dropdowns under the Output header
-
Windows 7/8.x—Select Playback Devices. The Sound window will open with the Playback tab highlighted
- Find your device in the window
- A Plugable USB 3.0 docking station or sound-enabled display adapter will appear as Plugable Audio
- A Plugable USB 3.0 Silicon Motion docking station or sound-enabled display adapter will appear as SMI USB Audio
- A Plugable USB 2.0 docking station will appear as USB Multimedia Audio Device
- A Plugable USB Audio adapter will appear as USB Audio Device
- Right-click on the device you found in step 3 and select Set as Default Device. A check mark should appear next to your device, and sound should now play through it
- Click OK to exit the window
Additional Configuration for Bluetooth
Please see our pairing and configuration guide for Bluetooth devices.
Set Default Playback Device in macOS
- Open System Preferences
- Click Sound
- Select Output
- Select the most appropriate device
- A Plugable USB Audio adapter will appear as USB Audio Device
Set Default Playback Device in Linux
- Ensure that you audio device is connected to the PC
- If the audio device is self-powered, it is a good idea to make sure that it is powered on, and that the device's volume control is not at the absolute minimum setting
- Launch the 'Settings' application in your distro
- Go to the 'Sound' option
- Find the dropdown for your 'Output Device', and change it to your preferred output device
- For additional sound device controls, you may want to consider using Pulseaudio Volume Controls (package name pavucontrol)
Set Default Recording Device in Windows
- Check that your device is properly connected, and that any necessary drivers are installed
- It is also a good idea to make sure that your sound device is turned on, and that the device's volume control is not at the absolute minimum setting
- Right-click on the speaker symbol in the Windows taskbar/system tray
-
Windows 7/8.x—Select Recording Devices. The Sound window will open with the Recording tab highlighted
-
Windows 10/11—Select Open Sound Settings then click the link under 'Related Settings' for Sound Control Panel, then click the Recording tab
- Alternatively, after selecting Open Sound Settings, use the dropdowns under the Input header
-
Windows 7/8.x—Select Recording Devices. The Sound window will open with the Recording tab highlighted
- Find your device in the window
- A Plugable USB 3.0 DisplayLink docking station or sound-enabled display adapter will appear as Plugable Audio
- A Plugable USB 2.0 docking station will appear as USB Multimedia Audio Device
- A Plugable USB Audio adapter will appear as USB Audio Device
- Right-click on the device you found in step 3 and select Set as Default Device. A check mark should appear next to your device, and sound should now play through it
- Click OK to exit the window
Additional Configuration for Bluetooth
Please see our pairing and configuration guide for Bluetooth devices.
Set Default Recording Device in macOS
- Open System Preferences
- Click Sound
- Select Input
- Select the most appropriate device
- A Plugable USB Audio adapter will appear as USB Audio Device
Set Default Recording Device in Linux
- Ensure that you audio device is connected to the PC
- If the audio device is self-powered, it is a good idea to make sure that it is powered on, and that the device's volume control is not at the absolute minimum setting
- Launch the 'Settings' application in your distro
- Go to the 'Sound' option
- Find the dropdown for your 'Input Device', and change it to your preferred input device
- For additional sound device controls, you may want to consider using Pulseaudio Volume Controls (package name pavucontrol)
Why Isn’t My Plugable Dock Charging My Laptop?
Your laptop may not be charging because not all USB-C ports support charging, meaning the host system must explicitly support USB Power Delivery (PD) on the connected port. Additionally, the docking station must be fully powered on to pass a charge to your laptop.
How to Verify Port and Power Status for Charging
- Verify whether your computer supports Power Delivery (PD) over USB-C, and identify which port (s) support this functionality if multiple USB-C ports are present on your device.
- Check that the docking station is turned on and receiving power. Depending on the specific model of your Plugable dock, a blue or white light should illuminate to indicate that the dock is powered.
Applicable To
- USB-C docking stations and laptops supporting USB Power Delivery (PD)
- UD-CAM, UD-ULTC4K, UD-ULTCDL, UD-7400PD, UD-3900C4, UD-6950PDH, UD-3900PDZ, UD-6950PDZ, UD-CA1A, UD-MSTH2, etc.
I’m Having Issues With the Ethernet Port on My UD-CA1A or UD-CAM Not Functioning As Expected on a Mac Host System
Most users experience normal network functionality using the existing drivers already built-in to macOS. However, users who are encountering any unexpected network issues can download and install an updated Realtek driver that has resolved these issues. This driver is compatible with macOS up to macOS 10.15.7, and incompatible with macOS 11 and newer.
Can I Use the The Power Button on the Front of the UD-CAM Dock to Turn On My Computer?
No. The power button on the front of the UD-CAM dock only turns on or off the dock itself. Our docking stations do not have control over the power state of the connected computer, so it is not possible to turn on a laptop from an "off" state. It's always possible to restart or turn off a laptop however by doing so from Windows itself.
Please note that the ability to power on a computer through a dock is 100% proprietary among manufacturer's and their own respective docks.
My Docking Station/Adapter Works Well With My Windows Laptop, but When I Close the Lid the Displays and Laptop Turn Off or Sleep. How Do I Fix This?
Windows defaults to putting the computer to sleep when the lid is closed, even if there are external displays and devices connected, we can change this setting to enable closing the lid while using a docking station.
Recommended Setup
To ensure the computer can reliably function with the lid closed there are some requirements and recommendations:
- The system should be powered: This can be from a USB Type-C Docking Station with host charging, or by connecting the laptop's original power source.
- There should be at least one external display connected, this can be through a docking station, or directly to the computer.
- There should be a keyboard and mouse connected, either through a docking station, USB Hub, or directly to the computer.
Windows 11 24H2 and Newer
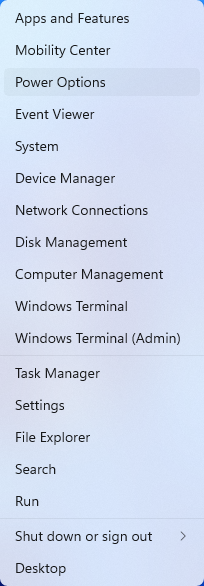
- Right-click on the Start menu and select Power Options from the context menu

- Expand the Lid, power & sleep button controls sub-section

- Under Plugged in select Do Nothing from the Closing the lid will make my PC context menu
Windows 11 23H2 and Earlier
- Right-click on the Start menu and select Power Options from the context menu
- In the upper left corner of the settings window, in the search box, type "lid" then select Change what closing the lid does from the search results
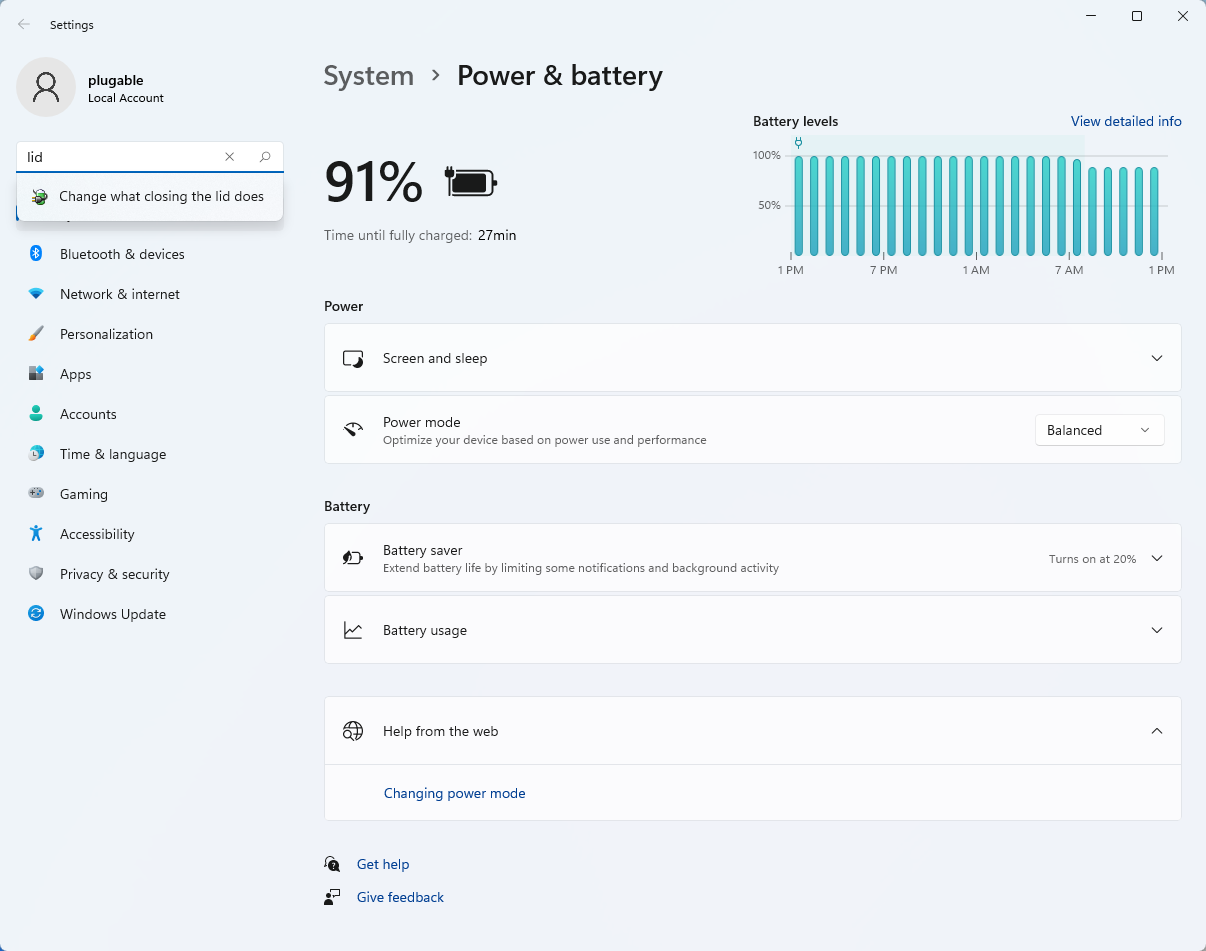
- Make sure the setting for When I close the lid under the Plugged In column is set to Do Nothing
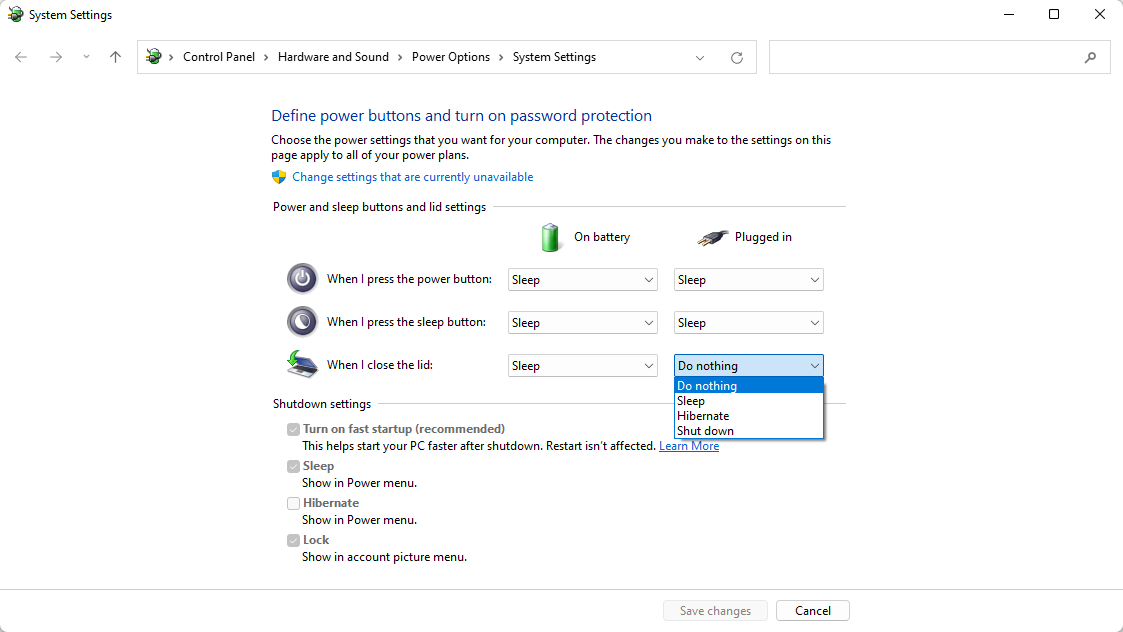
- Click the Save Changes button to apply the new settings.
Windows 10
- Start by right-clicking on the Start button and select Power Options from the menu.
- From the right side of the Power Options settings page, select the blue link for Additional power settings
- From the choices present on the left-hand side of the Power Options window, please click on Choose what closing the lid does
- Make sure the setting for When I close the lid under the Plugged In column is set to Do Nothing
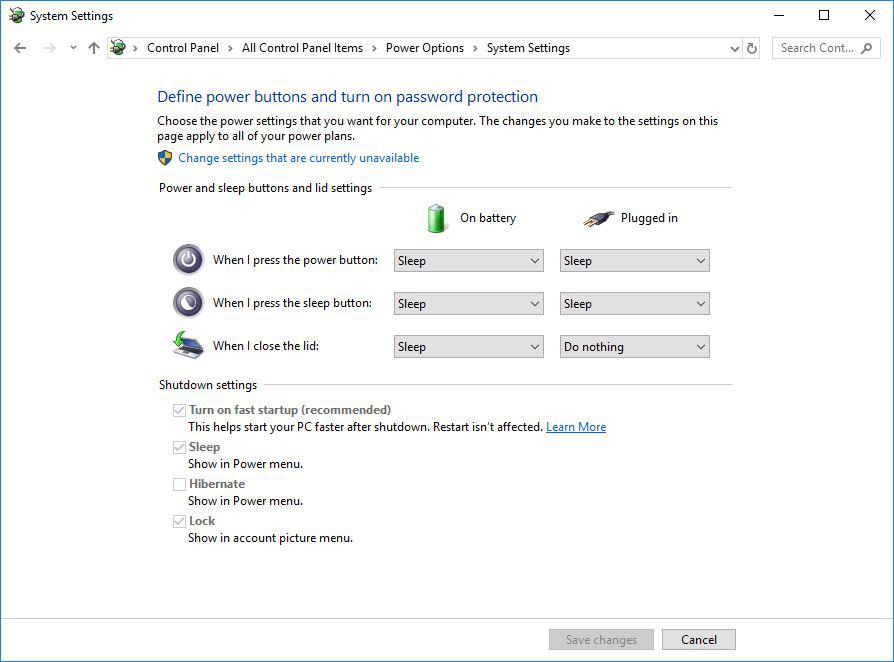
- Click the Save Changes button and restart the system (making sure that the laptop's power adapter is also connected) and test the behavior again.
Closing the lid should no longer put the computer into sleep mode when an external display and power source is connected, instead one of the external displays should now become the Primary display with the desktop icons instead of the laptop's built-in display.
When to open the lid?
The laptop lid may still need to be opened when performing any of the following:
- To power on the computer from a fully powered off state
- To log into the computer if logged out or if the computer is restarted with the lid closed
- To wake the computer from a deep sleep state (hibernation, or Windows hybrid sleep states)
If you have any questions please feel free to contact us at support@plugable.com and we'll be happy to help!
My Windows Computer Will Not Boot Properly When a Docking Station, USB Hub, USB Adapter, or USB Storage Drive Is Connected
If your Windows computer will not boot properly when a docking station (such as the Plugable UD-3900), USB hub (such as the Plugable USBC-HUB7C), or USB hub adapter (such as the Plugable USBC-7IN1E) is connected most often the cause is an external device connected to the product (for example an external USB storage drive) as opposed to the product itself.
There are also cases where an external USB storage device (such as a Plugable USBC-NVME SSD enclosure) is the only device connected that can sometimes produce a similar result.
If you are affected by this condition while using a docking station, USB hub, or USB hub adapter, please temporarily disconnect all of the external devices from the product. The only remaining connections should be the product's external power source (if it has one) and the cable connecting the product to the host computer.
While in this simplified physical configuration, reboot the host computer in order to test the behavior. Presuming the host computer boots as expected while in the simplified configuration, reconnect each external device back to the product one at a time and reboot after each one to test the behavior again. This process should isolate the source of the issue.
In cases where only an external USB storage device is in use, please temporarily disconnect the USB storage device from the host computer and then reboot in order to test the behavior again.
To expand further, in our experience helping others the most common cause of this behavior is an external USB storage drive connected to one of the product's USB ports. In some cases, a Windows computer may try to boot from an external storage drive by mistake as opposed to the host computer's built-in storage drive. Since most external USB storage drives are not 'bootable', this can interrupt the boot process.
If this behavior occurs, the most common way to mitigate the behavior is to access the host computer's System BIOS (also known as UEFI firmware) to change the 'boot order' settings to ensure that the host computer's internal storage drive is the first boot option. Doing so helps ensure that the host computer will not try to boot from an external USB storage device.
Every Windows host computer system is different, so the best resource for accessing the System BIOS and changing the settings is the manual for the host computer provided by the manufacturer of the host computer.
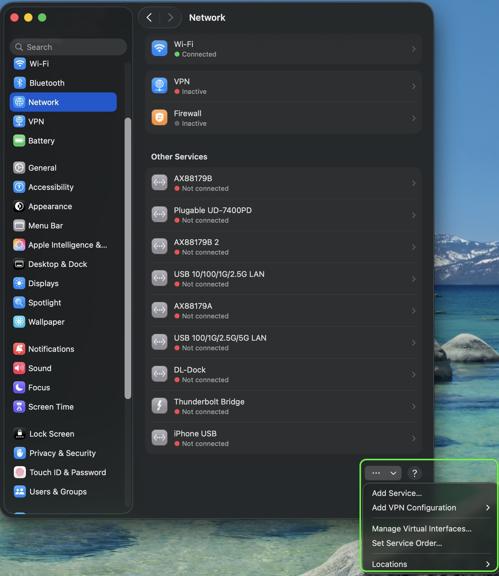
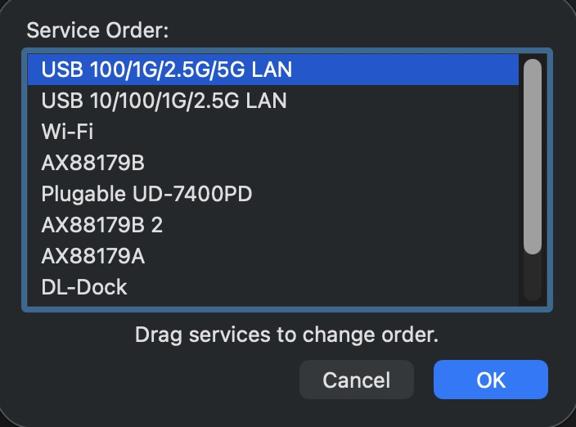
Network Prioritization - How to Set Service Order on macOS
If you find that your Plugable Ethernet adapter or docking station is not connecting to the internet or is experiencing slower than expected speeds on your Mac, it may be related the macOS Network Service Order. This is a list of the network connections available to the computer setting the priority for network connections.
macOS attempts to connect to the internet using the network service at the top of your list first. If a wireless network is listed above your Plugable Ethernet adapter, this often leads to users unknowingly using a slower wireless connection when they intended to use a wired one.
To ensure you are getting the full speed and stability of your wired connection, you must prioritize the Plugable Ethernet adapter above Wi-Fi. Normally wired network connections take priority, however if priority has been modified in the past it can affect newly connected devices.
Set the order of network services
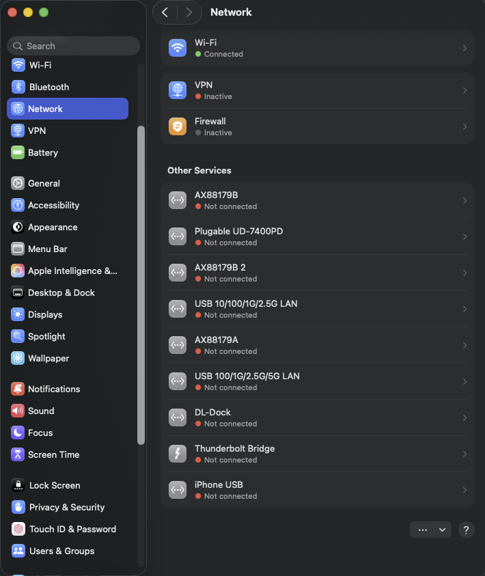
Navigate through these steps to Set Service Order:
- Click the Apple Menu in the top-left corner of your screen and select System Settings.
- In the sidebar, click Network.
- Look for the Action Menu (a circle with three dots ...) located at the bottom right of the main window area.
- Click the three dots and select Set Service Order.…
- A list will appear showing all your network interfaces. Click and drag your Ethernet Adapter (often named "USB 10/100/1G/2.5G LAN" or “Plugable Docking Station”) to the very top of the list, above Wi-Fi.
- Click OK to save your changes.
Your network traffic will now automatically prioritize the wired connection, ensuring you receive the best possible speeds and stability from your Plugable adapter.
If you have any questions please feel free to contact us at support@plugable.com and we'll be happy to help!
Docking Station Power Adapters
Below is a list of power adapter models used by Plugable docking stations. We offer refurbished replacement power adapters on eBay as they are available for purchase, however, we may not have replacement power adapters available for all of our docking stations.
If the power adapter for your docking station or region is not listed, out of stock on eBay or if you have any other questions regarding replacement power adapters for our docks please contact us at support@plugable.com and we will be happy to assist further.
We offer a 30-day return period for our replacement power adapters listed on eBay.
| Dock Models | Power Supply Model Number | Replacement Power Supply (if available) |
|---|---|---|
| USB 3.0 / USB-C Docking Stations | ||
| UD-3900 UD-3000 UD-5900 UD-PRO8 UD-3900C |
DSA-24PFS-05 |
|
| UD-3900H | P120W2000U |
|
| UD-3900PDZ - 100W (purchased from March 2025) | A18-135P1B |
|
| UD-3900Z | ADS-26SGP-12 12024E |
|
| UD-6950 | A16-045N3A |
|
| UD-6950H | P200W2000UG |
|
| UD-6950Z | ADS-40SGP-19 20040G |
|
| UD-CA1 UD-CA1A |
EA10953D-200 |
|
| UD-ULTCDL (MK1 original and MK2 updated version) Note: Check here to determine what version of dock you have |
A16-065N2A (MK1 model) A18-135P1B-Rev3 (MK2 model) Note: MK2 model adapters will work with MK1 docks |
|
| UD-ULTC4K (MK1 original and MK2 updated version) Note: Check here to determine what version of dock you have |
A16-100P1A (MK1 model) A18-135P1B-Rev3 (MK2 model) Note: MK2 model adapters will work with MK1 docks |
|
| UD-3900C4 |
A18-135P1B-Rev3 |
North America plug |
| UD-3900PDH UD-3900PDZ - 60W alternative power adapter |
PS200D06500G1 |
North America plug |
| UD-768PDZ |
PA-1131-72 v2 |
North America plug |
| UD-6950PDZ - 100W (purchased from February 2025) |
A18-135P1B |
North America plug |
| UD-MSTH2 |
ADS-110DL-19-1 200110E |
North America plug |
| UD-MSTHDC |
ADS-110DL-19-1 200110E |
North America plug |
| UD-CAM |
A16-100P1A |
|
| UD-CUBE |
EA1024CR-050 |
|
| UD-6950PDH |
PS200D06500G1 (v1 of dock*) F-J-SW202720006700 (v2 of dock with serial numbers 4157 or newer*) *For more details about v1 and v2 UD-6950PDH docks visit our Knowledge Base article |
North America plug (v1) North America plug (v2) |
| Thunderbolt / USB4 Docking Stations | ||
| TBT4-UDZ |
PA-1131-72 v2 |
North America plug |
| TBT3-UDC1 | PA-1131-72 v1 |
|
| TBT3-UDV | A18-135P1B-Rev1 |
|
| TBT3-UDZ | PA-1171-72 |
|
| TBT3-UDC3 | PA-1171-72 |
|
| TBT4-HUB3C | ADS-110DL-19-1 200110E |
|
| USB4-HUB3A |
ADS-110DL-19-1-200100E |
North America plug |
| TBT4-UD5 | FJ-SW202720006400 |
North America plug |
| TBT4-UDX1 | A18-135P1B-Rev4 A18-135P1B-Rev3 (Large Barrel) |
|
| TBT-6950PD | YW180A2-2100858 |
North America plug |
| UD-4VPD |
PA-1171-72 |
North America plug |
My Plugable Dock Is Missing a Component Such As the Power Supply, USB Cable, or Other Adapter.
If your package is missing one or more of the items that should be included with your Plugable dock (included items are listed on a chart on the side of the box), start by double checking if the part is still in the packaging. Pieces can occasionally get stuck in the corners under the main insert in the box.
If you are still unable to locate the piece, please contact support@plugable.com with the following information:
1. Amazon Order ID (or other proof of purchase) associated with your Plugable device.
2. A description of the parts that are missing from your order.
3. Your preferred shipping address (and a phone number associated with that address).
4. The serial number of your Plugable Dock.
Can I Connect My High Refresh Rate Monitor (e.g. 120Hz, 144Hz) to a Plugable Dock?
Most Plugable docks do not officially support monitors over 60Hz including 120Hz or 144Hz refresh rate unless otherwise specified on the Plugable product page or listing.
DisplayLink USB Graphics technology and Silicon Motion based docking stations and graphics adapters, like our USB 3.0 dual display and USB Type-C triple display docking stations, are limited to 60Hz fresh rate by the USB graphics controller hardware.
USB Type-C DisplayPort Alternate Mode docking station and ports on our USB Type-C Triple Display Docking Stations can support higher refresh rates, but may be limited by the computer's capability and available bandwidth to the docking station. Additionally, when paired with DisplayLink or Silicon Motion USB graphics, having displays at different refresh rates may reduce overall system performance. Due to this we normally recommend limiting all connected displays to 60Hz refresh rate when using DisplayLink and Silicon Motion graphics technology with directly connected, or USB Type-C DisplayPort Alternate Mode controlled displays.
Monitors with refresh rates higher then 60Hz may be connected to a docking station operating at up to 60Hz, or connected directly on the computer's HDMI or DisplayPort to ensure the display is powered by the system's native GPU.
Do Plugable products support the Apple SuperDrive?
Unfortunately Plugable products do not support the Apple SuperDrive.
The Apple SuperDrive has stringent power requirements that can only be met by directly connecting the SuperDrive to your host laptop. As a result at this time Apple recommends only using their USB-C adapter cables. You can find more information on that here → How to connect the Apple USB SuperDrive
If you have purchased a Plugable product to use with your Apple SuperDrive, and would like some additional assistance please do not hesitate to reach out. You can do so by emailing support@plugable.com, or going to Plugable.com/Support.
My Plugable product with wired Ethernet is no longer working on macOS. What can I do?
Please Note
The below guide is an advanced troubleshooting step, and we do not recommend doing so unless you are comfortable manually altering files on your Apple product running macOS. You may not be able to perform the below troubleshooting step if you are unable to execute administrative credentials on your laptop. Please reach out to our support first if you do not wish to attempt the below instructions. You can do so at Plugable.com/Support
How to delete a specific Ethernet adapter from your Network devices on macOS
- Click on the Apple logo in the top left corner of your primary monitor, and select ‘System Preferences’
- Next select ‘Network’ in the ‘System Preferences' window.
- In the now visible list, please select the Plugable Ethernet, or Thunderbolt Ethernet device that may not be working as expected.
- Once selected click on the minus button in the bottom left of the network window.
- Click on Apply in the bottom right.
- Next click on the plus button in the bottom left of the network window, and add the previously removed device.
- Click on Apply in the bottom right.
- Test to see if this has resolved the unexpected behavior, and assure that your Ethernet is now working.
- If this does not resolve the problem, please proceed to the next section (As noted previously the next section is for advanced users only!)
Manually erase your macOS Network Settings to fully reset the Network configuration
(Advanced! Click to reveal)
- Open the ‘Finder’ app, then in the ‘Go’ menu at the top of your screen select ‘Computer’
- Click on ‘Macintosh HD’ then Library, Preferences, SystemConfiguration
- Copy the file named ‘NetworkInterfaces.plist’ to your desktop as a backup of your current configuration.
- Delete the original version of the ‘NetworkInterfaces.plist’ located in the SystemConfiguration directory.
- Restart your Mac
- Login to your Mac, and return to System Preferences → Network
- If the list is now empty, please re-add the Plugable or Thunderbolt network adapter by clicking on the plus button in the bottom left of the Network window. Once done click on 'Apply'.
- Test to see if this has resolved the unexpected network behavior
I am still unable to get my Ethernet connection working on my Mac
If this is the case please reach out to our support team. When you do please include a diagnostic log gathered using our PlugDebug tool (instructions are provided on the PlugDebug page). If you are not able to gather the PlugDebug diagnostics do not worry we are still here to help! Please reach out to our support team at support@plugable.com or Plugable.com/Support with a detailed description of your problem, and the model of Plugable product you are using.
Can I leave my notebook computer connected to a charging dock overnight, or should I discharge and recharge the notebook battery regularly?
We are often asked if it is okay to leave a notebook computer connected to one of our USB-C docking stations with Power Delivery for extended periods of time. The short answer is yes, it is no different from leaving the laptop connected to the manufacturer's original USB-C power supply for the same time. The long answer is yes for modern laptops, and maybe for older (1990s-early 2000s laptops) and involves going into the different battery technologies used in consumer electronics devices.
Another common question is if it is possible to use the docking station but to disable powering and charging the computer. When a modern notebook computer runs on battery power it will often set the system to a reduced power state which may impact performance, or connected devices and we recommend always powering the computer when using a desktop docking station. For all of our docking stations that provide power to the host computer this will not affect the lifespan of the computer's battery.
Modern Laptop Batteries: Lithium-Ion
Lithium-ion (li-ion) batteries are found in a wide range of consumer electronics from notebook computers and cell phones, to electric cars, power tools, and wearable electronics like wireless earbuds. Li-ion offers fast charging, high-current discharging, fairly long service live compared to other rechargeable battery technologies and are relatively inexpensive.
The life-span of a rechargeable battery depends on many factors including age, temperature history, charging patterns, the chemical composition of the specific battery, and usage. For example batteries stored at 100% charge will degrade faster than batteries stored at 50% charge, this is why most consumer electronics devices arrive from the manufacturer with between 25% to 75% charge.
Lithium-ion batteries are consumable components, however in most modern computers, cell phones, and tablets these are not user serviceable components. To help maintain the battery all modern computers and most consumer electronics will include battery charge and protection circuits. These can be fairly simple, charging up the battery at preset rates depending on the charge level to help maintain the battery life, or complex software controlled charging that monitors battery temperature, voltage and current draw to maintain the fastest charging while maintaining the battery longevity.
Modern notebook computers can be left connected to the original power cable or a docking station with charging capability for extended periods, and do not benefit from regular discharge/recharge cycles. Our docking stations with charging capability rely on USB Type-C Power Delivery to power and charge compatible computers. USB Type-C Power Delivery is a negotiated charging protocol between the host computer and the docking station or USB Type-C power supply, this allows the computer to draw only the power it requires, and even select the best voltage level for powering the computer. In combination with a computer's built-in battery charging controller the computer is capable of maintaining the battery's optimal state even when left connected to a power source for an extended period of time.
Legacy Laptop Batteries: NiCad and NiMH
Older laptops, from the 1990s and some early 2000s, as well as some consumer electronics, and most rechargeable AA or AAA battery replacements use Nickel-Cadmium (NiCad) or Nickel-Metal Hydride (NiMH) batteries. These batteries are slower to charge and discharge than li-ion batteries, and require very simple charge controllers, and in some cases can even be trickle-charged ( very low-current continuous charging ) if desired.
These batteries generally don't have smart charging controllers and to prolong the life of the battery required "training" or fully discharging and recharging the battery every so often. Many laptop manufacturers recommended fully charging and discharging a new laptop 2-3 times to train the battery, this is not necessary with modern laptops.
Conclusion
Modern notebook batteries are managed by the computer's built-in battery charging circuit, and require little to no user intervention to maintain optimal battery health. It does not harm the battery to leave the computer connected to an external power supply, so long as the computer is being used regularly. If the computer is to be stored for a prolonged period then discharging the battery to between 50-75% can help to maintain the battery life.
Batteries are consumable components and degrade over time, however modern notebook computers can extend the battery life generally to meet or exceed the life of the computer's other electronic components.
What Can I Do If My Dock or Connected USB Devices Are Not Detected by My Computer?
Applicable To
Plugable Docking Stations
Problem Summary
The internal USB hub in a docking station may occasionally stop working correctly, leading to your computer not detecting connected USB devices or failing to recognize the dock entirely. This can often be resolved by performing a power-cycle of the dock in a specific order to fully reset its internal hub chipset.
Instructions
- Disconnect all USB peripherals connected to the dock.
- Disconnect the docking station from the host computer.
- Disconnect the dock's power adapter from power.
- Leave the dock unplugged for at least 1 minute to allow power to dissipate.
- Connect the docking station initially into power only.
- Connect the docking station to the host computer.
- Reconnect your USB peripherals and test them for functionality.
Expected Result
Your computer should successfully recognize the docking station and detect all connected USB peripherals.
If the Issue Persists
Reach out to Plugable support by email at support@plugable.com
Understanding Heat Generation in Electronics
It's not uncommon for users to notice a certain level of heat generation from electronics and by extension, Plugable products during operation. In this knowledge base article, we'll explore the reasons behind this heat generation and why it is considered a normal experience within reasonable limits.
Electronics, by their nature, generate heat during operation. This is primarily a result of the electrical current flowing through various components, such as integrated circuits, transistors, and other electronic elements. As Plugable products are designed to efficiently process and transfer data (among other functionality), some level of heat generation is inherent.
Factors Influencing Heat Generation:
- Power Consumption: The power consumption of a device directly influences the amount of heat it generates. Higher power usage, especially during data transfer or charging processes, can lead to increased heat.
- Enclosure Design: The design of the product's enclosure and its ability to dissipate heat play a crucial role. Adequate ventilation and heat sinks are often incorporated to manage and disperse generated heat effectively. This is evident in our TBT3-UDZ and TBT4-UDZ designs. The metal case in these docks are designed to function as a heatsink with thermal pads placed throughout the enclosure. This allows heat dissipation from inside to the outside, but will also make it feel as if the device is “too hot”.
- Ambient Temperature: The external environment may also play a role. Higher ambient temperatures can contribute to increased perceived heat from the product. This means that summer temperatures may increase the heat generation of not just Plugable products, but many other electronic devices.
Normal Heat Levels: While it is normal for electronic devices to generate heat, Plugable products are engineered to operate within safe temperature ranges. We conduct rigorous testing to ensure that the heat generated during normal operation falls within industry-standard safety parameters. While not all products are or need to be UL certified, we try to go by UL guidelines for thermal readings. The UL threshold is 77C/170.6F, and we aim for around 71C/160F.
Tips for Users:
- Ventilation: Ensure that Plugable products have sufficient ventilation around them. Avoid placing them in enclosed spaces where heat dissipation may be impeded.
- Usage Patterns: Intensive tasks such as high-speed data transfer or charging multiple devices simultaneously may result in increased heat generation. This is generally normal but may be more noticeable in such scenarios.
- Accessories: A number of our devices will allow for the connection of USB accessories and as such, these will require power. If too many “power-hungry” devices are connected, this will cause the device to run much hotter than expected. Be sure to keep in mind the power limits of your dock/device.
In conclusion, experiencing heat from Plugable products is a normal aspect of their operation. Users can rest assured that we prioritize the safety and efficiency of our devices. By understanding the factors influencing heat generation and following simple usage guidelines, users can make the most of their Plugable products while ensuring a reliable and efficient user experience.
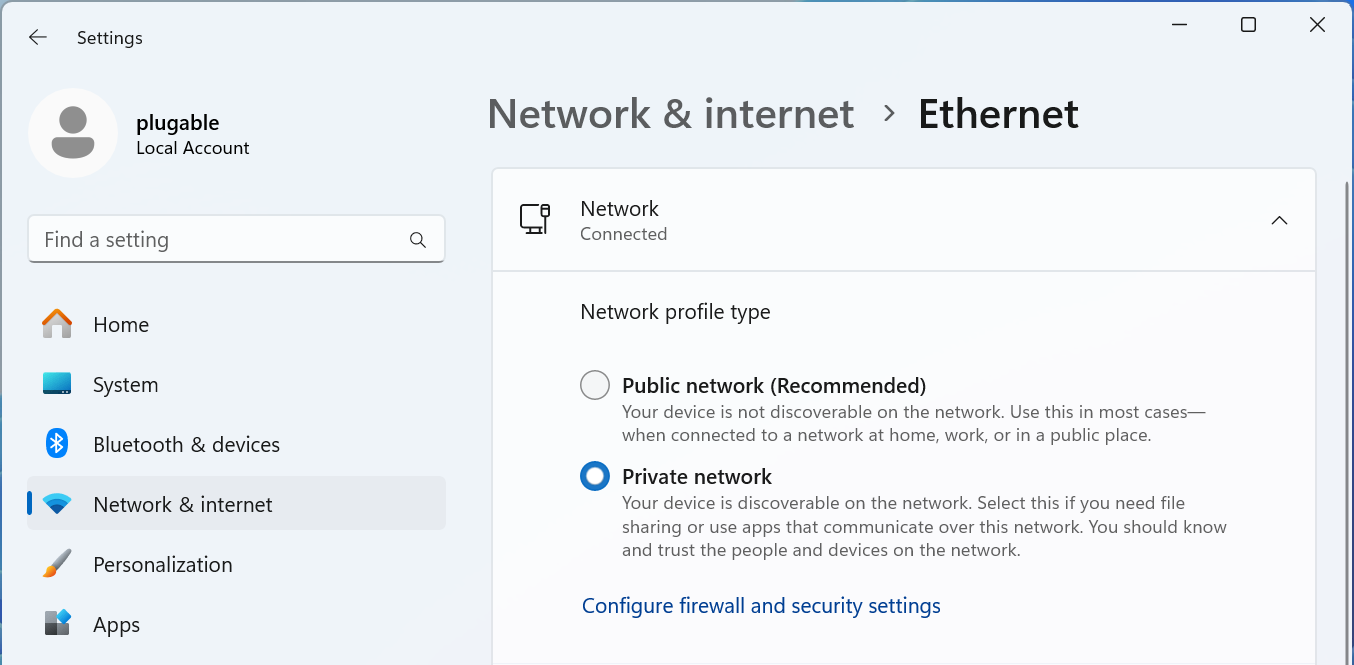
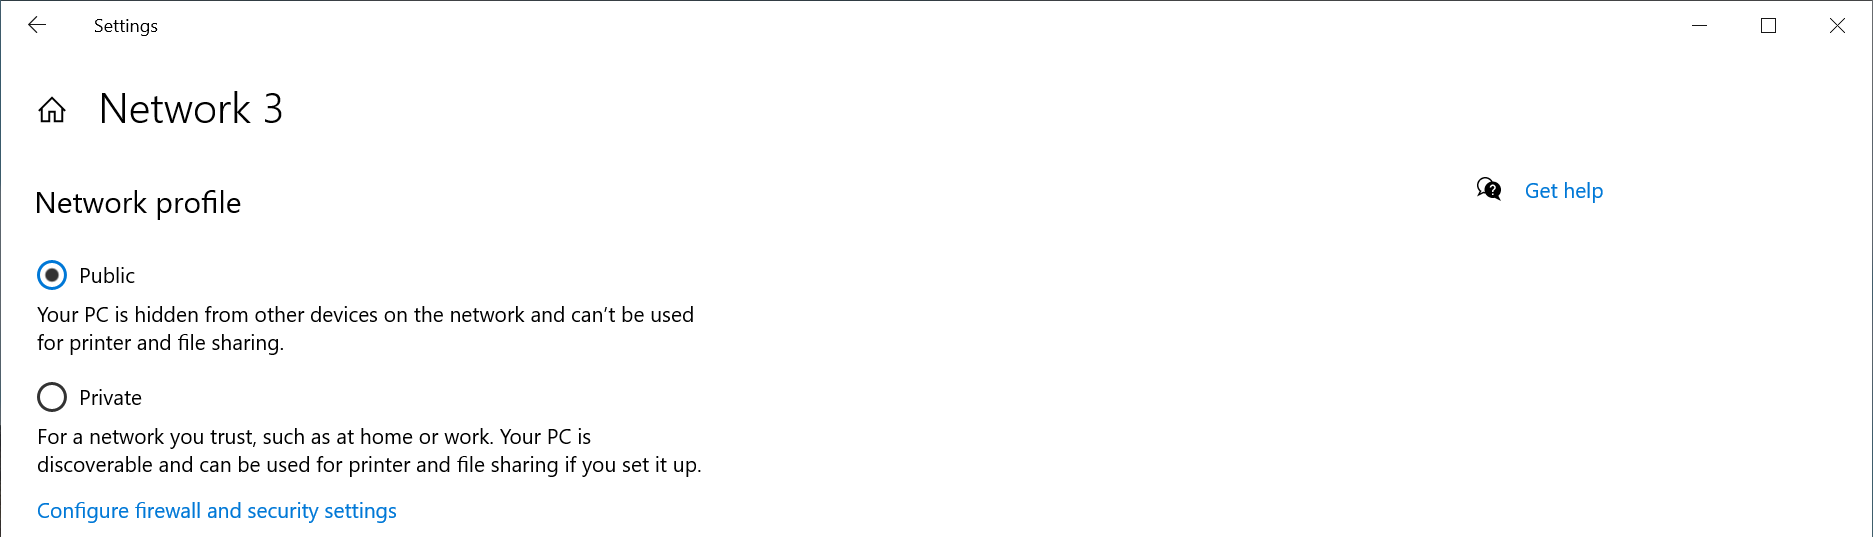
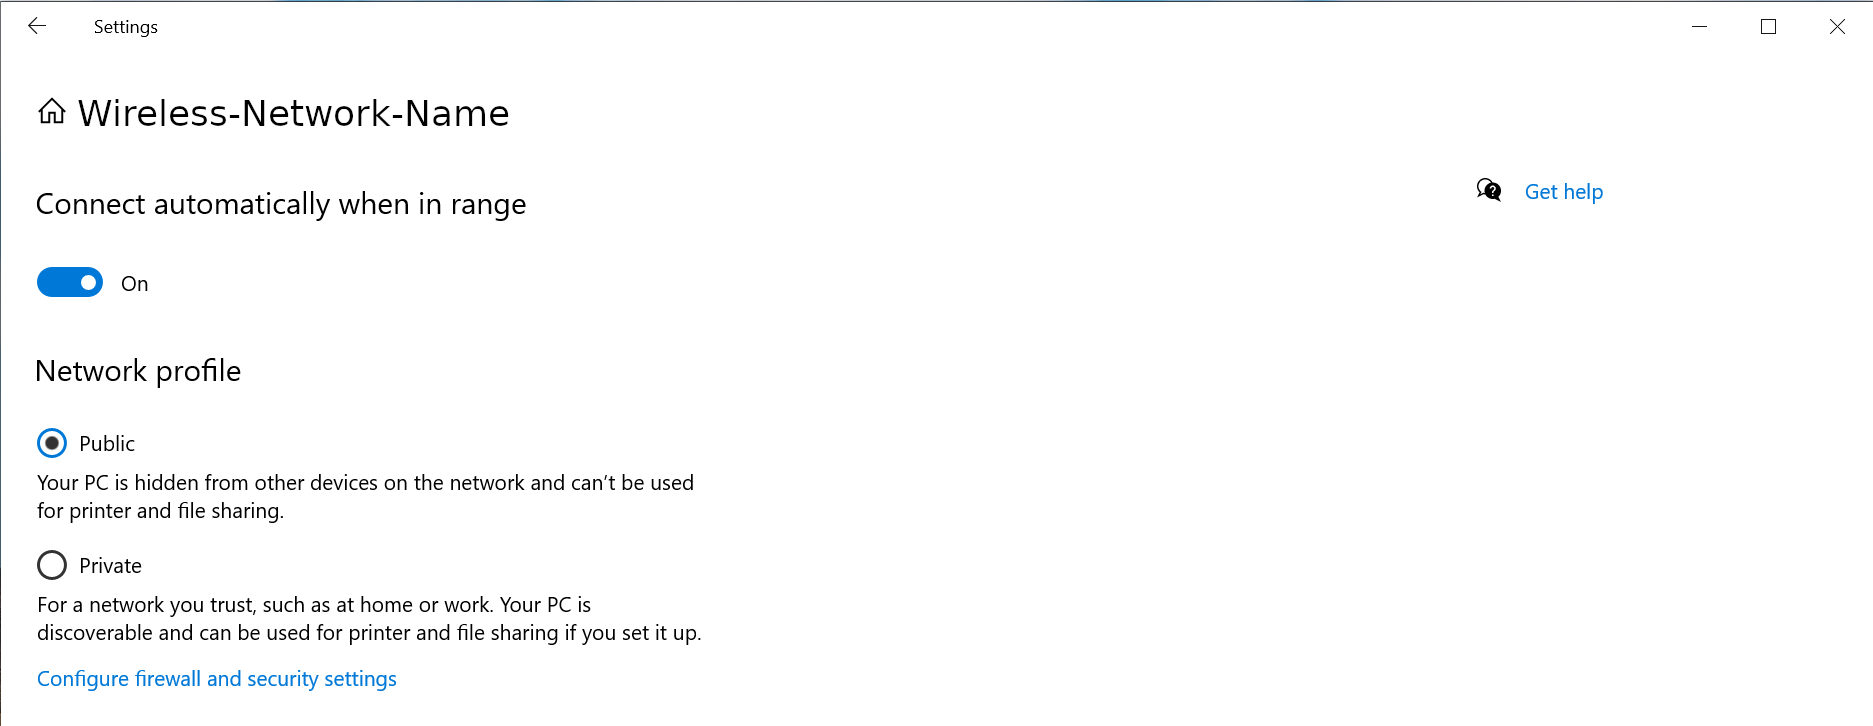
How To - Set a Network to Private or Public in Windows 10 & 11
The Windows Firewall may block some networking features when the local network is not set to Private. This article will describe the process for setting the local network, either wired Ethernet or Wi-Fi to be a Private network.
Windows 11
1 - Connect the computer to the network, either wired or wireless
2 - Open the Windows Settings: right-click on the Start Menu and select Settings from the pop-up menu
3 - On the left column select Network & internet
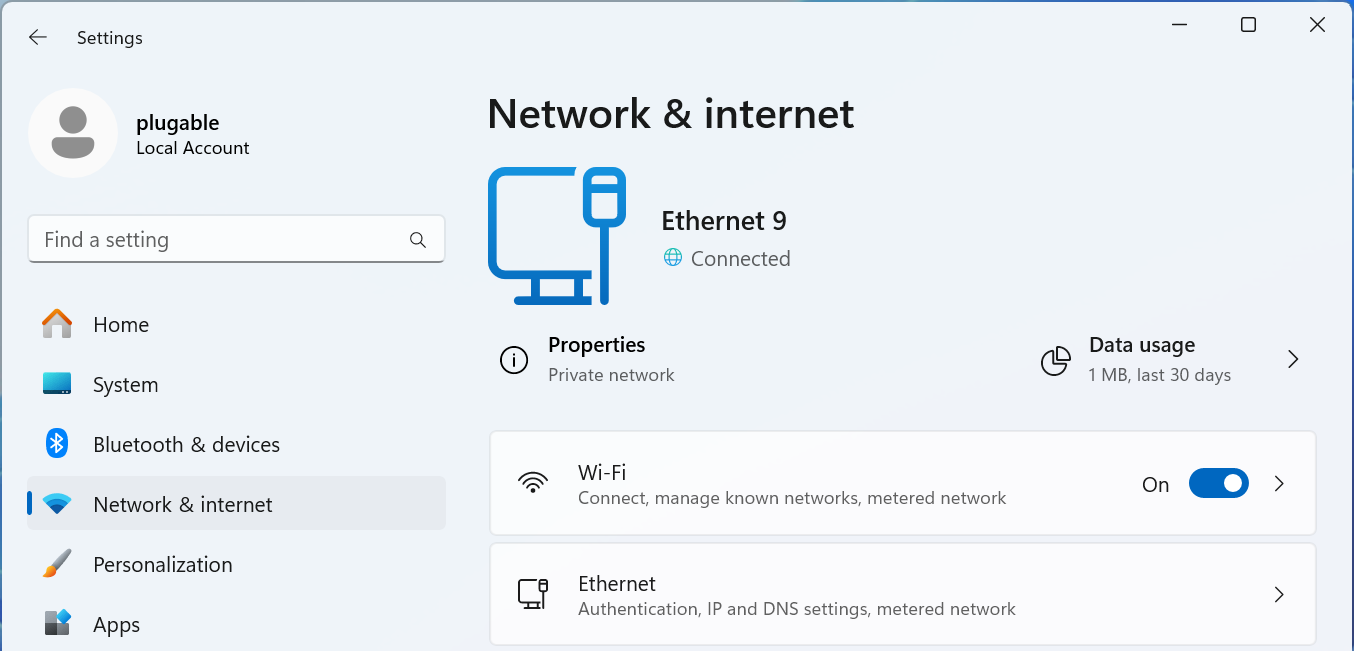
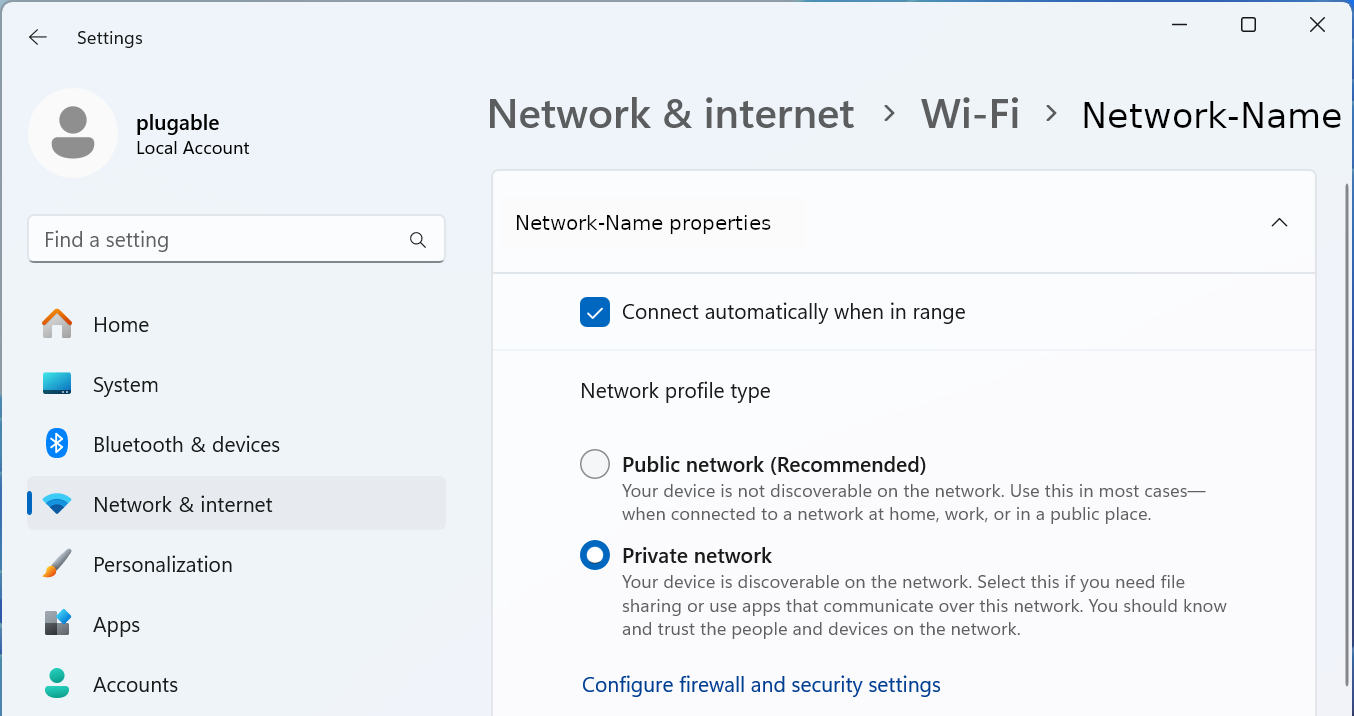
For Wired Networks
4 - Select the Ethernet option
5 - The connected network should be expanded, if not click on Network Connected to expand the section
6 - Select the Network profile type either Public network or Private network to suite your needs
For Wi-Fi Networks
4 - Select the Wi-Fi option
5 - Select your Wi-Fi network name properties
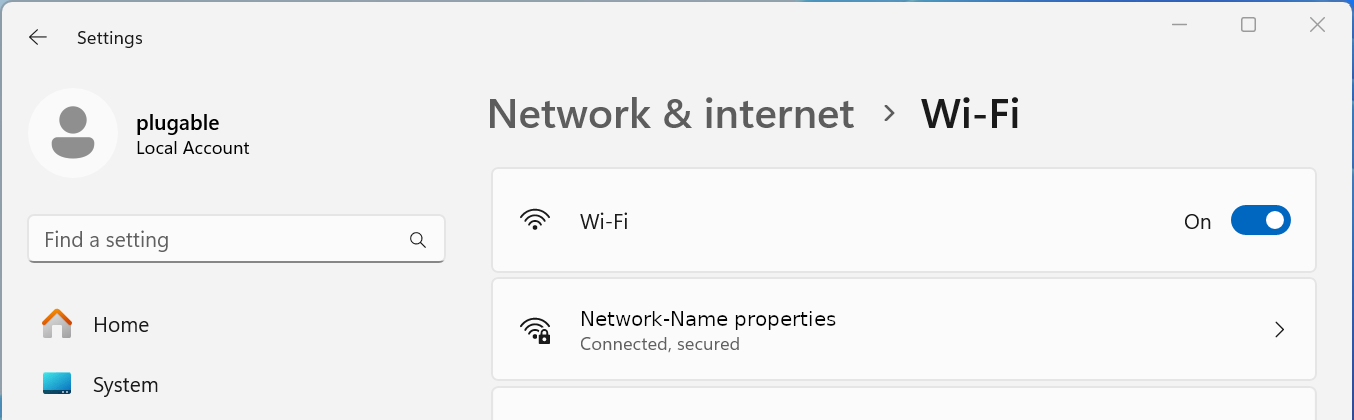
6 - Select the Network profile type either Public network or Private network to suite your needs
Windows 10
1 - Connect the computer to the network, either wired or wireless
2 - Open the Windows Settings - right-click on the Start Menu and select Settings from the pop-up menu
3 - Select Network & Internet fro the bottom section
4 - Select the Ethernet option from the left pane
5 - Select the Connected network from the right pane
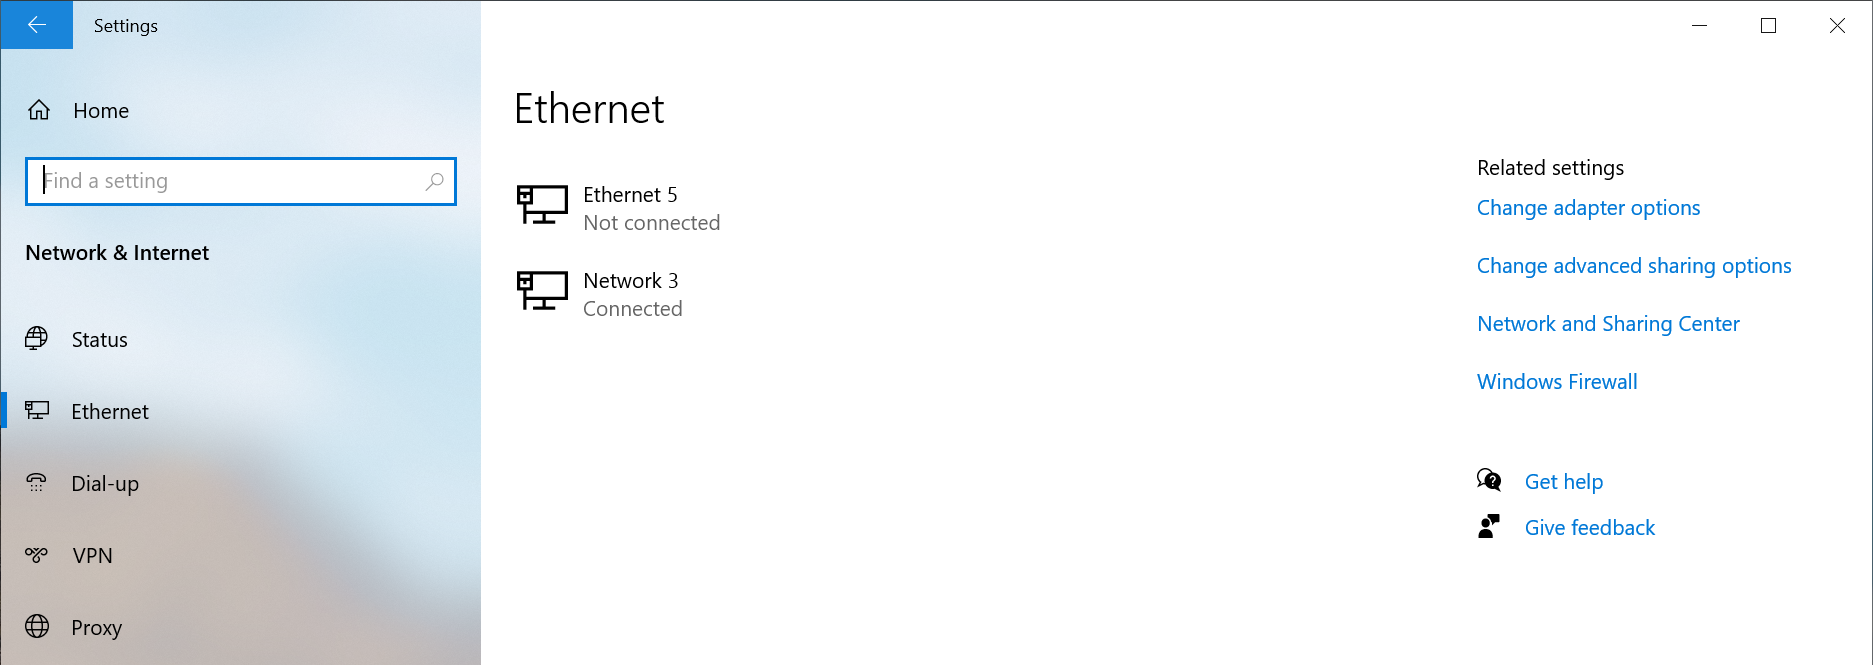
6 - Select the Network profile type either Public network or Private network to suite your needs
Windows PowerShell
If the option does not show up in the Windows Settings GUI, for example if the network is not connected to the internet, or if you prefer to use the terminal.
1 - Open a new terminal: Right-click on the Start Menu and select Terminal
2 - Run the following command to list the available networks
Get-NetConnectionProfile
PS C:\Users\plugable> Get-NetConnectionProfile
Name                     : Network
InterfaceAlias           : Ethernet Instance 0
InterfaceIndex           : 7
NetworkCategory          : Private
DomainAuthenticationKind : None
IPv4Connectivity         : Internet
IPv6Connectivity         : NoTraffic
3 - Run the following command to set the network to Private
Set-NetConnectionProfile -Name Network -NetworkCategory Private
Where Network is the network name from step #2 and Private can be either Public or Private
If you have any questions please feel free to contact us at support@plugable.com and we'll be happy to help!
Understanding USB-C Alt Mode
What is Alt Mode, and how does it work?
USB-C is a truly versatile connection that supports a range of functions, including power delivery, data transfer, and video. Alt Mode leverages this versatility by repurposing high-speed data pins to enable alternative video data protocols. Many of our docking stations support this protocol, but there is a catch! To take advantage of this feature, your host system must support Alt Mode via the host USB-C port and controller. If the host system and device support Alt Mode, the USB-C ports automatically switch from its default data protocol to the required Alt Mode protocol for video.
How do I determine if my system supports Alt Mode?
Reviewing your manufacturer's system specifications or user manual is the easiest way to determine if your system supports Alt Mode via the USB-C port, but unfortunately, it’s not always consistent or straightforward. Below, we have included examples of how some system manufacturers mention the capabilities of the USB-C ports on their laptops. This information will usually be included in the user manuals or system specification sheets.
Please note that mention of DisplayPort or DP 1.2, 1,4, and 2.1 indicates Alt Mode support.
Lenovo
HP
Dell
Additionally, some manufacturers, but not all, will also include a DP symbol next to the port to illustrate its ability to support video. If your USB-C port is unmarked, check your user manual or consult the system specifications.
What about Thunderbolt 4 and USB4?
Unlike earlier iterations of USB-C, which use Alt Mode for video support, USB4 and Thunderbolt 4 primarily use video tunnelling to transmit video over the USB-C connection. Video tunnelling dynamically allocates bandwidth for video and data to ensure optimized performance. If a device does not fully support video tunnelling, your Thunderbolt 4 or USB4-capable system can fall back to Alt Mode, ensuring compatibility with devices that support Alt Mode for video. So you don’t have to worry about a Thunderbolt or USB4 connection supporting USB-C Alt Mode!
Troubleshooting For Alt Mode
When using a USB-C video cable, adapter, docking station, or hub, it's important to ensure that your laptop supports Alt Mode. If you encounter any issues, the following steps can help you troubleshoot and determine why video may not be working through your USB-C Alt Mode cable or device.
-
First and foremost, check to ensure that your system supports Alt Mode. This is vital as Alt Mode is an optional feature that not all manufacturers include on their systems.
- If your system does not support Alt Mode, unfortunately, this is a hardware limitation, and there is no workaround for achieving Alt Mode compatibility. However, it’s possible to still drive external monitors through DisplayLink.
- Reboot your system and perform a power reset on your docking station or hub (if applicable)
-
If you are using a docking station, ensure that you are using a USB-C cable that supports Alt Mode.
- Not all cables are created equal—USB-C cables that support USB 2.0 only or “charging only” cables are not built to support video. To ensure compatibility, all of our Alt Mode-capable products will come with a USB-C cable that supports this feature.
- Do not use USB-C to USB-A adapters, as they are not designed to support video transmission.
- Be sure to check your operating system's display settings. The connected display can sometimes be disabled within the display settings, or the resolution and refresh may need to be adjusted to match what your device or display can support.
- Check if your Alt Mode-capable device has any firmware updates listed specifically for Alt Mode.
- Ensure that your system is up to date with all its latest drivers, firmware, and BIOS, especially your USB and internal graphics controller. Outdated drivers can often lead to connectivity issues, and at times, a BIOS update is needed, which the system manufacturer will generally mention on their official support page.
- Check BIOS and UEFI settings; some manufacturers add settings that control USB-C functionality. Ensure that your settings are enabled and correctly configured for Alt Mode.
- Test out another USB-C port on your system if you have more than one. This is beneficial in determining if the issues are related to the specific port.
Benefits of USB-C Alt Mode
Alt Mode over USB-C provides a direct connection to the GPU, allowing you to take advantage of the capabilities of your built-in GPU. This ensures native-level performance without the need for extra software or drivers. As a result, your USB-C Alt Mode-connected display will have reduced latency compared to other methods of adding additional displays, making it perfect for users who require sharp and detailed visuals at optimal refresh rates. Unlike traditional video connectors like HDMI or DisplayPort, which only support video, a USB-C connection with Alt Mode is more flexible and multifunctional, allowing a single connection to carry video, data, and power delivery.
Alt Mode supported devices from Plugable
If your system supports Alt Mode or if you are looking to get more out of your laptop, especially Apple M1, M2, or M3 base chipsets (which are limited to one external display), we have compiled some options below that utilize Alt Mode or a combination of Alt Mode and DisplayLink for even more monitor expandability.
Plugable USB-C Docking Station with HDMI, 60W Laptop Charging
SKU: UD-CA1A
The UD-CA1A is a versatile docking station that enables you to connect a 4K HDMI display via Alt Mode. In addition, it comes equipped with high-speed Gigabit Ethernet, USB 3.0 ports, 3.5mm jacks for headphones and microphone, and will provide 60W of power delivery to your host device—all via a single USB-C port. It is compatible with macOS, Windows, ChromeOS, Linux, iOS, and iPadOS, making it the ideal solution for any setup. You can enjoy seamless plug-and-play functionality and save space with its sleek vertical design or lay it flat for a more subtle look.
Plugable USB-C 7-in-1 Hub with Ethernet
SKU: USBC-7IN1E
The USBC-7IN1E instantly transforms a single USB-C with Alt Mode or Thunderbolt port into a versatile hub featuring 2x USB 3.0 ports, a 4K HDMI output, Gigabit Ethernet, and SD and microSD card readers. For hosts that support Power Delivery over USB-C, this hub also supports 100W PD passthrough, allowing you to plug in your included USB-C power adapter to further simplify your setup for greater portable productivity.
The products mentioned above demonstrate the versatility of a single USB-C connection. Plugable offers a wide range of solutions to meet your needs. Whether you are looking for a full-featured docking station that utilizes DisplayLink and USB-C Alt mode, such as our UD-ULTC4K, or a USB-C cable that supports video, data, and charging, like our USBC-240W-1M, you can rest assured that we have you covered. If you have any questions or need help building a solution that takes full advantage of your laptop's USB-C connection, please reach out to us at support@plugable.com.
How Can I Use Two External Displays With the Lid Closed on MacBook Air and MacBook Pro M3?
Base MacBook Air and MacBook Pro systems with M3 chips can natively host two external displays in clamshell mode when running macOS Sonoma 14.3 or 14.6 respectively. Connect your external displays, a power source, and an external keyboard and mouse, then close the laptop lid to switch to this mode. Plugable Thunderbolt docks can also be used to expand connectivity with dual displays, USB ports, audio, and ethernet without requiring additional software.
Requirements
Before getting started, ensure you have the following:
- MacBook Air or MacBook Pro with an Apple M3 chip.
- macOS Sonoma 14.3 or later for an M3 MacBook Air or macOS Sonoma 14.6 or later for an M3 MacBook Pro.
- Two external displays with compatible video inputs (e.g., HDMI, DisplayPort, USB-C).
- A dock or graphics adapter can be used as well.
- External keyboard and mouse (wired or wireless).
- Power adapter or power source for your MacBook
- A docking station that provides adequate charge can be used in place of the native power adapter, be sure to check the wattage your dock provides.
How to Set Up Dual External Displays With the Lid Closed
- Set Up Your External Keyboard and Mouse
- If you’re using a wired keyboard and mouse, connect them directly to your MacBook or Plugable dock.
- For wireless peripherals, ensure they are paired with your MacBook and functioning properly.
- Ensure the MacBook is charging from an external power source to prevent it from entering sleep mode.
- A docking station that provides adequate charge can be used in place of the native power adapter, be sure to check the wattage your dock provides.
- A docking station that provides adequate charge can be used in place of the native power adapter, be sure to check the wattage your dock provides.
- Connect your displays through the Plugable dock using the appropriate cable (e.g., HDMI, DisplayPort, USB-C, etc.)
- Ensure both displays are powered on and set to the correct input source.
- Enable "Clamshell Mode" (Lid Closed Mode)
- With your external displays connected and set up, close the lid of your MacBook.
- Your MacBook will automatically switch to "Clamshell Mode," where the internal display turns off, and the external displays become your primary screens.
- Configure Display Settings
- Open System Settings on your MacBook.
- Go to Displays.
- You should see both external displays listed. Arrange them according to your preference by dragging the display icons.
- Adjust the resolution, refresh rate, and other settings as needed.
5. Check the Display Arrangement
- With the lid closed, check that the external displays are functioning as expected.
- If necessary, re-open the Displays settings to adjust the arrangement, resolution, or other preferences.
Troubleshooting Tips
- No Display on External Monitors: If the external displays are not showing anything, open the lid of your MacBook and check the connections.
- MacBook Sleeps When Lid Is Closed: Make sure your MacBook is connected to a power adapter. Clamshell Mode requires the MacBook to be plugged into an external power source.
- Performance Issues: If you experience lag or performance drops, try lowering the resolution or refresh rate of the external displays.
Applicable To
- Plugable Thunderbolt Docking Stations
How To: Set the Display Refresh Rate in Windows 11
Many modern displays can support above the default 60Hz refresh rate, however this may need to be manually set within Windows 11. Please note, not all computers, graphics adapters, and docking stations can support all resolutions and refresh rates.
Setting the Display Refresh Rate in Windows 11
1. Right-click on the desktop and select Display Settings from the drop-down menu
2. Scroll down to the Related settings subsection and select Advanced display

3. At the top of the Advanced display window, select the external display from the drop-down menu

4. From the Choose a refresh rate drop-down menu select the desired refresh rate
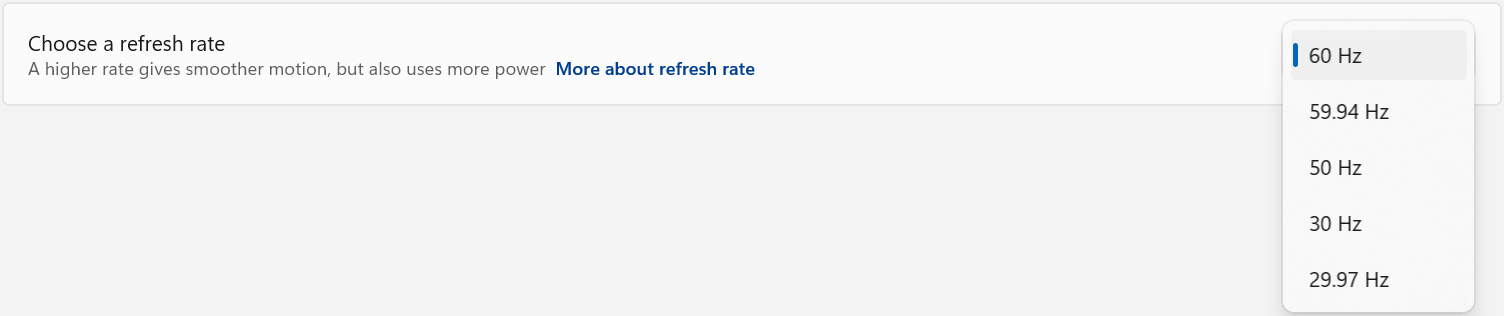
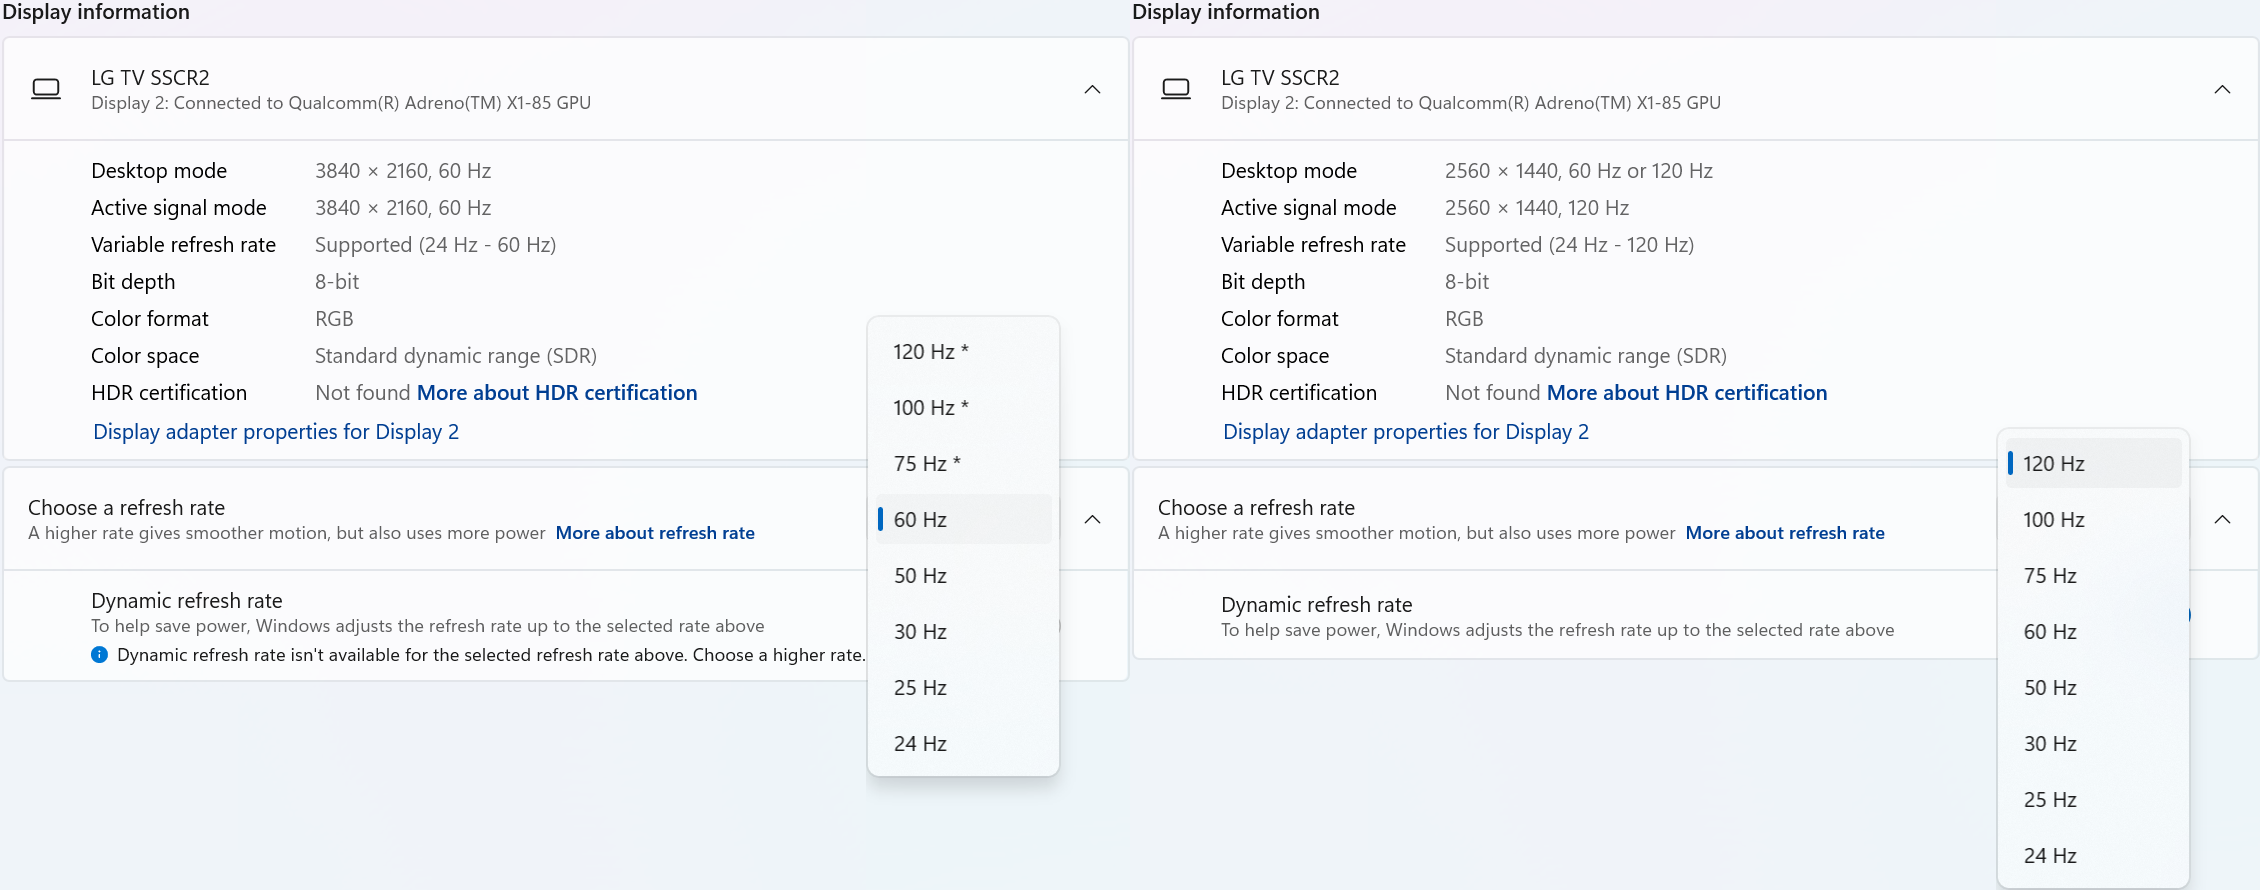
Refresh Rate Limitations
With Windows 24H2 and newer, dynamic refresh rates are supported, this allows the system to adjust the display refresh rate to save power, up to the selected refresh rate. As a consequence of this new mode, when selecting the display refresh rate you may see an asterisk. This indicates that selecting the specific refresh rate may reduce the display resolution or image quality in order to prioritize the refresh rate. This exposes the refresh rate option from the display even if the display cable or computer is incapable of supporting that refresh rate at the native resolution and is the intended behavior per Microsoft. [1]
In the screenshot below the left side shows the 4K 120Hz capable display limited to 60Hz refresh rate without asterisks, and on the right the same display after setting the refresh rate to “120 Hz*”, the “Desktop mode” resolution has been reduced to 2560 x 1440 (1440p) instead of 3840 x 2160 (4K UHD). Unlike when using the display scaling option this also causes a reduction in image quality. On the right side asterisks are no longer shown in the refresh rate list. Setting the refresh rate back to 60Hz does not change the resolution, you will have to go back one page and set the resolution manually.
References
[1] Windows Insider description of new behavior (https://blogs.windows.com/windows-insider/2023/08/31/announcing-windows-11-insider-preview-build-25941-canary-channel/)
Is this safe to use if my computer doesn't support USB-C Power Delivery?
USB-C Power Delivery (PD) is negotiated between the power-sourcing equipment (e.g., a dock or multiport hub) and the connected host device. During this negotiation, the device offering power communicates its capabilities, and the host determines whether it can accept the power. If the host does not support Power Delivery, no power will be sent to the computer over the USB-C connection. This will allow you to take advantage of other capabilities such as data transfer or video output without risking damage to the computer.
Is there a way to add more displays to my dock?
Extra displays can be added to your docking station by using USB graphics adapters. This allows you to expand your workspace beyond the number of displays natively supported by your dock or computer.
Here’s how it works:
- Ensure your dock has open USB-A or USB-C ports to connect the USB graphics adapter(s).
- Select a Plugable USB graphics adapter compatible with your operating system and monitor specifications. Feel free to contact Plugable support (support@plugable.com) for assistance in selecting the appropriate adapter for your setup.
- Download and install the driver from the "Downloads" section of the product page for the USB graphics adapter on Plugable's website.
- Plug the adapter into an available USB port on your docking station.
- Use an appropriate video cable (e.g., HDMI, DisplayPort) to connect the adapter to your monitor.
Important Considerations:
- Windows supports up to 8 DisplayLink/SiliconMotion-based monitors.
- macOS has a hard limit of 4 DisplayLink/SiliconMotion-based monitors.
- USB graphics adapters use bandwidth and system resources. Connecting multiple adapters can reduce performance.
Why is the Alt Mode video output on my dock not working?
Alt Mode video works by creating a direct pipeline from the host device's graphics processor through USB-C to the dock to output video to connected displays. This relies on the host device's graphics processor, the host device's USB-C port, and the cable used to connect the dock supporting this specific functionality.
It's recommended to check these possible causes if the Alt Mode video output on your dock is not working:
- USB-C Port Limitations: Not all USB-C ports support video output (Alt Mode). Check your host device's specifications to confirm it supports Alt Mode video output.
- Incompatible USB-C Cable: Some USB-C cables support power and data, but not Alt Mode video. Use the USB-C cable that was originally included in the box with your dock to ensure it supports Alt Mode video output.
- Incorrect Host Connection: Ensure you’re connecting to the correct USB-C port on the dock, typically labeled a laptop icon. Other USB-C ports on the dock may not function for connecting the dock to a host device, and using them could result in no function.
- Outdated Drivers: Ensure your operating system and graphics drivers are up to date. USB-C Alt Mode primarily relies on the laptops graphics processor to produce video, so outdated drivers can often cause issues.
Why the Alt Mode Video Output Requires Specific Hardware
For many Plugable docking stations that utilize Alt Mode, the video output port is etched with "Alt Mode" to indicate this specific requirement. This connection type is not a standard USB data stream and requires the host laptop's USB-C port to be wired internally for DisplayPort Alternate Mode.
Workaround or Alternative Options
If your laptop does not support Alt Mode, consider using a DisplayLink docking station or USB graphics adapters to add additional monitors. These solutions use a driver-based approach that does not rely on the host's physical Alt Mode capabilities.
Applicable To
UD-768PDZ, UDS-7IN1, UD-CUBE, UD-CAM, UD-CA1A, UD-MSTHDC, UD-MSTH2, UD-6950PDZ, UD-ULTC4K, UD-ULTCDL, UD-3900PDZ, UD-3900PDH, UD-3900C4, UD-4VPD, TBT3-UDZ, TBT3-UDC3, UD-7400PD, TBT4-UDX1, TBT4-UD5, TBT-UDM, TBT-UDT3, TBT-6950PD, TBT4-UDZ
Can I replace the original power adapter included in the box with my Plugable product with a different, 3rd-party power adapter?
Plugable recommends and supports using only the external power adapter originally included in the box with a Plugable product to power the device.
Plugable does NOT recommend or support using any type of alternate or 3rd-party power adapters in conjunction with our products that originally included a power adapter in the box.
This is because 3rd-party power adapters may not work as expected, and in some cases can potentially cause damage to the Plugable product.
Should you require a replacement for an original Plugable provided power adapter, Plugable offers a multitude of power adapters for purchase separately → LINK
Please also note, this provision does NOT apply to Plugable products that do NOT originally include a power adapter in the box with the product.
For example, the PS-10CC → LINK does not include a power adapter in the box with the product. The intention with the PS-10CC (and other similar products like the USBC-9IN1E → LINK) is to use a USB Type-C power adapter that supports USB Power Delivery that you already have in conjunction with the product.
This works because USB Power Delivery is an industry standard. Products that support USB Power Delivery are intended to work with a variety of different USB Type-C power adapters that support the USB Power Delivery standard.
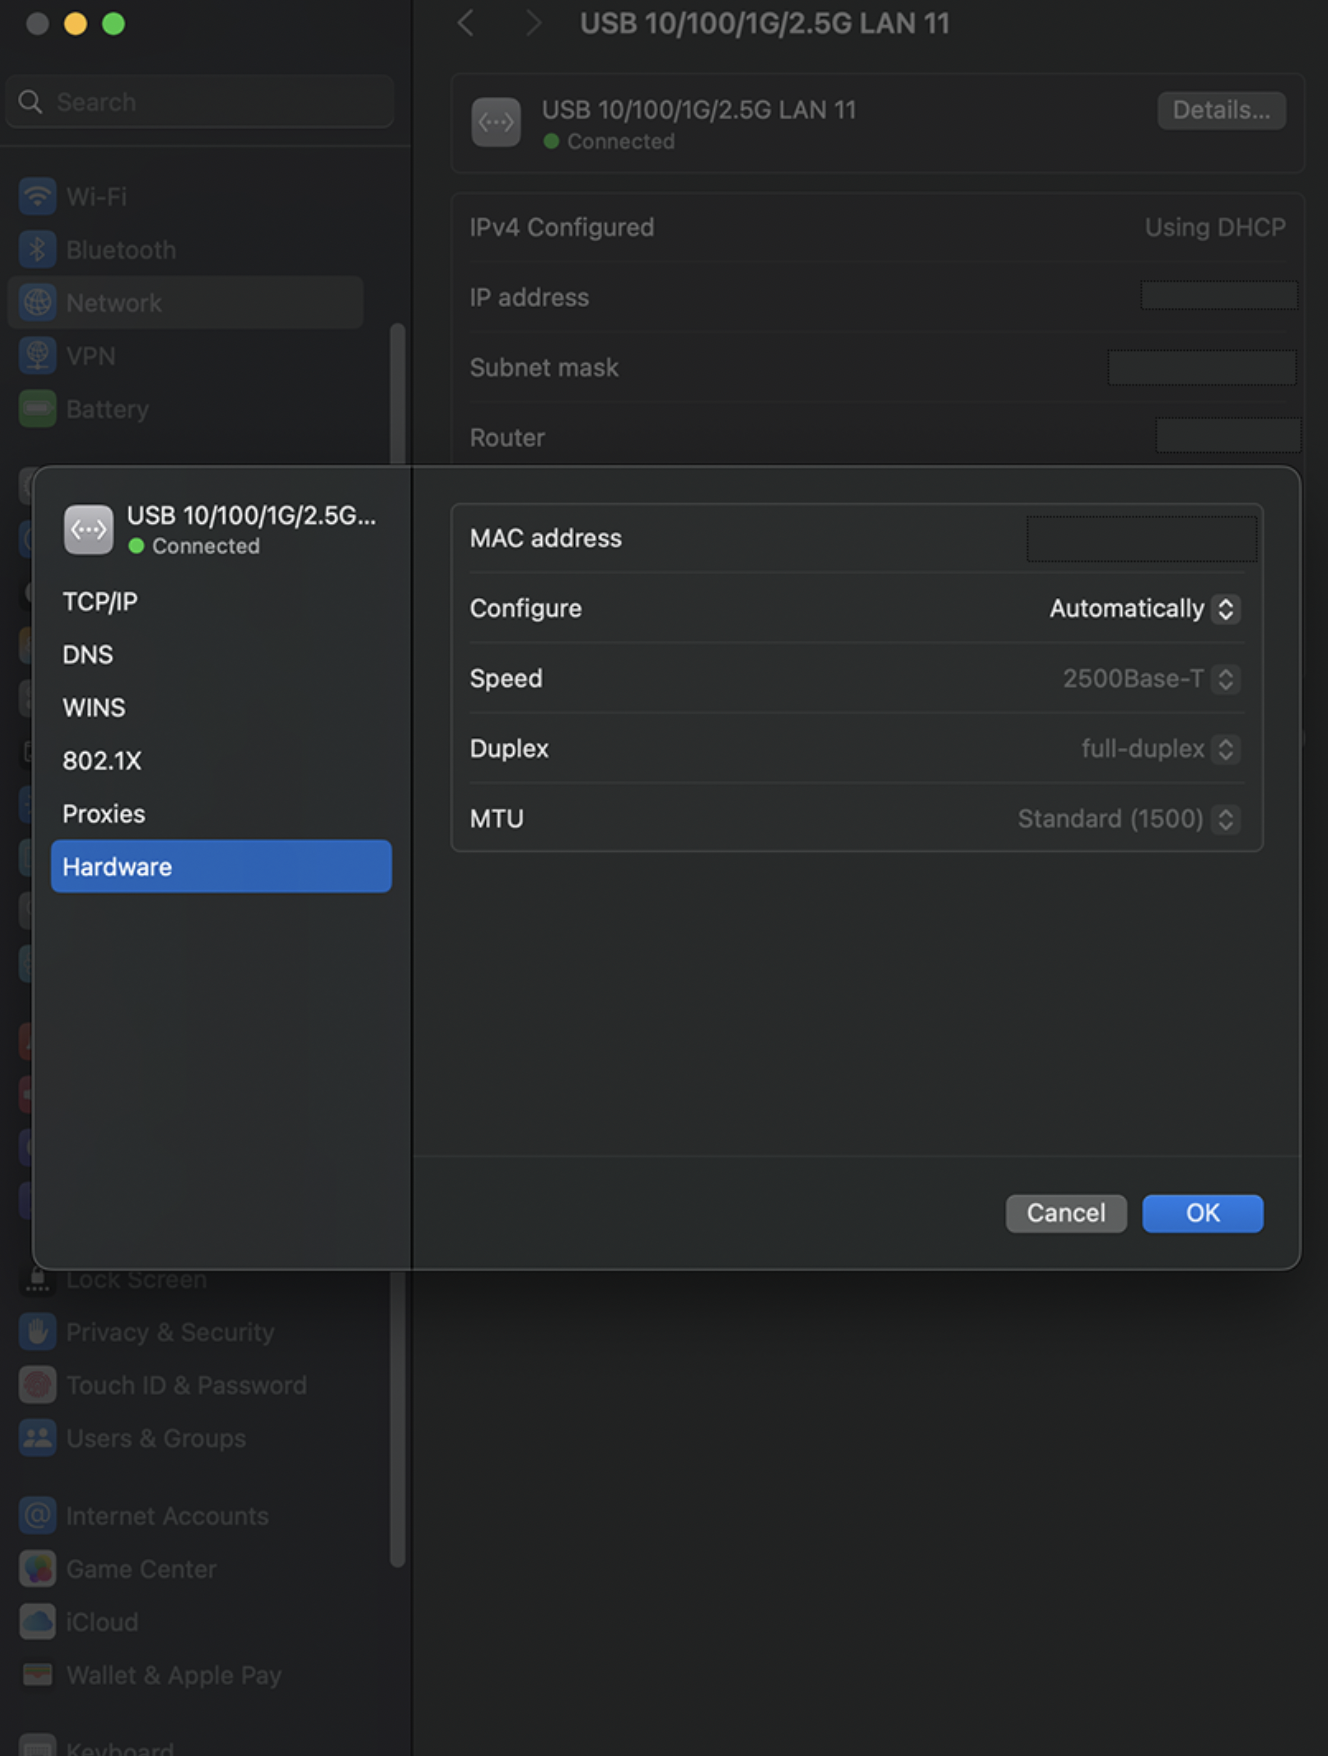
How Can I Check the Ethernet Adapter Link Rate on my Mac?
One helpful way to identify your ethernet link rate speed is through the System Settings app in macOS. This can help us identify if your Plugable ethernet adapter is negotiating either 1Gbps or 2.5Gbps network speeds. Some routers have a mix of 1Gbps or 2.5Gbps ports, and in the macOS System Settings this will be shown in the Speed field.
In this example, we will be analyzing our USBC-E2500, which is a 2.5Gbps ethernet adapter. This method applies to all of our ethernet adapters, such as:
Navigate to the Network section, select the entry named “USB 10/100/1G/2.5G LAN” with the Green - Connected icon. Expand the Details button, and go to Hardware.
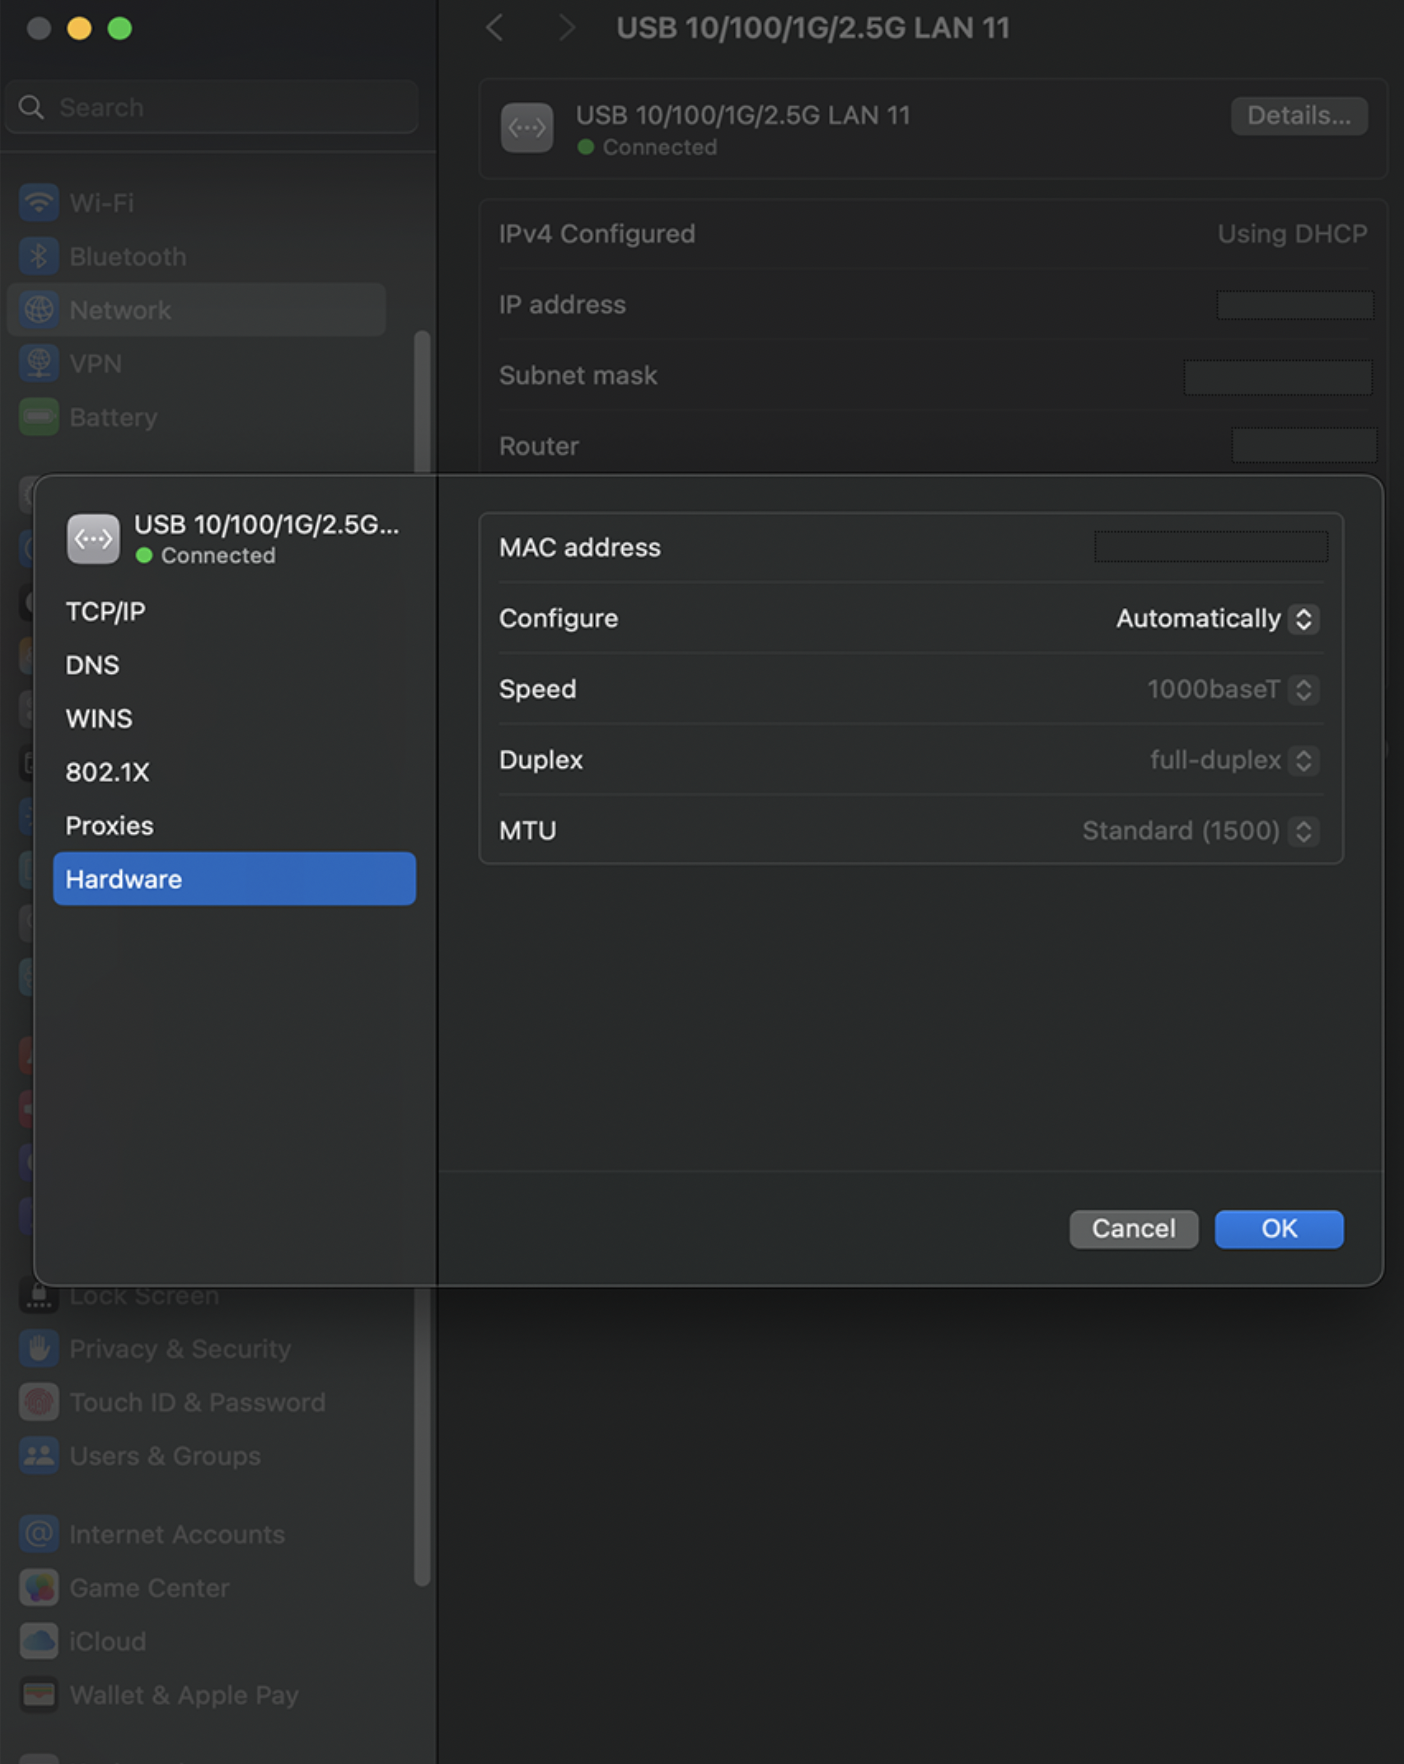
In the field that says Speed, you should see 2500Base-T if the ethernet adapter is connected to a 2.5G ethernet LAN port on your router. If you see 1000Base-T, this means the adapter is connected to a 1G ethernet LAN port. If you are expecting faster network speeds, please see your router's documentation on its multi-gig LAN port.
Choosing the Right USB Type-C Cable for Your Docking Station
At Plugable, we rigorously test our docking stations with the included accessories to ensure they work seamlessly together. One key reason for using the included cable is that not all USB Type-C cables on the market support the same features. Therefore we strongly recommend using the USB Type-C or Thunderbolt cable that comes with your Plugable dock for best results.
Understanding the differences between charging and data cables is essential to fully enable your new docking station, or if you are ever in need of a replacement or longer cable for your docking station. Let’s break it down.
USB Type-C Cables: Charging vs. Data
USB Type-C cables may look identical, but their capabilities can vary significantly. Unfortunately, the USB specifications do not require cables to be clearly labeled, which can make identifying the right cable a challenge.
There are two main categories:
USB Type-C Charging Cables
Charging cables are among the most common Type-C cables available. They typically support:
✔ USB 2.0 data (up to 480Mbps)
✔ USB Power Delivery for charging devices
These cables are often included with smartphones, tablets, and some laptops. They are also frequently sold specifically for charging purposes. However, they lack the necessary conductors for high-speed data transfer and video output.
Fully Featured USB Type-C Cables
Fully featured USB Type-C cables offer full functionality and are required for docking stations. The cables we include with our USB Type-C docks support:
✔ USB4 or USB 3.0/3.1 data (5Gbps or faster)
✔ USB 2.0 data
✔ USB Power Delivery
✔ USB Type-C DisplayPort Alternate Mode for video output
These cables ensure full compatibility with our docking stations, allowing for both high-speed data transfer and external display support.
Thunderbolt Data Cables
Thunderbolt cables are a specialized subset of USB Type-C data cables. They are Intel-certified and typically marked with the Thunderbolt logo (⚡).
✔ Interchangeable with USB Type-C data cables when using USB 3.x devices
✔ Required for Thunderbolt devices to ensure proper functionality
If you're using a Thunderbolt docking station or device, a certified Thunderbolt cable is essential for maximum performance.
What Makes These Cables Different?
The key difference lies in the internal wiring:
🚫 Charging cables lack the conductors required for high-speed data (USB 5Gbps or higher) and video output. Even if a device supports USB Type-C DisplayPort Alternate Mode, a charging cable won’t transmit video.
✅ Data cables include additional wiring to support higher data rates, video output, and greater flexibility in bandwidth allocation.
How Can I Tell the Difference?
🔎 Charging cables are generally thinner and may have smaller connector grips, as they often lack electronic markers. They are typically advertised as:
- "Charging cable"
- "480Mbps data rate"
- Advertised primarily for phones and tablets, not laptops
🔎 Data cables are usually thicker and slightly more expensive due to their additional complexity. Look for statements such as:
- "USB 3.0/3.1," "USB4," or "Thunderbolt"
- "5Gbps" or faster data rates
- Mention of video support for use with external displays
⚠ Cable Length Matters!
Fully featured data cables are typically limited to 1 meter (3.3 feet) to comply with USB Type-C specifications. Charging cables, on the other hand, can be much longer.
Need a Longer or Replacement Cable?
If you need a replacement or a longer cable for your USB Type-C or Thunderbolt docking station, consider these options:
For USB 3.1/3.2 Type-C Docking Stations:
🔗 USB Type-C 10Gbps 1m (3.3ft) Cable
For Thunderbolt & USB4, and USB 3 Type-C Docking Stations:
🔗 Thunderbolt 4 40Gbps 1m (3.3ft) Cable
🔗 Thunderbolt 4 40Gbps 0.8m (3ft) 90° Right-Angle Cable
🔗 Thunderbolt 4 40Gbps 2m (6.6ft) Cable
Note: The USB Type-C 10Gbps cable is only recommended for USB 3.x docking stations, not Thunderbolt docks.
Do Plugable Docking Stations Support Automatic Ethernet Hardware Address (also known as Media Access Control or MAC address) Pass Through from the Host Computer?
Plugable does not officially support automatic or automated MAC address pass-through functionality from the host computer. As of this writing, the only exception is the UD-7400PD docking station which natively supports this capability and is discussed in more detail here → LINK
How to Approximate MAC Address Pass-Through in Windows
When our docking station products are used within a Windows environment, MAC address pass-through behavior can be approximated, though Plugable does not officially support these solutions. The specific method depends on the Ethernet network chipset used within the product, which is listed in the 'Specifications' tab of the docking station's product page.
For DisplayLink-based Ethernet network adapters, you can manually enter a hexadecimal value in the 'MAC Address' field within the adapter's 'Advanced' settings tab within Windows Device Manager will override the MAC address stored in the Ethernet chipset (in so far as it is presented to the Windows operating system).
For products based on Realtek, Intel, and ASIX Ethernet network chipsets, a virtual MAC address can be manually configured in a similar manner within Device Manager, but the option name will vary. For Intel Ethernet chipsets, the option is called 'Locally Administered Address', and for Realtek Ethernet chipsets, the option is called 'Network Address'.
Manually entering this value overrides the MAC address presented to the Windows operating system but does not change the physical MAC address stored within the dock itself.
Alternative Options for DisplayLink Docks
Synaptics, the creator of DisplayLink technology, offers additional options for configuring a DisplayLink-based MAC address. Some of these options provide a certain level of automation, while others require manual inputs. The available options are outlined within the DisplayLink Corporate Deployment knowledge base → LINK and the article specific to the topic is here → LINK
Because Synaptics develops the DisplayLink technology and software, it is Synaptics that supports these Corporate Deployment options directly, and you should contact DisplayLink directly for further assistance regarding these methods.
Applicable To
- Plugable DisplayLink-based docking stations
- Plugable docking stations with Realtek, Intel, or ASIX Ethernet chipsets
Understanding Power Delivery vs. Pass-Through Power Delivery
When choosing a docking station or USB hub, it's important to understand the difference between Power Delivery (PD) and Pass-Through Power Delivery. While both terms refer to charging capabilities, they function differently and impact how power is distributed to connected devices.
What is Power Delivery (PD)?
USB Power Delivery (PD) is a fast-charging standard that allows devices to negotiate power levels dynamically. Key aspects include:
- Enables higher power transfer (up to 100W or more, depending on the device and cable).
- Ensures efficient charging by dynamically adjusting voltage and current.
- Commonly used in USB-C chargers, docking stations, and hubs that provide power directly to laptops, tablets, and smartphones.
Example: A USB-C docking station with PD output can charge a connected laptop while simultaneously powering other peripherals. Additionally, these tend to come with their own AC adapter.
What is Pass-Through Power Delivery?
Pass-Through Power Delivery refers to a hub or docking station that does not generate power itself but instead allows power to pass through from an external power adapter. Key aspects include:
- Requires a dedicated power adapter (e.g., a USB-C PD laptop charger) plugged into the docking station or hub.
- Typically, a portion of the incoming power is allocated to the dock’s functionality (such as data transfer and peripheral connections), and the remaining power is sent to the connected laptop or device.
- May reduce the total power available to the laptop compared to direct charging.
Example: A USB-C hub with pass-through PD allows a laptop's original USB-C PD charger to be connected to the hub, which then distributes power to the laptop while also supporting external peripherals.
Choosing the Right Option
- If you need a docking station that can directly charge your laptop, look for one with dedicated Power Delivery (PD) support.
- If your laptop already has a high-wattage charger and you want to maintain power while expanding connectivity, a pass-through PD hub may be a better choice.
- Be mindful of power limitations with pass-through charging, as some hubs may reserve power for their own operation, reducing the power available for the laptop.
Some examples of hubs with PD pass-through would be our USBC-9IN1E with 140w pass-through charging or our smaller USBC-4IN1 with 100w pass-through.
On the flip side, we have our docking stations that power your devices by themselves. Examples such as our UD-7400PD which is capable of 140w of charge and 5 displays.
Understanding these differences will help ensure you select the right docking station or USB-C hub for your setup. If you have any questions or would like a recommendation, feel free to reach out to our support at support@plugable.com
What information is helpful to provide when contacting Plugable support for assistance?
Here are a few things that you can do when contacting Plugable for assistance that can help expedite the process:
1. Provide a clear, detailed description of the issue, and if possible the steps necessary to recreate it
At first glance this may appear somewhat obvious, however a clear detailed description will help prevent our support engineers from making any incorrect assumptions.
If the unexpected behavior is repeatable, then a list of the steps necessary to recreate the issue will help provide us with important context.
2. Provide the model number of your Plugable product
All Plugable brand products have their model number or ‘stock keeping unit’ (aka SKU) printed somewhere on the product. For example, ‘UD-3900’ or ‘TBT4-UDZ’
When contacting us for assistance, providing the model number will help us route your request to the appropriate support engineer.
3. Provide the purchase information for your Plugable product, such as the Amazon Order ID number
Providing us with the order information for your purchase allows us to do two things:
A. Be sure that we understand precisely which product you are using (we make a lot of different products)
B. Help confirm the unit’s warranty status.
4. Provide us with a diagnostic file from your computer, gathered when the issue is actively occurring or just after the event
Rather than have our customers manually compile and provide information about their computer, we created the PlugDebug utility which automates the process of collecting various pieces of diagnostic information from both Windows and macOS systems.
A PlugDebug file gathered while the issue is occurring (or just after the issue has occurred) will provide important information that will allow us to help troubleshoot the issue.
5. If possible, photographs or a video of the issue
While not always necessary, in some cases having photographs of the problem and/or a video that documents the issue will allow us to ‘see’ what is happening, which in turn may help provide clues to the cause.
Now, to be clear it is not always necessary (nor is it required) to provide all of the information we described above in order for us to be of help. However, the more information we have available the faster are able to help.
As always, if you require assistance with a Plugable product please reach out to us directly via support@plugable.com and we will be happy to assist.
What kind of power adapters come with Plugable products, and how can they be used in different parts of the world?
Introduction
At Plugable, we make a lot of different products that can help make your computing efforts more efficient and productive.
Many of those products (such as our extensive line of docking stations → LINK) require an external power adapter in order to function.
In the course of helping our customers, we often receive questions in regard to what type of power adapter is included with the product and how those power adapters can be used in different parts of the world.
This knowledge base article will help answer those questions.
Power Adapter Types
To put it simply, in general there are two types of power adapters included with a Plugable product.
WALL PLUG
The first type is typically referred to as a ‘wall plug’ or in some cases as a ‘wall wart’ due to its size being larger than that of a standard electrical plug.
This is a small AC to DC power adapter that is completely self contained and plugs directly into an electrical power outlet.
For example, here are photos of the ‘wall plug’ included in the box with the Plugable UD-6950Z docking station.
UD-6950Z U.S. Style Wall Plug Power Adapter:
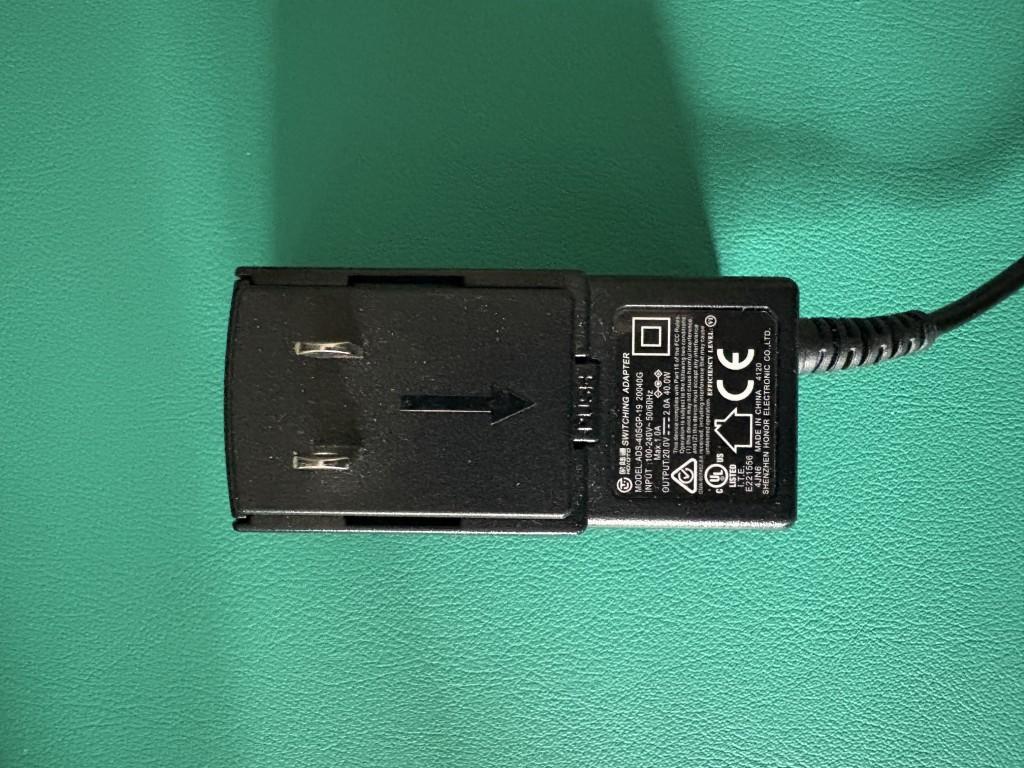
UD-6950Z U.S Style Wall Plug Power Adapter with Prong removed:
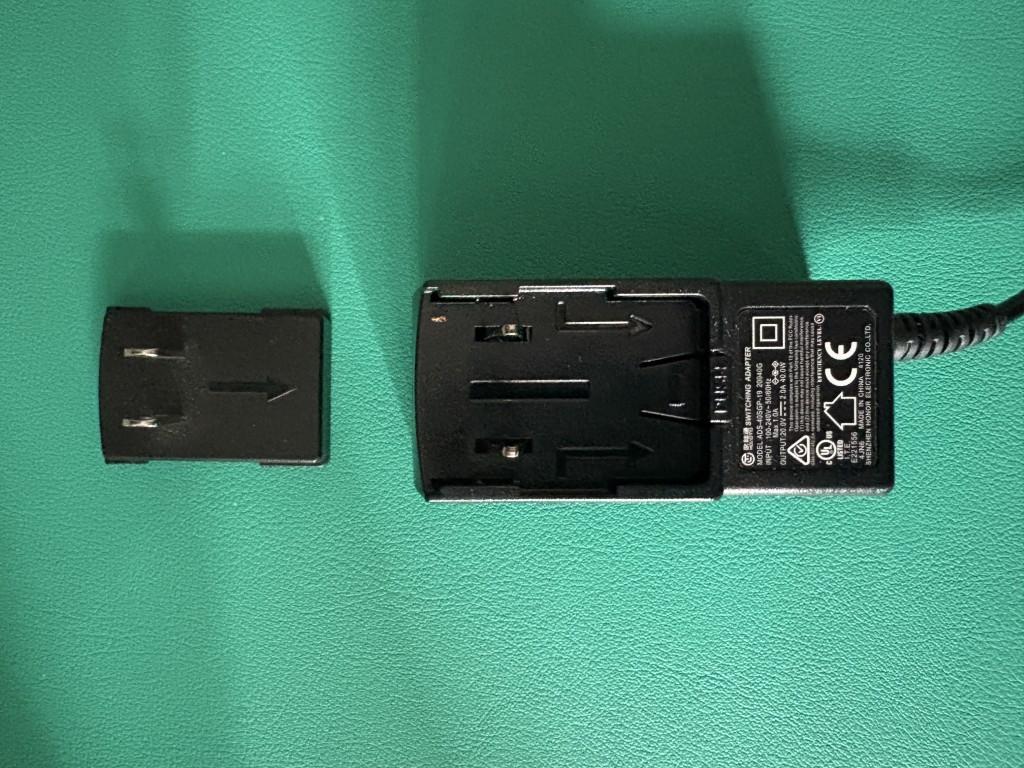
Most ‘wall plug’ style power adapters included with Plugable products support all of the electrical voltages and electrical frequencies used throughout the world.
Note, you can double-check the specifications by looking at the label printed on the wall plug power adapter, or by reviewing the ‘Power’ specifications located on each Plugable product page.
However, the electrical ‘prong’ (the small plastic piece that provides the blades that insert into the electrical power outlet) included with the wall plug will only be for the country in which the product was sold.
To put that another way and using the aforementioned UD-6950Z as an example, if the UD-6950Z is purchased from Amazon.com within the United States, the electrical prong included with the wall plug power adapter will be for a United States style power outlet only.
If the wall plug power adapter needs to be used in a different part of the world, a small inexpensive ‘travel style’ adapter that converts the United States style plug to the local plug type is required.
POWER ADAPTER BRICK
The second type is typically referred to simply as a ‘power adapter’ or by some as a ‘power adapter brick’.
The power adapter is a combination of two separate components. One component is the power adapter itself, which is typically rectangular in shape and why some people refer to it as a ‘brick’.
The second component is the power cable that connects to the power brick. This cable has an electrical wall plug on one end and an industry standard connector on the opposite end.
Looking at two different example power adapters will allow us to expand further.
Let’s look at the power adapter and power cable for our TBT4-UDZ Thunderbolt 4 docking station:
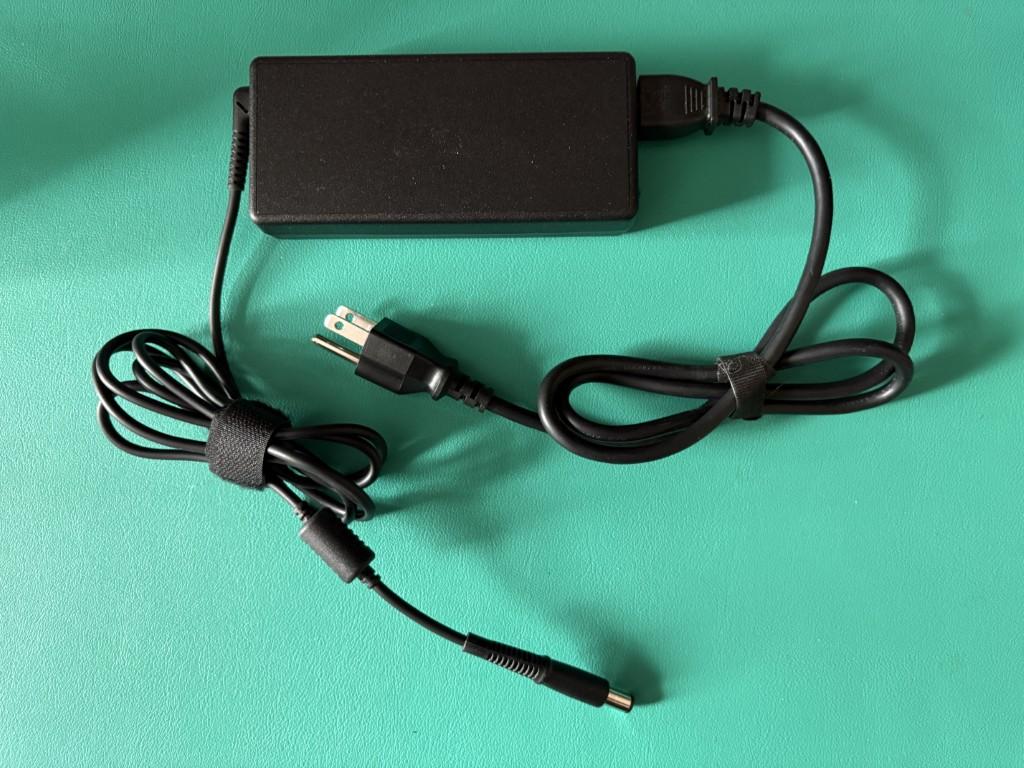
Within the power adapter brick, there is a female inlet:
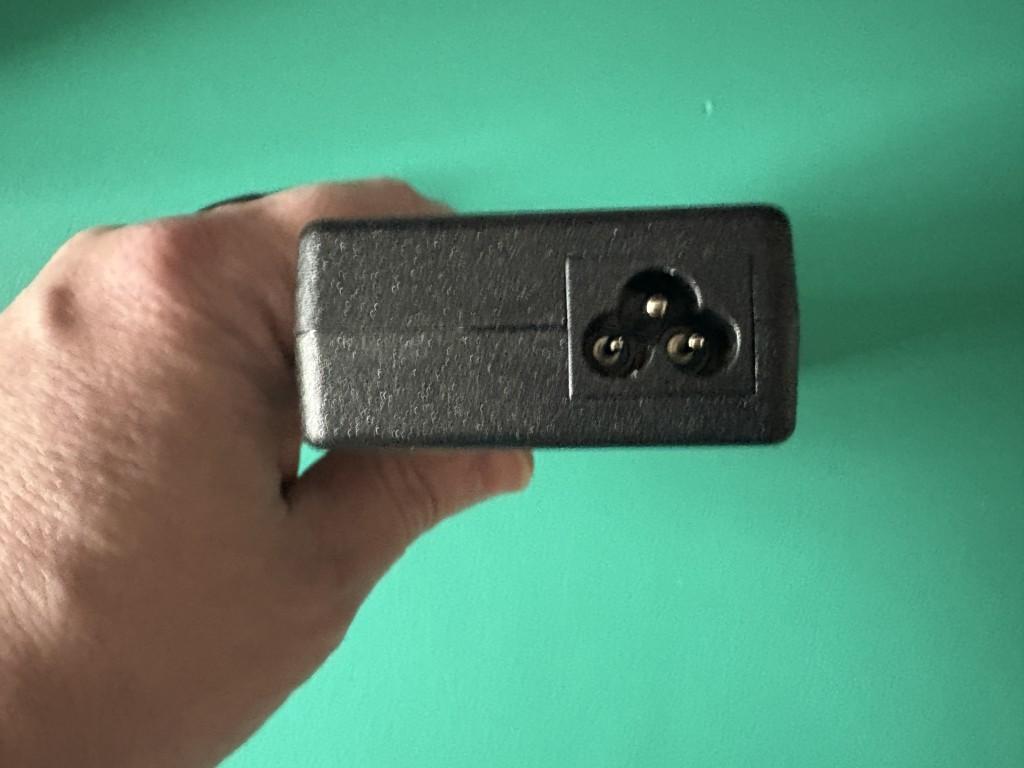
On one end of the power cable, there is an electrical wall plug.
On the opposite end of the power cable, there is a male connector. This connector will be inserted into the power brick.
There is an international standard that governs the shapes and sizes of the connectors in use, specifically IEC 60320 → LINK
In this example, the male connector on the end of the power cable is known as a ‘C5’ connector:
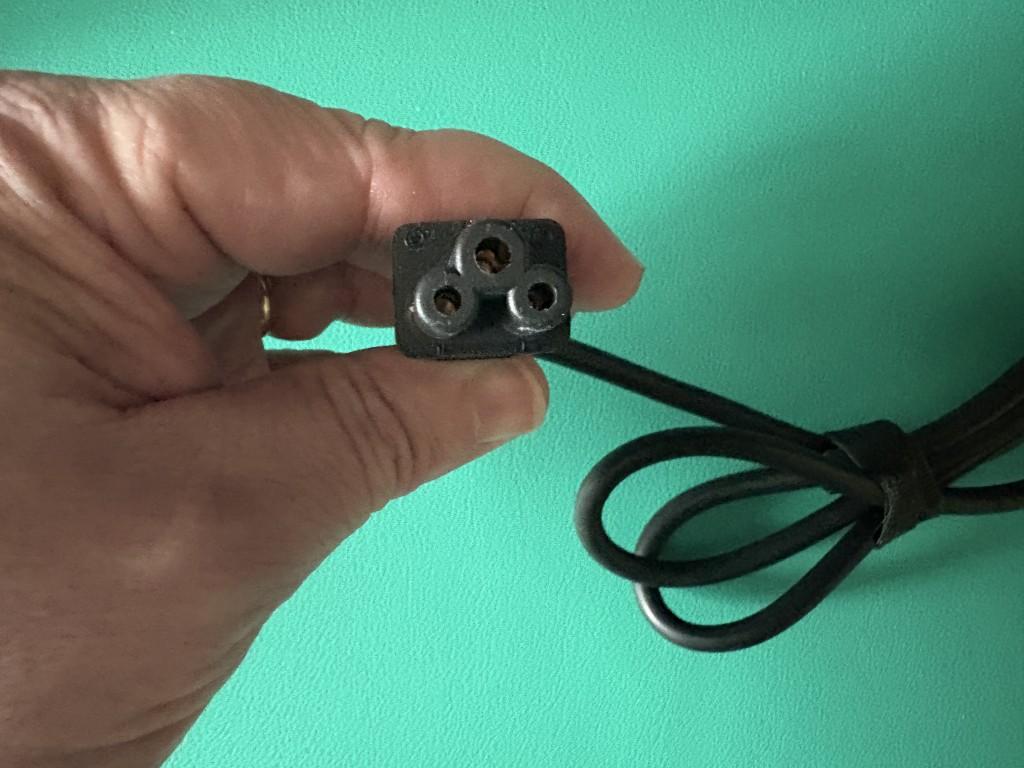
In this example, the female inlet is known as a ‘C6’ connector.
Some refer to this type of connection as a ‘Mickey Mouse’ connection, because the overall shape of the connector visually resembles the outline of a silhouette of the cartoon character Mickey Mouse.
Now, let’s look at the power adapter and power cable for our USB4-HUB3A Thunderbolt 4 hub.
Within the power adapter brick, there is a female inlet:
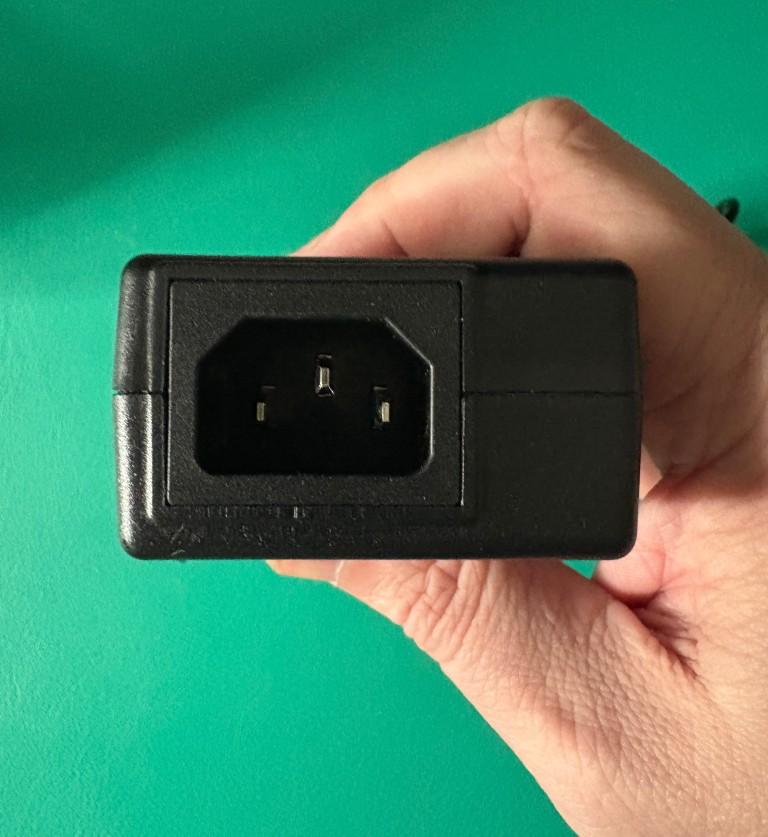
On one end of the power cable, there is an electrical wall plug.
On the opposite end of the power cable, there is a male connector. This connector will be inserted into the power brick.
Note that the shapes on the inlet and connector are different as compared to the TBT4-UDZ example we looked at previously, however as was the case before the IEC 60320 standard governs the design.
In this example, the male connector on the end of the power cable is known as a ‘C13’ connector.
In this example, the female inlet is known as a ‘C14’ connector.
While the cables are different, the benefit of both cables being based on a common standard is that replacement cables for use in different parts of the world can typically be sourced locally.
Most Plugable power adapters support the electrical frequency and electrical voltages used throughout the world.
Note, you can double-check the specifications by looking at the label printed on the wall plug power adapter, or by reviewing the ‘Power’ specifications located on each Plugable product page.
If necessary, the power cable can be replaced with a different one with the necessary wall plug in order to use the product in different parts of the world.
Note, when replacing the cable with a different one please be sure to purchase a cable from a reputable brand and that also meets the electrical specifications printed on the power adapter.
Summary
In summary, there are two different types of power adapters included with Plugable products and the power adapters support the electrical voltage and frequency used throughout the world.
However, the plug that inserts into the power outlet will be specific to the region in which the product was sold.
If a wall plug type power adapter is in use, then a ‘travel style’ adapter is needed to convert the power adapter for use in a different part of the world.
If a power adapter brick is in use, then an industry standard replacement power cable can be used to convert the power adapter brick for use in a different part of the world.
Should you have any additional questions, please reach out to us via support@plugable.com and we will be happy to assist you further.
Can I connect this product to a computer's Thunderbolt/Thunderbolt 2 port?
Many users assume that USB-C devices can work with older Thunderbolt 2 Macs if they use a Thunderbolt 3 to Thunderbolt 2 adapter, such as the one made by Apple. However, this is not the case. These adapters are specifically designed to support Thunderbolt devices only - not standard USB-C peripherals.
While Thunderbolt 3 and USB-C share the same connector type, they use different underlying data protocols. Non-Thunderbolt USB-C devices, rely on USB standards for data and power. The Thunderbolt 3 to Thunderbolt 2 adapter does not carry USB signals; it only passes Thunderbolt data. Because of this, plugging a USB-C device into a Thunderbolt 2 Mac using this adapter will not work - the computer will not detect or communicate with the device.
If you need to connect peripherals to a Thunderbolt 2 system, we recommend using a USB-A dock or hub (if available on your system). This ensures compatibility without relying on unsupported adapter chains.
In short, even though the connectors may fit, USB-C devices are not compatible with Thunderbolt 2 Macs via Thunderbolt adapters - only Thunderbolt devices will work in that setup.
Why Isn’t My Plugable Dock Charging My Laptop?
If your Plugable docking station isn’t charging your laptop, it’s usually due to one of a few common causes. This guide offers some diagnostic checks you can perform to help pinpoint the issue.
Check if Your Dock Supports USB-C Power Delivery
Not all docks charge laptops. Docks fall into three categories:
- Built-in Power Delivery (PD): These include an AC power adapter and can provide 60W, 85W, or 100W to your laptop. A list of Plugable docking stations with built-in Power Delivery can be found here.
- PD Passthrough: These compact docks require a separate USB-C charger plugged into the dock to pass power through to your laptop. A list of Plugable docking stations with PD Passthrough can be found here.
- Host Charging Unsupported: Some docks do not offer any host charging functionality. These are designed solely for display expansion, data, or peripherals.
Tip: Check your Plugable dock’s product specifications for Power Delivery or charging support. If no charging is listed, the dock may not charge your laptop, and the system would need to be powered separately.
Verify the Dock’s Power Source
For your dock to charge your laptop, it needs to be adequately powered itself.
Check:
- Are you using the original Plugable AC adapter for a built-in PD dock?
- For PD passthrough docks, is your USB-C charger powerful enough for your laptop?
- Are you using a reputable, certified charger - not a low-wattage third-party adapter?
Use a Compatible USB-C to USB-C Host Cable
Cable issues can be a common cause of charging problems.
Check:
- Are you using the USB-C to USB-C cable that came with your Plugable dock? This can be identified through its included cable tag.
- If not, does your replacement cable explicitly support USB PD or Thunderbolt?
- Are you accidentally using a USB-C to USB-A cable, which cannot deliver charging to laptops?
- Could the cable be data-only or rated for lower wattage?
Confirm Your Laptop Supports USB-C or Thunderbolt Charging
Even with a PD-capable dock and cable, your laptop must support charging over the USB-C or Thunderbolt port in use.
Common compatibility issues:
- Some USB-C ports are data/video-only.
- Some laptops support charging only through a specific USB-C port.
- Gaming and enterprise laptops often use proprietary power adapters.
Tip: Check your laptop’s specifications or user manual for “USB-C charging” or “Power Delivery (PD) input” support.
Try a Hard Reset
Sometimes, a failed handshake between the dock and laptop prevents charging.
To reset the connection:
- Disconnect the dock from both your laptop and its power source.
- Wait 30–60 seconds.
- Reconnect power to the dock first, then reconnect it to your laptop.
This often resolves temporary communication issues that block charging.
Update Drivers and Firmware
System-level software can directly impact charging behavior - especially on newer laptops and docks.
Update:
- Your laptop’s BIOS or UEFI
- USB-C and Thunderbolt controller firmware and drivers
Tip: Visit your laptop manufacturer’s support site and search by model for the latest system updates.
Compare Power Requirements
If your laptop demands more power than the dock can supply, it may not charge - or may charge very slowly.
Check:
- What wattage does your original laptop charger provide? (Usually printed on the power adapter.)
- What is the maximum PD output your Plugable dock can provide?
- Does your laptop still slowly discharge while docked under heavy use?
Tip: For especially power-hungry laptops (like gaming or workstation models), consider connecting the laptop’s original charger along with the dock to ensure the laptop charges at full speed
Related: Overcoming Power Challenges: Efficiently Charging High-Demand Laptops While Docking
Can I connect my laptop charger to my laptop at the same time as my Plugable USB-C or Thunderbolt dock?
Yes, you can safely connect your laptop charger to your laptop at the same time a Plugable USB-C or Thunderbolt docking station is connected.
To expand further, all Plugable USB-C or Thunderbolt docking stations use a protocol known as USB Power Delivery (aka USB PD) in order to provide power to the host computer.
An external device using USB PD (such as a docking station) will provide power to the host computer only if the host computer requests it.
In cases where there are two external devices that can potentially provide power connected to the laptop, the host laptop will automatically determine the preferred source of power from which to charge.
If your laptop’s power adapter provides a higher rate of power than the Plugable docking station, then the laptop will only charge from the laptop’s power adapter and the Plugable docking station will not provide any power.
For example, let’s say your Plugable docking station can provide up to 96W of power to charge the host laptop. Let’s also say that the power adapter included with your laptop can provide 140W of power.
In this specific case, via the USB Power Delivery protocol the laptop will automatically determine that the 140W power source is preferable to the 96W power source. As a result, the laptop will only accept power from the 140W power source and the docking station will not provide any power.
Why Higher Voltage Power Supplies Are Included with USB 5V Hubs and Docks
Improved Voltage Regulation Under Load
When multiple USB devices are connected - especially high-draw peripherals like external drives or charging phones - the demand on the dock’s internal power can spike. If the power supply were delivering only 5V, any load increase might cause voltage “sag,” potentially leading to unstable or unreliable performance.
By starting with a higher voltage like 12V or 20V, the internal voltage regulators within the dock or hub can more reliably and efficiently step down that voltage to a consistent 5V, even under heavy load. It’s similar to having a reservoir above a village - you’ll have more reliable water pressure regardless of demand.
Greater Power Efficiency Over Distance
Transmitting power at higher voltage and lower current reduces energy loss due to resistance in the wires (which causes heat). By increasing the voltage we can decrease the amperage for the same power, and power loss in the line is directly proportional to amperage squared so even a small decrease in the amperage adds up quickly. Once the power reaches the dock, it's stepped down to the voltages needed for USB ports. This not only enhances efficiency but also makes compact, cooler-running designs possible.
Special Consideration for USB-C Docks
USB-C docks commonly include 20V power supplies, which serve a dual purpose:
- Supplying 5V for downstream USB devices
- Delivering up to 100W (or more) to host laptops via USB-C Power Delivery
With USB Power Delivery 3.1 (EPR), even higher voltages (up to 48V) are supported, enabling future docks and laptops to handle even more powerful devices like desktop replacement laptops or external GPUs.
Will Future Docks Use 48V Power Supplies?
It's likely. While 20V is common now (especially for consumer devices), 24V+ power supplies are widespread in industrial and telecom applications. As high-performance laptops and workstations demand more power, consumer docks may start including 24V, 36V, or even 48V adapters. These would align with USB PD 3.1 specs and simplify designs that support extended power ranges.
However, for now, 20V remains a sweet spot for cost, availability, and compatibility across a wide range of devices.
TL;DR
Higher voltages like 12V or 20V are used for better regulation and more efficient power delivery.
USB-C docks use 20V to support Power Delivery charging (up to 100W+).
USB PD 3.1 EPR opens the door to 48V systems, and while uncommon now, future docking stations may shift to 48V as demand grows.
How To - Set a Custom MAC Address in Windows
What is the MAC address?
The MAC address (Medium Access Control address) is a unique network address for each Network Interface Controller to identify the hardware on the network segment. The address is generally expressed as six hexadecimal digits, sometimes separated by a '-', ':', or without a separator.
The MAC address is assigned by the hardware manufacturer during production, however many network controllers allow the operating system (via the drivers) to override the MAC address, this is handled at the operating system level and does not change the address stored in the adapter.
The first three octets (first three hexadecimal values, six characters) identify the network hardware manufacturer while the last three octets should be unique within each hardware manufacturer's product line. For example Plugable's MAC addresses all begin with "8CAE4C", with lower values typically representing older companies, "000000" belongs to Xerox for example, some companies have multiple ranges of MAC addresses.
Why it can be useful to override the manufacturer's address?
Setting a custom MAC address can provide anonymity when connecting to public networks. It can also be used by an IT Network Administrator to provide specific access rights to computers based on the connection.
It can also be useful for Network Administrators for testing, troubleshooting, and maintenance to simulate different devices without having access to that specific device.
Changing the Mac Address in Windows
The MAC address can be manually set from the Device Manager:
1. Right-click on the Start Menu and select Device Manager from the pop-up window
2. Expand the Network adapters section and double-click on the network adapter to be modified
3. From the network adapter properties pop-up window, select the Advanced tab
4. Under the Property: category, scroll down to and select "Network Address"
5. In the Value: field, enter the new MAC Address in hexadecimal format, the field has a maximum of 12 characters so do not use any separators between octets
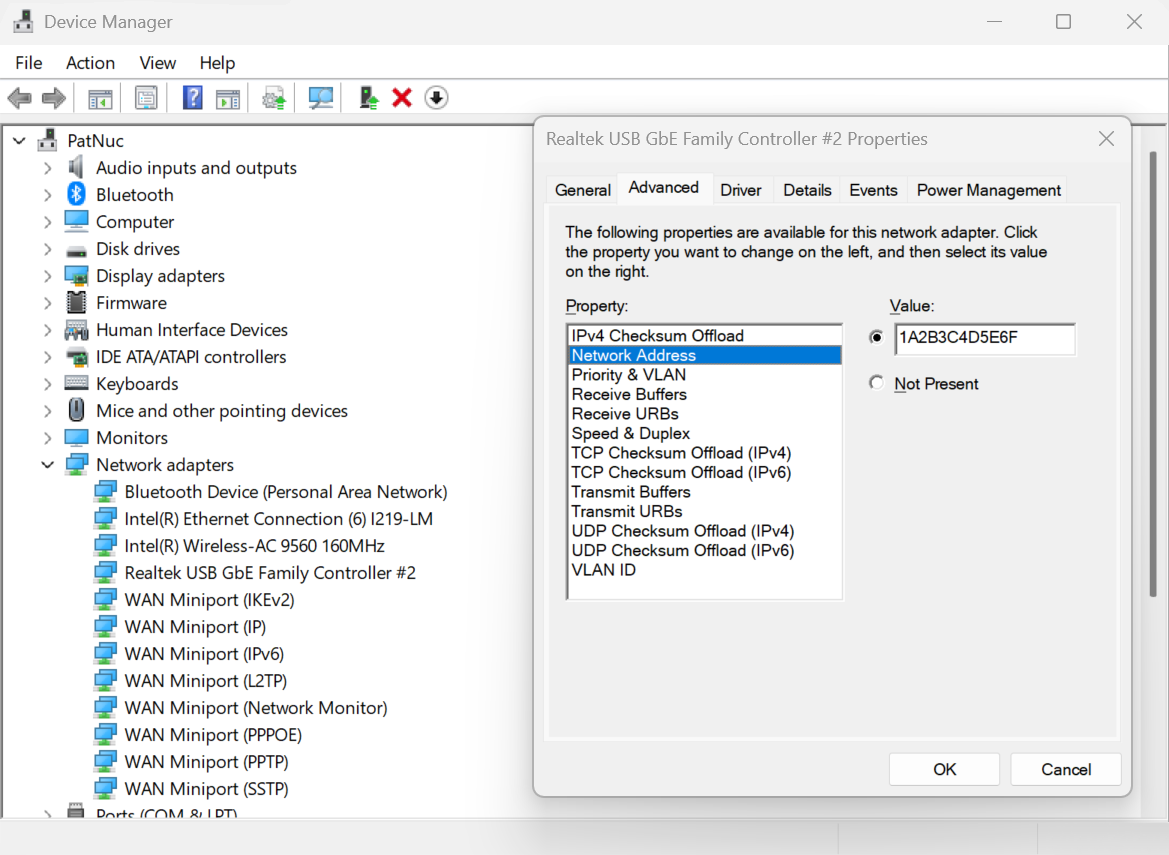
6. Select the OK button to proceed
You can also check the MAC Address from the command line
1. Right-click on the Start Menu and select Terminal or Windows PowerShell
2. Type in the following command ipconfig /all or ipconfig /all | findstr C:/"Physical Address" to filter just the Physical Address lines.
3. Scroll through the output to find the target network adapter and Physical Address
How To - Set a Custom MAC Address in Linux
What is the MAC address?
The MAC address (Medium Access Control address) is a unique network address for each Network Interface Controller to identify the hardware on the network segment. The address is generally expressed as six hexadecimal digits, sometimes separated by a '-', ':', or without a separator.
The MAC address is assigned by the hardware manufacturer during production, however many network controllers allow the operating system (via the drivers) to override the MAC address, this is handled at the operating system level and does not change the address stored in the adapter.
The first three octets (first three hexadecimal values, six characters) identify the network hardware manufacturer while the last three octets should be unique within each hardware manufacturer's product line. For example Plugable's MAC addresses all begin with "8CAE4C", with lower values typically representing older companies, "000000" belongs to Xerox for example, some companies have multiple ranges of MAC addresses.
Why it can be useful to override the manufacturer's address?
Setting a custom MAC address can provide anonymity when connecting to public networks. It can also be used by an IT Network Administrator to provide specific access rights to computers based on the connection.
It can also be useful for Network Administrators for testing, troubleshooting, and maintenance to simulate different devices without having access to that specific device.
Checking the MAC Address in Linux
The MAC Address can be checked from the terminal:
1. Open a bash shell
2. Read the address from the /sys directory:
cat /sys/class/net//address
or from the ip command to print out all of the hardware MAC Addresses
ip -o link | awk '$2 != "lo:" {print $2, $17}'Changing the MAC Address in Linux
Temporary change until system reboot
1. Open a bash shell
2. Run the following command to set the MAC Address for a specific network device.
sudo ip link set dev <devicename> down
sudo ip link set dev <devicename> address <mac address>
sudo ip link set dev <devicename> up
3. Confirm the new MAC address
Permanently change the MAC Address
This can depend on your distribution's specific network services and settings. This example will create a new systemd unit file to change the MAC Address on startup.
1. Open a bash shell
2. Create a new systemd unit file "/etc/systemd/system/changemac@.service with the following contents the mac address should be colon separated:
[Unit]
Description=Change MAC Address %i
Wants=network-pre.target
Before=network-pre.target

[Service]
Type=oneshot
ExecStart=/usr/bin/ip link set dev %i down
ExecStart=/usr/bin/ip link set dev %i address <mac address>
ExecStart=/usr/bin/ip link set dev %i up
RemainAfterExit=yes
User=root

[Install]
wantedBy=multi-user.target
3. Enable the service with the following command
sudo systemctl enable --now changemac@<interface_name>
4. Reboot the computer, the MAC address should be set to the new address
Update Graphics Drivers in Windows
Up to date graphics drivers are necessary for ensuring the best performance of your computer's built-in display, as well as the capability and compatibility with external displays and docking stations.
Windows has a built-in system update service: Windows Update, however this may not provide up to date drivers or timely updates. We often see systems with out of date drivers, in some cases systems may not receive updated graphics drivers for months or even years, leaving the computer with drivers incompatible with the installed version of Windows 11.
However, we can manually update the graphics drivers to ensure the best possible performance, reliability, and compatibility.
The first step is to identify the graphics hardware, then downloading, and installing the latest drivers.
Identifying Graphics Controller
For notebooks and many desktop computers, the primary graphics controller is embedded in the processor, both AMD and Intel provide graphics driver updates based on the processor model, as well as for discrete graphics controllers. Our first step is to identify up the processor or graphics hardware model details:
- Right-click on the Start Menu and select Settings from the pop-up menu
- From the left column select System and from the bottom of the right side select About
- From the top of the about page the processor details will be on the right side, and duplicated lower down on the page.

- In this example the processor is a 12th Gen Intel(R) Core(TM) i7-1260P, we'll keep that detail for the next step.
If your computer has two graphics controllers (it may show "Multiple GPUs Installed" under Graphics Card) then we can get the graphics card model details from the Windows System Information Utility.
- Open the Start menu and search for "msinfo32"
- Select the first result
- From the left-column expand the Components section, then select Display

- In this example the Intel Iris(R) Xe Graphics is enabled by the processor, while the Intel(R) Arc(TM) Pro B60 Graphics is a discrete graphics controller.
Downloading the Drivers
Intel Graphics
- In a web browser navigate to the Intel Driver Download Page
- In the "Search Drivers & Software" field, search for the Intel graphics card model or CPU model, "Arc Pro B60" in this example

- Select the appropriate "Intel Arc Pro Graphics - Windows" or similar entry from the search results, for modern hardware Intel will normally have at least one release per month, the list should return recent results within the last month
- Select the Download button to save the installer to your Downloads folder or selected location
AMD Graphics
AMD provides an Auto-Detect utility, this works relatively well and can be used to update the system available from the AMD Drivers and Support page.
This page also provides a search and browse option for finding drivers and specific compatibility details, we'll look up the drivers for an AMD Ryzen Pro 5650U processor with Radeon Graphics:
- Navigate to AMD Drivers and Support page
- From the Browse section, fill out the processor details and click the Submit button
- Expand the "Windows 11 - 64-Bit Edition" section and select the Download button for the latest graphics drivers
NVIDIA Graphics
Like AMD, NVIDIA provides an automatic installation utility, as well as a Manual Driver Search on the NVIDIA Drivers support page. We will look up the drivers for an NVIDIA RTX 5080 graphics card.
- Navigate to NVIDIA Drivers support page
- Fill out the Manual Driver Search drop-downs and select the "Find" button when complete
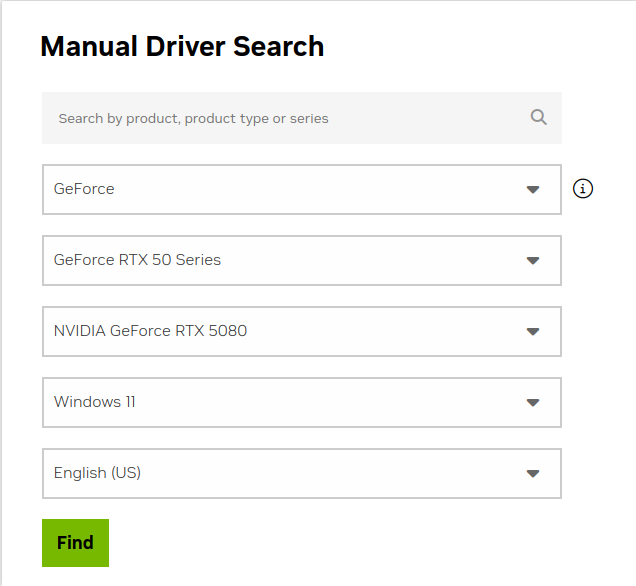
- From the search results, select the "View" button for the GeForce Game Ready Driver or NVIDIA Studio Driver (if you need the studio driver features)
- Select the green Download button for the latest graphics drivers
Installing the Graphics Drivers
For the most part this is relatively simple, we recommend disconnecting any external docking stations or devices that are not necessary for the driver installation, and for notebook computers connecting the system's original power supply.
Double-click on the downloaded driver installation executable and follow the on screen steps.
For more in-depth details on Intel, AMD, and NVIDIA's driver installation processes check out our step-by-step guides here:
- Intel Driver Installation In Detail
- AMD Driver Installation In Detail
- NVIDIA Driver Installation In Detail
If you have any questions or would like a recommendation, feel free to reach out to our support at support@plugable.com
How-To: Install the latest Intel Graphics Drivers
For a step-by-step guide to identify your graphics hardware and download the appropriate drivers, check out our KB article here
Download the drivers for your GPU or Processor Graphics
- In a web browser navigate to the Intel Driver Download Page
- In the Search Drivers & Software field, search for the Intel graphics card model or CPU model, "Arc Pro B60" in this example
- Select the appropriate Intel Arc Pro Graphics - Windows or similar entry from the search results, for modern hardware Intel will normally have at least one release per month, the list should return recent results within the last month
- Select the Download button to save the installer to your Downloads folder or selected location
Install the Intel Graphics Driver
To update the Intel Graphics Drivers to the latest version from Intel's website:
- Save and close any open applications
- Navigate to the downloaded graphics driver, then right-click on the saved driver installation file and select Run as administrator to start the installation process
- Allow the Intel driver installation through the User account control window, the drivers will be extracted
- When the extraction is complete select the Begin installation button

- Agree to the Intel Software License Agreement by selecting the I agree button
- Ensure all applications are saved and closed before selecting the I agree button
- For most installations, we recommend not selecting the Execute a clean installation checkbox. This option will remove previous driver versions and can lead to Windows Update reverting to an even older graphics driver. Select the Start button to proceed

- The installation process will proceed, but can take some time to complete
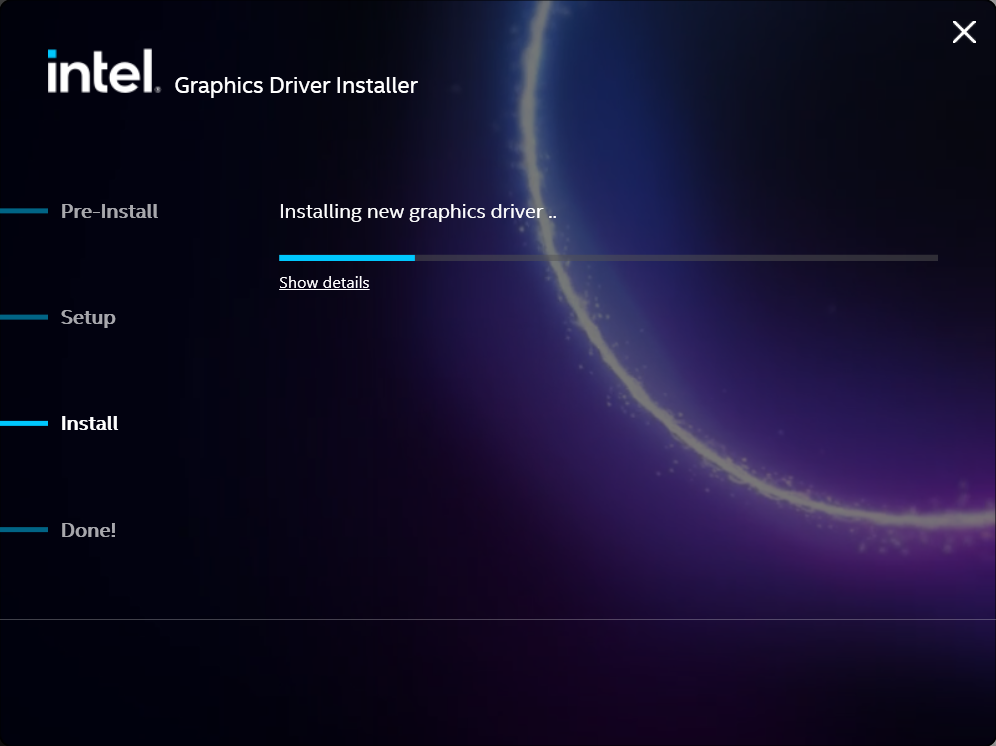
- When the installation has completed, deselect the Launch Intel Graphics Software checkbox - we don't need that right now, select the Reboot Now button to restart the computer applying the new graphics drivers
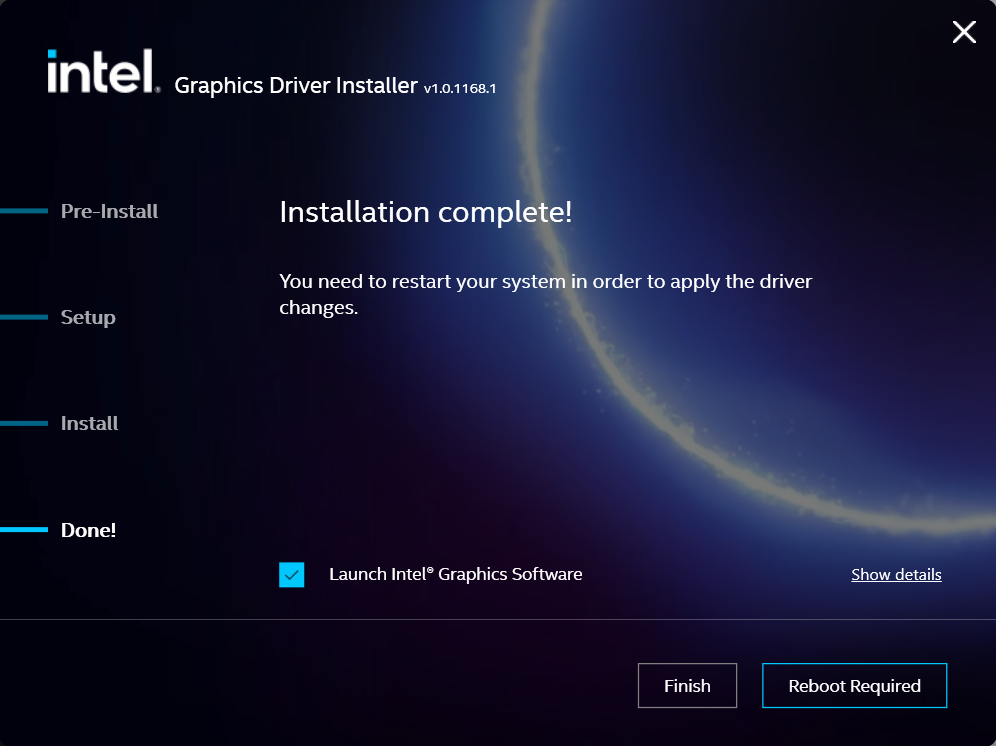
Windows should now detect the Intel Graphics Controller in the Device Manager and show the latest drivers.
If you have any questions or would like a recommendation, feel free to reach out to our support at support@plugable.com
How-To: Install the latest AMD Graphics Drivers
For a step-by-step guide to identify your graphics hardware and download the appropriate drivers, check out our KB article here
Download the drivers for your GPU or Processor Graphics
- In a web browser navigate to the AMD Drivers and Support page
- In the Search for your AMD product field, type in the model name, for example “RX 5600XT” for the AMD Radeon RX 5600 XT graphics controller, or a processor model like "AI 9 365", then select the best fitting result and select the Search button - note: Searching for a processor the "™" is required, so I recommend searching for the text after that symbol.
- On the results page, expand the section for Windows 11 64-bit then select the Download button for the latest AMD Software: Adrenalin Edition drivers, AMD may not provide a direct download for all hardware, in that case use the Auto-Detect and Install option
- Save the installer to your Downloads folder or selected location
Install the AMD Graphics Driver
To update the AMD Graphics Drivers to the latest version from AMD’s website:
- Save and close any open applications
- Navigate to the downloaded graphics driver, then right-click on the saved driver installation file and select Run as administrator to start the installation process
- Allow the Intel driver installation through the User account control window, the drivers will be extracted
- For most users the express installation is fine, ensure all applications are saved and closed selecting the Accept & Express Install button. If you have been having issues with older graphics drivers causing crashes or errors the Factory Reset (Optional) checkbox may be selected, but it isn’t necessary for most installations.

- The installation will proceed, the displays may flicker or flash off/on while the drivers are installing.
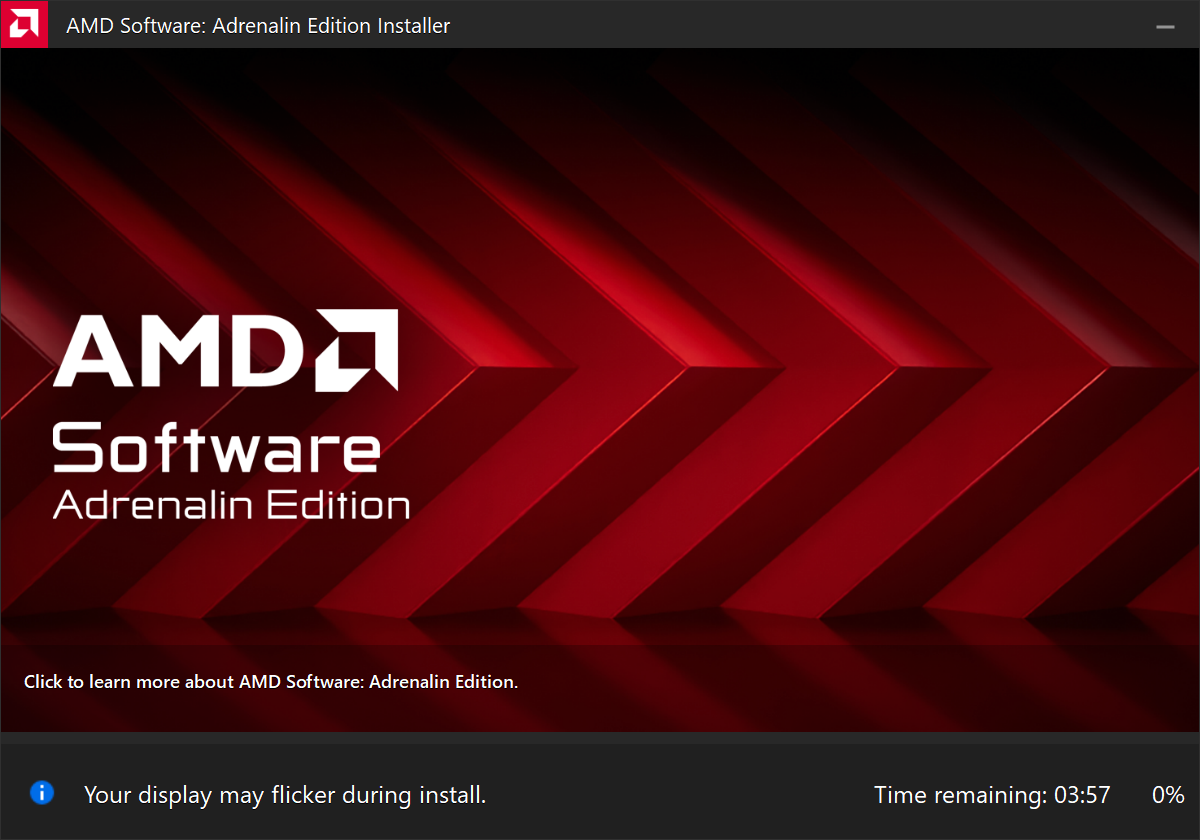
- When complete you will be prompted to Launch AMD Software: Adrenalin Edition and Keep AMD software up to date, you can uncheck the Launch AMD Software option
- Restart the computer to ensure the latest drivers are loaded from boot Start Menu > Power Icon > Restart
Windows should now detect the Intel Graphics Controller in the Device Manager and show the latest drivers.
If you have any questions or would like a recommendation, feel free to reach out to our support at support@plugable.com
How-To: Install the latest NVIDIA Graphics Drivers
For a step-by-step guide to identify your graphics hardware and download the appropriate drivers, check out our KB article here
Download the drivers for your GPU
Check your invoice for the specific model of NVIDIA graphics card, for this example we will use the RTX 5080 (the manufacturer is not relevant).
- In a web browser navigate to the NVIDIA Driver Download Page
- In the Manual Driver Search field, search for the NVIDIA graphics card model, "RTX 5080" in this example
- Select the GeForce RTX 50 Series | NVIDIA GeForce RTX 5080 | Windows 11 entry from the list
- Left-click the Find button
- Select either View buttons from the GeForce Game Ready Driver or NVIDIA Studio Driver
- Select the Download button to save the installer to your Downloads folder or selected location
Install the NVIDIA Graphics Driver
To update the NVIDIA Graphics Drivers to the latest version from NVIDIA's website:
- Save and close any open applications
- Navigate to the downloaded graphics driver, then right-click on the saved driver installation file and select Run as administrator to start the installation process
- Allow the NVIDIA driver installation through the User account control window
- Click OK to extract the NVIDIA Display Driver package contents
- At the System Check step, select either the NVIDIA Graphics Driver with NVIDIA App or the NVIDIA Graphics Driver alone, the NVIDIA App is gaming oriented and unnecessary for most users. Select AGREE AND CONTINUE
- At the License Agreement step, select the Express (Recommended) radio button then select NEXT to continue

- The installation will take some time to complete
- When complete please restart the computer Start > Power > Restart
Windows should now detect the NVIDIA Graphics Controller in the Device Manager and show the latest drivers.
If you have any questions or would like a recommendation, feel free to reach out to our support at support@plugable.com
Is Target Display Mode Available With Plugable Docks and Adapters?
No, target display mode generally requires a direct Thunderbolt connection from a compatible MacBook or Mac Mini to a compatible iMac. Graphics adapters and docking stations do not pass the required Thunderbolt video data.
Why Target Display Mode Is Not Compatible With Docks or Adapters
Target Display Mode is a legacy feature that allows certain older Mac systems to use an older model iMac as an external display via a Mini DisplayPort or Thunderbolt data cable. Most Plugable docking stations and graphics adapters are USB devices that do not meet the specific Thunderbolt data requirements for 2011 through mid-2014 iMac systems. While Thunderbolt 3 or newer docks may provide video capability, they are generally recommended for Apple M-Series systems which do not support this feature.
iMac Models as Display
Apple provides system compatibility here but we can summarize it in the following:
24-inch and 27-inch iMac (2009 and 2010)
- macOS 10.13 “High Sierra” or earlier
- Compatible with Macs from 2019 or earlier with macOS 10.15 “Catalina” or earlier
- NOTE: some MacBooks in this range do not include a Mini DisplayPort output and may not be compatible
- Connected with a Mini DisplayPort cable
iMac models (2011 through mid-2014)
- macOS 10.13 “High Sierra” or earlier
- Compatible with Macs from 2019 or earlier with macOS 10.15 “Catalina” or earlier
- NOTE: some MacBooks in this range do not include a Mini DisplayPort output and may not be compatible
- Connected with a Thunderbolt or Thunderbolt 2 cable - these use the Mini DisplayPort connector
- NOTE: This is not compatible with Thunderbolt 3 (USB Type-C) cables
Alternative Options
For earlier 2009-2010 iMacs, it may be possible to use a USB Type-C to DisplayPort adapter paired with a DisplayPort to Mini DisplayPort cable. However, this configuration is untested and we do not support this configuration.
Our research has shown mixed results using these early model iMac systems with adapters, modern unsupported Apple hosts, or Windows computers. Because Target Display Mode is no longer supported by modern Apple hardware and software, there is no guaranteed workaround for newer systems.
Modern displays offer higher resolutions, multiple connection options: both DisplayPort and HDMI, and newer features like High Dynamic Range (HDR) and higher refresh rates than iMac systems. Many modern displays can support multiple host computers either by switching between inputs or with picture-by-picture or picture-in-picture modes.
Applicable To
- 24-inch and 27-inch iMac (2009 and 2010)
- iMac models (2011 through mid-2014)
- macOS 10.13 “High Sierra” or earlier
If you have any questions please feel free to contact us at support@plugable.com and we'll be happy to help!

