


Hassle free, 2-Year Warranty
Fast, Free Shipping on Orders $35+
Lifetime Technical Support
30-Day Money Back Guarantee
Plugable Thunderbolt 5 AI eGPU Enclosure
$629.99 USD
SKU: TBT5-AIAmazon Rating : (1 Reviews)
機能
- Build Your Own AI Enclosure— The Plugable TBT5-AI is an 80Gbps high-performance Thunderbolt 5 eGPU enclosure featuring an 850W ATX 3.1 PSU and PCIe x16 slot with 4 lanes PCIe 4.0 to host your own GPU for offline AI models. (GPU not provided)
- Intelligence You Own— Resolve the innovation vs. privacy deadlock by running models like Llama 3 with an air gap. This secure system supports Ollama, LM Studio, Foundry Local, NVIDIA NIM, and llama.cpp, ensuring your sensitive prompts, data, and results never leave your perimeter. No cloud risks or subscription fees
- Modular Performance Scales With Your Workflow— More than an external GPU enclosure, the TBT5-AI includes features like 96W host charging, 2.5Gbps Ethernet, downstream Thunderbolt 5 port, and 10Gbps USB-A and USB-C ports. The 850W PSU (80+ Gold) provides a dedicated 600W to your GPU, leveraging 80Gbps Thunderbolt 5 speeds for double the bandwidth of Thunderbolt 4
- Works With— Thunderbolt 5, 4, and USB4 systems. USB4 must support eGPU: Designed for Windows 11, it connects via a single Thunderbolt 5 cable (included). Supports GPUs up to 346mm x 170mm x 77mm, and 3.5-slots wide, and 600W, fitting most high-end cards like NVIDIA, AMD. Check GPU dimensions before purchase. Not compatible with macOS, Linux, ChromeOS, or Thunderbolt 3
- Lifetime Support— This TAA-compliant AI enclosure has been designed with reliability at its core and was built to meet the deployment demands of IT departments and the ease of use necessary for home offices. Includes lifetime support from our North American team of connectivity experts
本製品は TAA(貿易調整支援 Trade Adjustment Assistance)に準拠しています。
For volume orders or business inquiries contact sales@plugable.com


技術仕様
| Thunderbolt 5 PCI Express Enclosure | External PCIe card expansion up to 3.5 slots wide, leveraging up to 80/120Gbps bandwidth |
| Powerful host charging | Provides up to 96W of power to charge the host computer |
| Port flexibility | 1x downstream Thunderbolt 5 port (up to 15W PD), 1x USB-C 10Gbps port (15W), 3x USB-A 10Gbps (7.5W) |
| 互換性 | Computers must support Thunderbolt 5, Thunderbolt 4 or USB4 and be running Windows 11 to be compatible with the TBT5-AI. Mac, ChromeOS and Linux not supported. Computers must have an 11th generation or newer Intel CPU or Zen 4 or newer AMD CPU. The TBT5-AI does not include a graphics processing unit (GPU). Examples of compatible GPUs are Nvidia GeForce RTX 50, 40, or 30 series or AMD Radeon RX 9000, 7000, or 6000 series. |
A: Computers must support Thunderbolt 5, Thunderbolt 4 or USB4 and be running Windows 11 to be compatible with the TBT5-AI. Mac, ChromeOS and Linux not supported. Computers must have an 11th generation or newer Intel CPU or Zen 4 or newer AMD CPU.
A: No, the TBT5-AI does not include a graphics processing unit (GPU). Examples of compatible GPUs are Nvidia GeForce RTX 50, 40, or 30 series or AMD Radeon RX 9000, 7000, or 6000 series.
A: Drivers must be installed on the host computer for the customer-provided GPU. Local AI application software (for example, LM Studio, Microsoft Foundry Local) must be installed for performing AI inference tasks.
A: The TBT5-AI includes a 80 Gold Plus certified 850W power supply with Japanese capacitors that offers 3x 6+2 pin and 1x 12VHPWR power connectors. 600W of power available for GPU use.
A: Using the TBT5-AI for local AI inference helps keep your data secure, lowers operating costs compared to cloud subscriptions, allows you to upgrade the capabilities of an existing computer, all while allowing you to upgrade your GPU in the future.
Filter Help Articles and Frequent Questions by Category
Choose one or more filters within each category to narrow down the articles. Each selection will result in only displaying articles that include all of your choices.
Articles
Well how about that, it looks like we don't have any articles matching your filters! Try removing one of your choices or clear the filters to show all articles.
You can always contact support if you need help too!
What Does the Single Indicator Light on the Front of the TBT5-AI Mean?
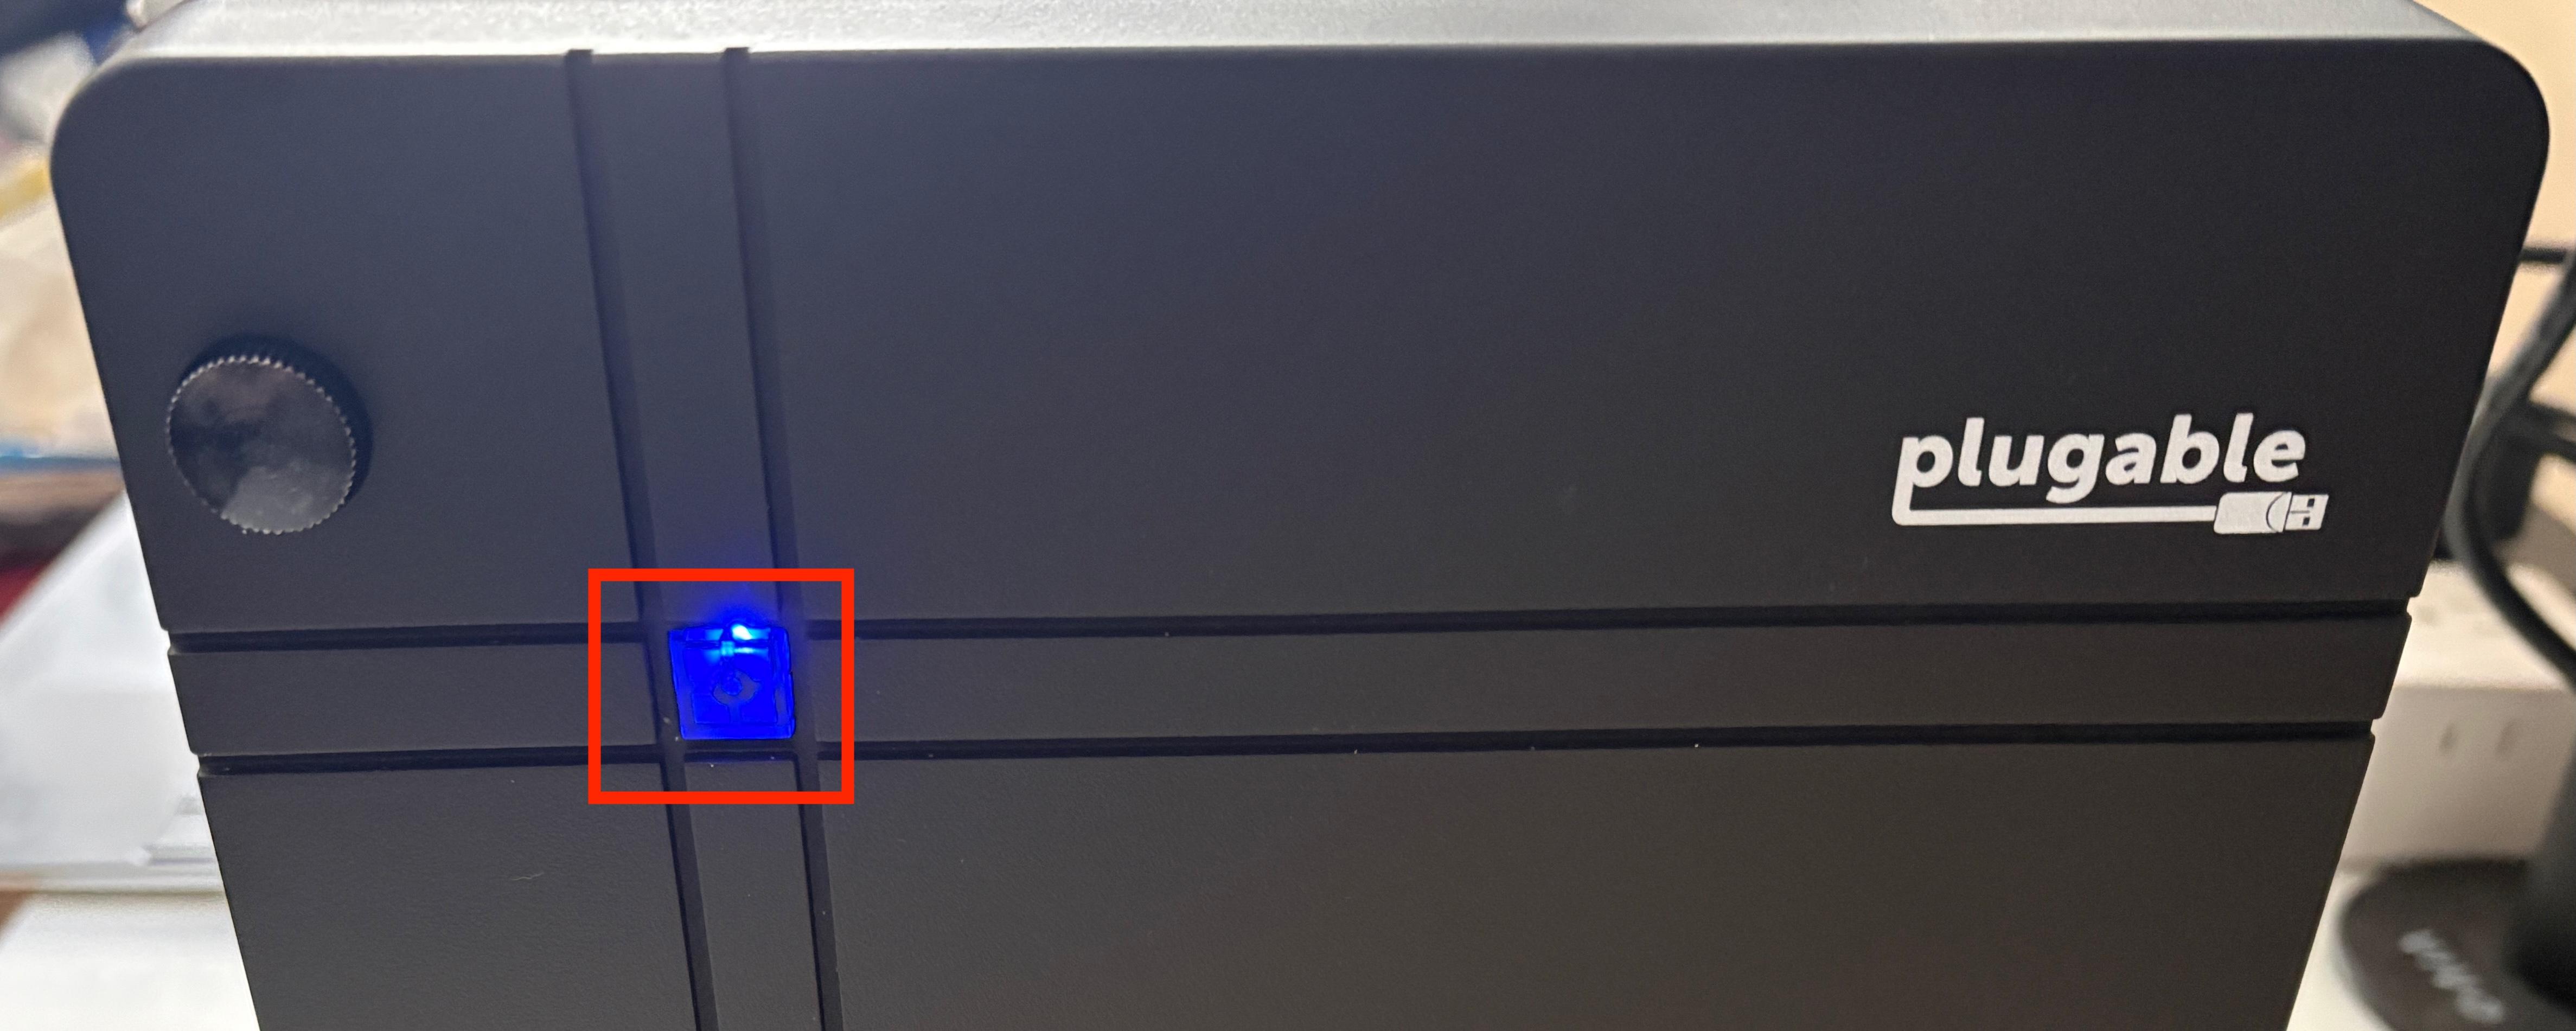
When the TBT5-AI is connected to an electrical power source, powered on via the switch on the back of the unit, and connected to a compatible host computer there will be a small solid blue power indicator light present on the front of the unit.
*** NOTE - The unit will only power on when connected to a compatible host computer. The unit will NOT power on if it is not connected to a compatible host computer ***
Does the TBT5-AI Charge My Computer, and if So, at What Rate?
The TBT5-AI can provide up to 96W of power to charge a compatible host computer via USB Power Delivery.
Does the TBT5-AI Have a Power Switch, and if So, How Is the Unit Turned On?
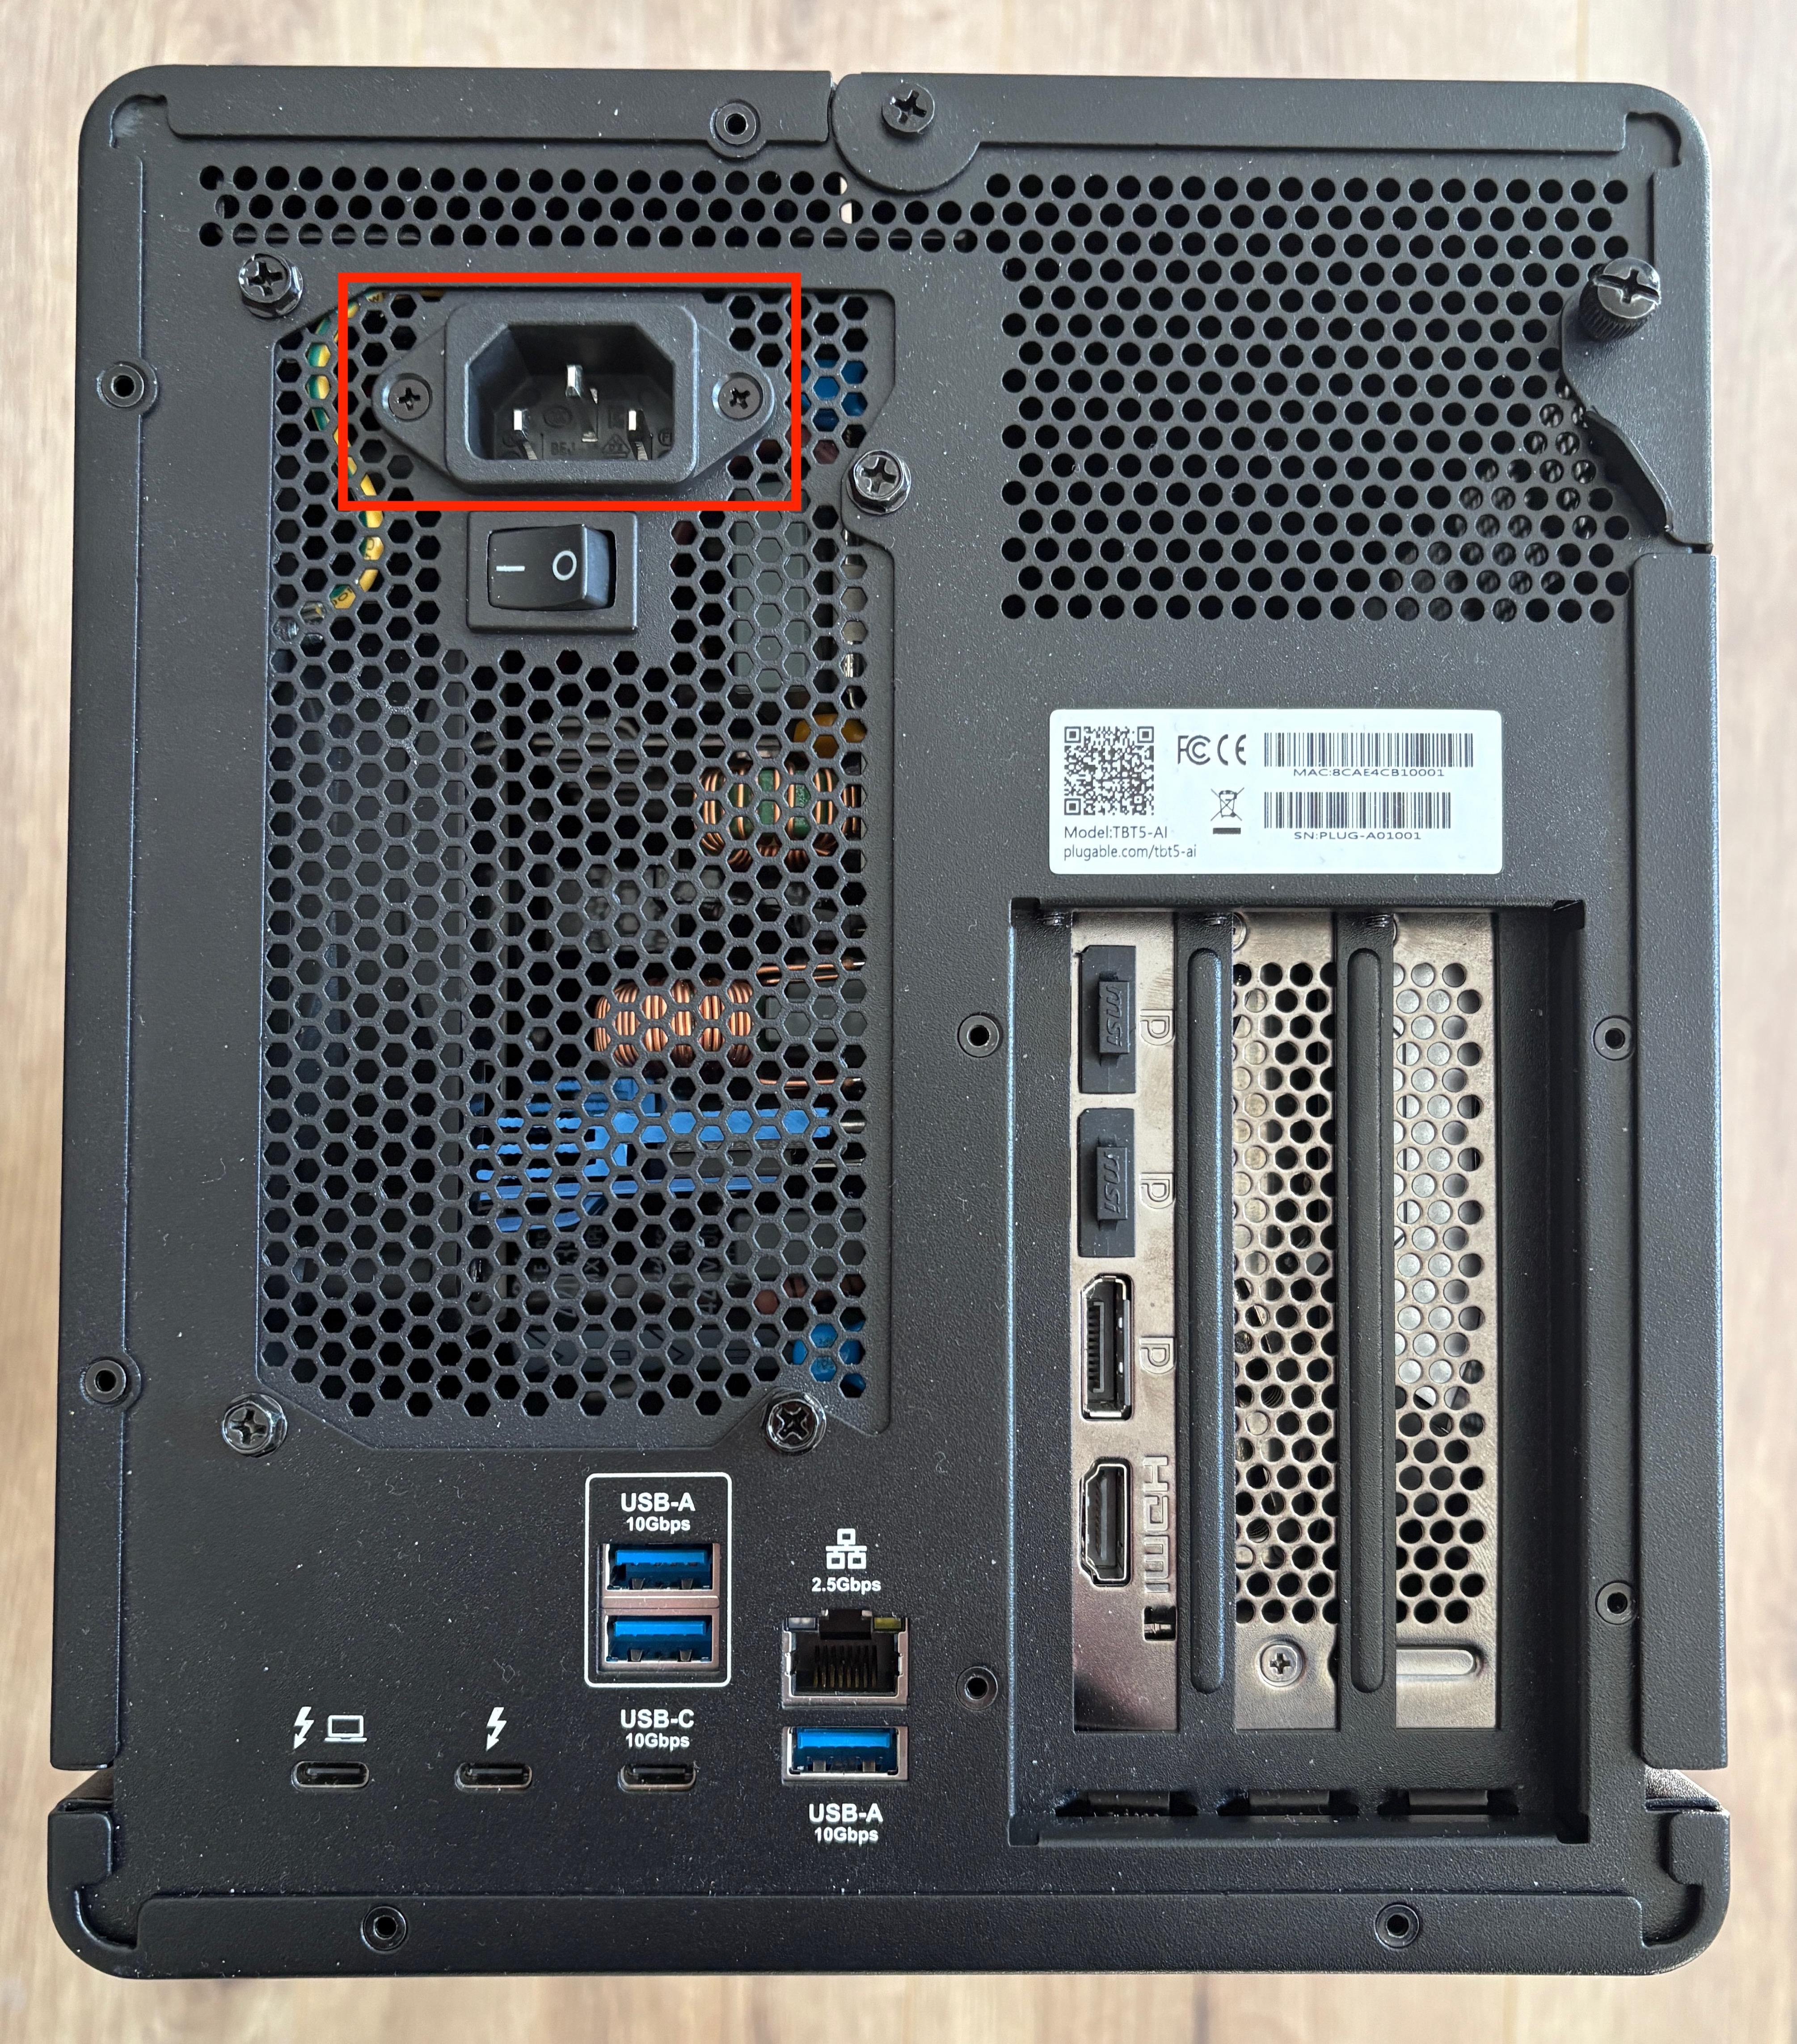
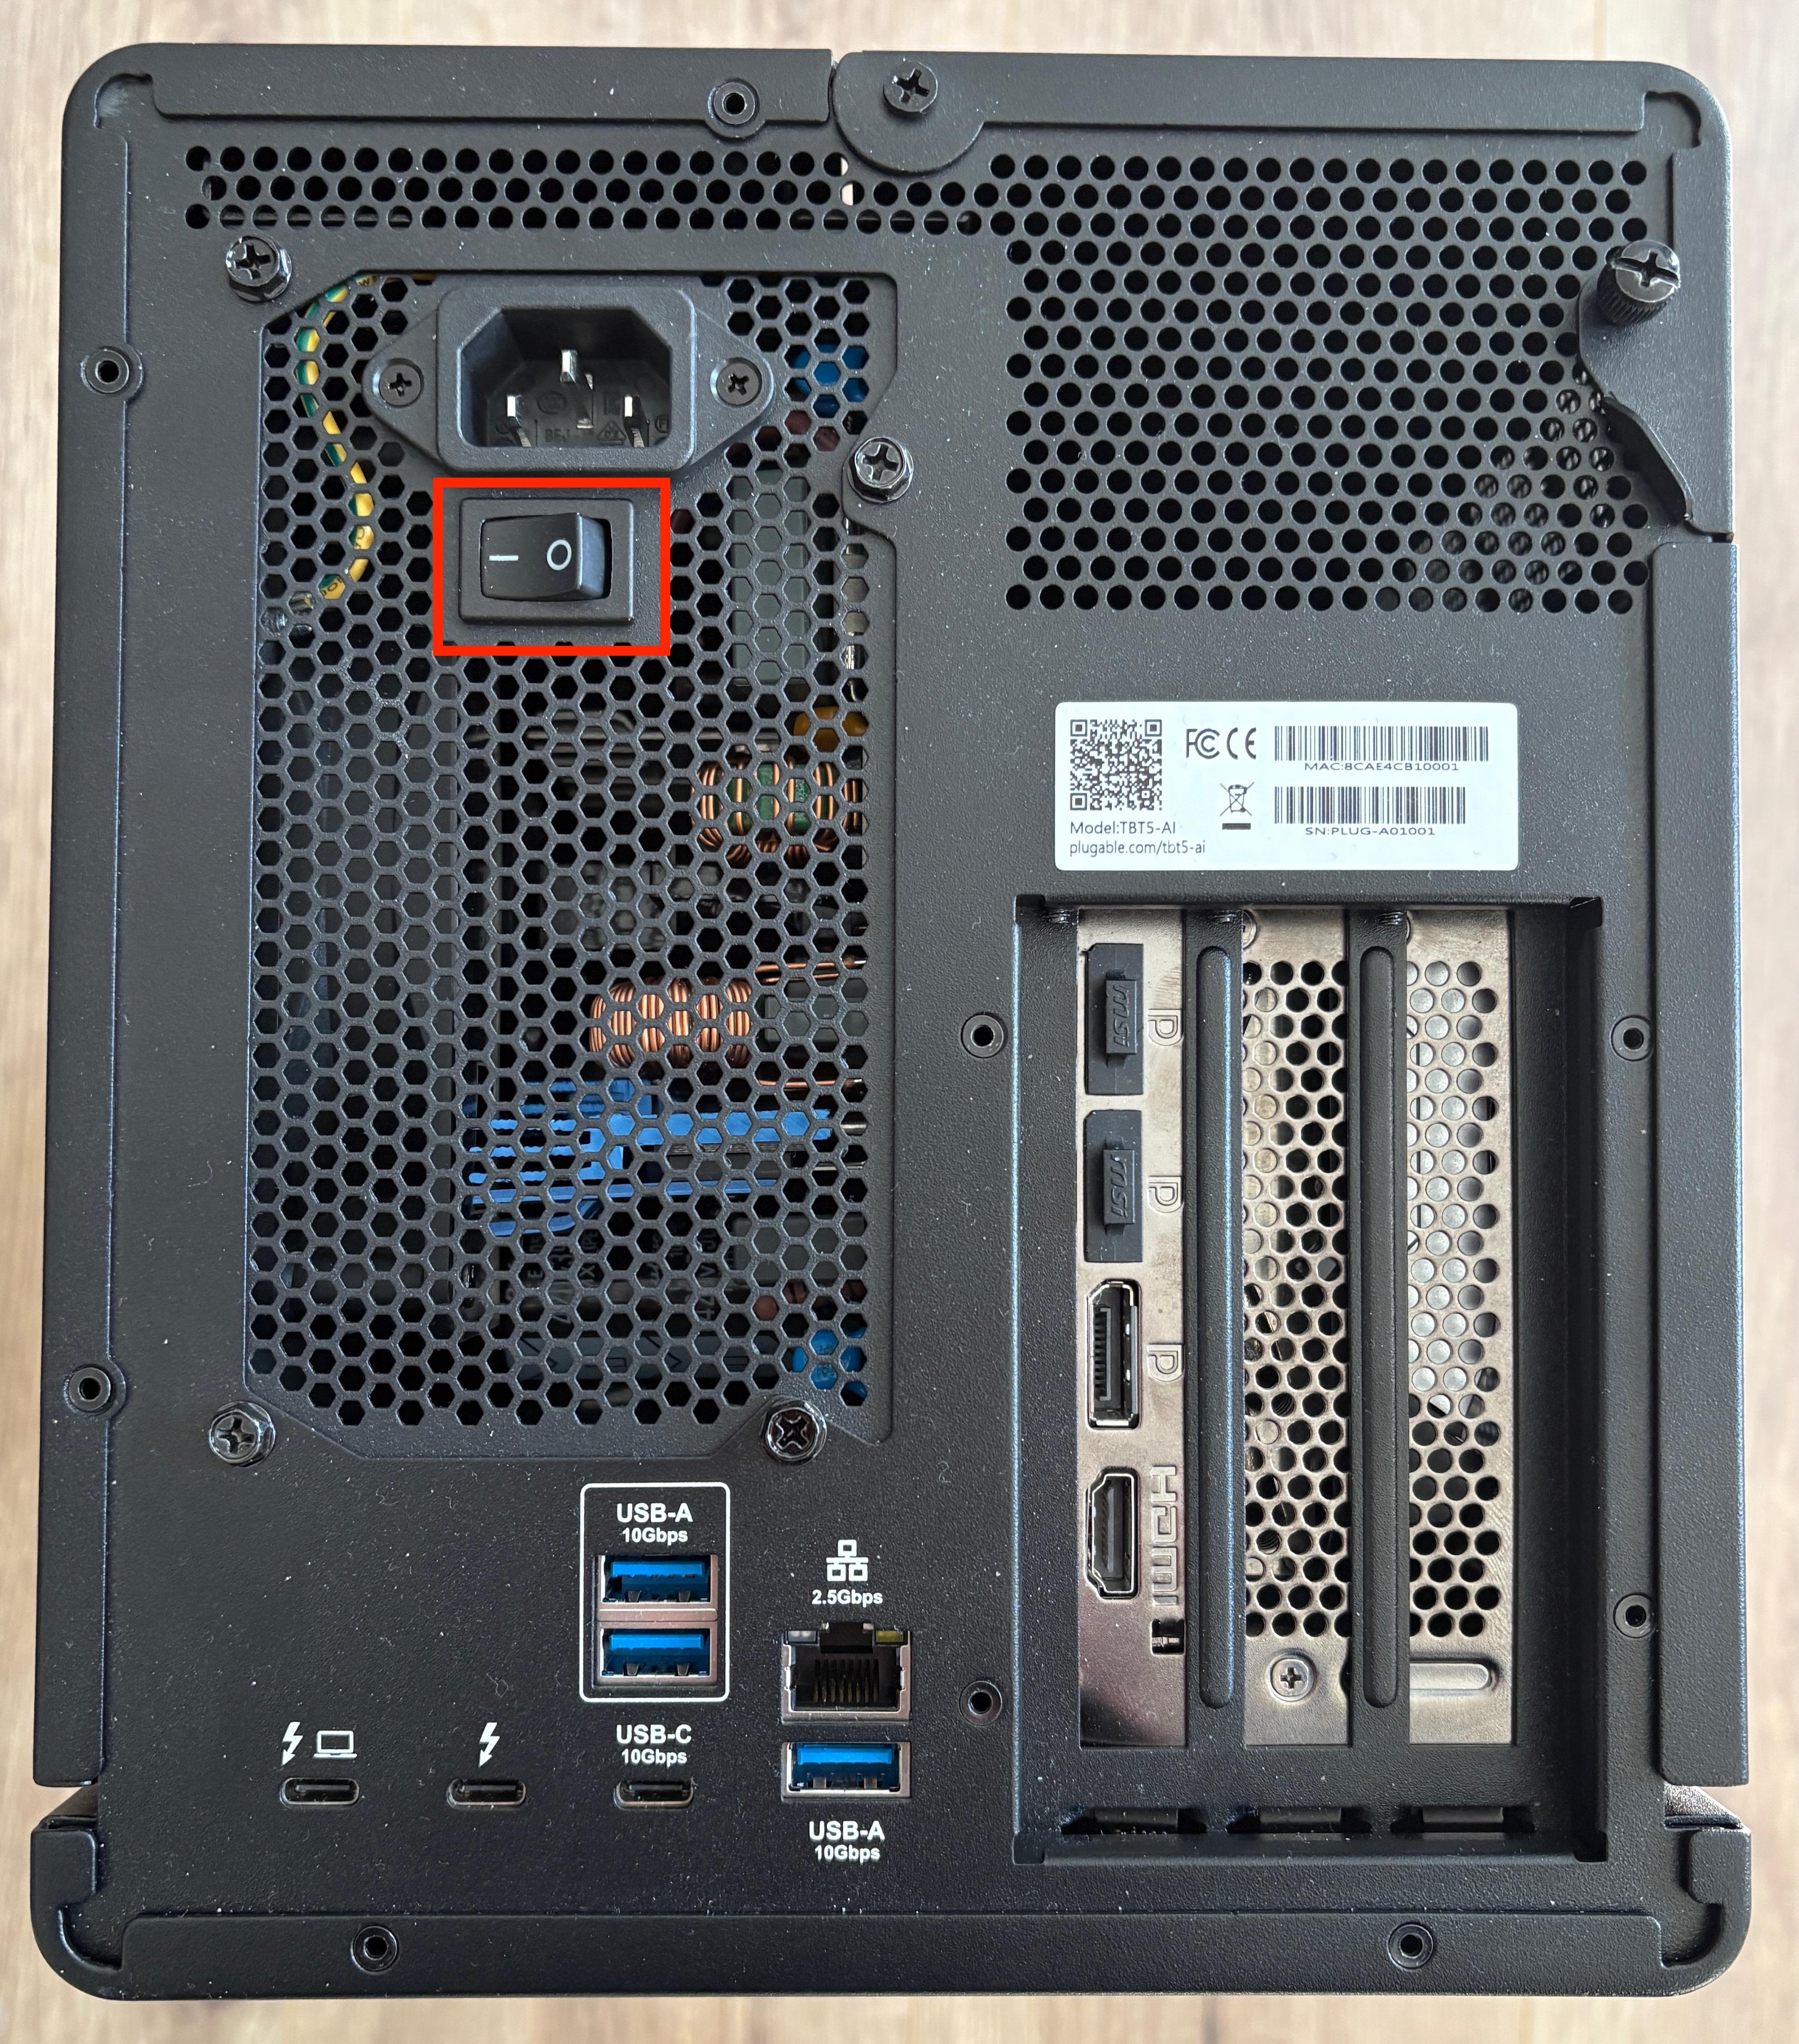
The TBT5-AI has a power switch located on the back of the unit, located directly underneath the power cable inlet. The switch must be in the ‘On’ position (horizontal line side pushed down) in order for the unit to operate.
*** NOTE - Even with the switch in the ‘On’ position, the unit will only power on when connected to a compatible host computer. ***
Do I Need to Install Any Software in Order to Use the TBT5-AI?
No software installations are necessary to use the TBT5-AI unit itself, as the necessary drivers should already be installed or built-in to Windows.
When a graphics processing unit (GPU) is installed within the TBT5-AI, an appropriate driver must be installed within Windows in order for the GPU to function. Please consult the manufacturer of your GPU in order to determine the appropriate driver.
In order to perform AI inference tasks, additional software such as Ollama, LM Studio, Microsoft Foundry Local, or Nvidia NIM (requires Nvidia GPU) must be installed on the Windows host computer. Please consult the application vendor for assistance in using their software.
What Expansion Ports Are Available on the Inside and the Outside of the TBT5-AI?
The TBT5-AI offers one internal four lane PCIe 4.0 expansion slot.
The TBT5-AI offers the following ports on the rear exterior of the unit:
One downstream Thunderbolt 5 port
One downstream 10Gbps USB-C port
Three downstream 10Gbps USB-A ports
One 2.5Gbps Ethernet network port
*** NOTE - 2.5Gbps Ethernet receive/download throughput is commonly observed in the ~1.5–1.8Gbps range. ***
What Are the Specifications of the Power Supply Included With the TBT5-AI?
The TBT5-AI includes a 850W ATX power supply that can supply up to 600W of power to a graphics processing unit (GPU). The included power supply has several different power connectors that can be used to power the GPU, specifically three 6+2 pin power connectors and one 12VHPWR power connector.
The number and type of power connections required will vary depending on the specific model of GPU installed. Please consult the documentation provided by the manufacturer of your GPU for the specific type and number of power connections required.
What Are the Maximum Dimensions of a Graphics Processing Unit (GPU) That Can Be Installed Within the TBT5-AI?
The maximum GPU dimensions that are supported by the TBT5-AI are 346mm x 170mm x 77mm. The TBT5-AI accepts GPUs up to 3.5 slots wide.
What Are the External Dimensions of the TBT5-AI, How Much Does the Unit Weigh?
The external dimensions of the TBT5-AI are 403mm x 200mm x 237mm. Without an add-in card installed, the unit weighs approximately 13 pounds 9 ounces.
Does the TBT5-AI Come With a Thunderbolt Cable, and if So, What Are the Cable’s Specifications?
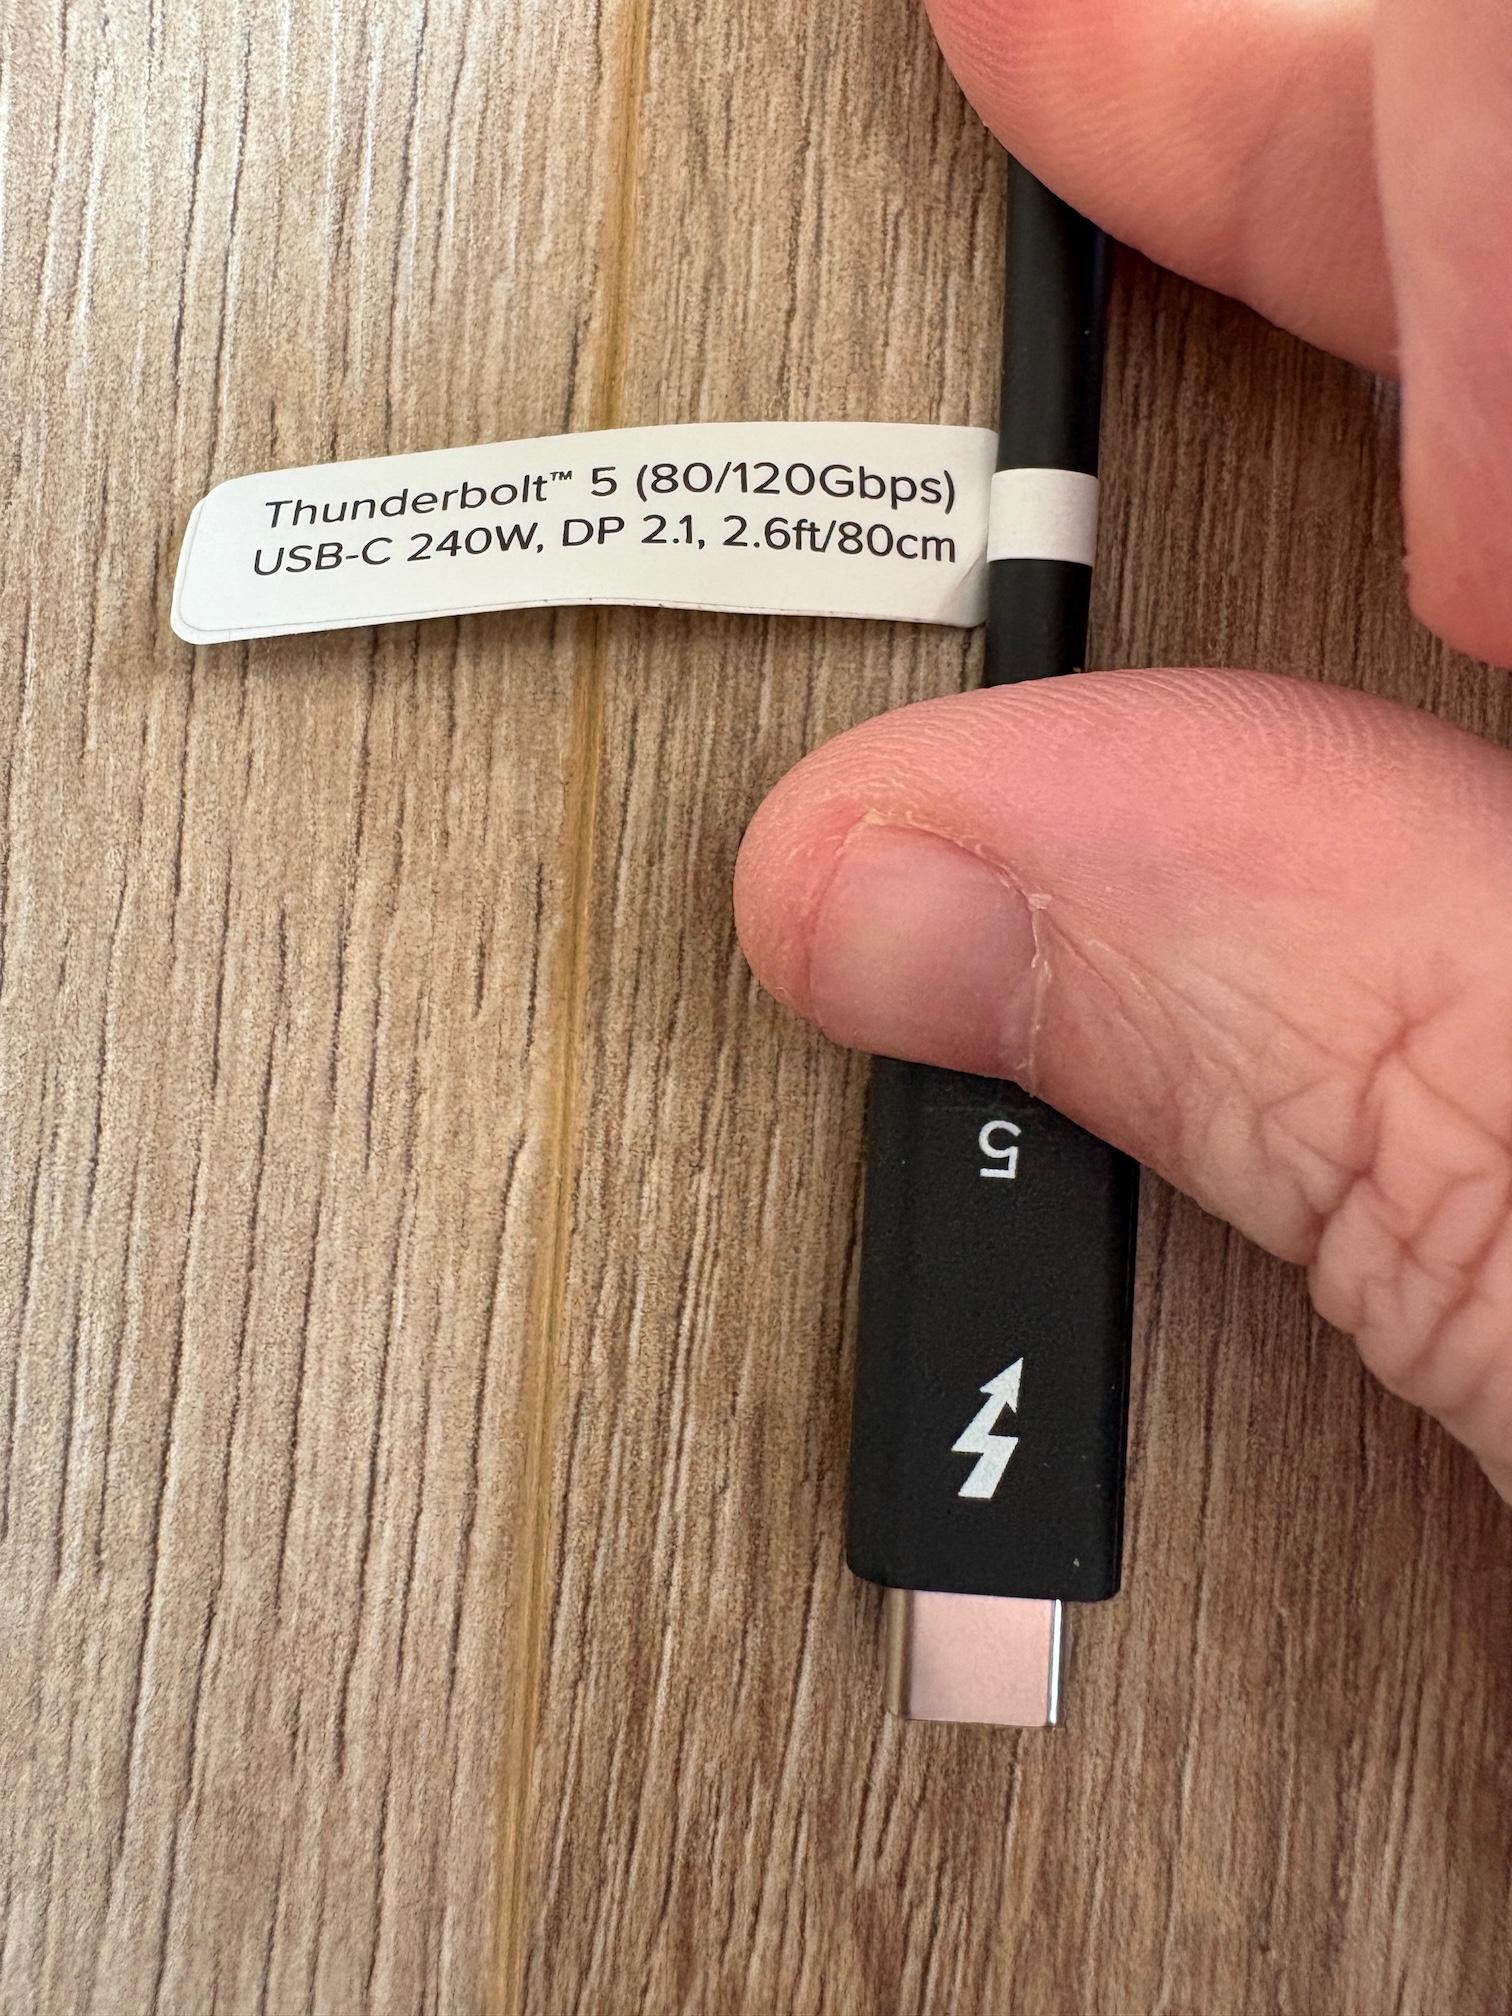
A Thunderbolt 5 cable 0.8 meters long supporting up to 80Gbps bandwidth is included in the box with the TBT5-AI.
Do I Need Any Tools to Open the TBT5-AI and Install a Graphics Processing Unit (GPU)?
The only tool required to open the TBT5-AI in order to install a GPU is a Philips screwdriver.
Does the TBT5-AI Come With an Internal Fan?
The TBT5-AI includes one internal fan. Graphics processing units (GPU) installed by the end user should have their own cooling solution already attached.
What Type of PCI Express Add-In Cards Are Supported in the TBT5-AI, and What Are the Specifications of the PCI Express Slot?
Plugable supports the use of graphics processing unit (GPU) cards with the TBT5-AI. The TBT5-AI has one internal PCIe x16 slot with 4 lanes PCIe 4.0.
Plugable does not officially support the use of any type of PCIe add-in card other than a GPU with the TBT5-AI.
What Types of Graphics Processing Units (GPUs) Does the TBT5-AI Support?
What follows is a partial list of GPUs Plugable has found to be compatible with the TBT5-AI:
What Are the Host System Hardware Requirements for Using the TBT5-AI?
In order to be compatible with the TBT5-AI the host computer must have a Thunderbolt 5, Thunderbolt 4 or USB4 port (USB4 ports must support eGPUs).
Note - the higher data bandwidth of Thunderbolt 5 will provide improved performance as compared to Thunderbolt 4 and USB4.
Note - host computers with only USB Type-C are NOT supported.
What Are the Host System Software Requirements for Using the TBT5-AI?
The TBT5-AI is supported only with the Windows 11 operating system. macOS, Linux and ChromeOS operating systems are not supported.
What Are the Host System Memory Requirements for Using the TBT5-AI?
A host computer must have a minimum 16GB of RAM in order to be used with the TBT5-AI, and 32GB of RAM or more is recommended.
What Are the Host System CPU Requirements for Using the TBT5-AI?
In order to be used with the TBT5-AI a host computer must have an 11th generation or newer Intel CPU or Zen 4 or newer AMD CPU.
I Have Tried to Set Up My TBT5-AI and Things Are Not Working As Expected. What Are the First Troubleshooting Steps I Should Take?
If things are not working as expected when setting up your TBT5-AI, please use the following steps in order to troubleshoot:
1. Double-check that you are using only the 0.8 meter long Thunderbolt 5 cable Plugable included in the box with the TBT5-AI in order to connect the TBT5-AI to your computer. This is important because other cables can sometimes cause problems.
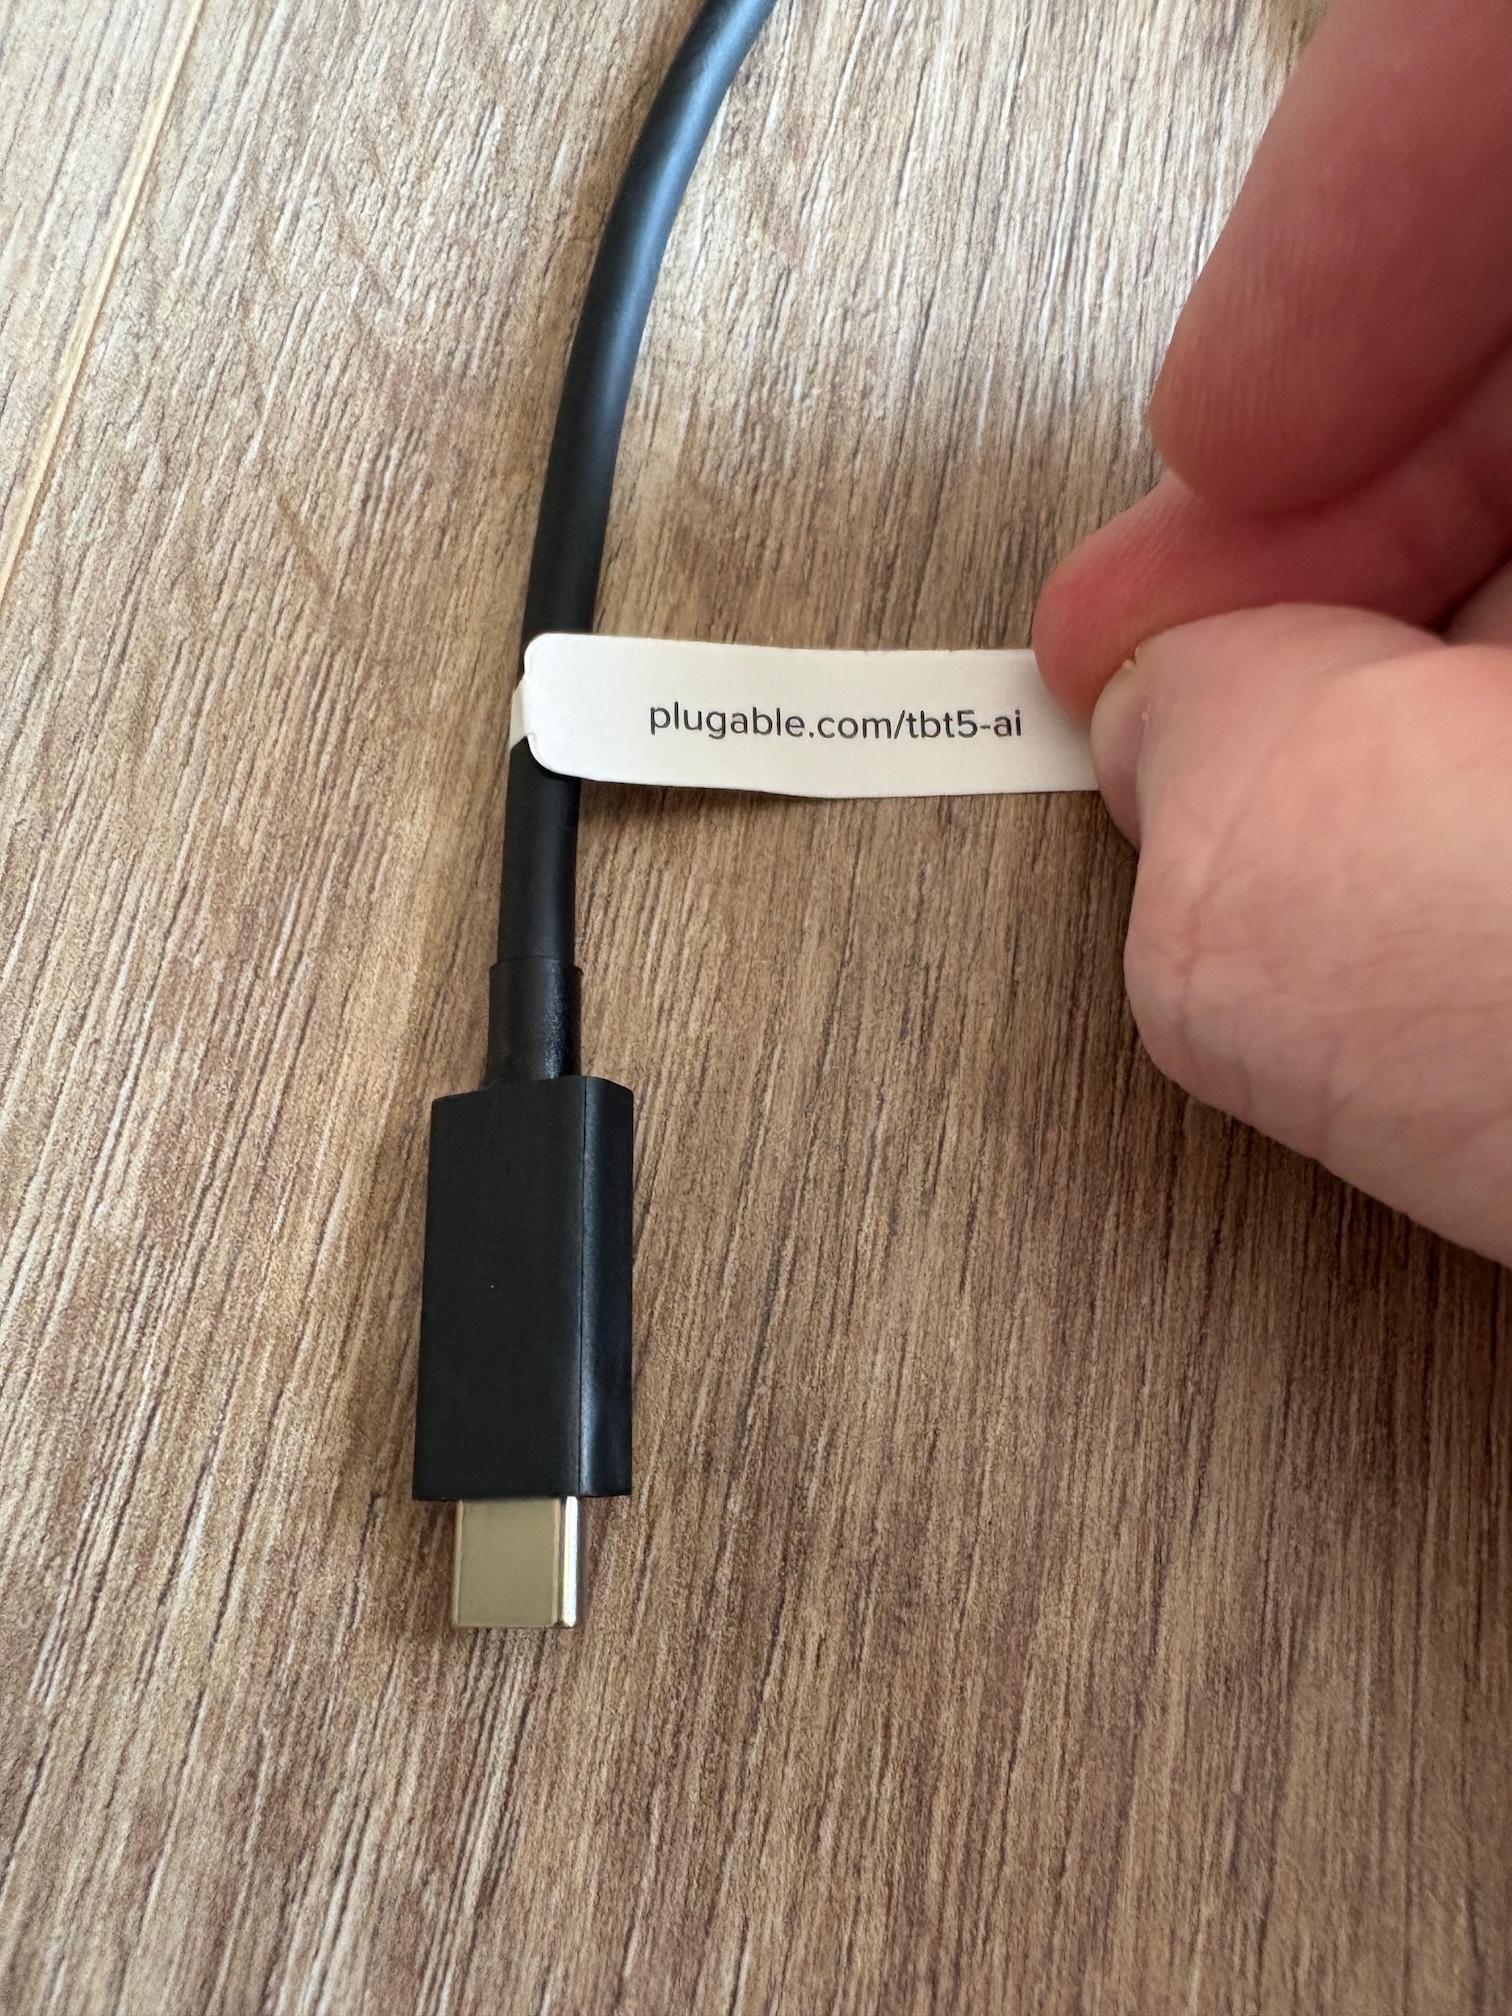
For your reference, the Plugable Thunderbolt 5 cable will have a small white cable flag attached to it that lists the product model on one side and the cable’s specifications on the opposite side.
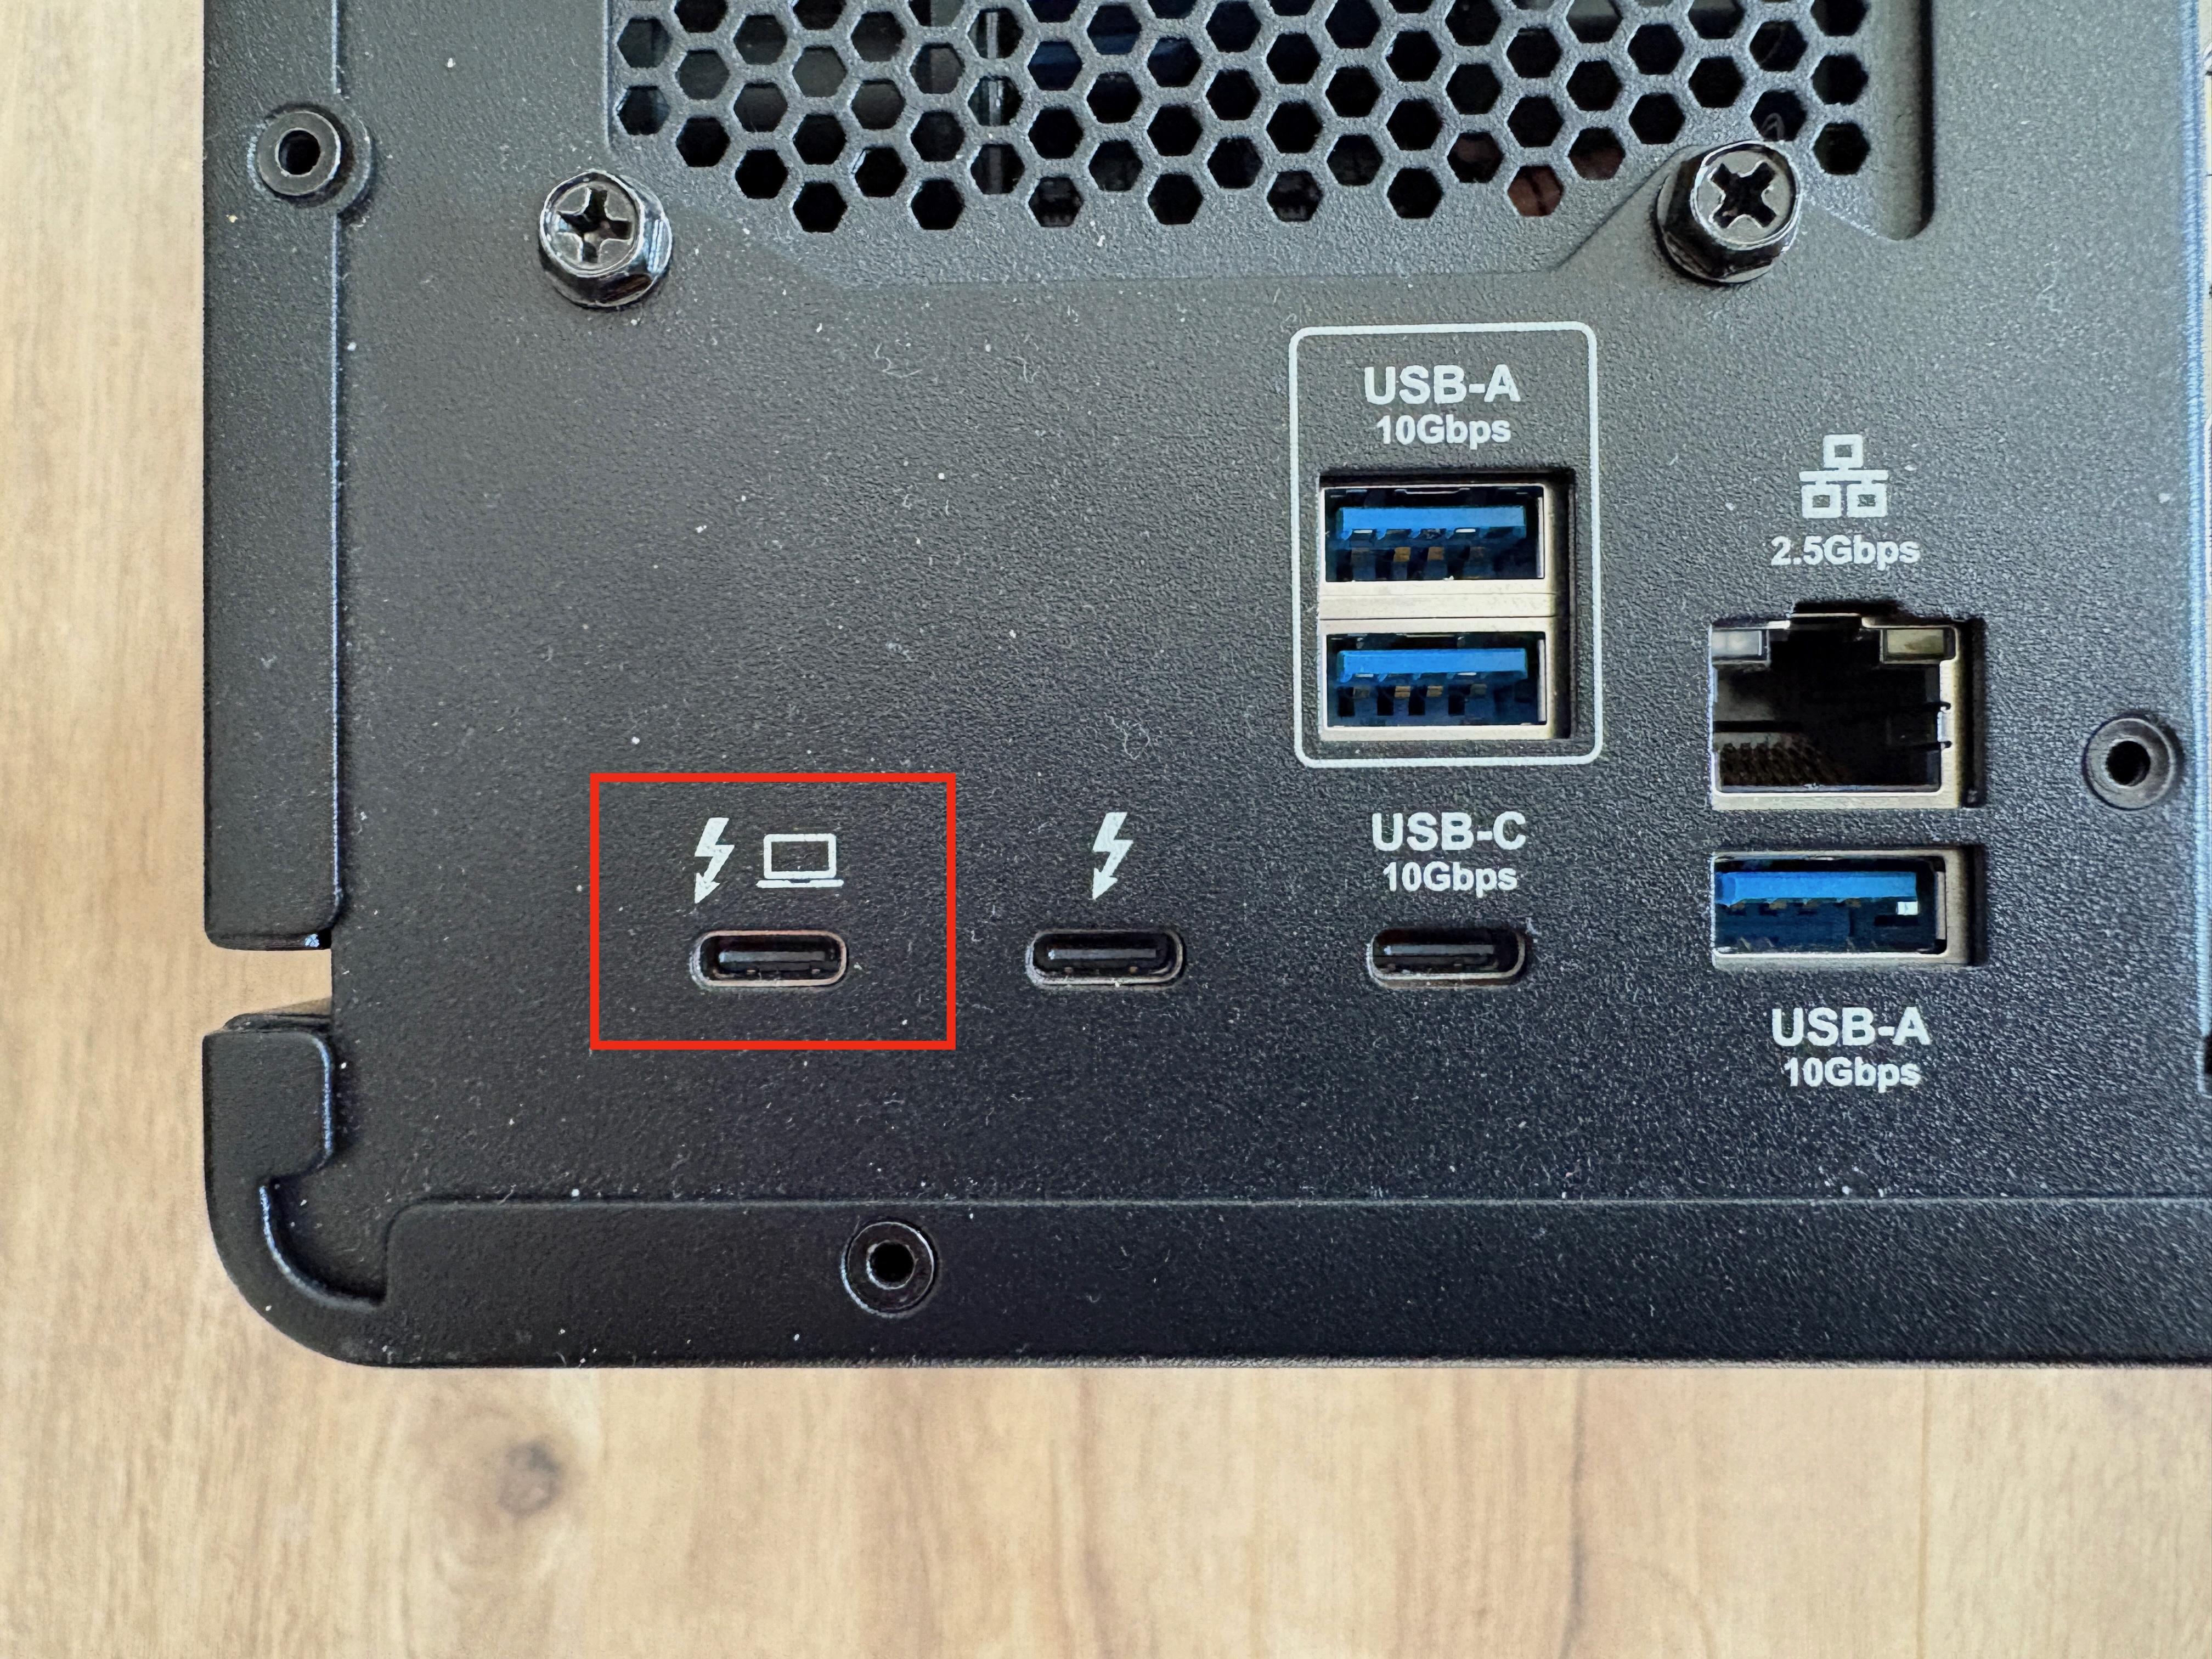
2. Double-check that you are connecting the included Thunderbolt 5 cable to the single Thunderbolt 5 host connection port located on the back of the enclosure.
The Thunderbolt 5 host connection port has a small computer icon and Thunderbolt icon located above it. The Thunderbolt 5 host connection port is the port furthest to the left on the back of the TBT5-AI.
3. Double-check that the power switch located on the back of the TBT5-AI is switched to the ‘On’ position. The ‘On’ position is when the side of the switch with the horizontal line is pushed down.
*** NOTE - The TBT5-AI will only power on when it is connected to a compatible host computer. The TBT5-AI will NOT power on when it is not connected to a compatible host computer, even if the power switch is in the ‘On’ position. ***
4. Double-check to ensure that the graphics processing unit (GPU) is securely installed within the TBT5-AI’s PCI Express slot, and that all of the required internal power connections to the GPU are secured.
Please consult your GPU manufacturer for information in regard to the required power connections.
5. Double-check to ensure that the Thunderbolt 5 cable is connected directly to a Thunderbolt 5, Thunderbolt 4, or USB4 port (that supports external GPUs) within your computer.
The TBT5-AI will not work if it is connected to a USB Type-C port that does not support Thunderbolt 5, Thunderbolt 4, or USB4.
*** NOTE - The TBT5-AI should be connected directly to the host computer. There should not be any devices located in between the TBT5-AI and the host computer. ***
6. Double-check to ensure that the necessary Windows driver has been installed on the host computer for the graphics processing unit (GPU) installed within the TBT5-AI. If the necessary driver is not installed, then the GPU will not function.
Please consult your GPU manufacturer for information in regard to obtaining the proper driver.
If the information provided above does not help resolve the issue, please reach out to Plugable directly via support@plugable.com for assistance.
TBT5-AI Graphics Processing Unit (GPU) Installation Guide
Overview
This guide will demonstrate how to install a graphics processing unit (GPU) within the Plugable TBT5-AI enclosure. The process is fairly straightforward, and typically can be completed in just a few minutes. If you have any questions about the process, prior to proceeding with the installation please contact Plugable support → support@plugable.com for additional guidance.
NOTE - We also have a video installation guide available here → LINK
Suggested materials
- Large, flat stable work surface
- Electrostatic discharge mat (suggested but not required)
- Philips screwdriver
Installation process
1. Completely remove the TBT5-AI from all of its external packaging. Please save all of the packaging materials for use in transporting the unit at a later date.
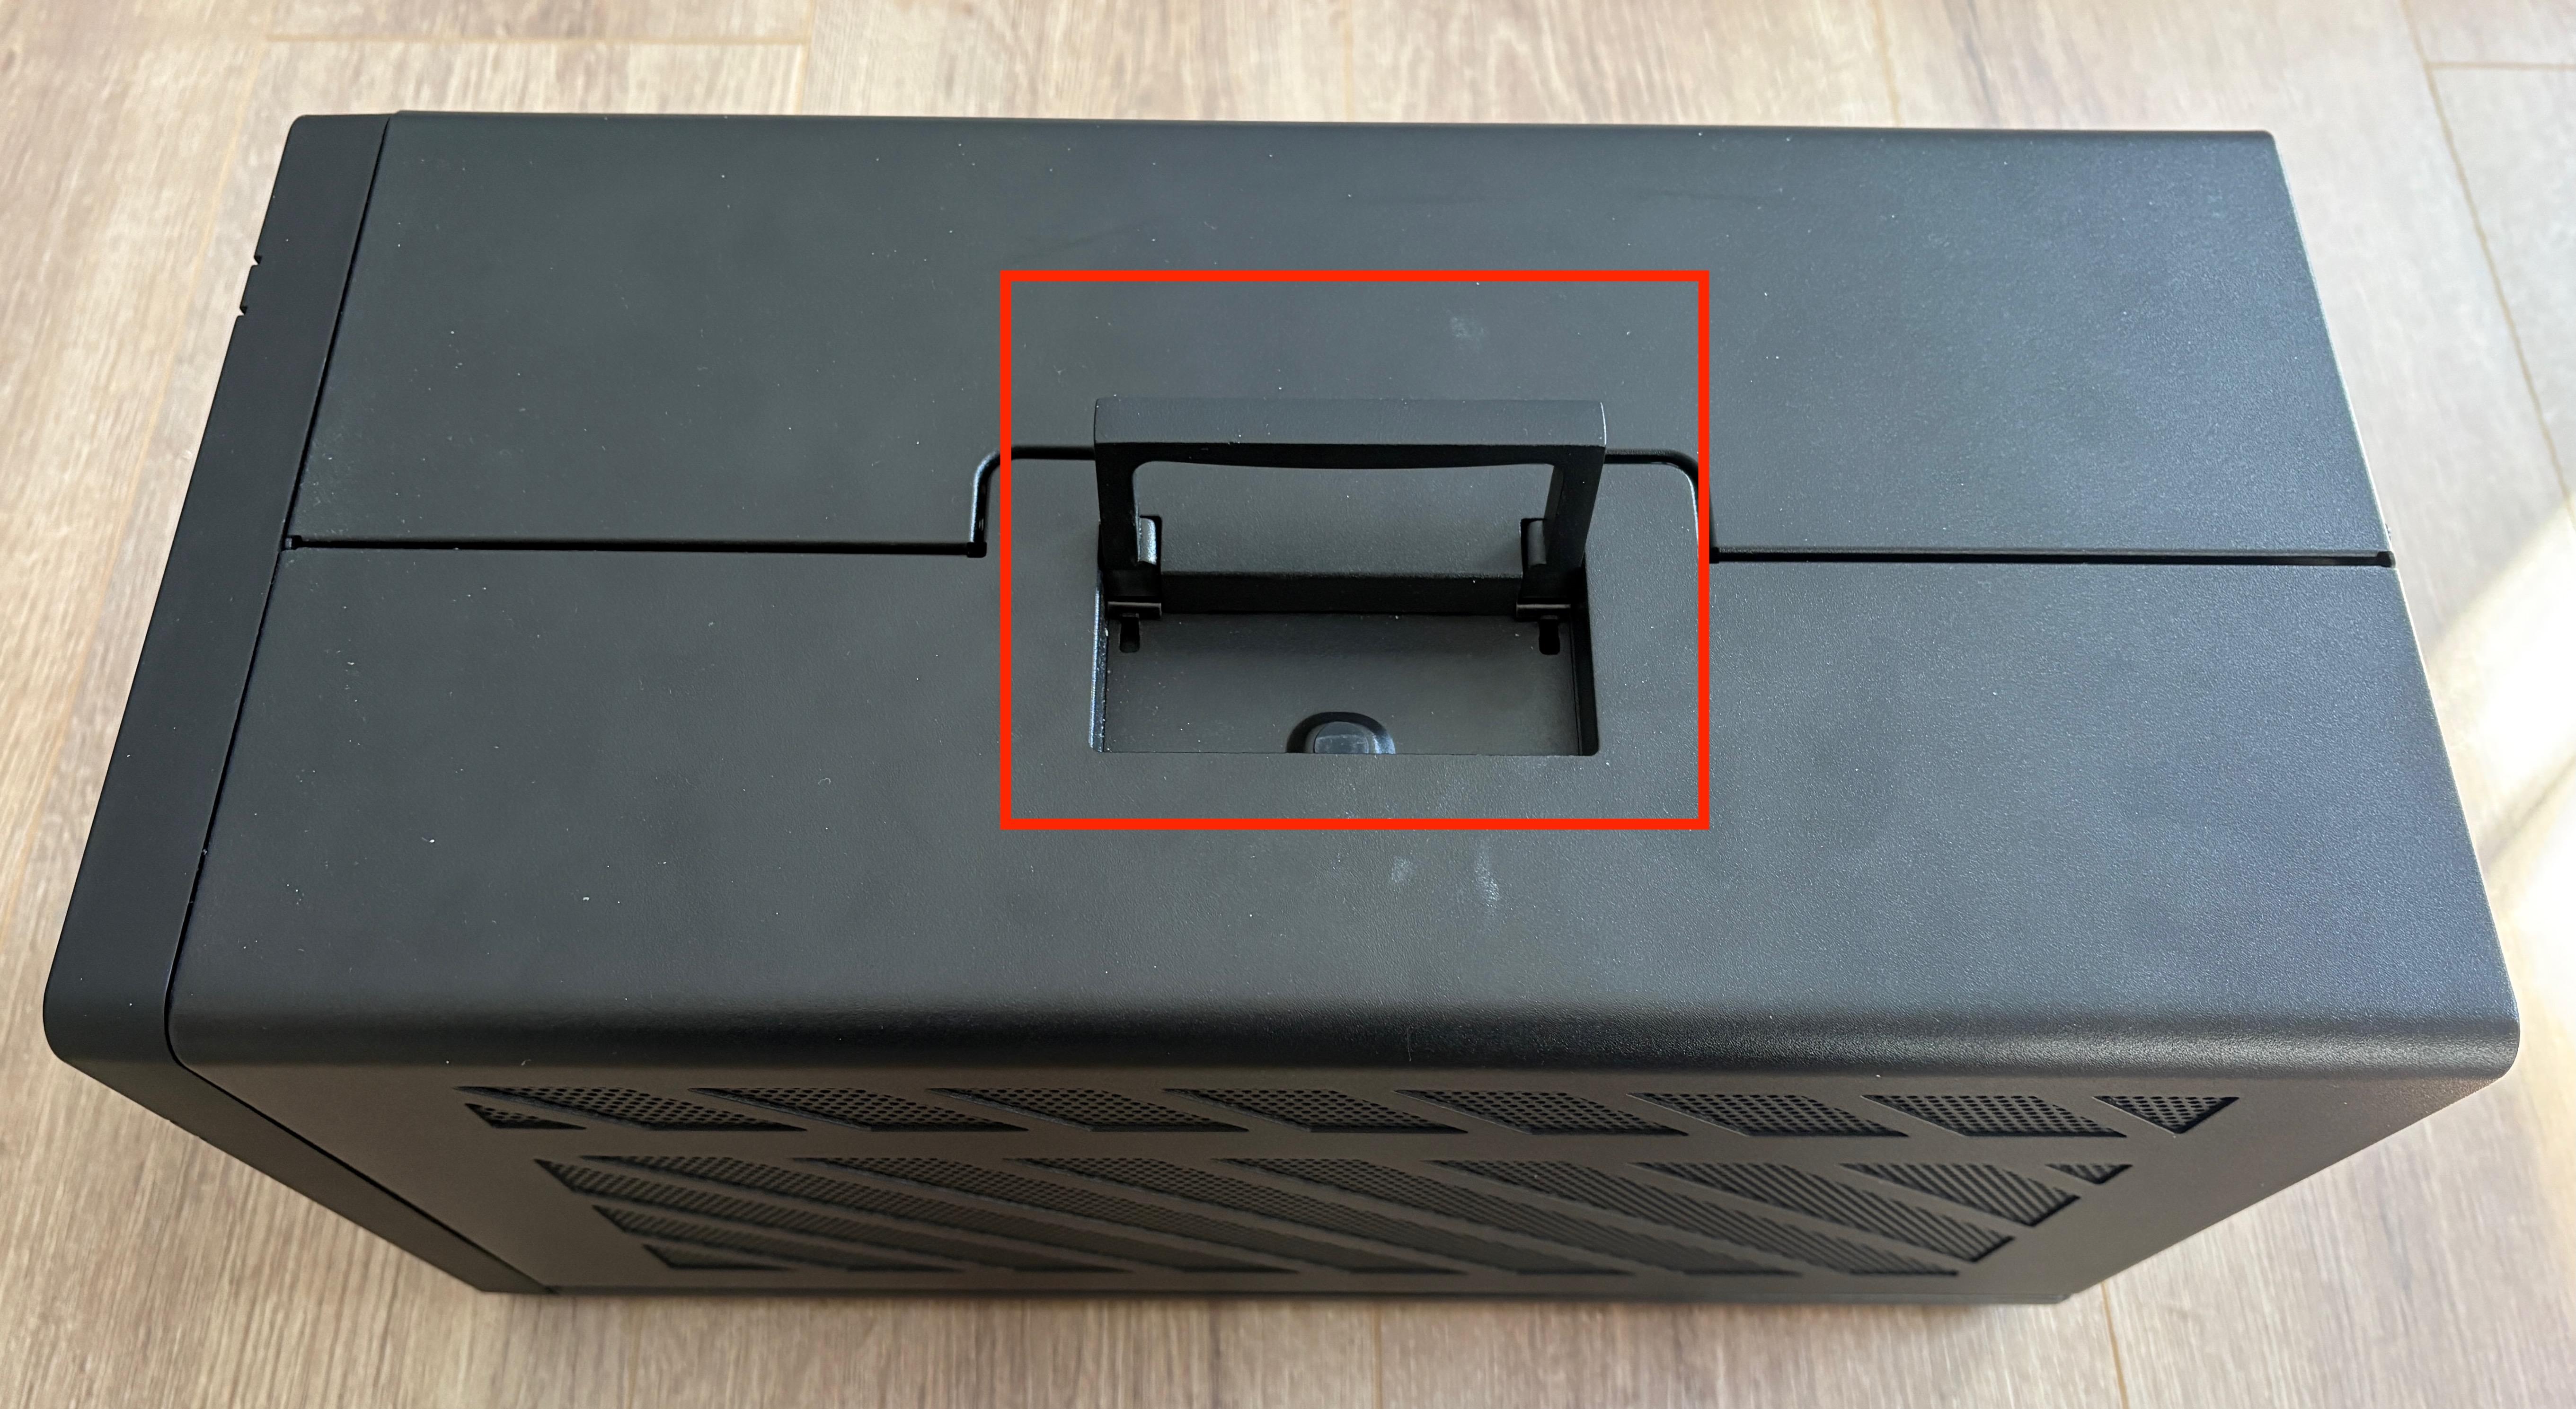
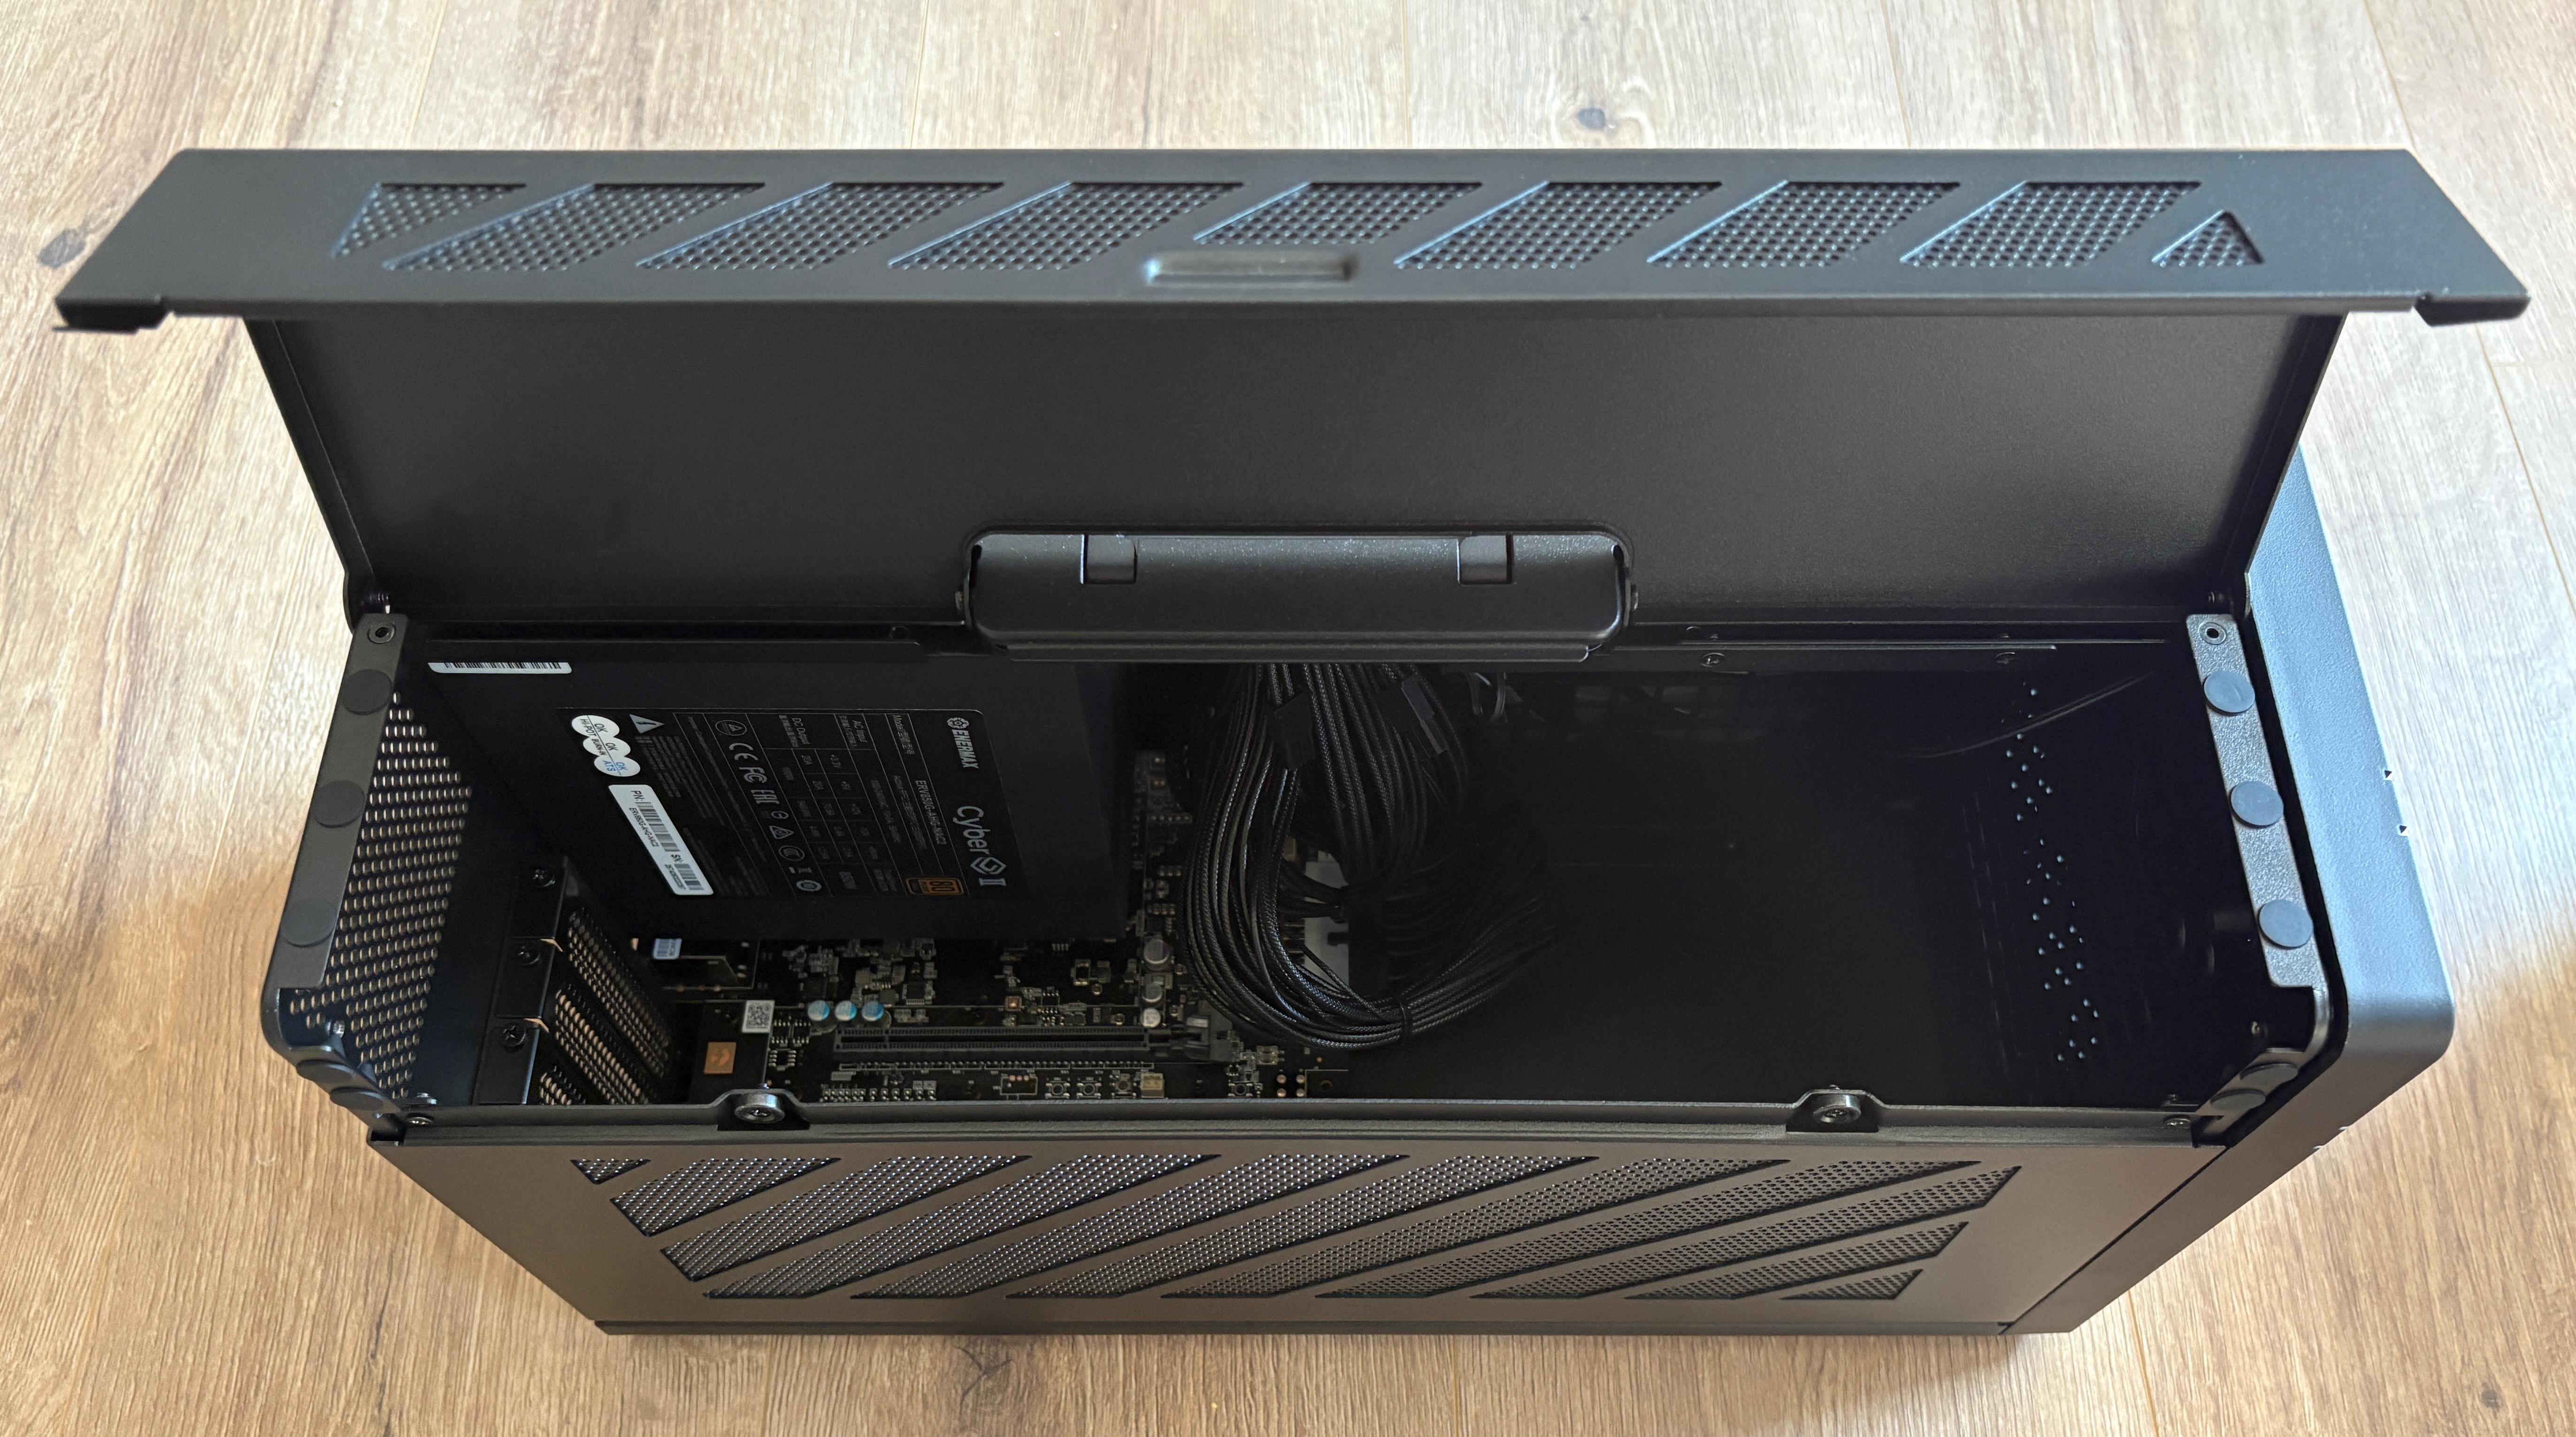
2. Manually extend the top-handle of the unit by pulling up on it with your fingers. Using the handle, place the TBT5-AI on a sturdy and smooth work surface.
NOTE - The use of an electrostatic discharge mat is suggested, however it is not required.
3. Examine the exterior of the enclosure for any signs of damage that may have occurred during the shipping process. If any damage is noted, please stop the installation process immediately and contact Plugable support for assistance → support@plugable.com
*** IMPORTANT NOTE - Please do NOT connect the power cable to the TBT5-AI at any point moving forward. There should be no external cable connections of any kind to the TBT5-AI while the GPU is being installed ***
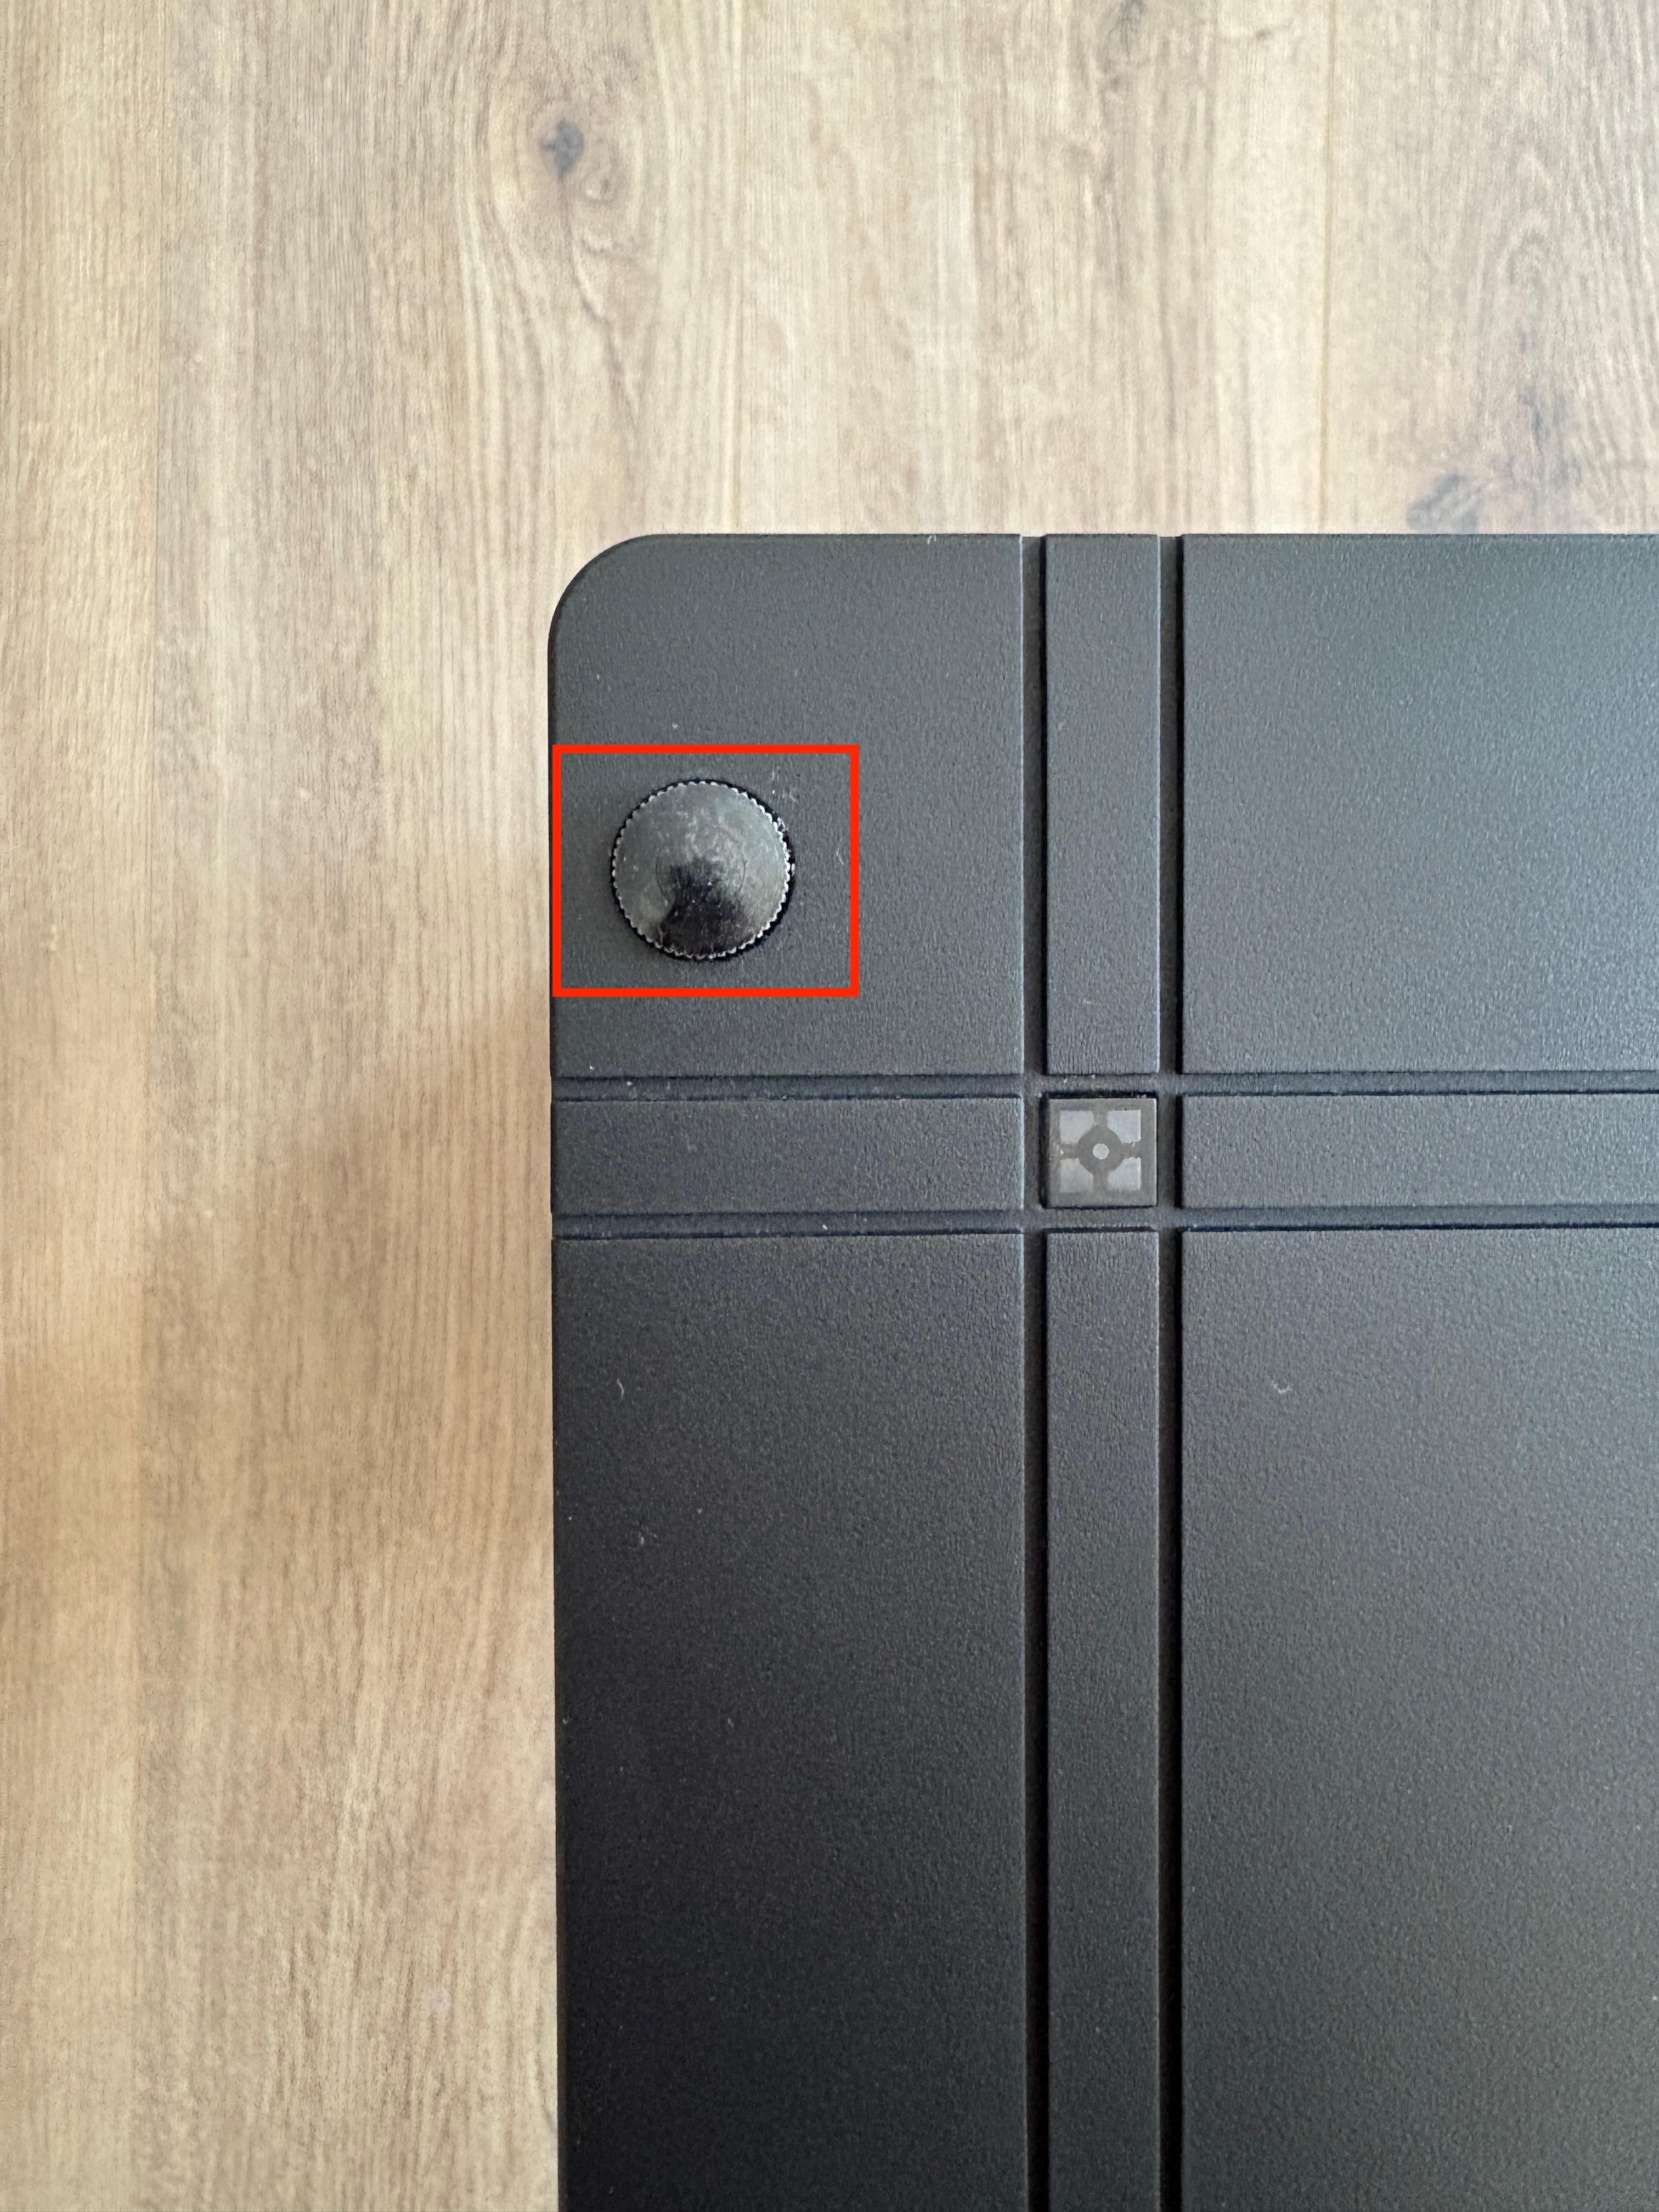
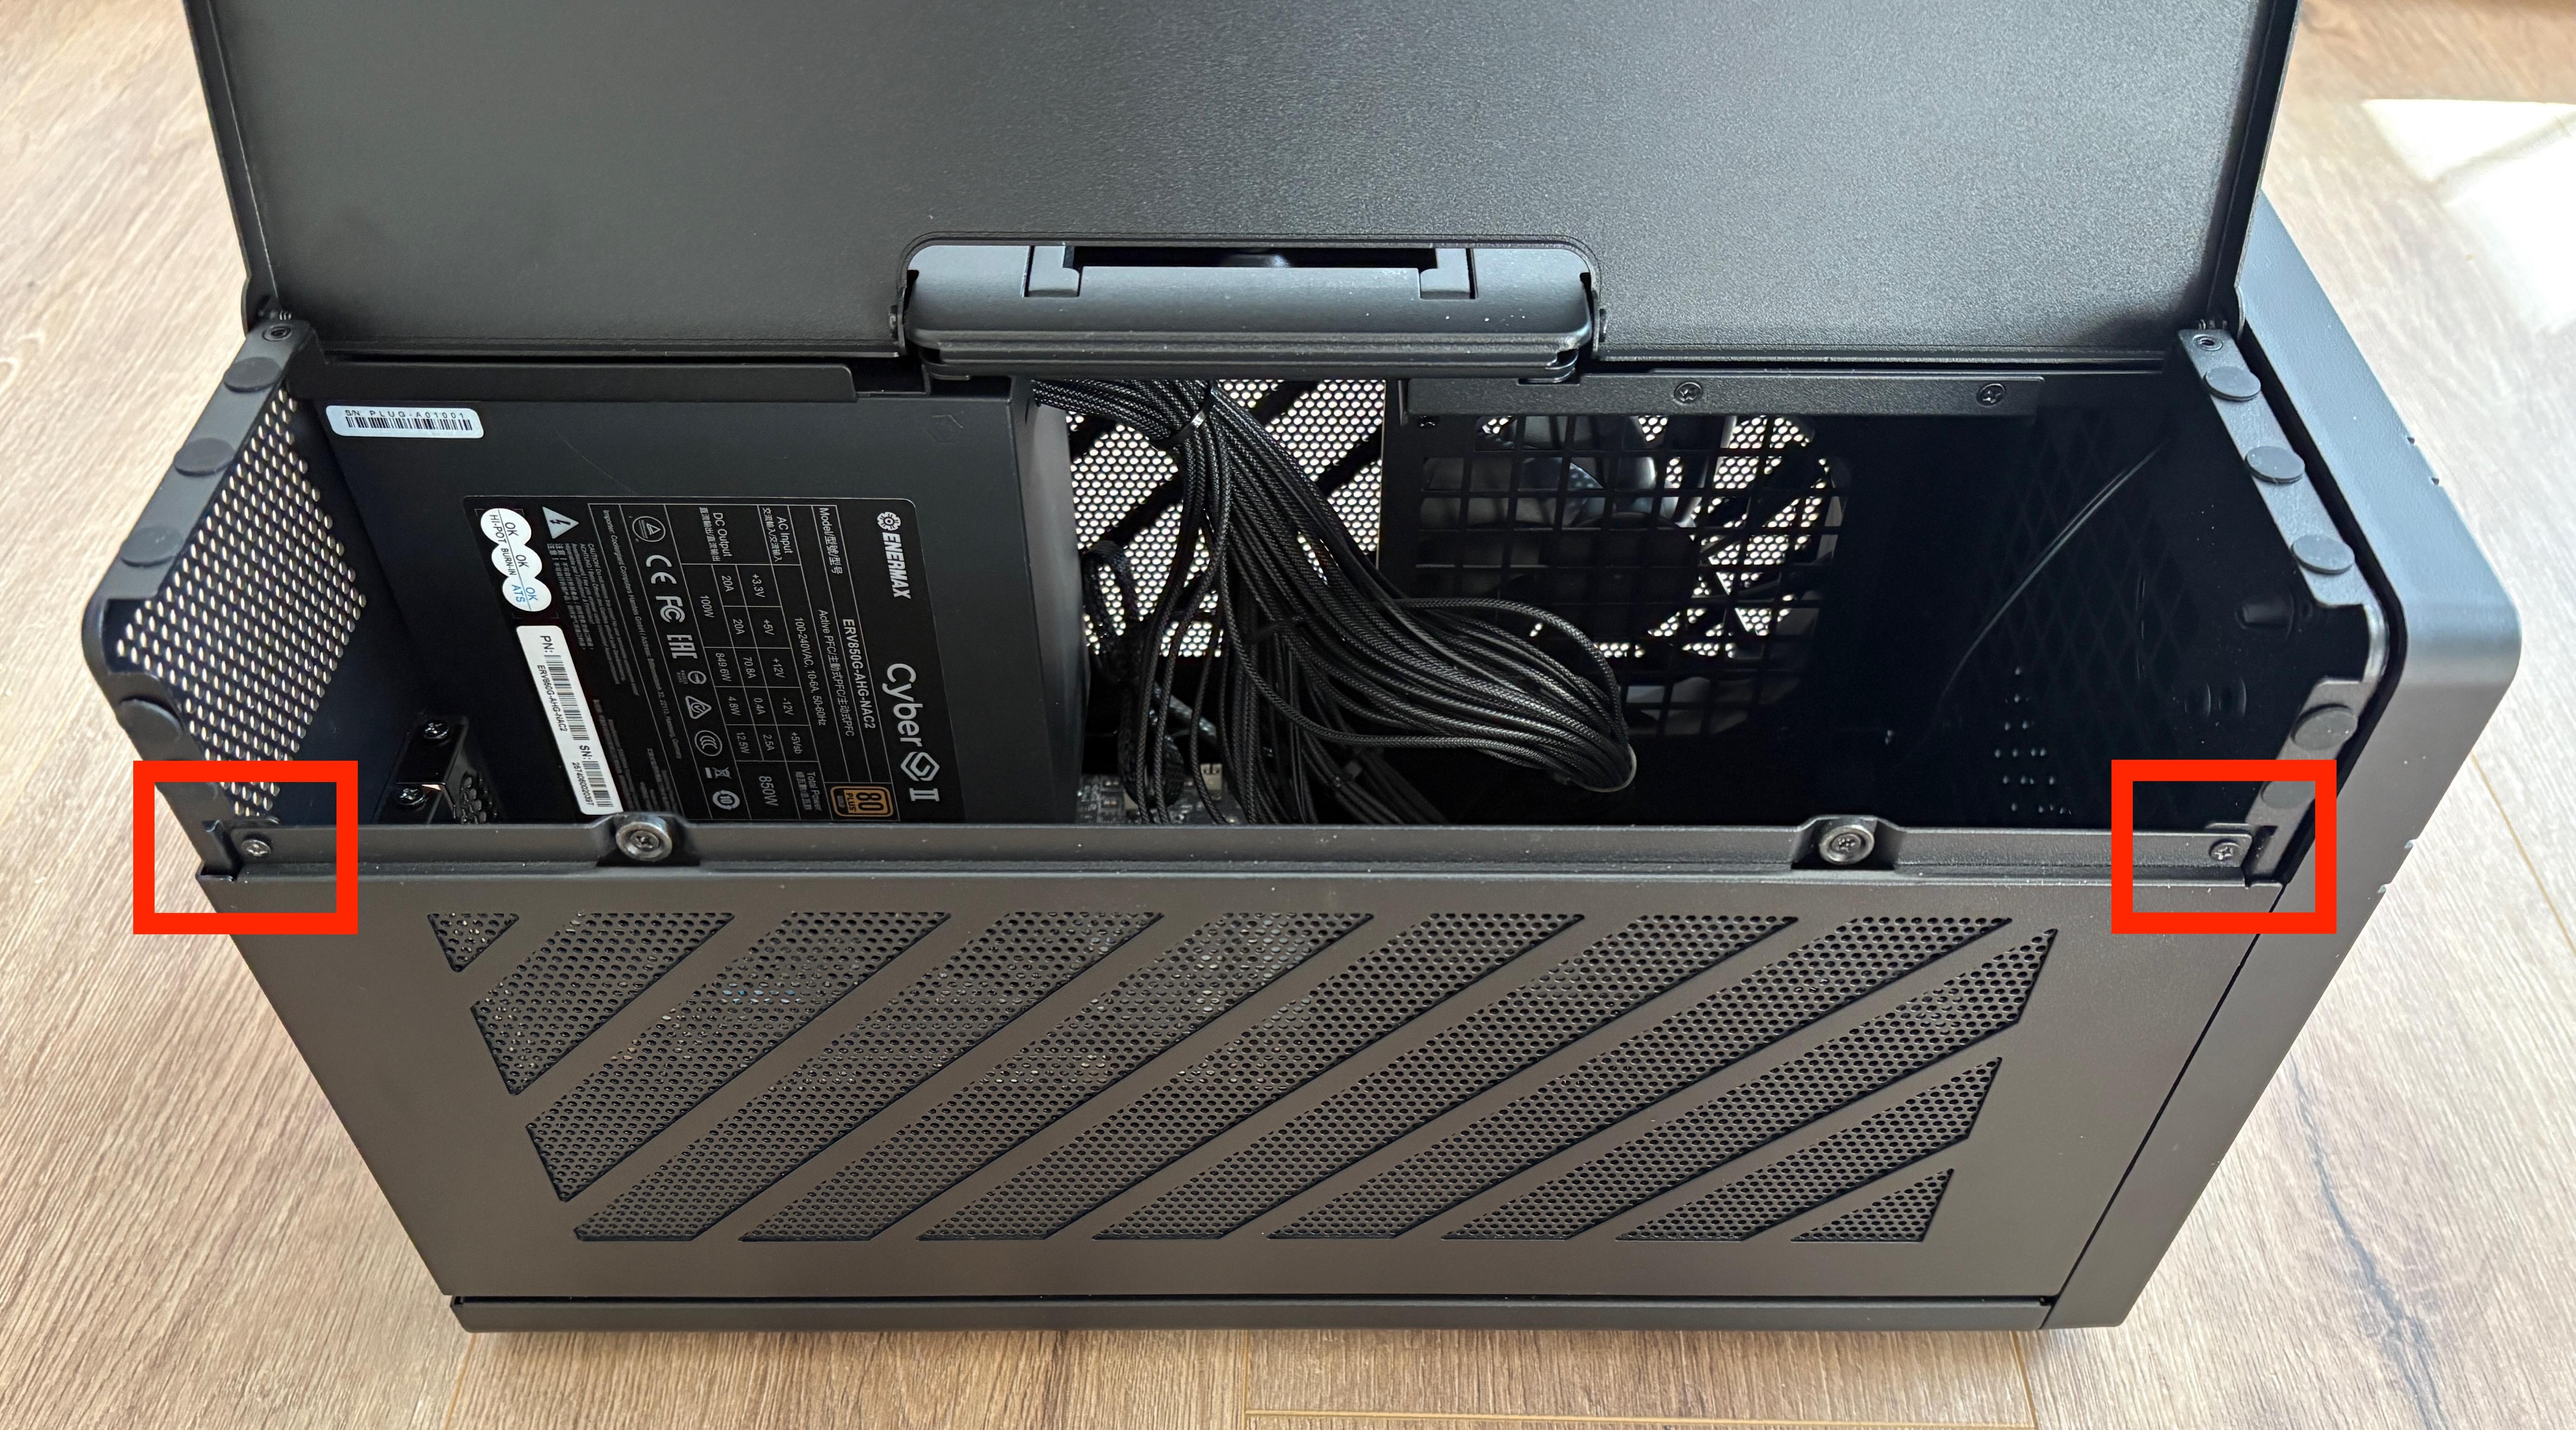
4. Remove the large thumbscrew located on the top left corner of the front of TBT5-AI by turning it counterclockwise with your fingers.
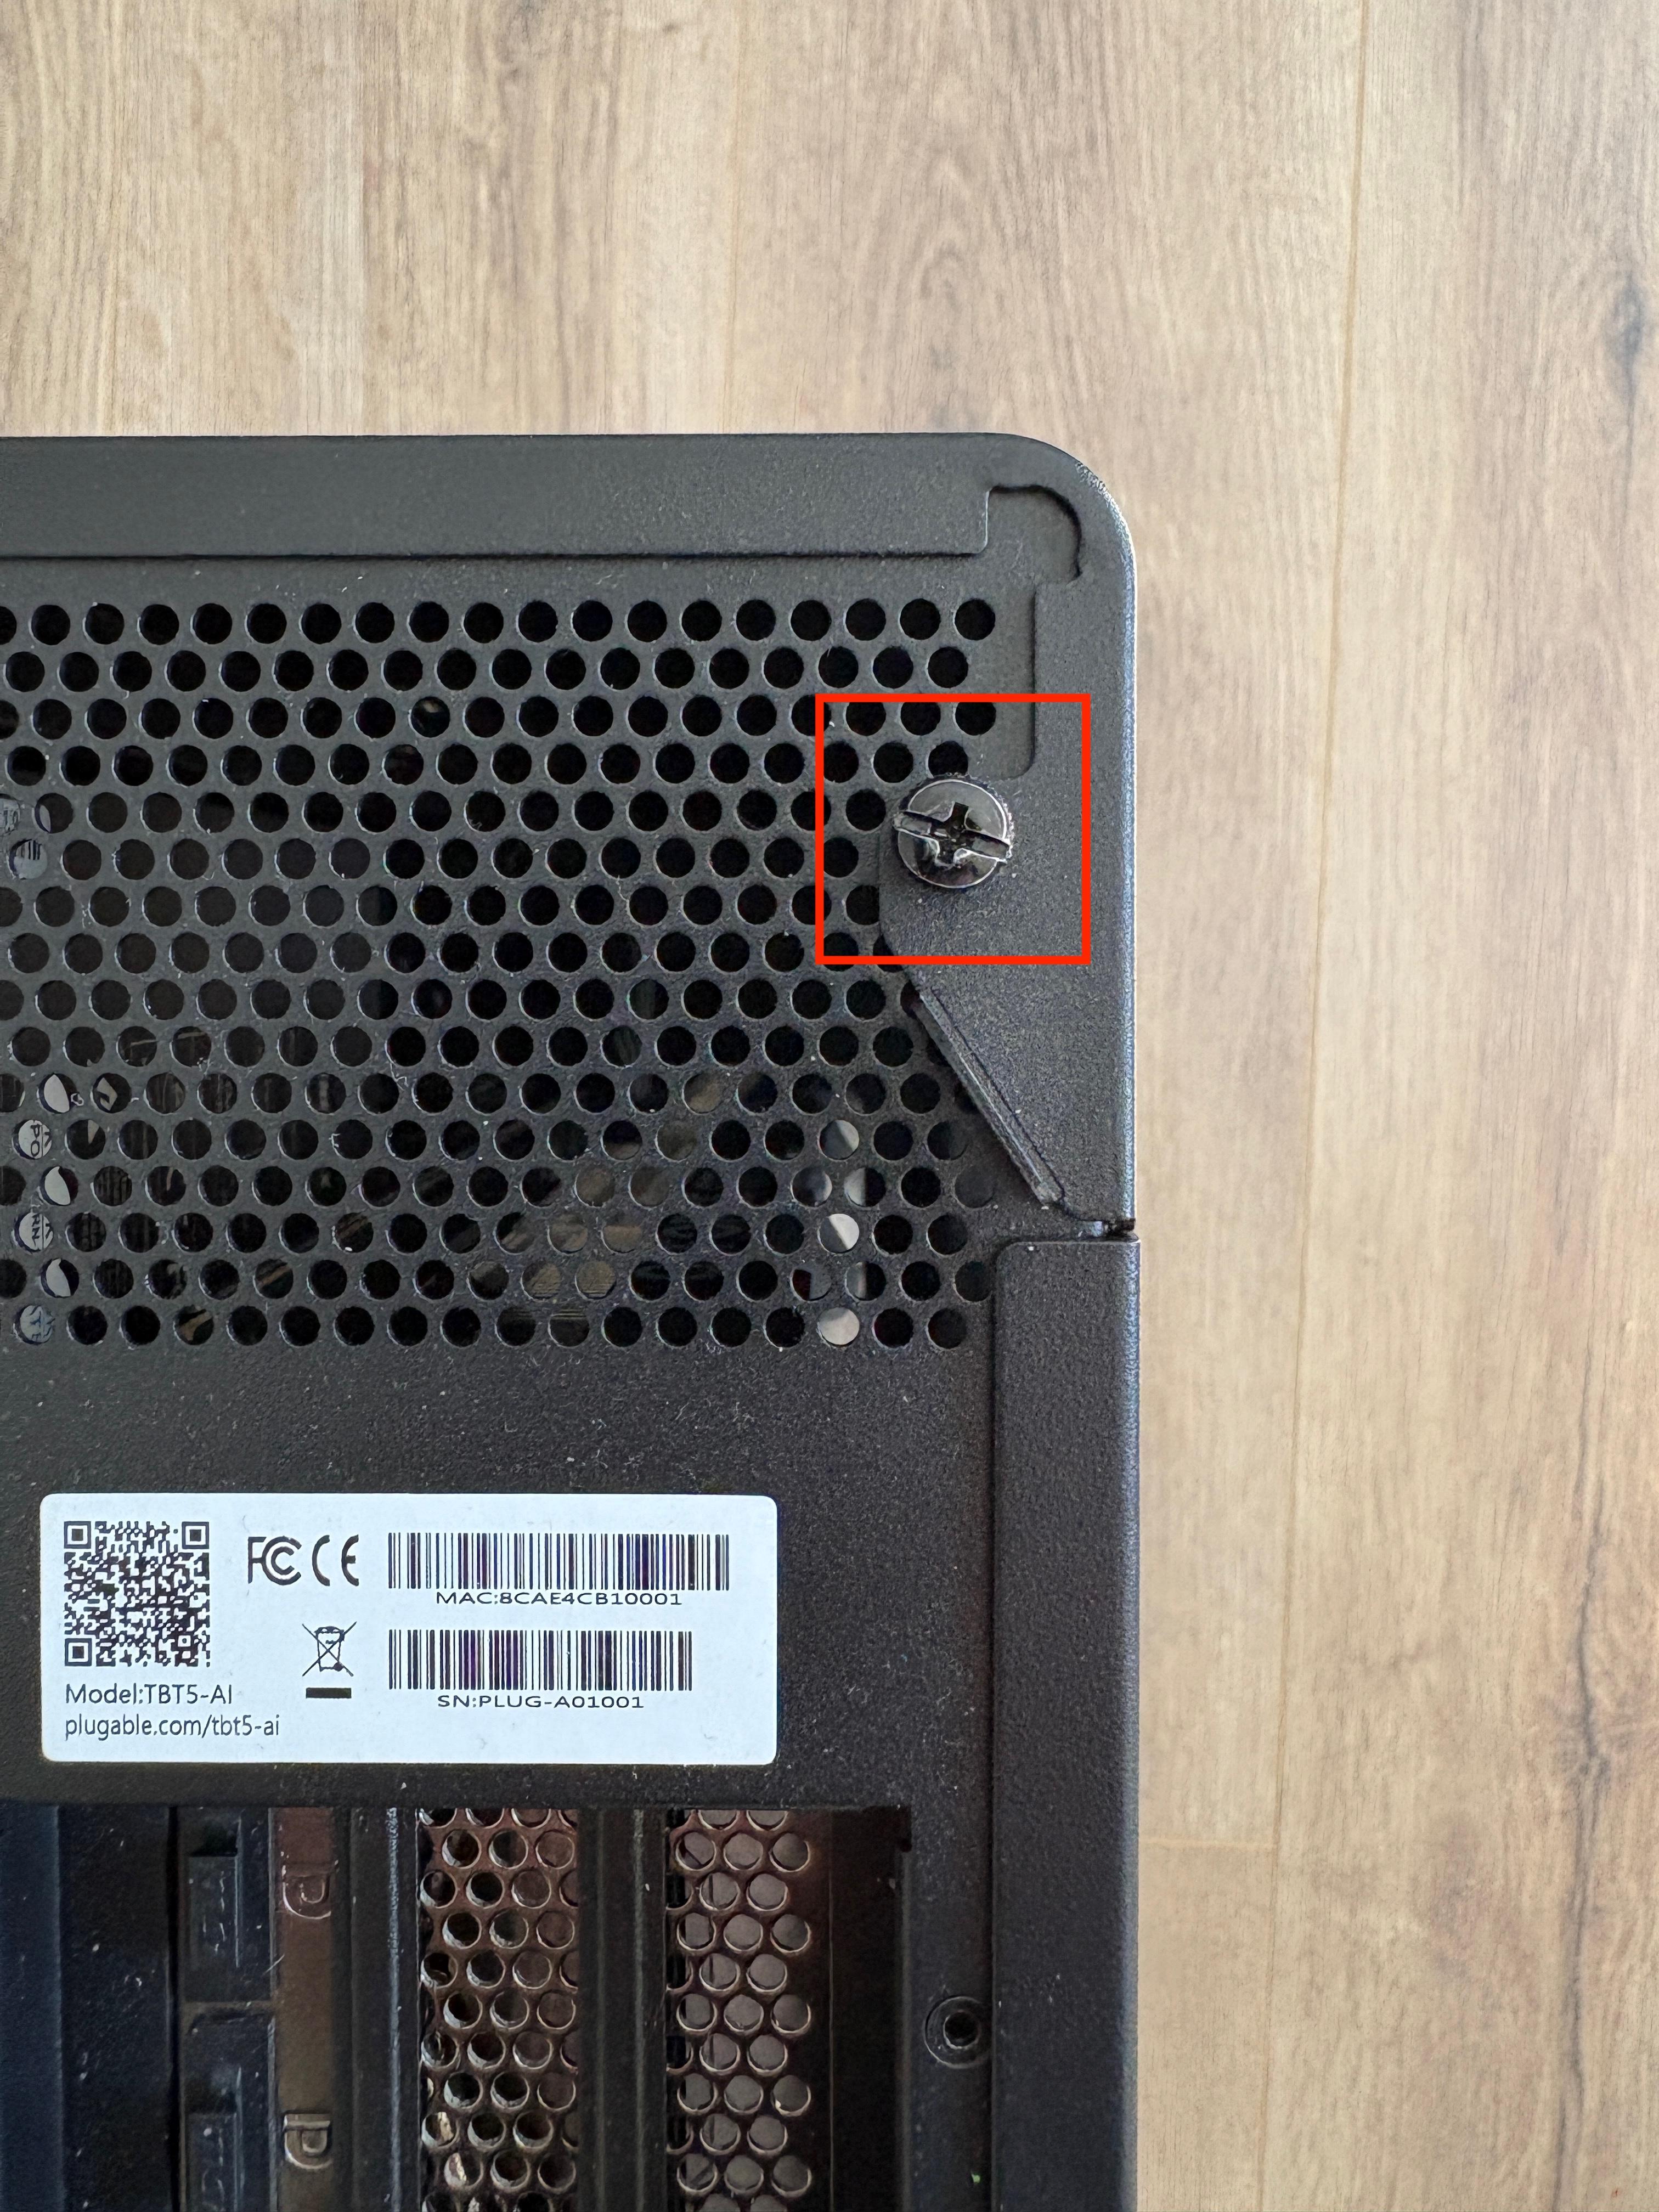
5. Remove the thumbscrew located on the top right corner of the rear of the TBT5-AI by turning it counterclockwise with your fingers. You can also use a Phillips screwdriver to remove the screw, if necessary.
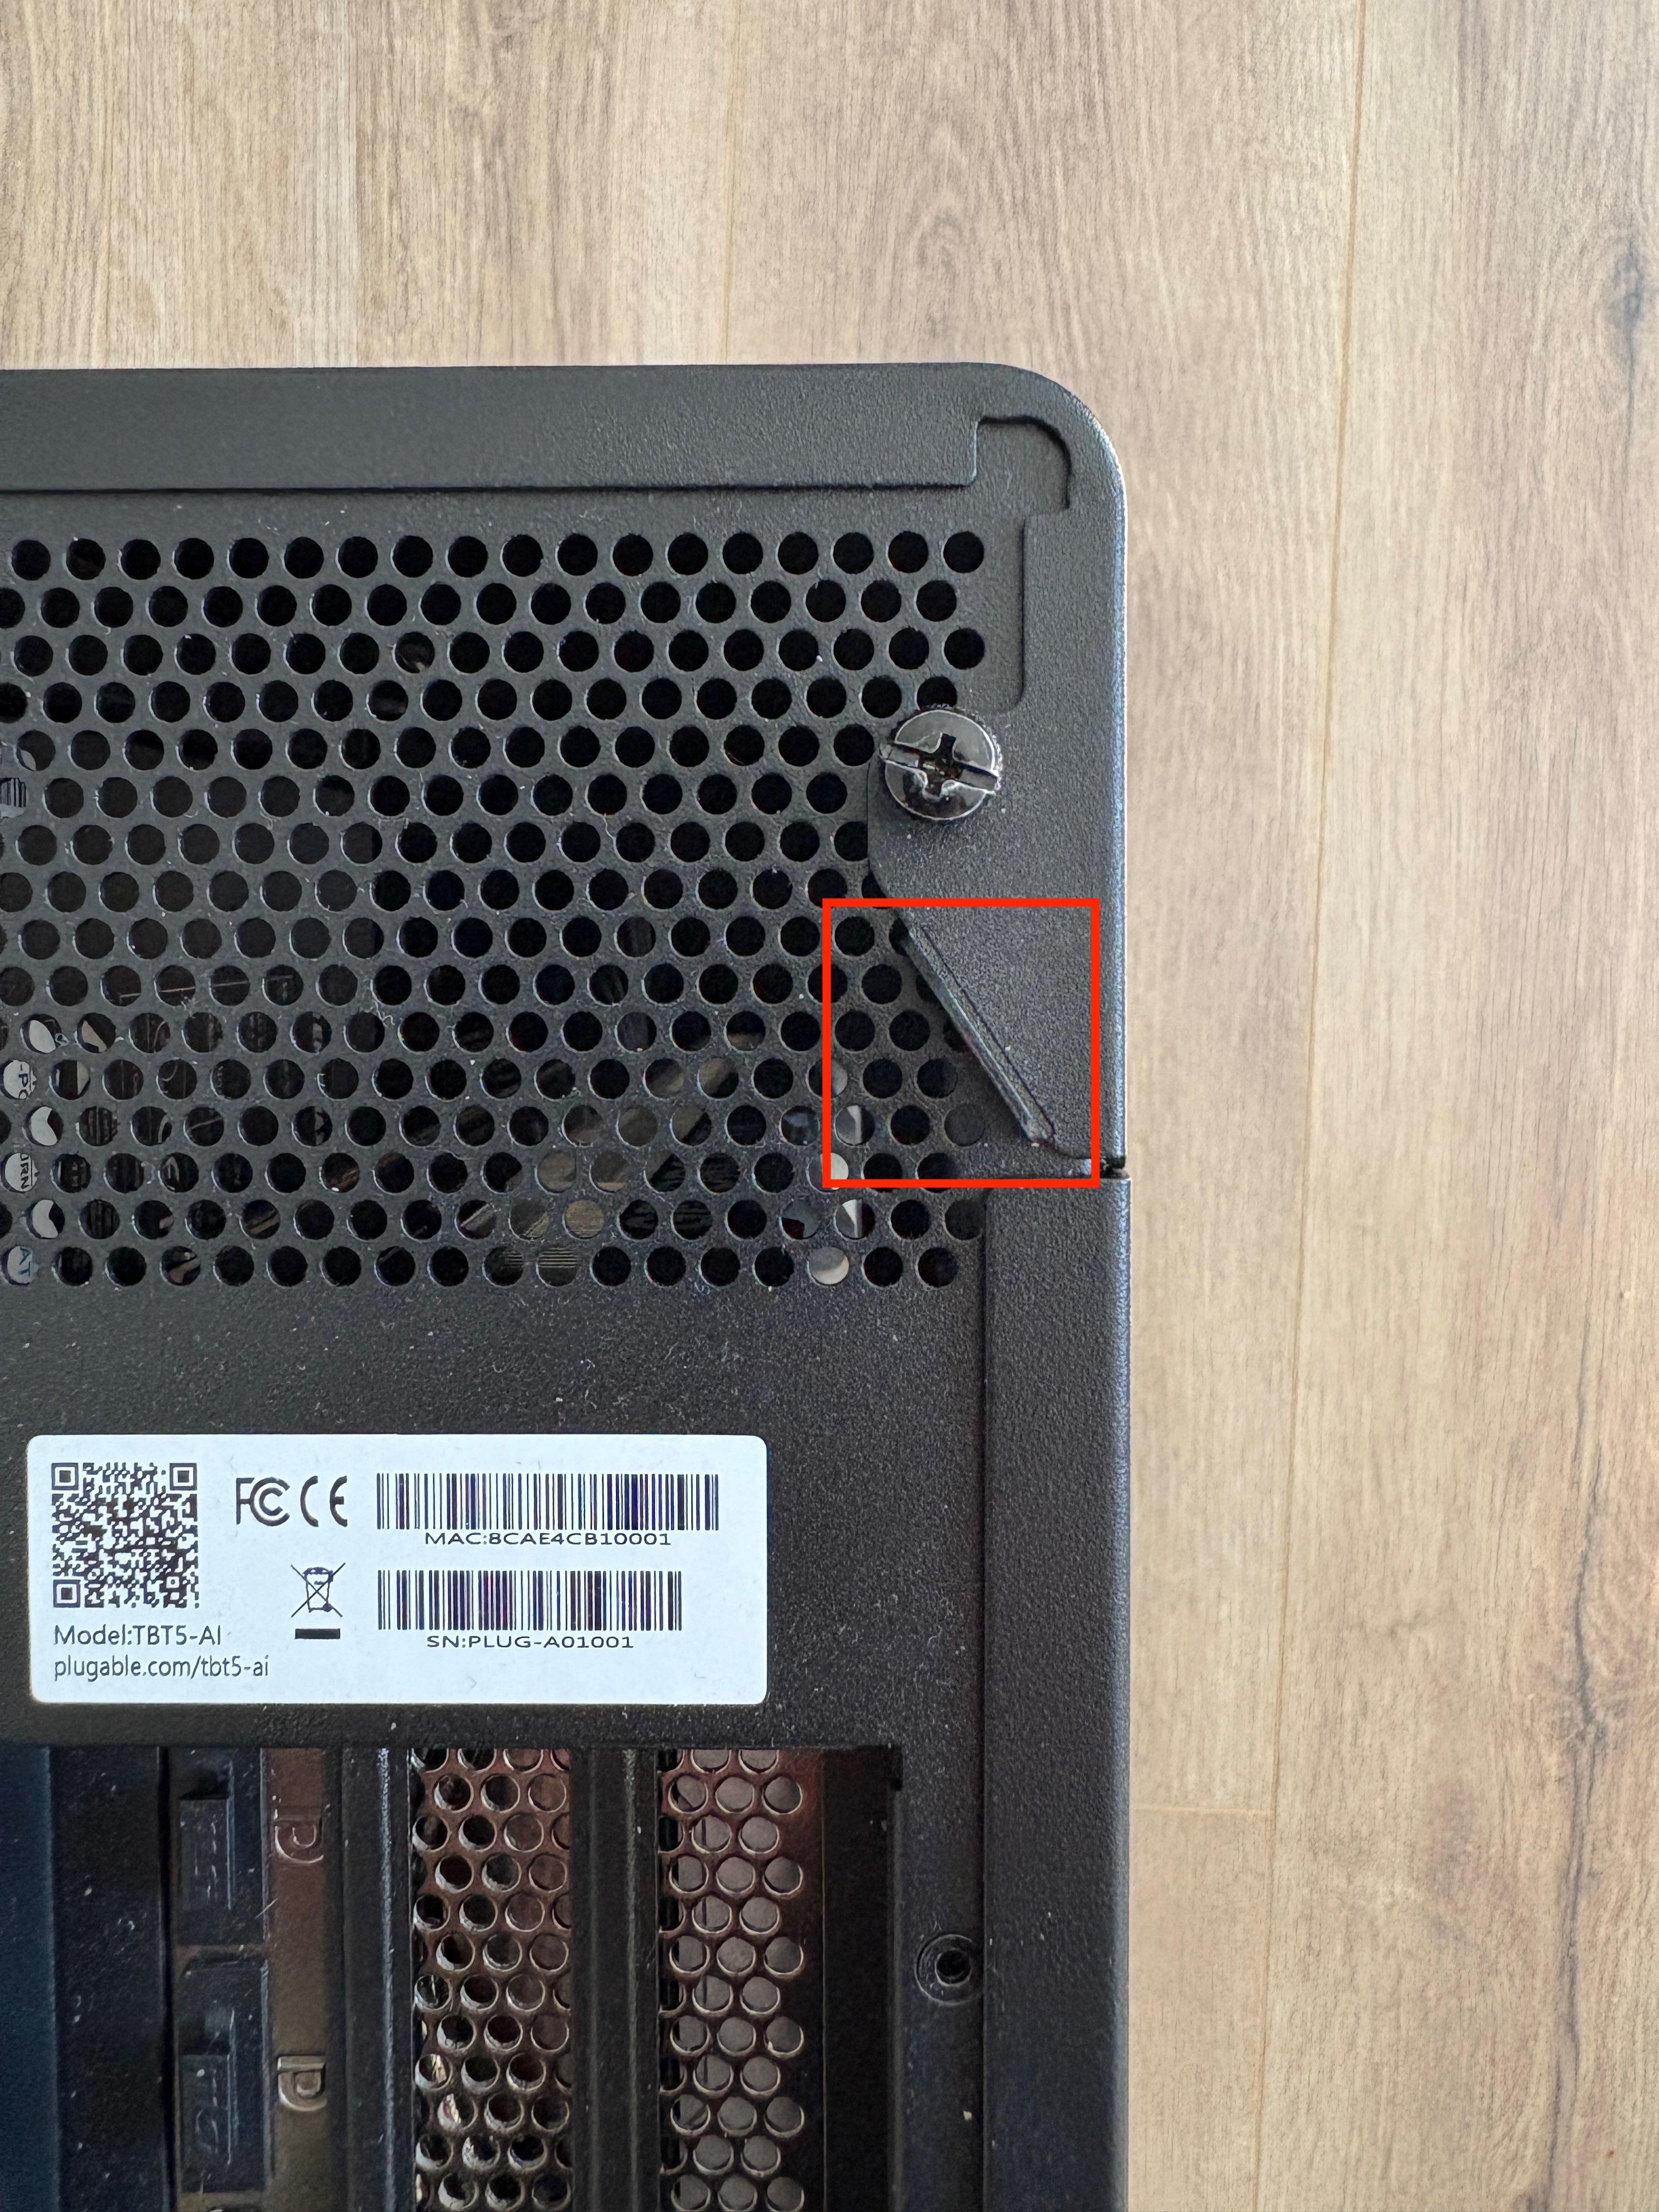
6. Using your fingers, use the small diagonal flap located just underneath where the rear thumbscrew was located to lift up the enclosure's top access door. The door should swing open approximately 90 degrees.
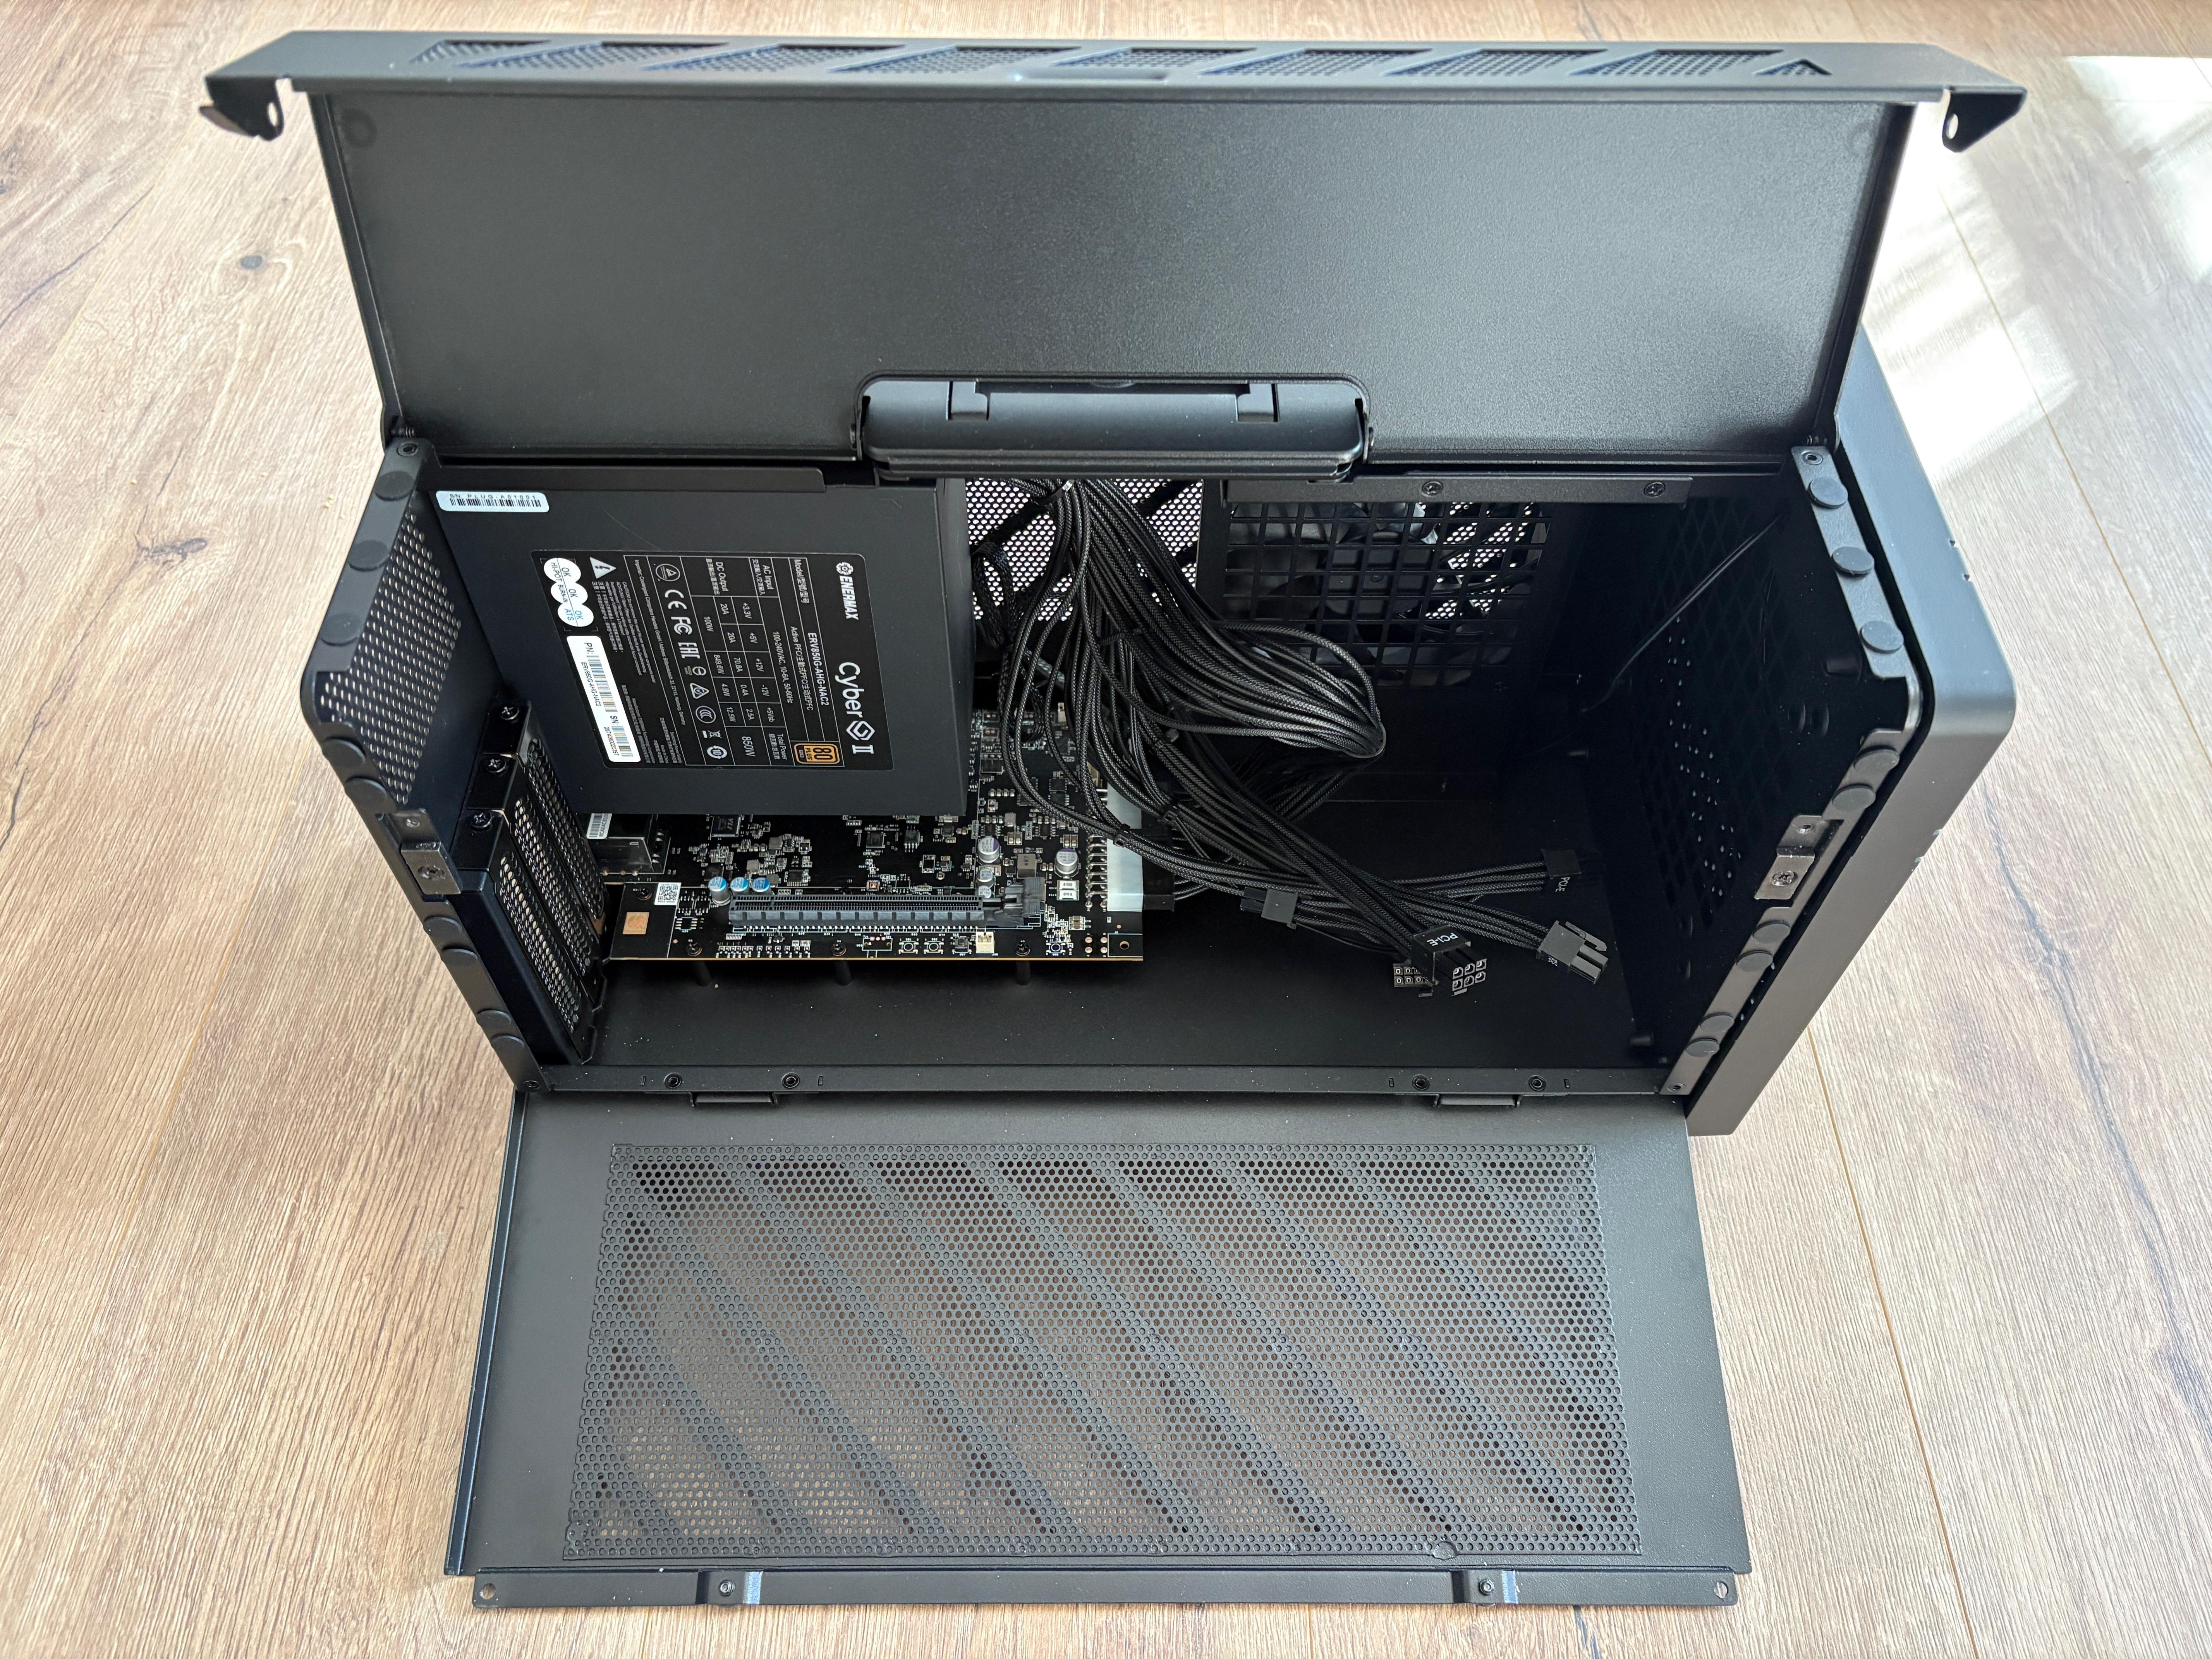
7. Using a Philips screwdriver, remove the two Philips screws located on the enclosure’s bottom access door. Keep the screws nearby as they will be used in a later step.
8. Using your fingers pull the bottom access door towards you until it lays horizontally, which will allow full access to the inside of the unit.
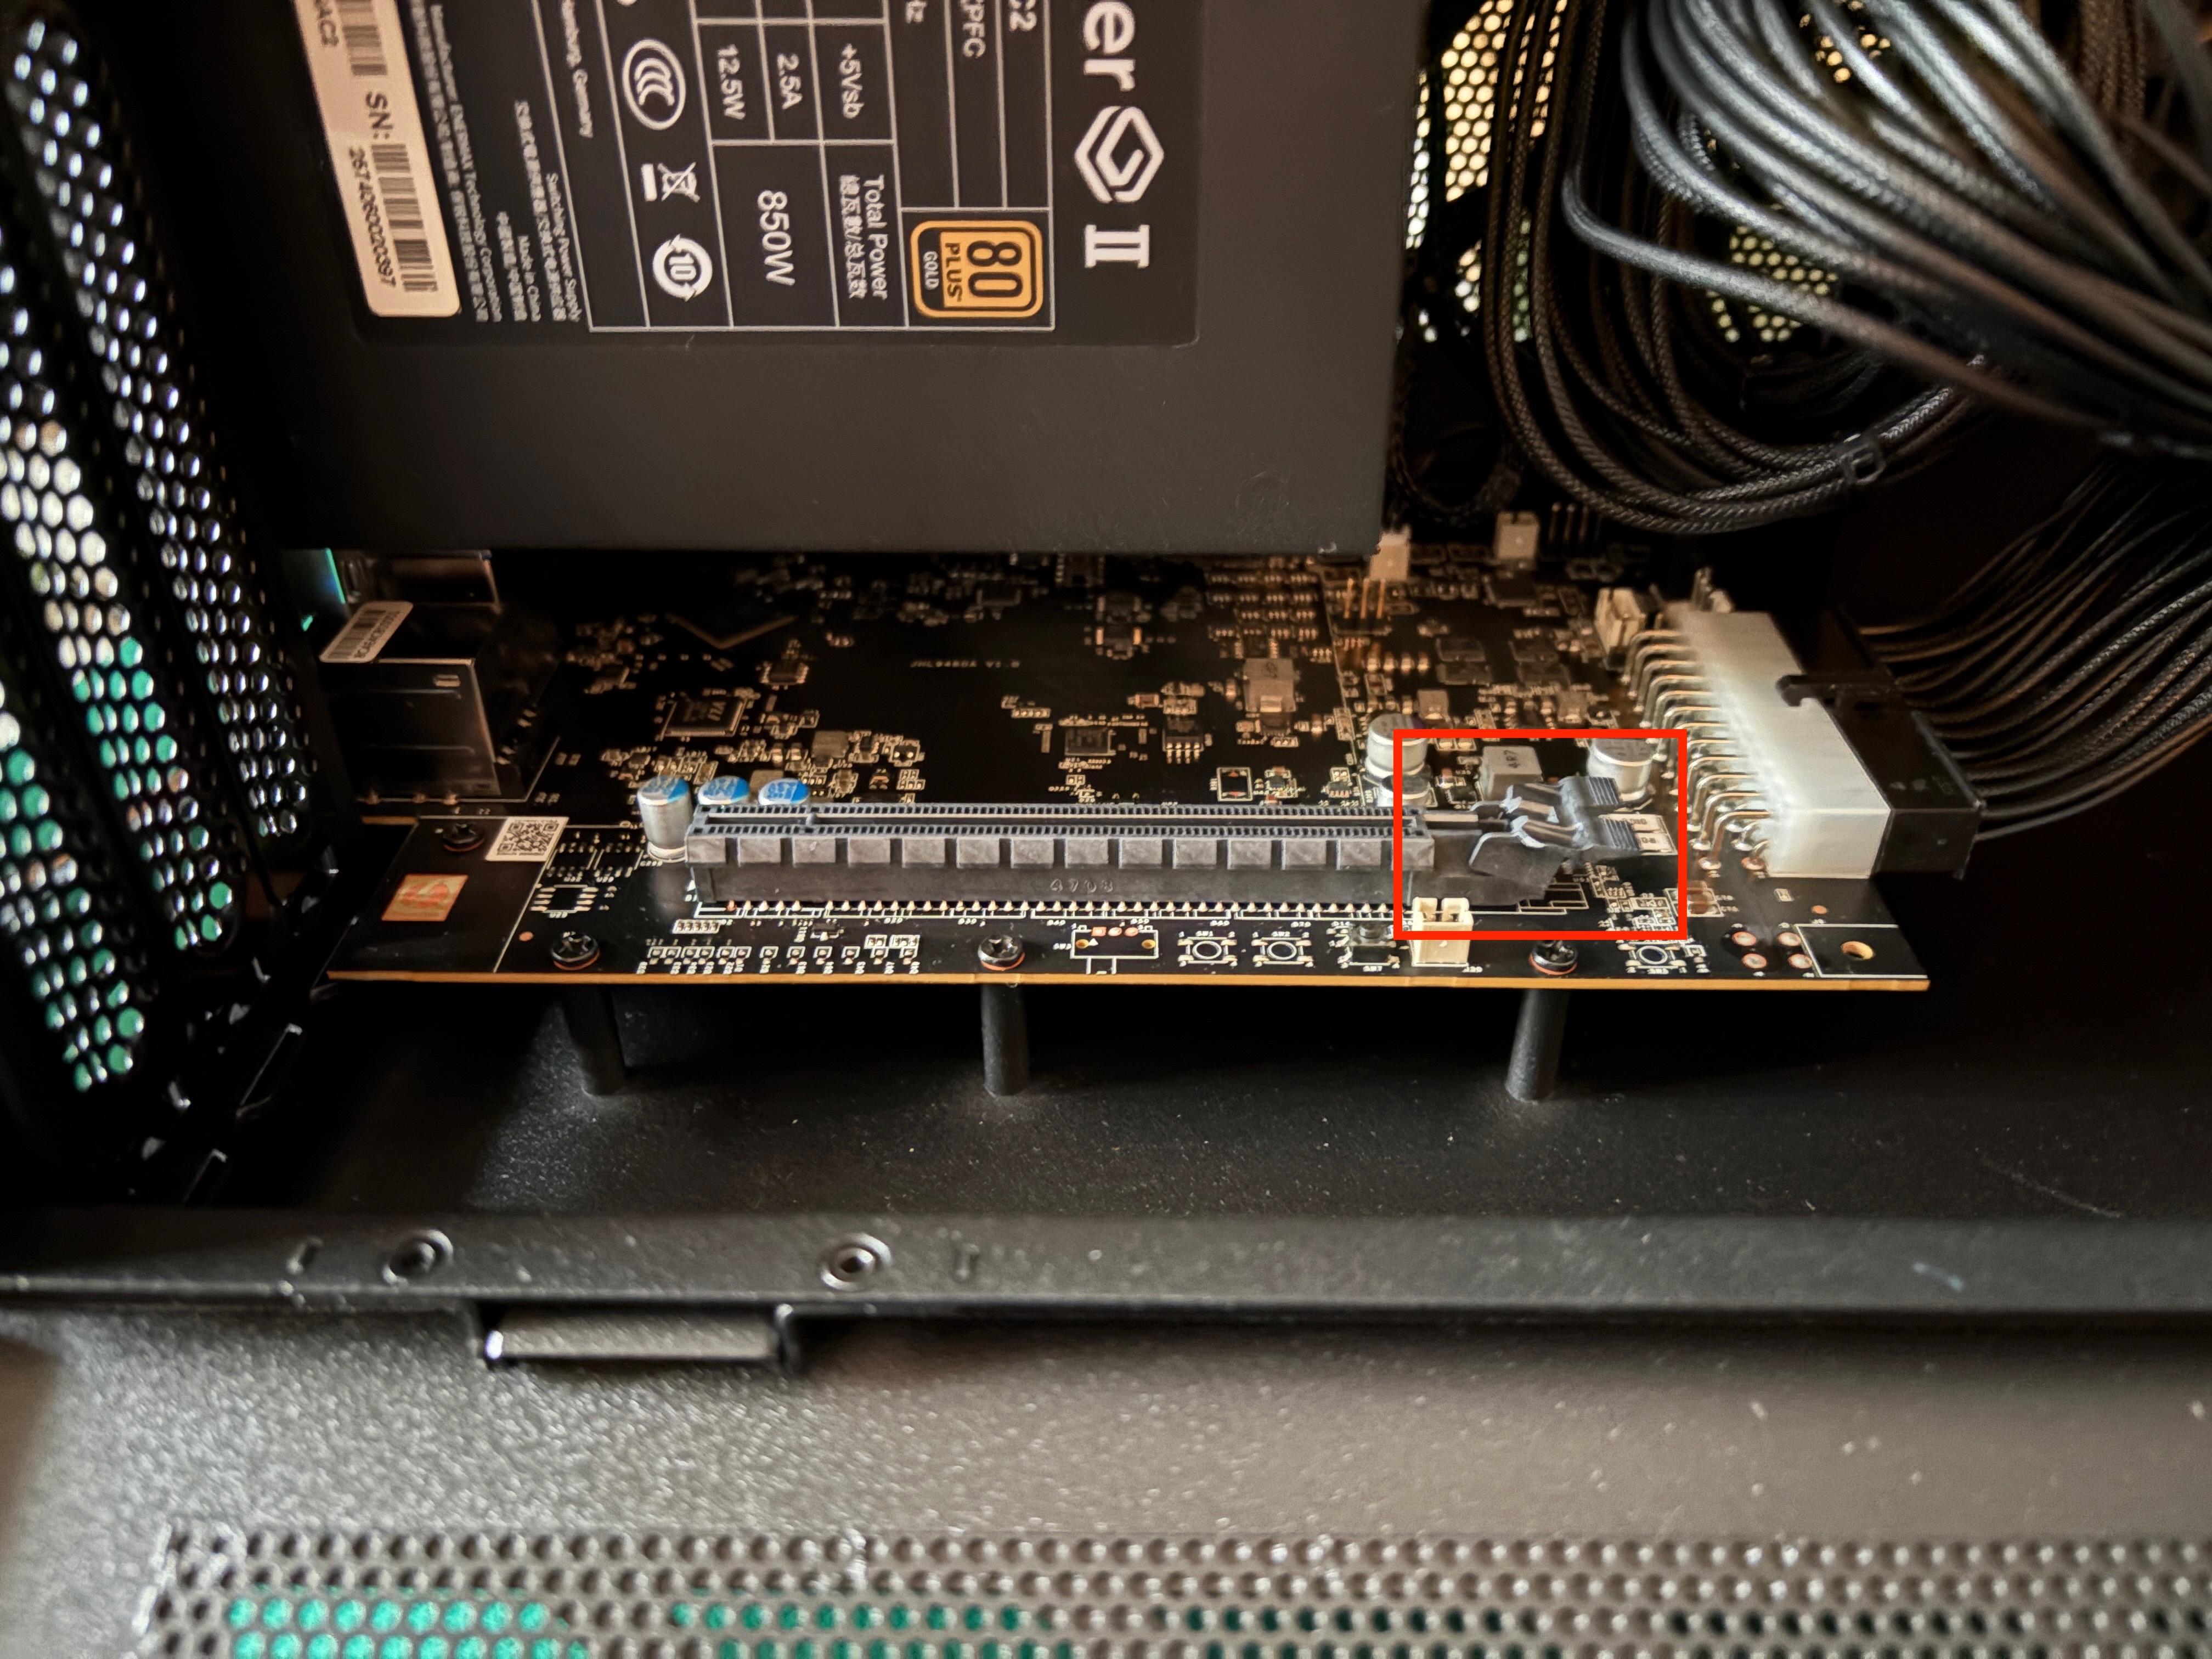
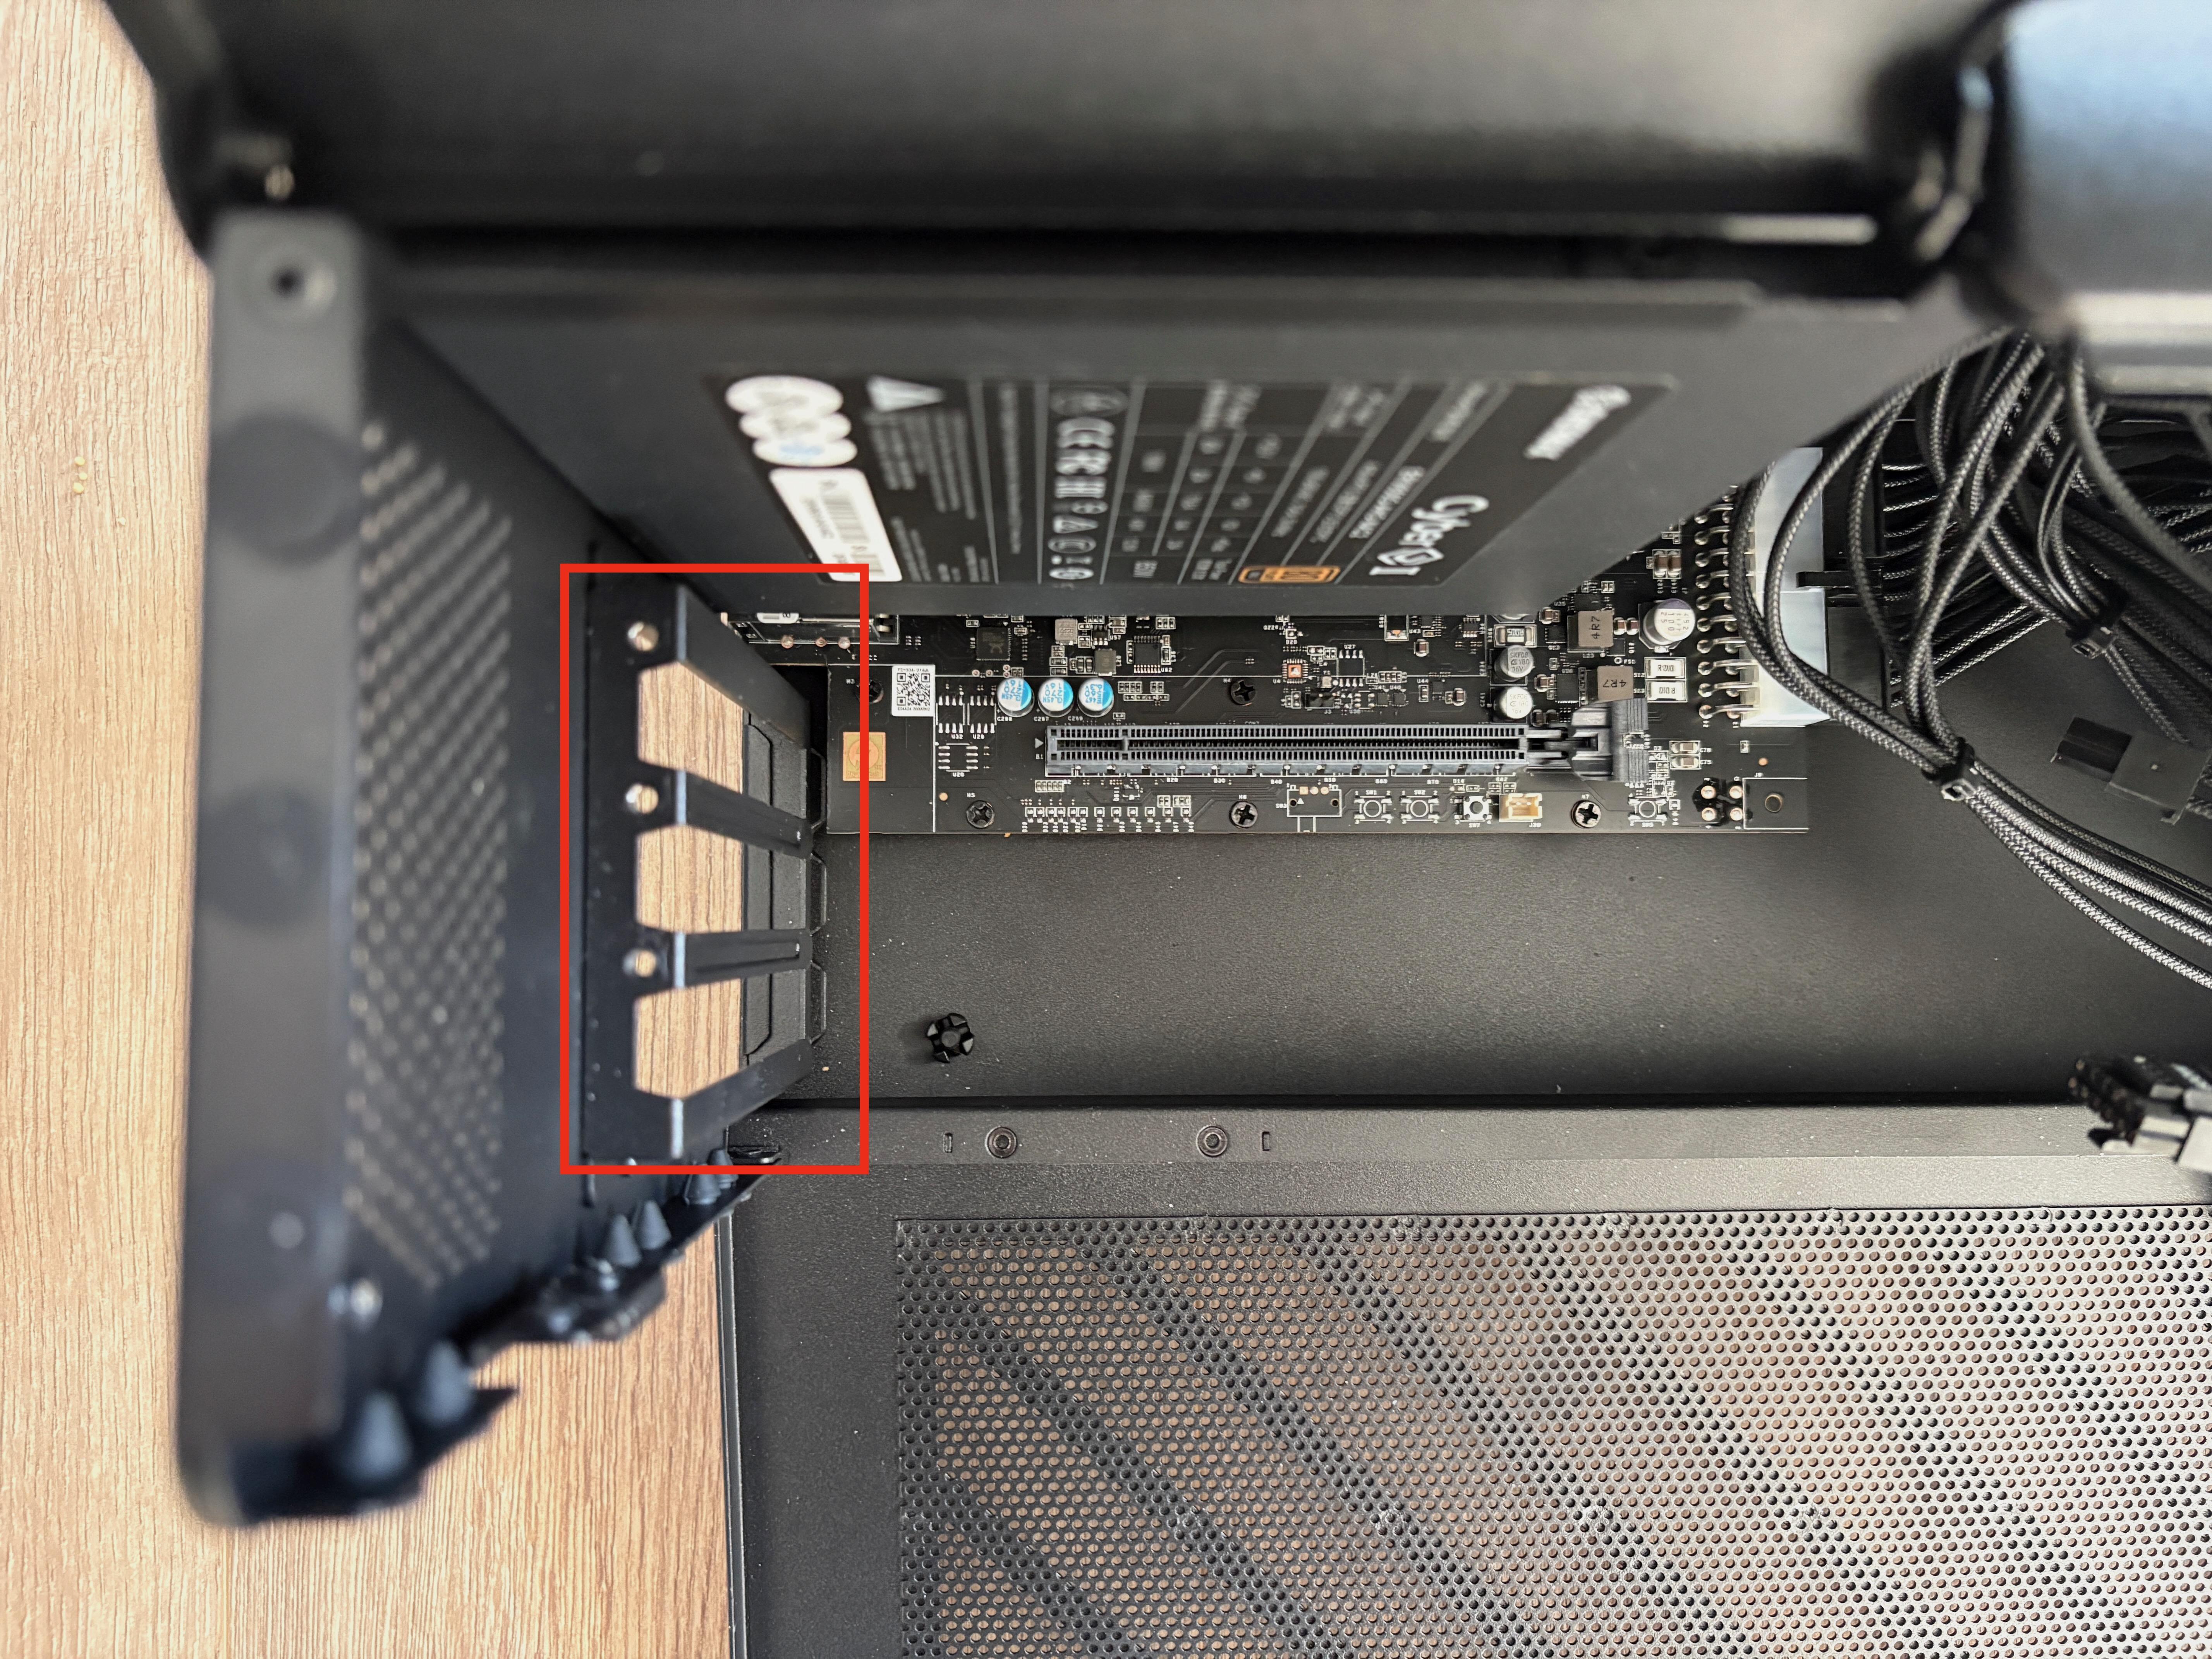
9. For reference, the TBT5-AI has one PCI Express x16 slot that provides four lanes of PCIe 4.0 bandwidth. The single PCI Express slot also has a small plastic retention clip. Prior to installing the GPU, ensure that the retention clip is open. When open, the clip will be angled slightly to the right as compared to the slot.
10. For reference, graphics processing units (GPUs) are available in variable widths. The unit of width measurement is typically the number of PCI Express slots that the GPU will occupy once installed. The TBT5-AI can accommodate GPUs up to 3.5 PCI Express slots in width.
Again for reference, the maximum GPU dimensions that are supported by the TBT5-AI are 346mm x 170mm x 77mm.
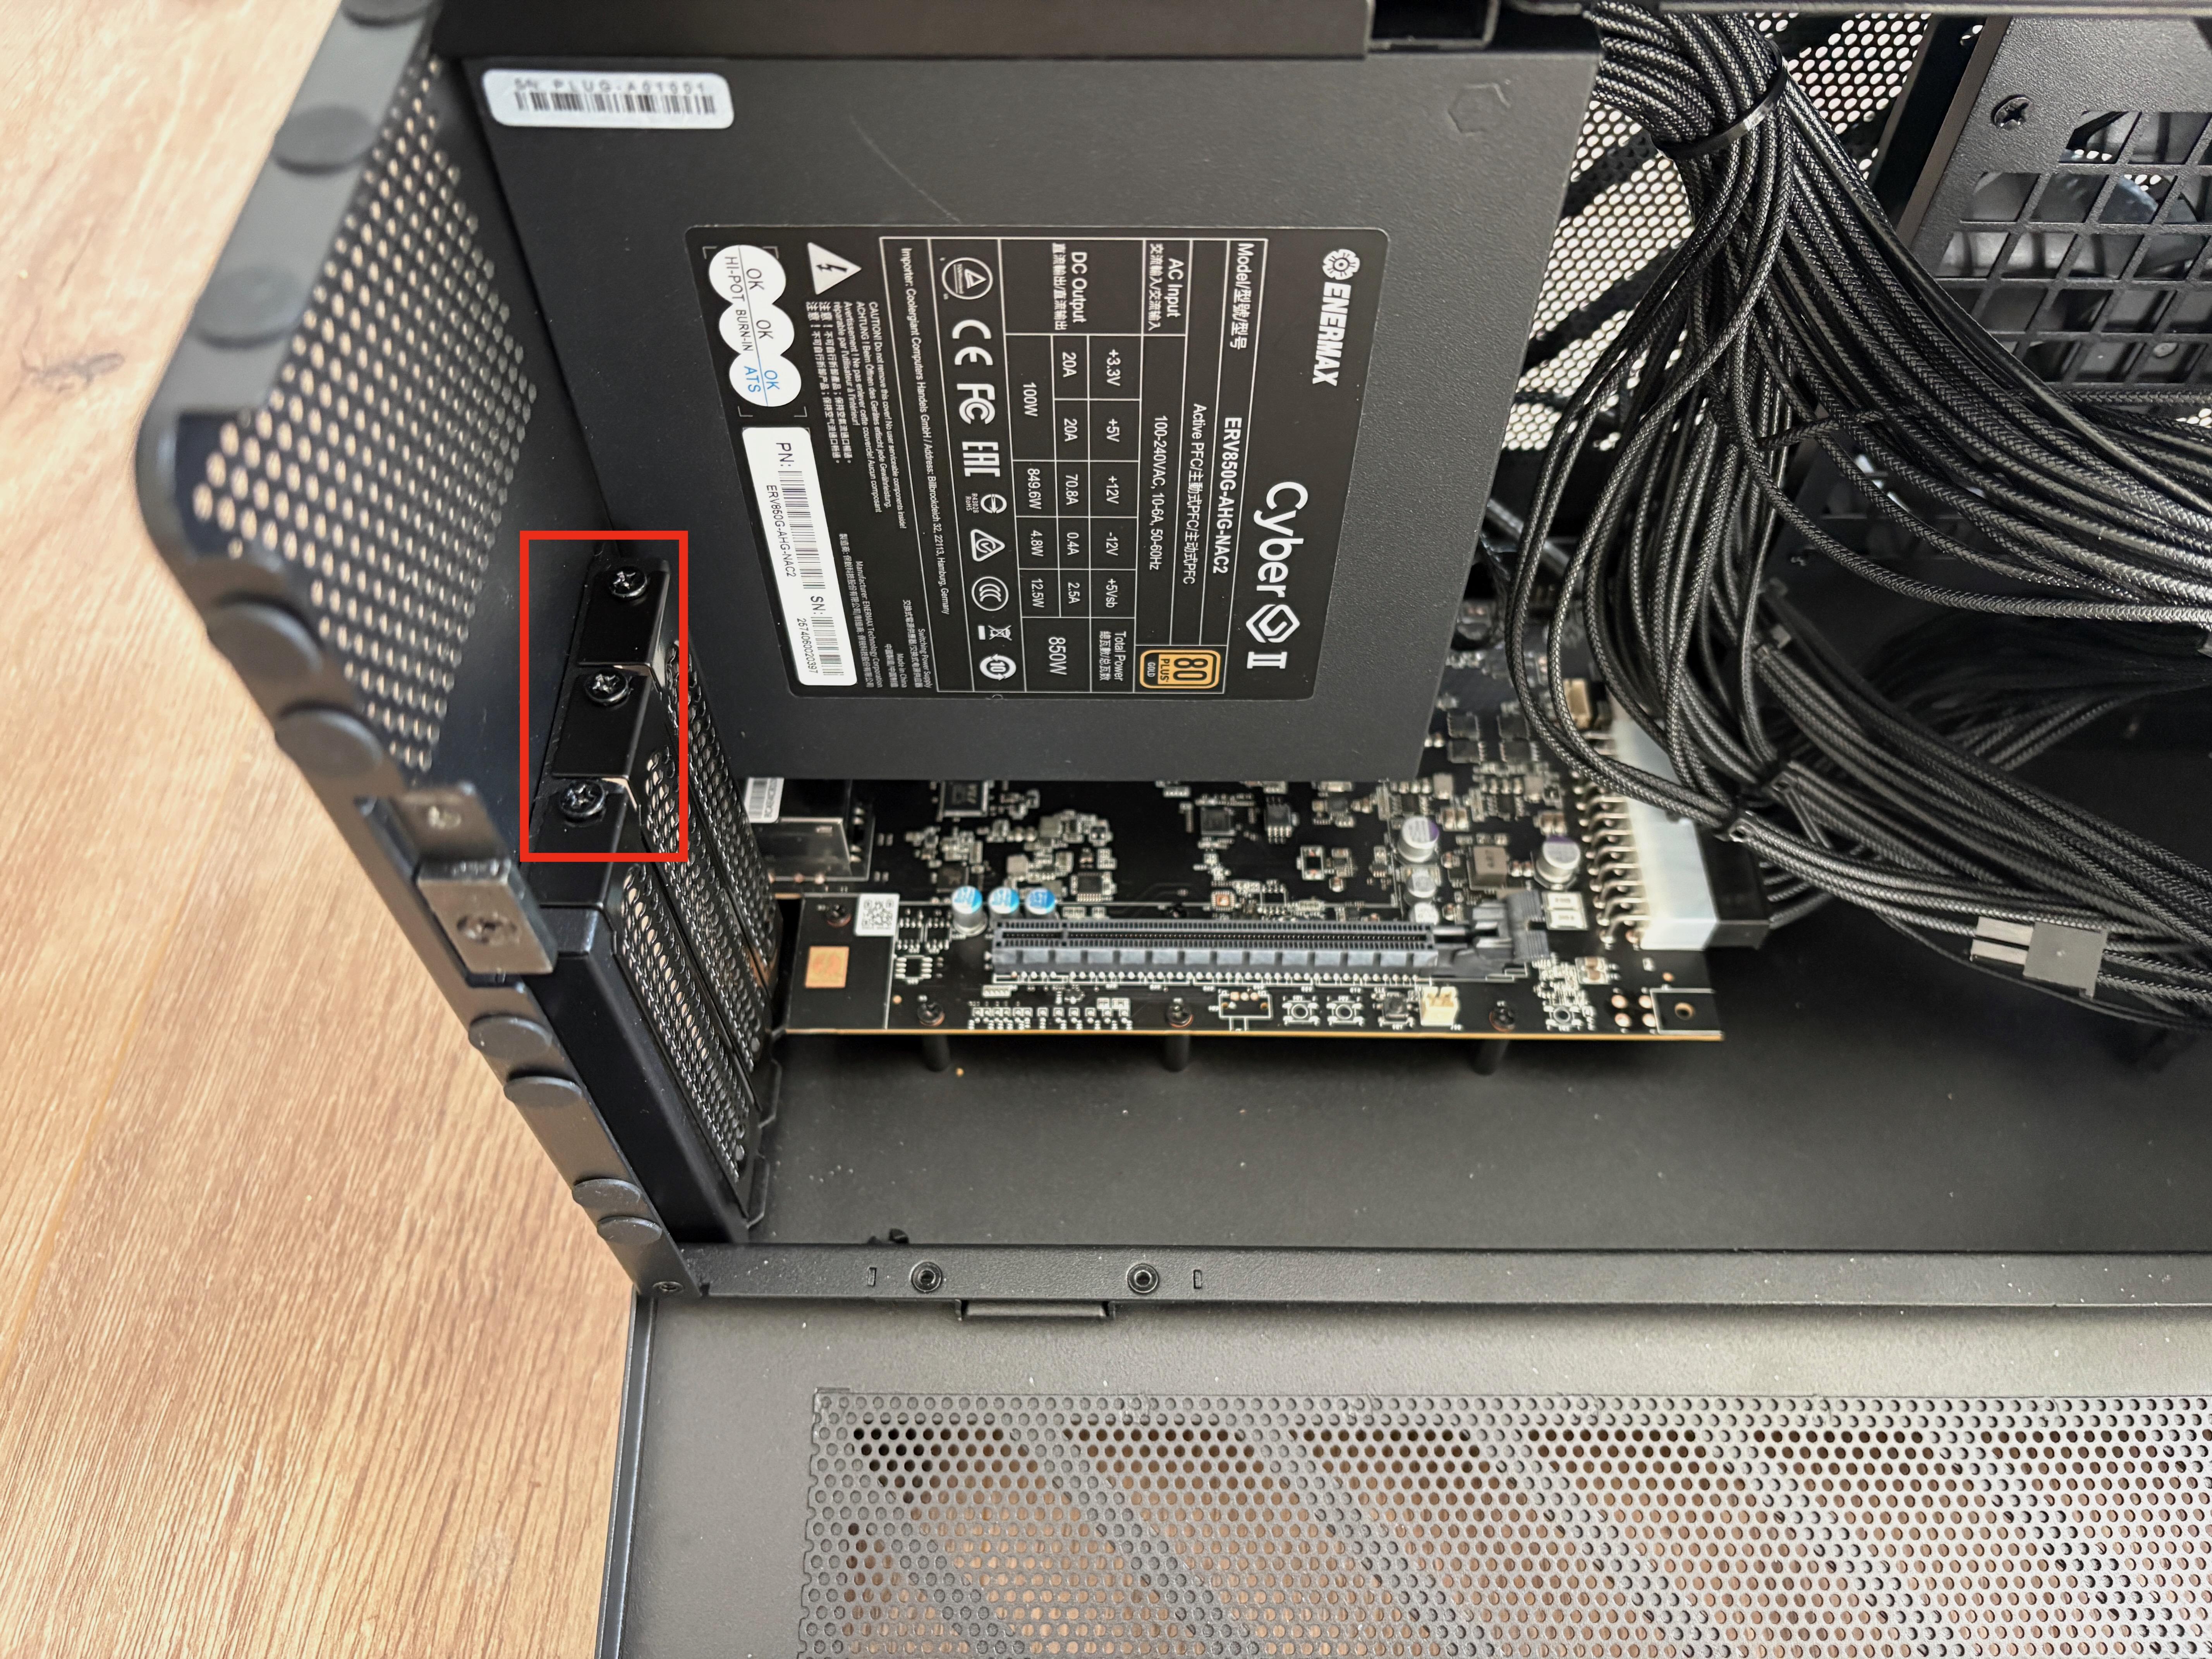
In order to install a GPU, the appropriate number of PCI Express slot covers must be removed from the TBT5-AI.
Using a Philips screwdriver, remove the Philips screws holding the PCI Express slot covers in place. Only remove the screws for the covers you wish to remove. The amount of covers removed will vary depending upon the width of your GPU.
Store the removed PCI Express slot covers with the product packaging for potential future use. Keep the screws nearby as they will be used in the next step.
11. Prior to removing your GPU from its packaging, please ensure you are seated at your work area and touch the metal surface of the TBT5-AI. This step is done in an effort to prevent electrostatic discharge. Then completely remove all packing materials from the GPU.
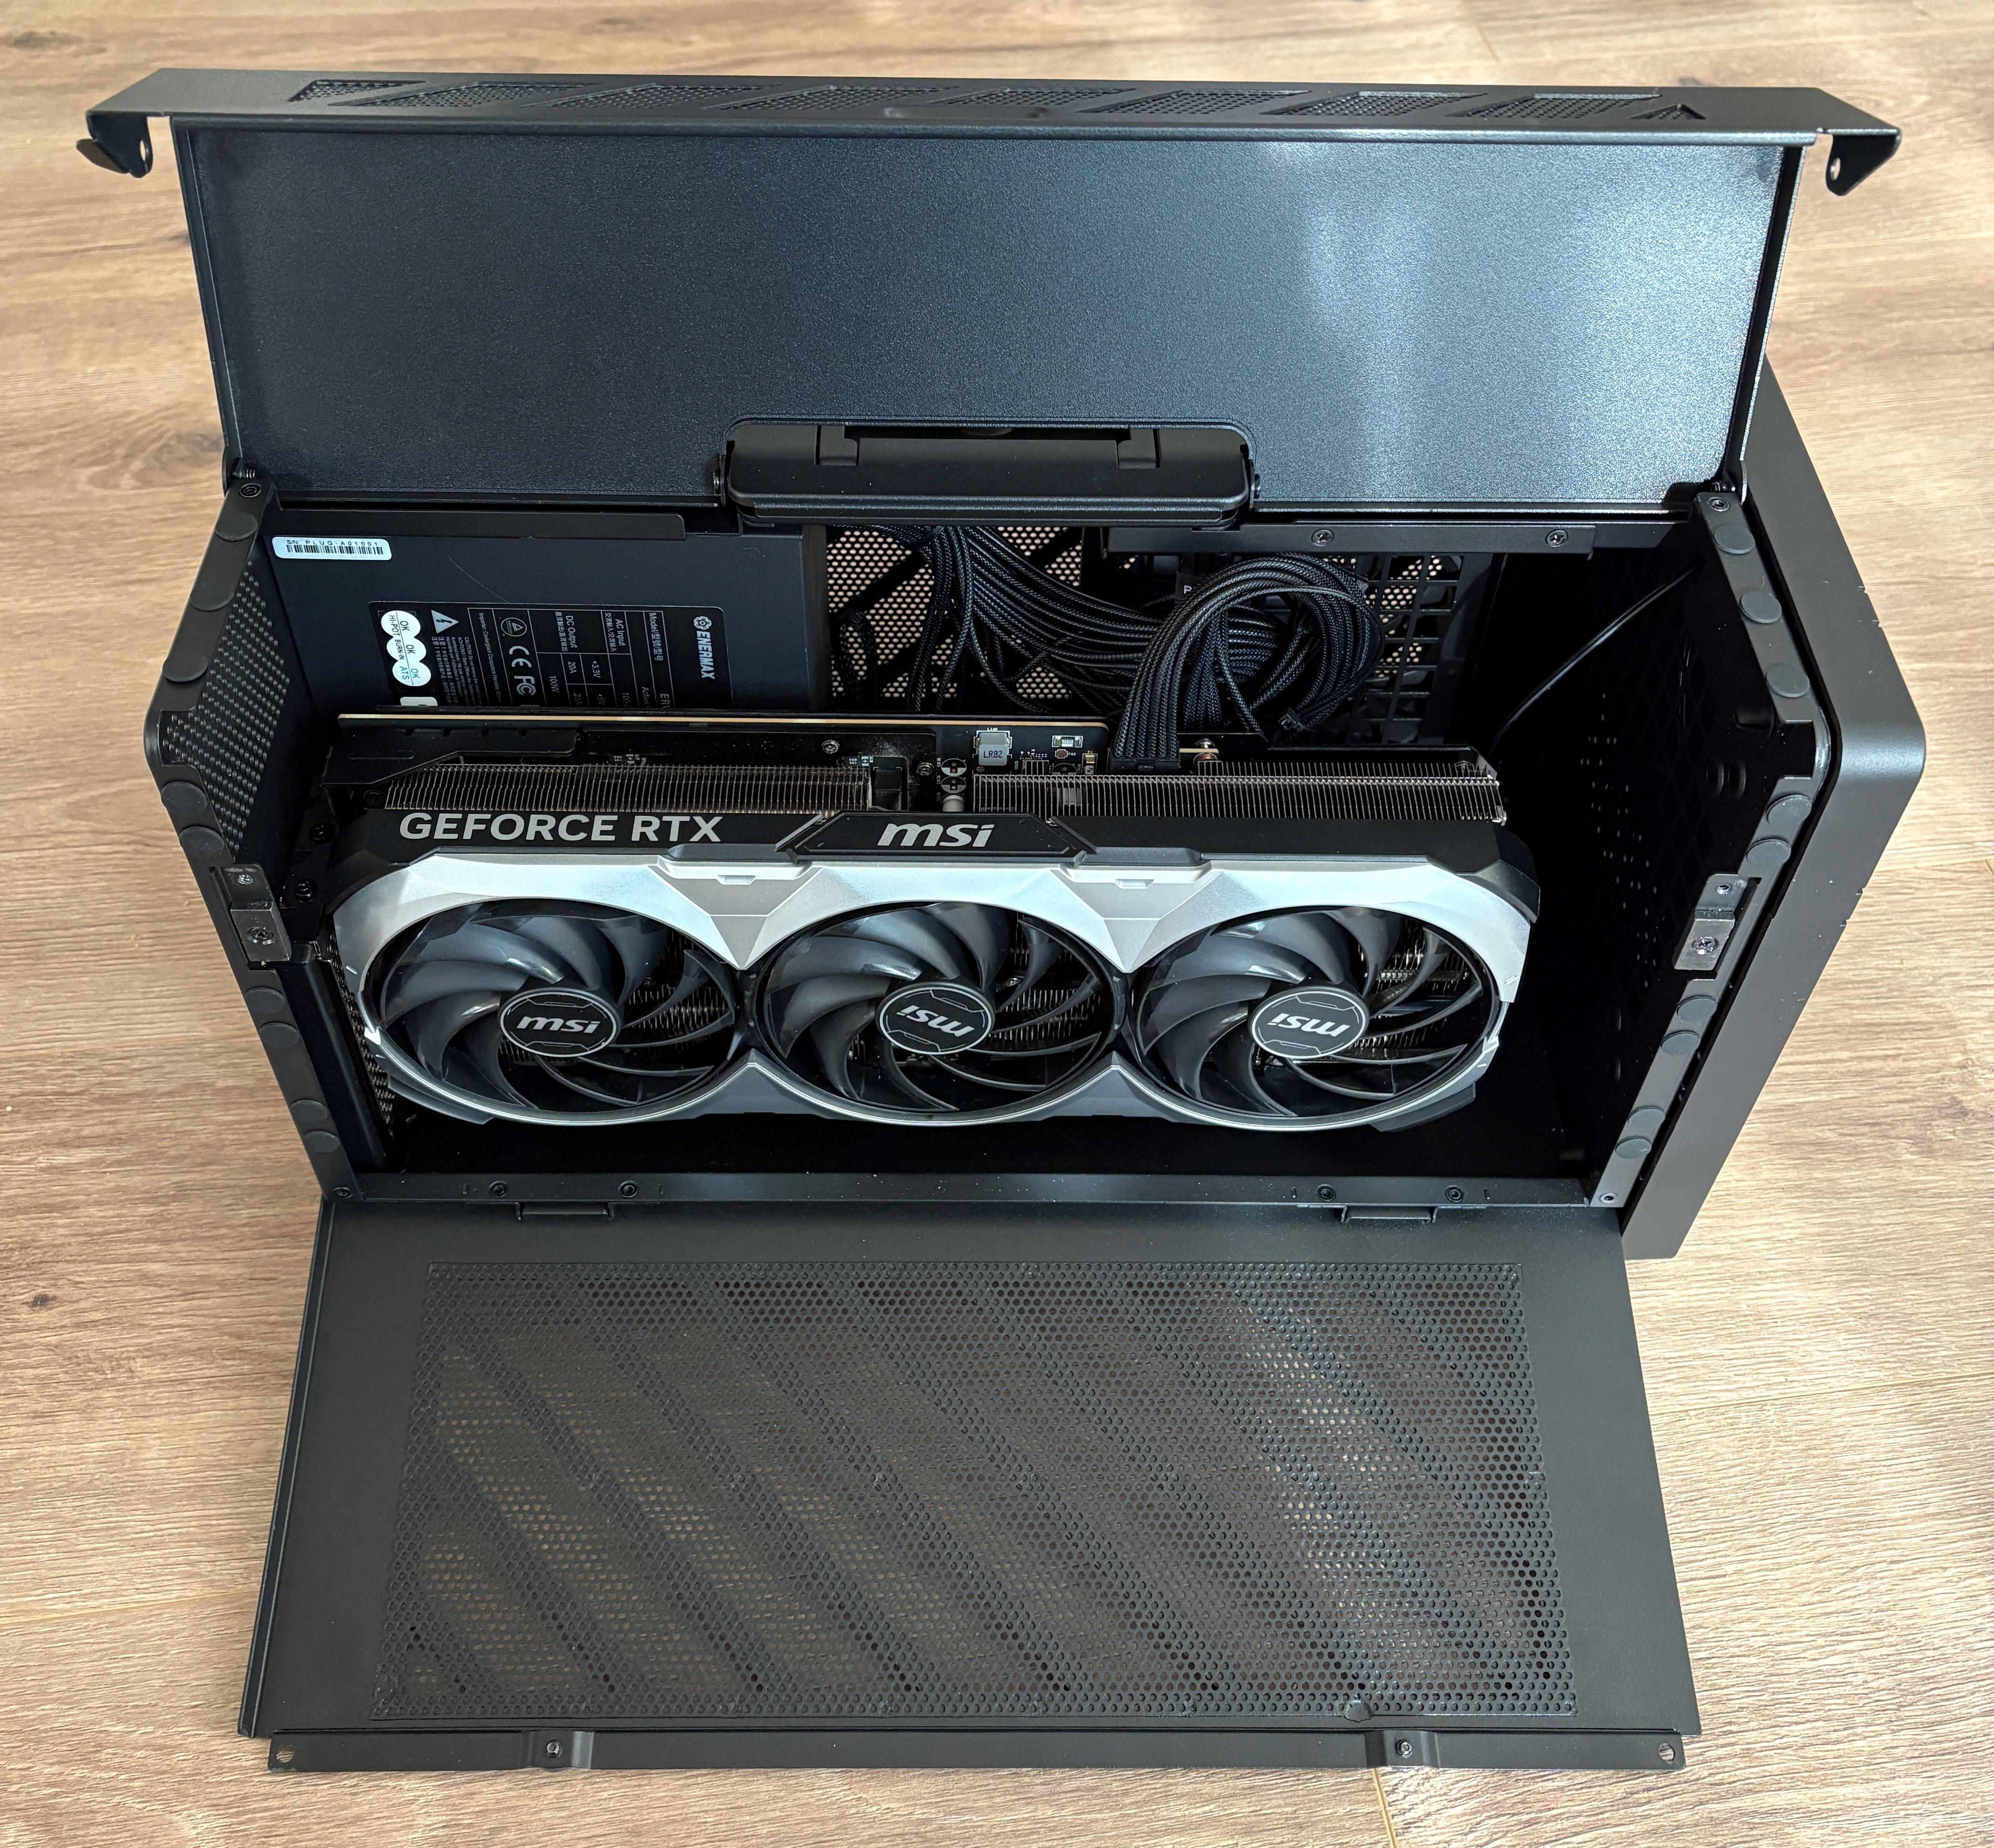
Gently insert your GPU into the TBT5-AI, taking care to ensure that the GPU is level both horizontally and vertically while you insert the GPU’s PCI Express connector into the PCI Express slot of the TBT5-AI system board.
NOTE - Do NOT attempt to force a GPU into the PCI Express slot. Doing so could result in damage to the TBT5-AI or the GPU.
When the GPU is fully seated, the PCI Express retention clip should snap into place and move to become level with the PCI Express slot. Ensure that the card is fully and evenly seated into the PCI Express slot.
Ensure that the GPU’s PCI Express metal retention bracket on the top edge of the GPU aligns with the empty PCI Express slot covers you removed previously, and that the bottom edge ‘feet’ are inserted into the slot receptacles at the bottom of the slot openings.
Once the GPU has been installed, use the Philips screws you removed from PCI Express slot covers to secure the GPU to the TBT5-AI.
12. For reference, the TBT5-AI includes a 850W ATX power supply that can supply up to 600W of power to a GPU. The included power supply has several different power connectors that can be used to power the GPU, specifically three 6+2 pin power connectors and one 12VHPWR power connector.
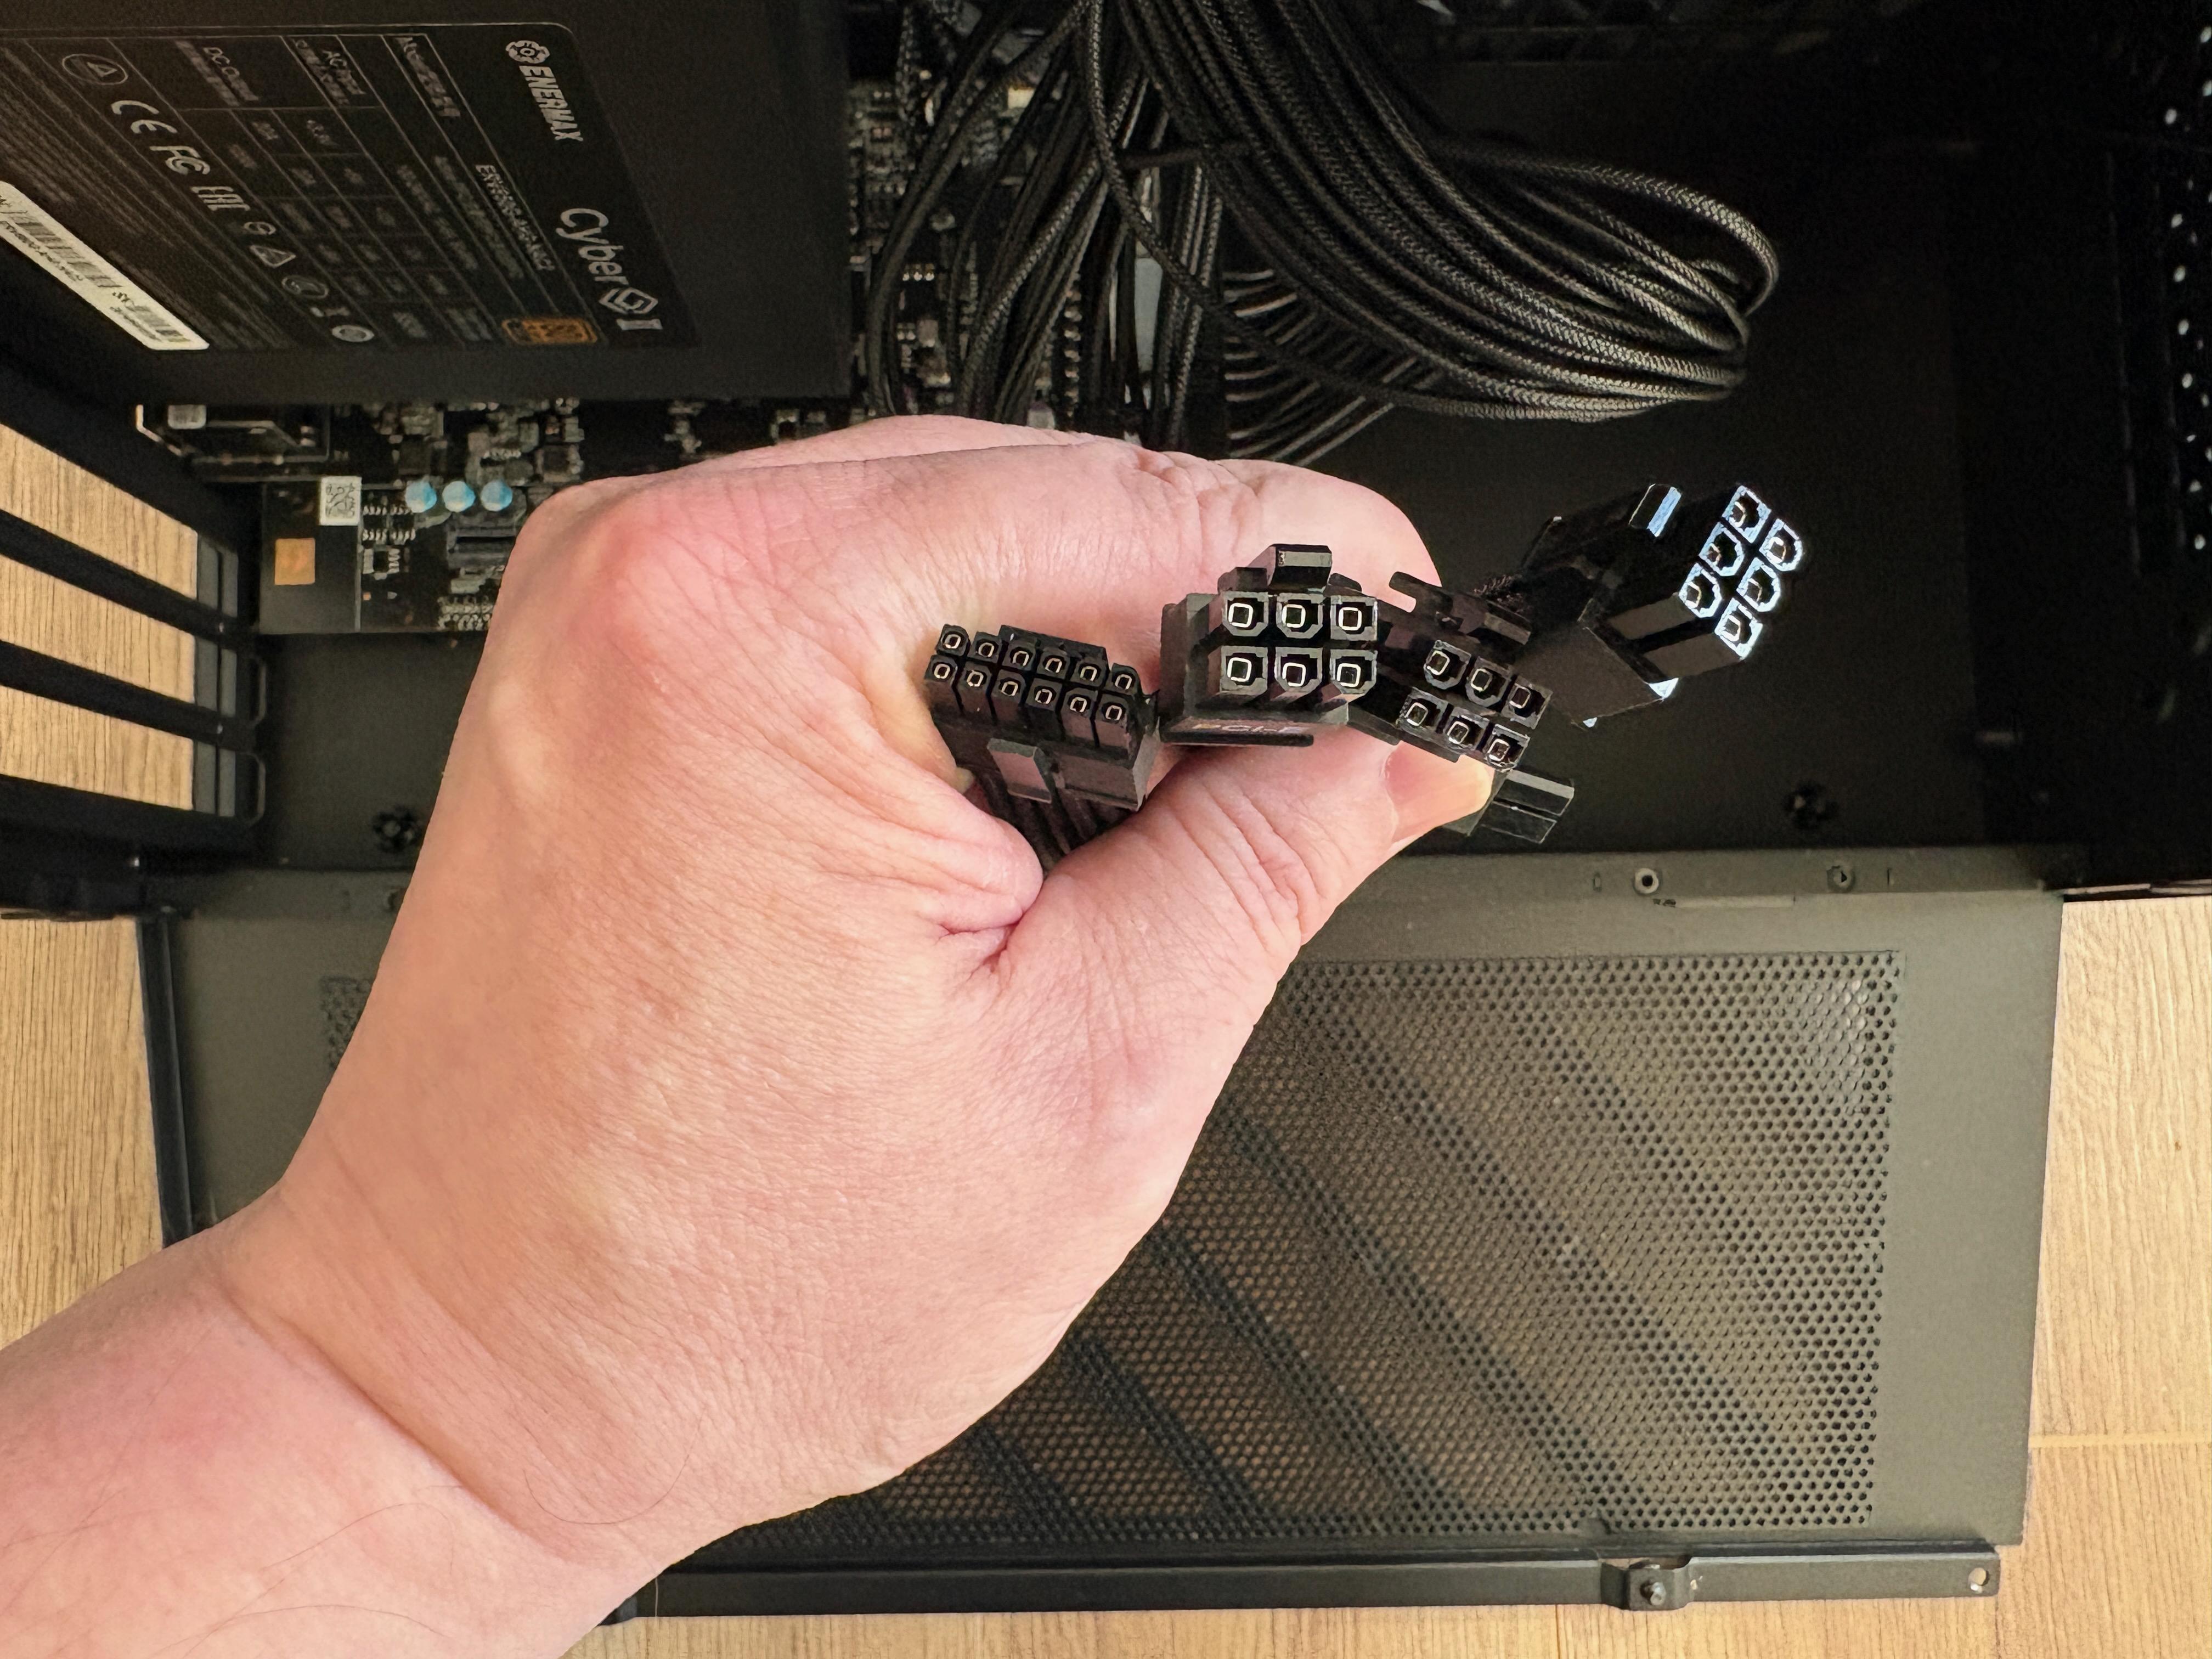
The four power connectors of the TBT5-AI power supply
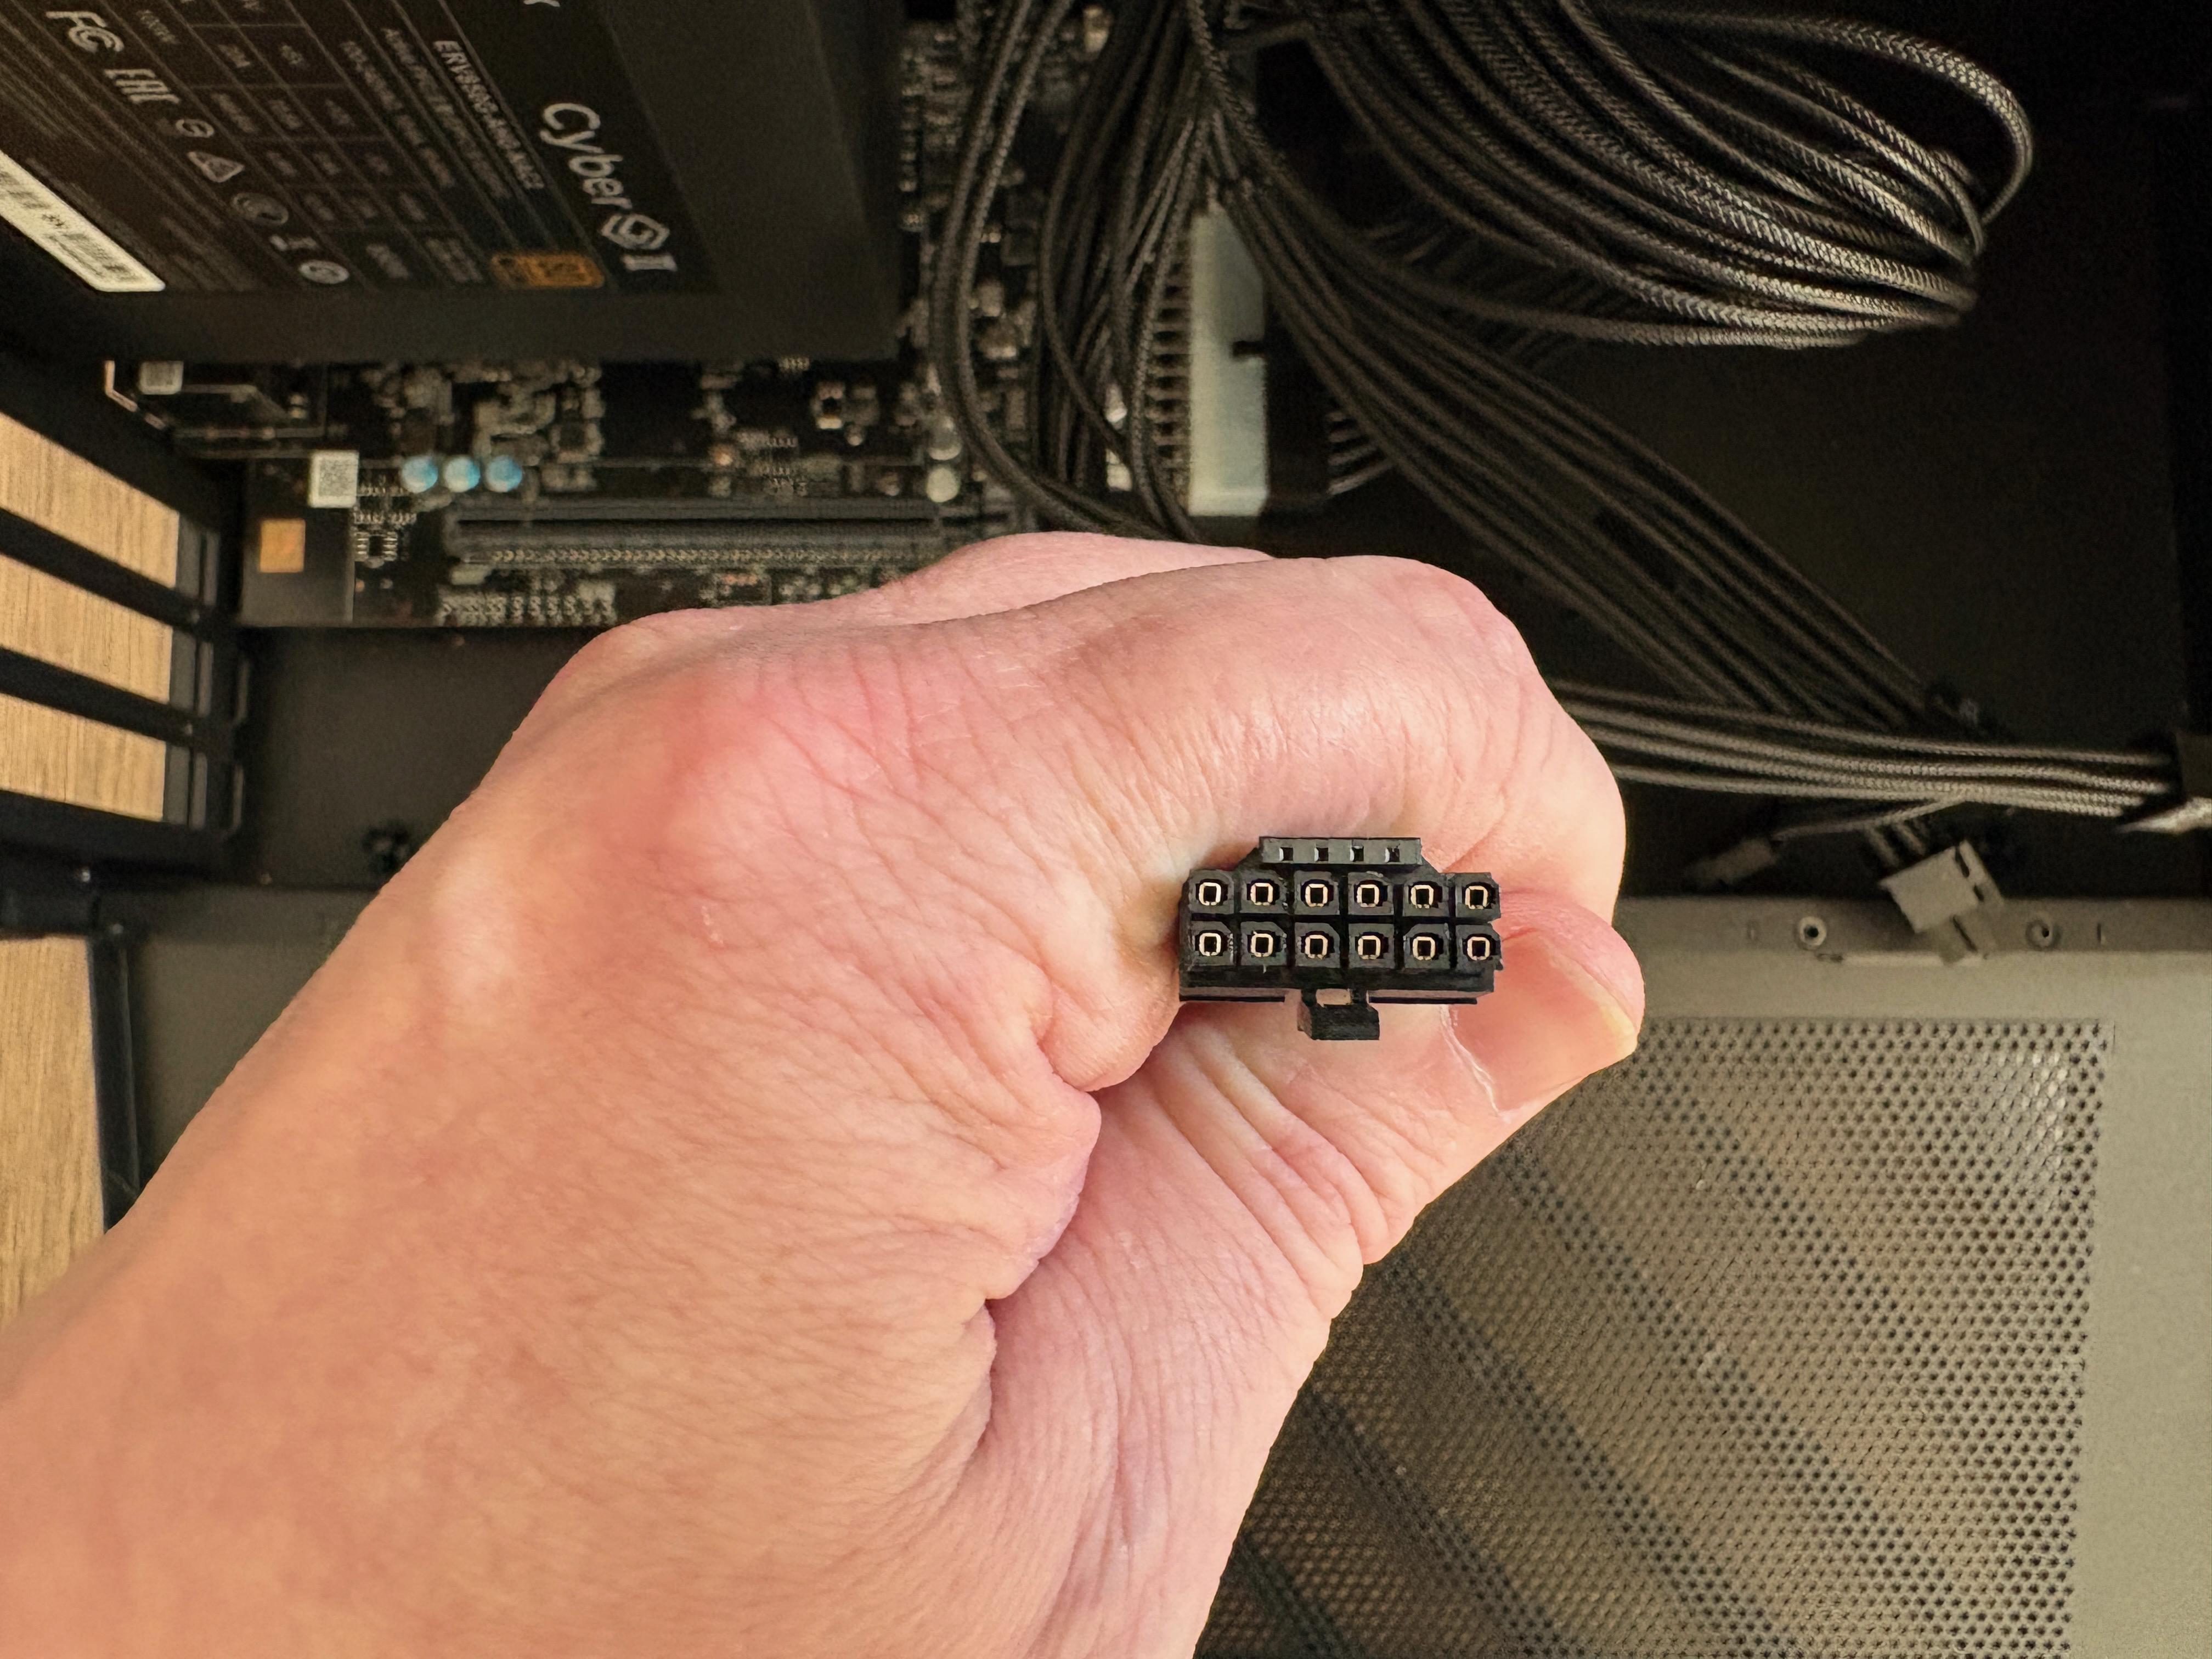
The 12VHPWR 600W power connector of the TBT5-AI power supply (top view)
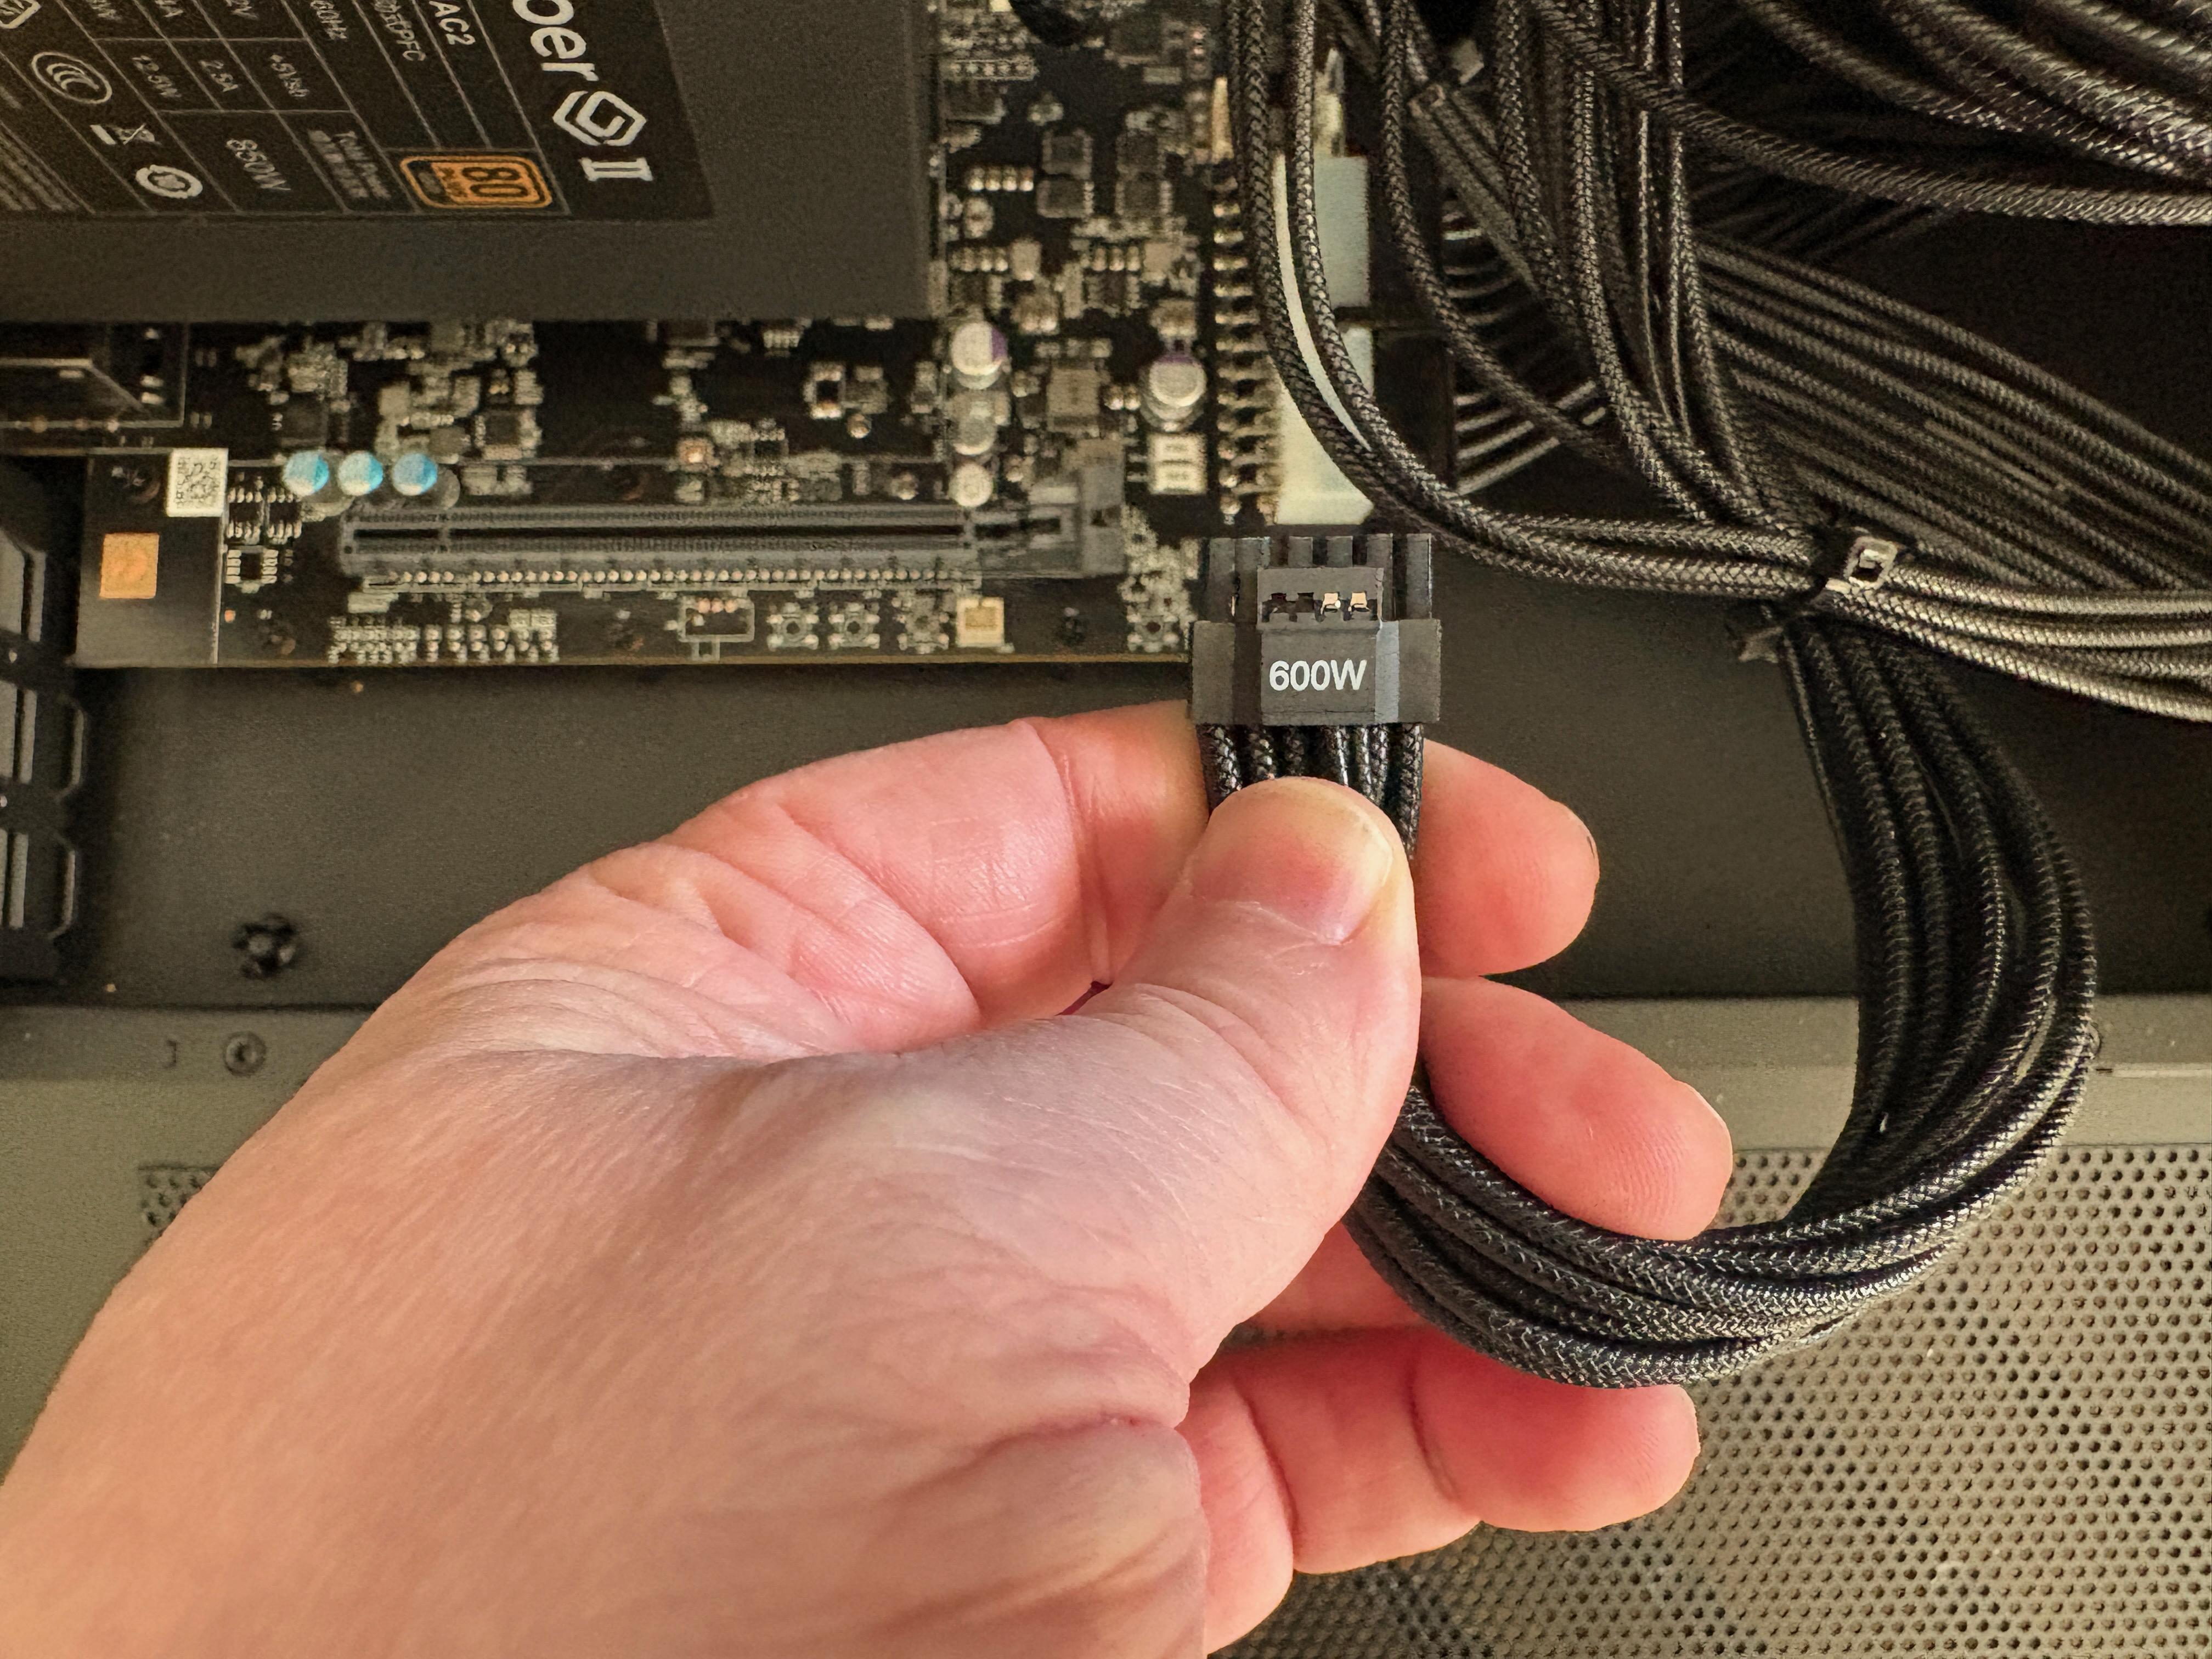
The 12VHPWR 600W power connector of the TBT5-AI power supply (side view)
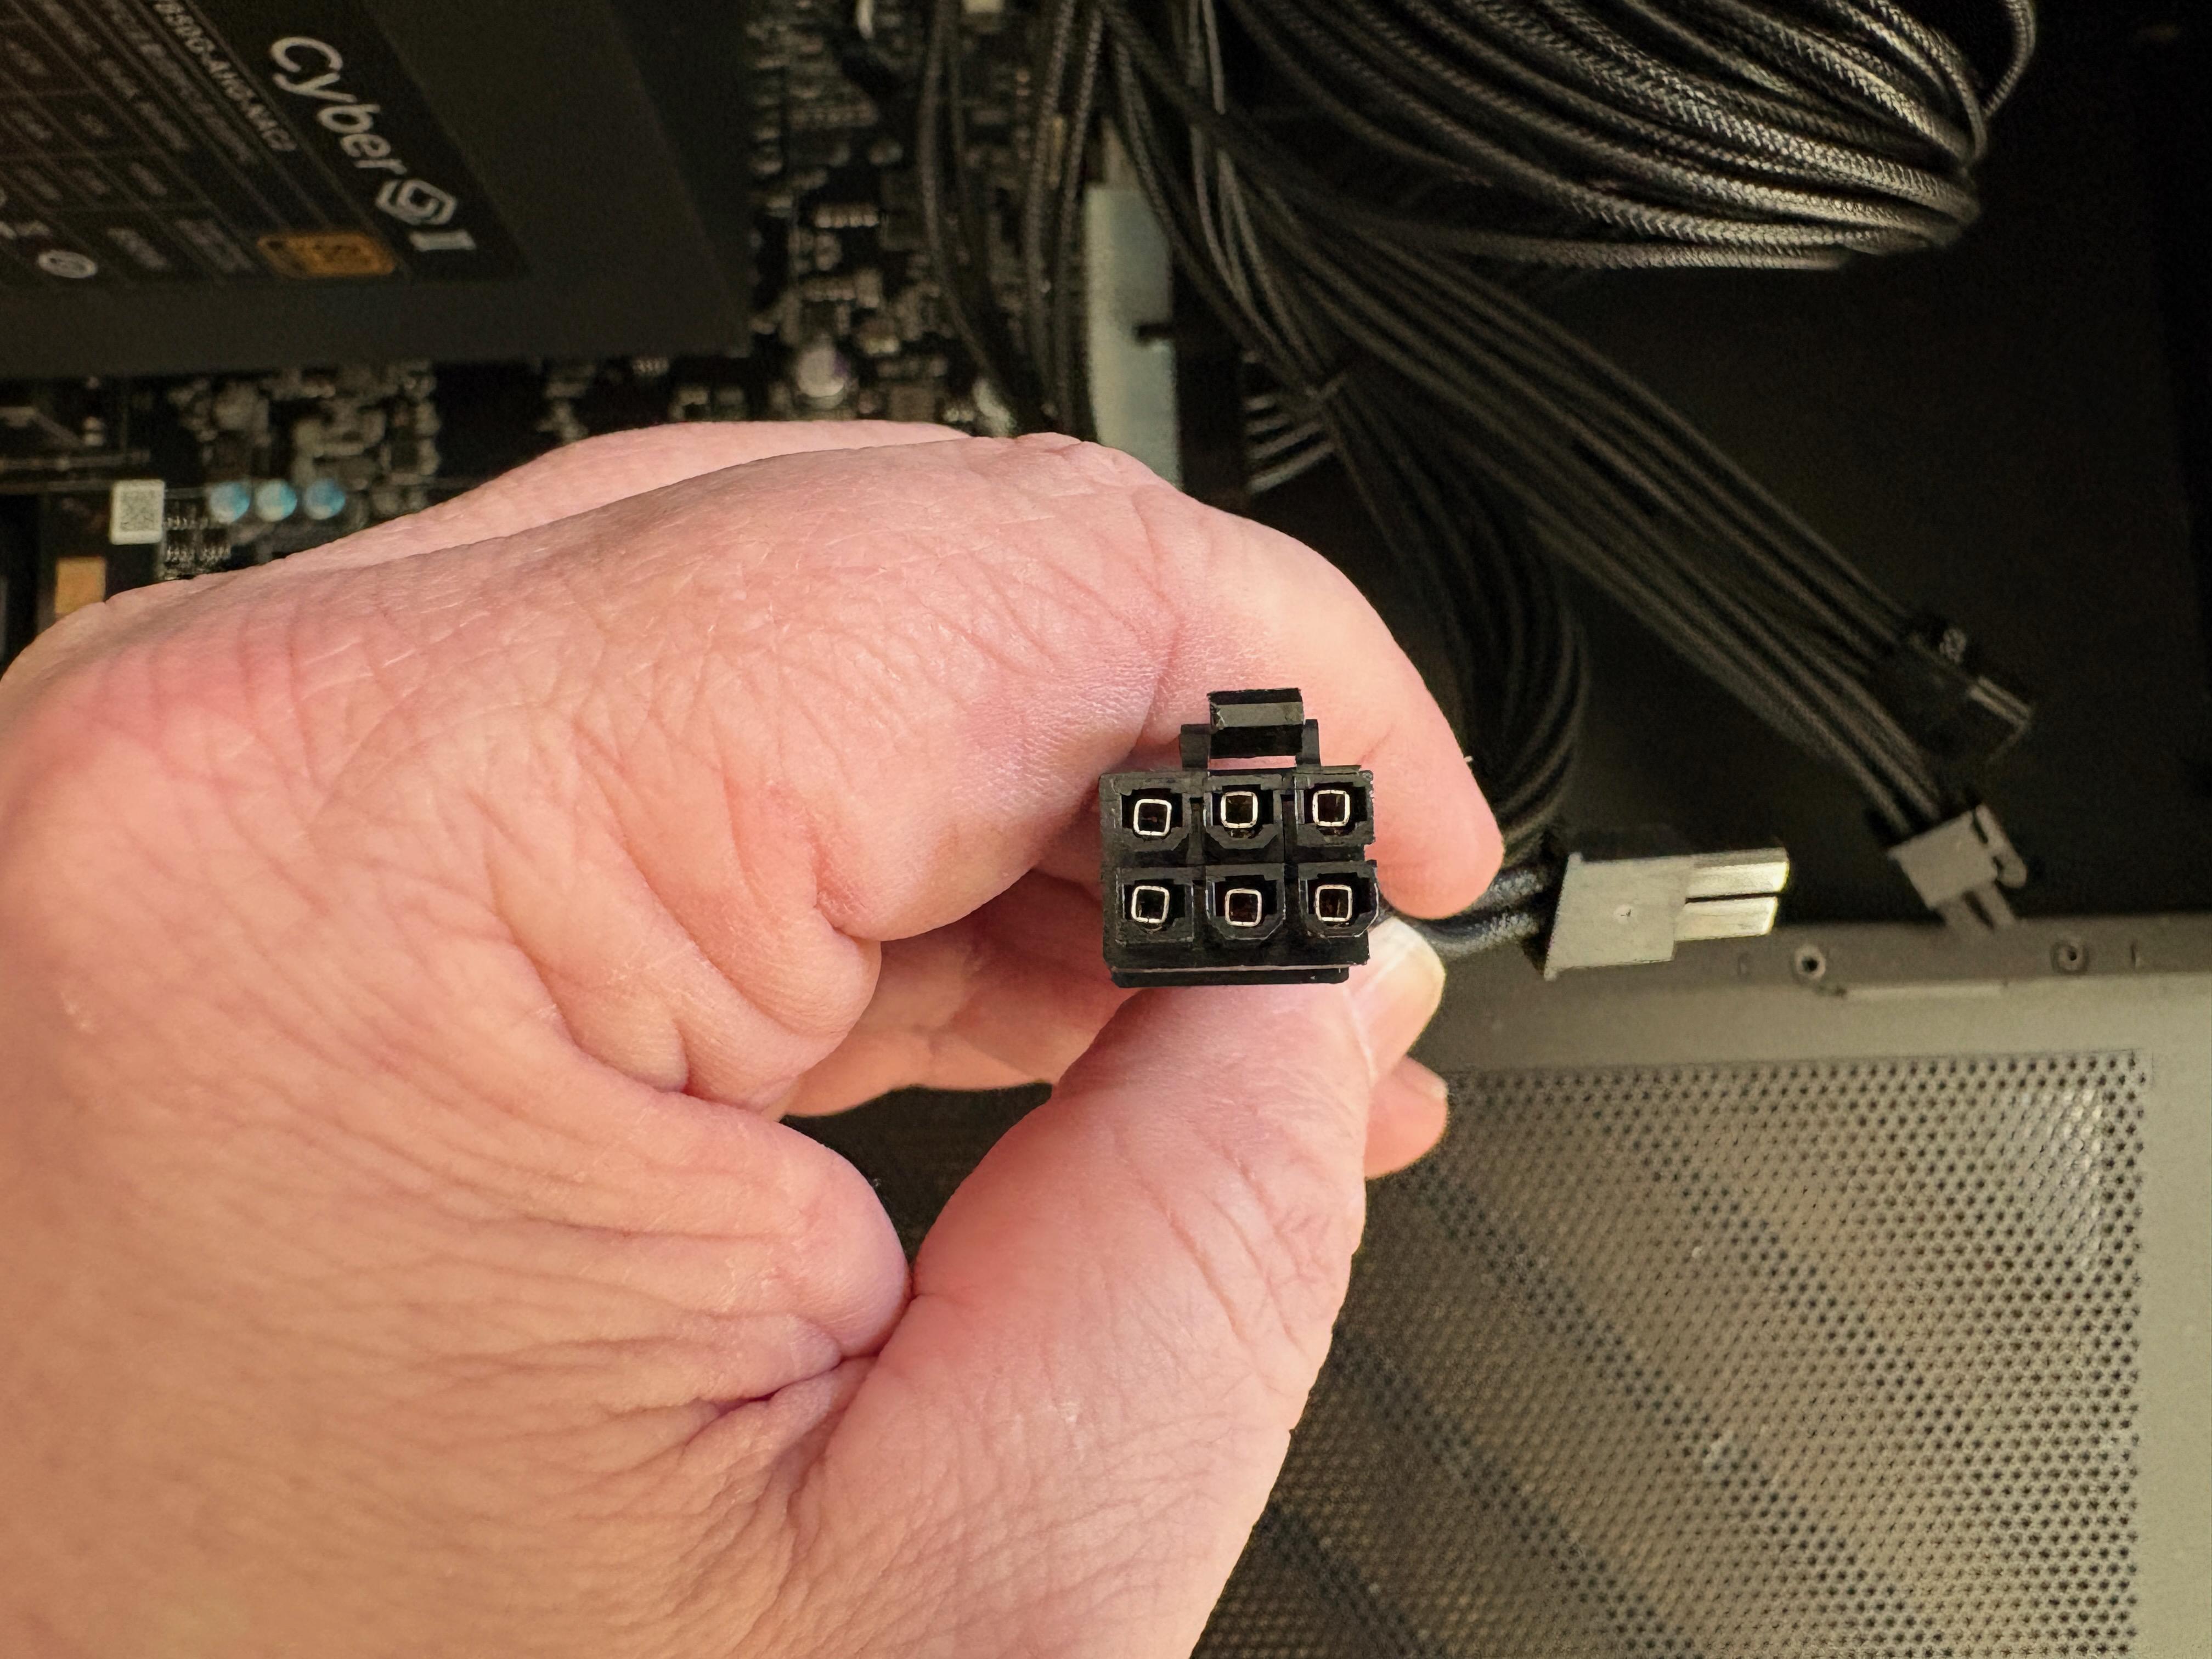
One PCIe 6+2 power connector of the TBT5-AI power supply (top view)
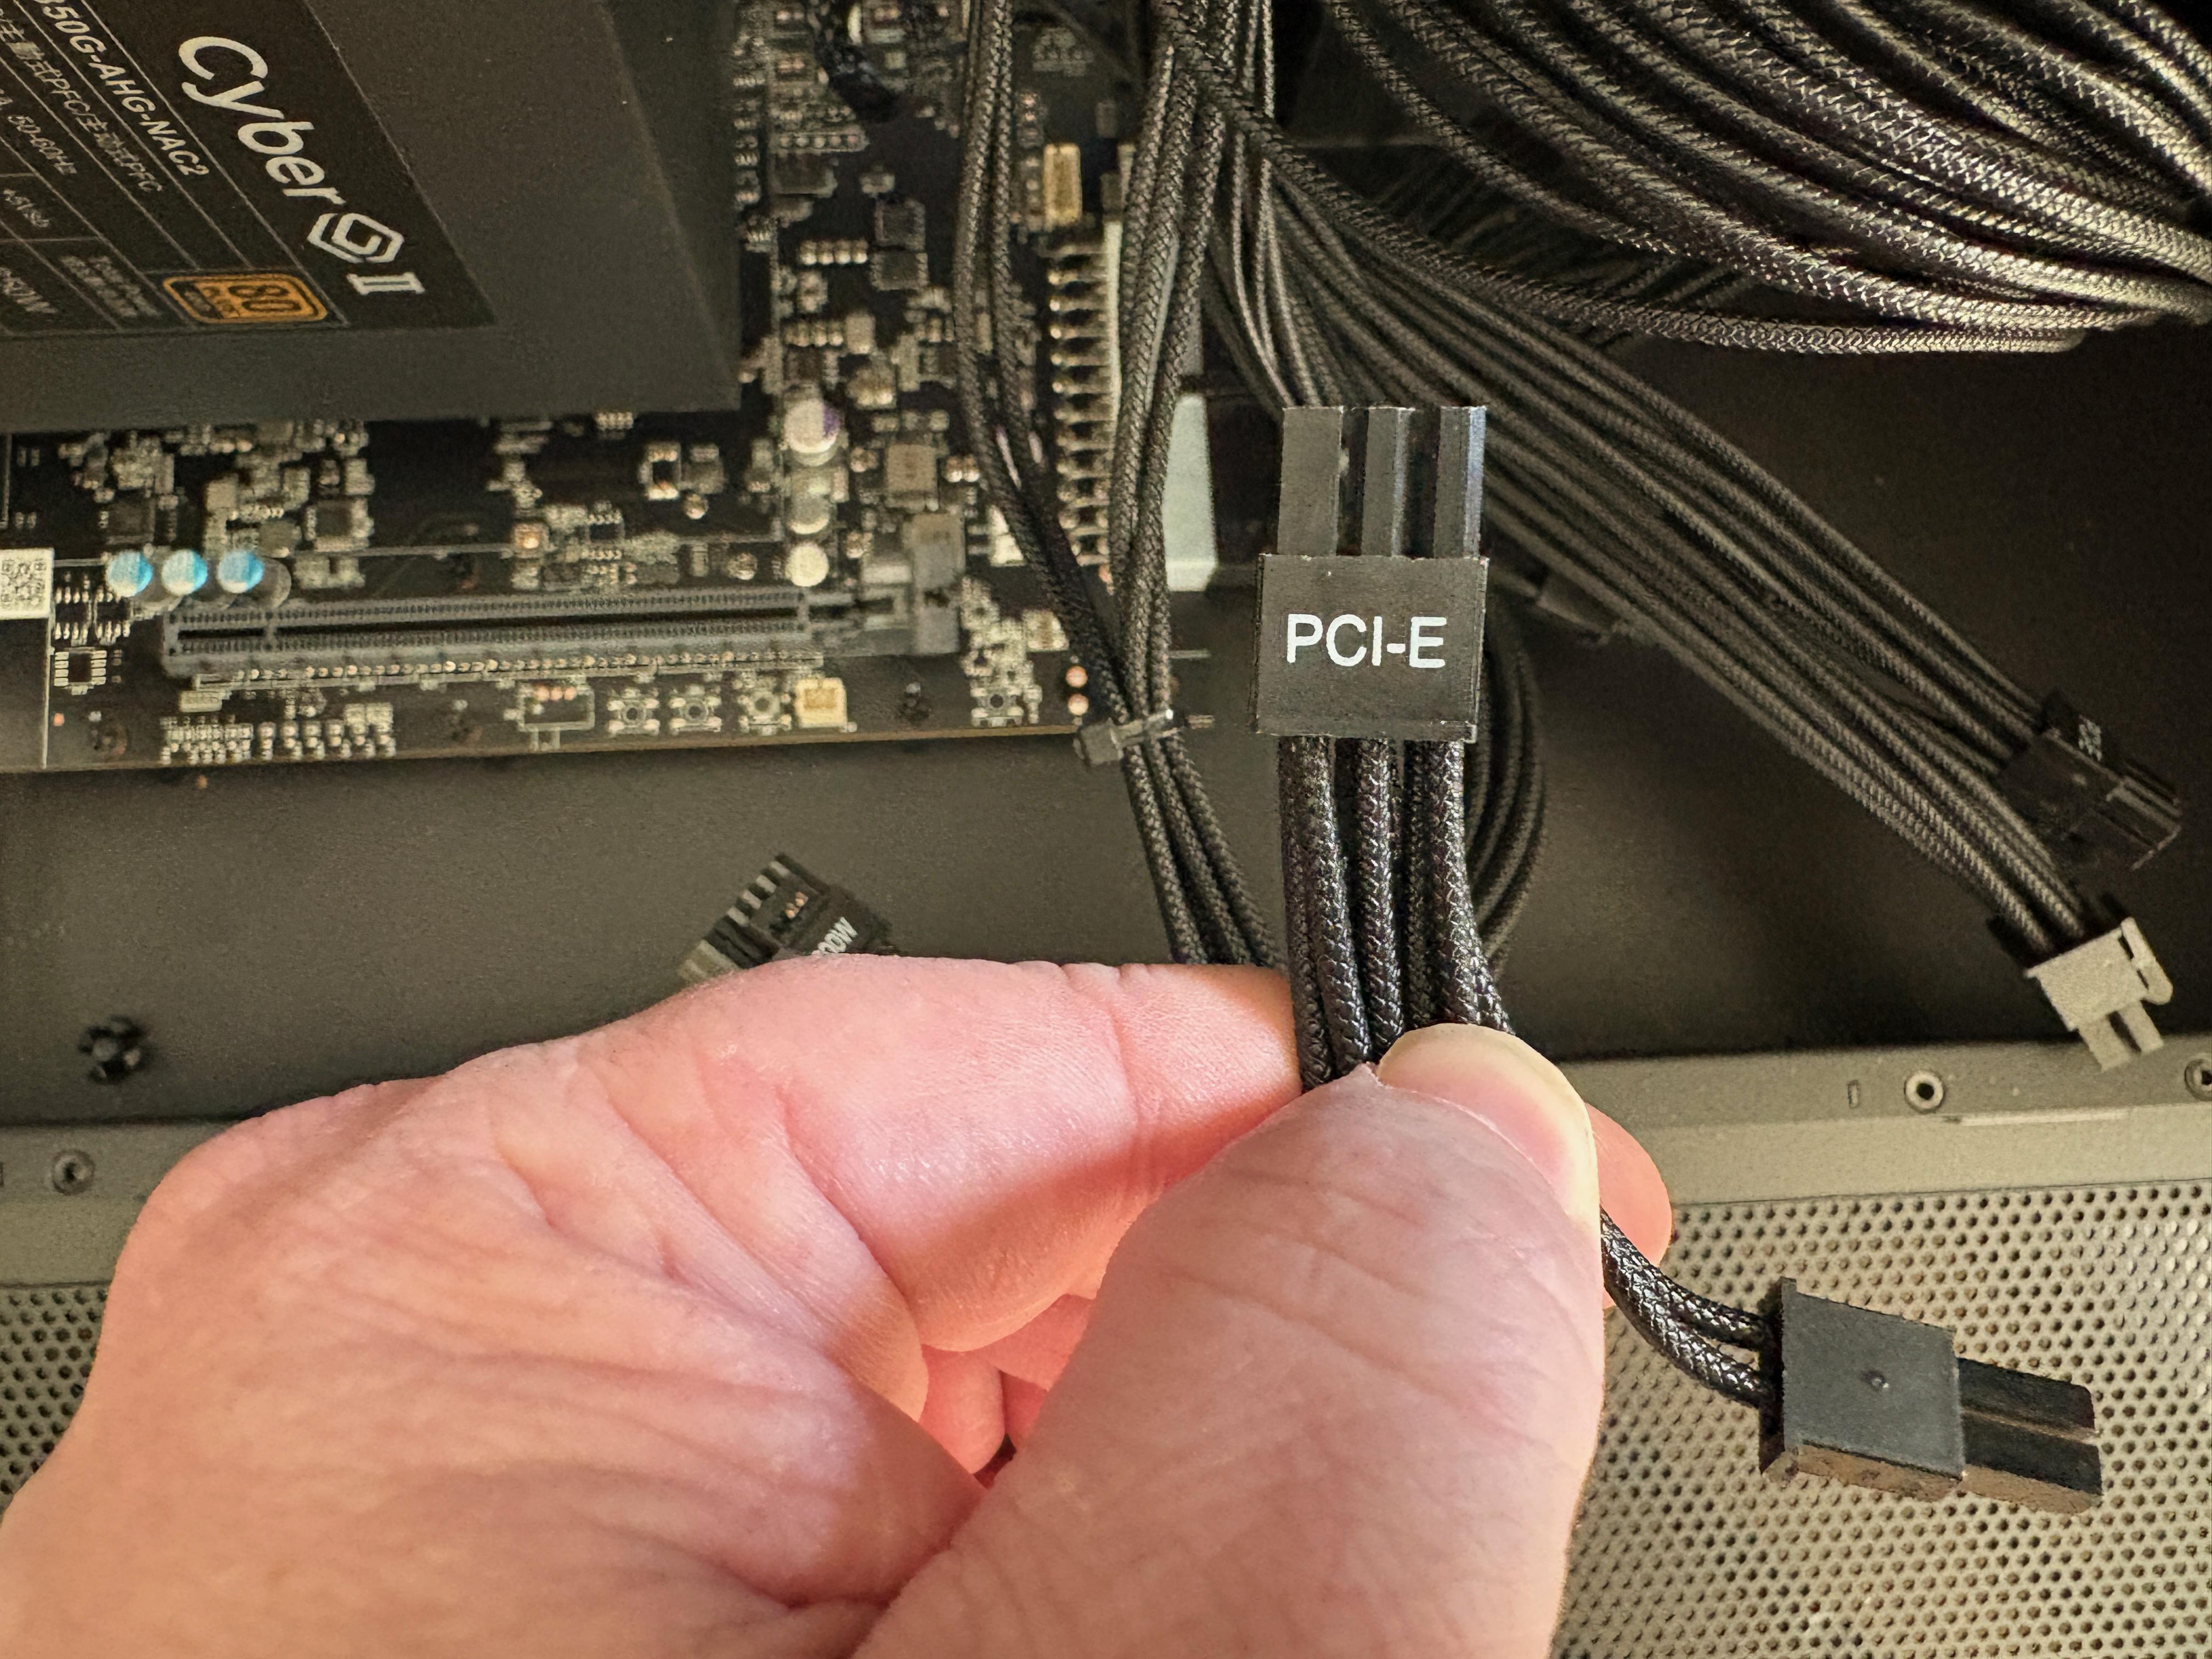
One PCIe 6+2 power connector of the TBT5-AI power supply (side view)
The number and type of power connections required will vary depending on the specific model of GPU installed. Please consult the documentation provided by the manufacturer of your GPU for the specific type and number of power connections required.
Once the appropriate power connections have been determined, connect the required power connectors from the TBT5-AI’s power supply to your GPU.
NOTE - Please ensure that the power connectors are fully seated. Loose connections can cause problems.
ALSO NOTE - Depending on the GPU model, not all of the provided power connections may be required. If a specific power connection is not required, it is okay to leave the connector disconnected.
13. Once the GPU has been installed, please take a moment to double-check all of the connections:
A. Please ensure that the GPU is fully seated into the PCI Express slot, and that the PCI Express retention clip is secure
B. Please ensure that the screws holding the GPU into the PCI Express slot openings on the back of the TBT5-AI are secure.
C. Please ensure that all appropriate power connections to the GPU have been made, and that all of the connections are secure.
14. Once everything has been double-checked, please raise the enclosure’s lower access door. Optionally secure the door with the Philips screws you removed earlier.
15. Please close the enclosure’s upper access door. Secure the door with both the front and rear thumbscrews that you removed earlier.
Once the above steps are completed, the GPU is now fully installed.
If you need help
If you have any questions about this procedure or require any additional assistance, please reach out to Plugable directly via → support@plugable.com and we will be happy to help.
END OF PROCEDURE
TBT5-AI Getting Started Guide
Overview
This document describes how to get started using the Plugable TBT5-AI for local AI tasks. This document presumes that you have already installed a graphics processing unit (GPU) inside the TBT5-AI. If you have not already installed a GPU, please see our TBT5-AI GPU Installation Guide.
Requirements
TBT5-AI with GPU already installed
Windows 11 computer with Thunderbolt 5, Thunderbolt 4 or USB4 (Thunderbolt 5 recommended for best performance)
Physical setup
1. Connect the included power cable to the power input port on the back of the TBT5-AI. Connect the opposite end of the power cable into a known-working electrical power outlet.
2. Ensure that the power switch located underneath the power input is switched to the ‘On’ position, which is represented by a horizontal white line.
*** IMPORTANT NOTE - The TBT5-AI will not power on unless it establishes a connection to a compatible host computer ***
3. Connect the included Plugable Thunderbolt 5 cable to the TBT5-AI’s single Thunderbolt 5 host connection port. This port has a small icon of a computer located above it.
For reference, the included Plugable Thunderbolt 5 cable has a small white cable flag attached to it that lists the cable’s specifications on one side and the product model (TBT5-AI) on the opposite side.
The TBT5-AI will only work if the Thunderbolt cable is connected to the Thunderbolt 5 host connection port. If the cable is connected elsewhere, then the TBT5-AI will not function.
4. Power and login to a compatible computer running Windows 11.
5. Connect the opposite end of the Thunderbolt 5 cable to the host computer. When the TBT5-AI establishes a connection to the host computer, the TBT5-AI will power on automatically, which will be indicated by a solid blue power indicator light on the front of the unit.
Most compatible host computers should detect the TBT5-AI automatically.
6. While the TBT5-AI should be automatically detected by the host computer, the graphics processing unit (GPU) installed within the TBT5-AI may not be detected automatically until an appropriate Windows driver is installed.
Consult the documentation included with your GPU in order to determine and download the appropriate driver software. Once the appropriate GPU driver software is installed, the GPU should be detected by Windows 11.
END OF PROCEDURE
What Types of AI Applications Can I Use in Conjunction With the TBT5-AI?
In order to perform AI inference tasks, additional software such as Ollama, LM Studio, Microsoft Foundry Local, or Nvidia NIM (requires Nvidia GPU) must be installed on the host computer. Please consult the application vendor for assistance in using their software.
What size LLM can I run on my video card?
How is the video memory used, and why is this often the limiting factor in what models can be run?
Video memory or VRAM, is used to both store the active model weights and the KV cache of the current conversation. The required VRAM for a model depends on the number of parameters in the base model, and its quantization level.
Parameters
Think of a parameter as a single connection or "synapse" in the AI's digital brain. When the AI is being trained, it adjusts these billions of connections to learn how words relate to each other. Each parameter is represented by a large number, generally 16-bit float, taking up two bytes of storage or VRAM. An uncompressed 8 billion parameter or “8b” model will take about 16GB of space on the disk or loaded into memory.
Quantization
Quantization is lossy compression of an AI model's brain by reducing the precision of parameters. Quantization reduces the number of bits used to represent each number, shrinking the model so it fits on cheaper or consumer-grade GPUs. For example the 8b model with INT8 quantization takes up half the space. However this can reduce the precision of the model and may reduce the quality of the output.
| Format | Bits per Parameter | Memory per 1B Parameters | Quality |
|---|---|---|---|
| FP16 / BF16 | 16-bit | ~2 GB | Original (Lossless) |
| INT8 / Q8 | 8-bit | ~1 GB | Near-Perfect (99%+) |
| INT4 / Q4 | 4-bit | ~0.5 GB | Great (95-98%) |
| EXL2 / IQ3 | 2-3 bit | ~0.3 - 0.4 GB | Noticeable Loss |
Lossless Compression
IBM’s ZipNN open-source compression library provides lossless compression potentially reducing model download and storage size by as much as 33 percent, however this is unlikely to affect the VRAM used by a model. Lossless compression is achieved by replacing duplicate sequences with pointers to the original sequence. Many English speakers already do this, replacing longer words like “Hello” with shorter words like “Hi” which have the same meaning. The compression relies on some statistical research showing that most parameters share one of twelve exponents (out of 256 possible values) 99.9% of the time. ZipNN was introduced around mid-2025, while not yet widely used, it will likely be adopted to help reduce hosting costs and download times for larger models.
Estimating video RAM usage for a given model
With the above information, we can create a simple equation to approximate the VRAM used for a model. We start by multiplying the number of parameters ( in billions ) by the quantization bits (precision) and dividing by 8 to convert from bits to bytes. Finally we multiply by 1.2 to provide 40% for KVs and system overhead, the result is the bare minimum VRAM required to run a model. Most consumer video cards will support 6GB, 8GB, 12GB, 16GB, 20GB, 24GB, or 32GB of VRAM, with some “AI” Accelerators supporting up to 80GB VRAM, so we should round up to these values to ensure that the video card we have can run a model.

The number of parameters is normally included in the model name, however the bits per parameter or quantization are not for the base models, generally we can assume 16-bit unless otherwise stated. Refined models will most often include the quantization method in the model name. Some models will include recommended hardware and minimum VRAM, for those we recommend following the documented recommendation.
Parameter GPU Memory Requirements
| Model Size (Parameters) | Quantization | ||
|---|---|---|---|
| 16-bit (FP16) | 8-bit (INT8/FP8) | 4-bit (INT4/FP4) | |
| 3b to 4b | 8 GB to 12 GB | 4 GB to 6 GB | 4 GB |
| 7b to 8b | 16 GB to 24 GB | 8 GB to 12 GB | 6 GB to 8 GB |
| 10b to 13b | 24 GB to 32 GB | 12 GB to 24 GB | 6 GB to 12 GB |
| 30b to 34b | 60 GB to 80 GB | 32 GB to 48 GB | 16 GB to 24 GB |
| 70B | Multi-GPU 160 GB | 48 GB | 24 GB |
| Color Key | |||
| Mid-tier graphics cards | |||
| High-end gaming cards | |||
| "AI" accelerators | |||
| Multiple cards or specialty hardware | |||
Popular models for standalone use
Disclaimer: Download sizes are based on the base model from the model provider either via direct download or through a 3rd party hosting service. Where the model provider does not provide hardware requirements or recommendations, we are estimating the VRAM requirements and have not tested these specific models. Plugable does not endorse or support either the original base model or 3rd party models based on these or other models.
| Base Model Name (16-bit) | Base Model Download Size | Recommended GPU Memory Base Model | Recommended GPU Memory for Quantized Models | |
|---|---|---|---|---|
| 8-bit (INT8/Q8) | 4-bit (INT8/Q8) | |||
| gpt-oss-120b1 | 65.3 GB | 80 GB | 40 GB | 24 GB |
| gpt-oss-20b1 | 13.8 GB | 16 GB | 8 GB | 6 GB |
| DeepSeek-R1-Distill-Llama-8B2 | 16.07 GB | 48 GB | 24 GB | 12 GB |
| DeepSeek-R1-Distill-Qwen-7B2 | 15.23 GB | 32 GB | 16 GB | 8 GB |
| DeepSeek-R1-Distill-Qwen-1.5B2 | 3.55 GB | 12 GB | 6 GB | 4 GB |
| Qwen-72B3 | 144.18 GB | 160 GB | 160 GB | 80 GB |
| Qwen-14B3 | 28.32 GB | 32 GB | 20 GB | 16 GB |
| Qwen-7B3 | 13.39 GB | 24 GB | 20 GB | 16 GB |
| Qwen-1.8B3 | 3.67 GB | 6 GB | 4 GB | 4 GB |
| Gemma-3-27b-it4 | 54.35 GB | 80 GB | 40 GB | 24 GB |
| Gemma-3-12b-it4 | 24.37 GB | 32 GB | 16 GB | 8 GB |
| Gemma-3-4b-it4 | 8.6 GB | 12 GB | 6 GB | 4 GB |
| Gemma-3-1b-it4 | 2 GB | 6 GB | 4 GB | 4 GB |
| Llama 3.2 90B5 | Subscription Required | 200 GB | 160 GB | 40 GB |
| Llama 3.2 11B5 | Subscription Required | 24 GB | 12 GB | 8 GB |
| Llama 3.1 8B5 | Subscription Required | 20 GB | 12 GB | 8 GB |
| Ministral-3-14B-Reasoning-2512 (FP8)6 | 27.9 GB | 32 GB | 32 GB | 16 GB |
| Devstral-Small-2-24B-Instruct-2512 (FP8)6 | 25.75 GB | 32 GB | 32 GB | 16 GB |
| Ministral-3-14B-Instruct-2512 (FP8)6 | 15.7 GB | 24 GB | 24 GB | 12 GB |
| Ministral-3-8B-Instruct-2512 (FP8)6 | 10.4 GB | 12 GB | 12 GB | 8 GB |
| Ministral-3-3B-Instruct-2512 (FP8)6 | 4.67 GB | 8 GB | 8 GB | 6 GB |
| Color Key | ||||
| Mid-tier graphics cards | ||||
| High-end gaming cards | ||||
| "AI" accelerators | ||||
| Multiple cards or specialty hardware | ||||
Microsoft Foundry Local models compatible with Plugable Chat software
Microsoft Foundry Local models are specifically selected and quantized for local LLM use with readily available desktop graphics controllers.
Disclaimer: GPU memory recommendations are based on the memory used to load the model using both NVIDIA RTX 5080 16GB and Intel ARC B60 Pro 32GB graphics cards then rounding the used VRAM to the nearest common video card memory size leaving some room for model KV data.
| Model Name | Quantization | Download Size(Est.) | Recommended GPU Memory |
|---|---|---|---|
| Source: Foundry Local | |||
| deepseek-r1-distill-qwen-14b-generic-gpu:3 | Not Listed - Appears to be INT8/Q8 | 10.27 GB | 16 GB |
| qwen2.5-14b-instruct-generic-gpu:4 | Not Listed - Appears to be INT8/Q8 | 9.30 GB | 16 GB |
| qwen2.5-coder-14b-instruct-generic-gpu:4 | Not Listed - Appears to be INT8/Q8 | 8.79 GB | 12 GB |
| Phi-4-generic-gpu:1 | Not Listed - Appears to be INT8/Q8 | 8.37 GB | 12 GB |
| deepseek-r1-distill-qwen-7b-generic-gpu:3 | Not Listed - Appears to be INT8/Q8 | 5.58 GB | 8 GB |
| qwen2.5-7b-instruct-generic-gpu:4 | Not Listed - Appears to be INT8/Q8 | 5.20 GB | 8 GB |
| qwen2.5-coder-7b-instruct-generic-gpu:4 | Not Listed - Appears to be INT8/Q8 | 4.73 GB | 8 GB |
| Phi-4-mini-instruct-generic-gpu:5 | Not Listed - Appears to be INT8/Q8 | 3.72 GB | 6 GB |
| Phi-4-mini-reasoning-generic-gpu:3 | Not Listed - Appears to be INT8/Q8 | 3.15 GB | 6 GB |
| Phi-3.5-mini-instruct-generic-gpu:1 | Not Listed - Appears to be INT8/Q8 | 2.16 GB | 6 GB |
| Phi-3-mini-4k-instruct-generic-gpu:1 | Not Listed - Appears to be INT8/Q8 | 2.13 GB | 6 GB |
| Phi-3-mini-128k-instruct-generic-gpu:1 | Not Listed - Appears to be INT8/Q8 | 2.13 GB | 6 GB |
| qwen2.5-1.5b-instruct-generic-gpu:4 | Not Listed - Appears to be INT8/Q8 | 1.51 GB | 6 GB |
| DeepSeek-R1-Distill-Qwen-1.5B-trtrtx-gpu:1 | Not Listed - Appears to be INT8/Q8 | 1.43 GB | 6 GB |
| qwen2.5-coder-1.5b-instruct-generic-gpu:4 | Not Listed - Appears to be INT8/Q8 | 1.25 GB | 6 GB |
| qwen2.5-0.5b-instruct-generic-gpu:4 | Not Listed - Appears to be INT8/Q8 | 0.68 GB | 6 GB |
| Color Key | |||
| Mid-tier graphics cards | |||
| High-end gaming cards | |||
| "AI" accelerators | |||
| Multiple cards or specialty hardware | |||
External Resources
TBT5-AI Software Installation Guide
Overview
This guide explains how to install, build, configure, and use Plugable Chat, the open source desktop application designed to run locally on systems connected to the Plugable TBT5-AI GPU enclosure.
You should complete the hardware GPU installation procedure first before proceeding with this software guide.
Plugable Chat is currently distributed as source code via GitHub and must be built locally. There are no pre-built signed installer packages at this time.
If you have questions at any point, contact Plugable support → support@plugable.com
Suggested Materials
- Host computer with Thunderbolt 5
- Plugable TBT5-AI enclosure with GPU installed
- Reliable internet connection
- Administrator privileges on your system
- At least 20GB free disk space for development tools and dependencies
Before You Begin
- Confirm the GPU is fully installed in the TBT5-AI enclosure.
- Connect the TBT5-AI to your host computer using a certified Thunderbolt 5 cable.
- Connect the enclosure to power.
- Power on the enclosure.
- Boot your computer.
Part 1 – Install GPU Drivers
Plugable Chat requires a properly installed GPU driver.
Windows (NVIDIA Example)
- Visit nvidia.com and download the latest driver for your GPU in the TBT5-AI.
- Run the installer.
- Choose Clean Installation.
- Restart your computer.
Part 2 – Download Plugable Chat Source Code
Plugable Chat repository:
https://github.com/PlugableTechnologies/plugable-chat
Step 1 – Install Git (if needed)
Windows:
winget install Git.Git
Step 2 – Clone the Repository
git clone https://github.com/PlugableTechnologies/plugable-chat.gitcd plugable-chat
Part 3 – Run the Platform Bootstrap Script
Plugable Chat provides platform bootstrap scripts that install all required dependencies automatically.
There is no separate installer path. The bootstrap script is the supported installation method.
Windows Installation
From inside the repository folder:
.\requirements.bat
This script will:
- Validate Windows version
- Check disk space
- Verify network connectivity
- Install Visual Studio Build Tools with C++ workload
- Install Node.js
- Install Rust
- Install Git
- Install Protocol Buffers
- Initialize Rust toolchain
- Run npm install
You may need to open a new command prompt and re-run .\requirements.bat several times to get all components installed.
Diagnostic mode (no installation):
.\requirements.bat --check
Once complete, start the app:
npx tauri dev
Part 4 – First Launch
When running:
npx tauri dev
The following occurs:
- React frontend builds
- Rust backend compiles
- Tauri desktop application launches
- Local database initializes
- Model configuration loads
On first launch, you may be prompted to:
- Select a model
- Configure local model endpoints
- Adjust settings
Part 5 – Using Plugable Chat
Starting a Chat Session
- Select your model from the model menu.
- Click New Chat.
- Enter your prompt.
- Press Enter or click Send.
Streaming responses will appear token-by-token.
Model Support
Plugable Chat supports multiple model families, including:
- OpenAI-compatible endpoints
- Gemma
- Granite
- Phi
- Other transformer-based models
Model-specific tool-calling formats are handled automatically by the backend.
Built-In Capabilities
Plugable Chat includes:
- Streaming response engine
- Local vector database (LanceDB)
- Python sandbox execution
- Tool calling loop
- MCP server integration
- Local-first storage of chat history
Troubleshooting
GPU Not Detected
- Confirm Thunderbolt connection.
- Confirm GPU drivers are installed.
- Check Device Manager or run nvidia-smi.
- Power cycle enclosure and system.
Build Fails on Windows
Common causes:
- C++ workload not installed in Visual Studio Build Tools.
- winget not installed.
- UAC prompt waiting behind other windows.
Run diagnostic mode:
.\requirements.bat --check
Rust Compilation Errors
Ensure Rust toolchain is initialized:
rustup update
Node Errors
Delete node_modules and reinstall:
rm -rf node_modulesnpm install
Windows:
rmdir /s node_modulesnpm install
Frequently Asked Questions (FAQ)
1. Is there a pre-built installer?
No. Plugable Chat must currently be built from source.
2. Do I need programming experience?
No coding is required for normal use. The bootstrap scripts automate setup.
3. Can I run this without a GPU?
Yes, but performance will be significantly reduced.
4. What GPU memory is recommended?
- 12GB VRAM for smaller models (7B class)
- 16–24GB for mid-sized models
- 24GB+ for larger models
5. Does this require internet access?
Only for initial dependency installation and model downloads. The app runs locally.
6. Where is chat history stored?
Locally on disk using LanceDB within the project directory.
7. Is the application secure?
All processing occurs locally. The Python sandbox restricts execution to a curated allowlist.
8. Can I deploy this in production?
Yes, but production builds are not yet code-signed. Enterprise deployments may require internal signing.
9. How do I completely uninstall?
Delete the repository folder and uninstall:
- Node.js
- Rust
- Visual Studio Build Tools (Windows)
10. Who do I contact for help?
Plugable Support → support@plugable.com
Include:
- Operating system
- GPU model
- Error messages
- Output logs
Conclusion
Once the hardware GPU installation is complete and Plugable Chat has been built and launched, your TBT5-AI enclosure becomes a high-performance local AI workstation capable of running advanced models, executing tools, and managing chat workflows entirely on your own system.
For assistance at any stage, contact support@plugable.com.
USB Port Types
USB-A

pietz, CC BY-SA 3.0 , via Wikimedia Commons
This is the standard USB connection that most computers offered prior to the introduction of USB Type-C (USB-C). Even after the introduction of USB Type-C, this is still quite common.
It can provide data transfer rates up to the USB 3.1 Gen 2 (10 gbps) specification depending on the host and device, but does not directly support video in the way that USB-C Alternate Mode does. This limitation makes DisplayLink USB graphics adapters and docking stations ideal on systems that do not have USB-C, or in instances where more displays are needed beyond available video outputs of a PC.
USB-B

Fred the Oyster, CC BY-SA 4.0 , via Wikimedia Commons

IngenieroLoco, CC BY-SA 4.0, via Wikimedia Commons
This type of connection comes in a couple different styles depending on whether USB 3.0 and higher transfer rates are supported (bottom graphic). Usually this type of connection is used to plug into USB devices that do not have a fixed cable connected, such as USB docking stations, USB hubs, printers, and others.
USB Mini-B

Fred the Oyster, CC BY-SA 4.0 , via Wikimedia Commons
One of the first connectors for charging a smartphone, wireless game controller (such as the Sixaxis and DualShock 3), and other small devices such as external hard drives. Not commonly used today, but is still used in some cases. Most devices using USB Mini B are using USB 2.0, though a USB 3.0 variant does exist. This specification also added USB On-The-Go (OTG) functionality, though it is more commonly implemented with Micro USB.
USB Micro-B

Fred the Oyster, CC BY-SA 4.0, via Wikimedia Commons

IngenieroLoco, CC BY-SA 4.0 , via Wikimedia Commons
A smaller connector that serves many of the same uses as the Mini B connector, with added optional features such as Mobile High-Definition Link (MHL) to allow devices like smartphones to output video to larger displays without requiring a dedicated port for video output.
The larger variant of USB-B is most commonly used for external hard drives for higher 5Gbps transfer rates.
USB-C, Thunderbolt™ 3, and Thunderbolt™ 4
Niridya , CC0, via Wikimedia Commons
The most recent USB connection, USB Type-C (USB-C), represents a major change in what USB can do. The connector is smaller, can be connected in two orientations, is able to carry substantially more power and data, and can directly carry video signals of multiple types (HDMI, DisplayPort, etc.) Intel has also adapted the USB-C connector for use with Thunderbolt 3 and Thunderbolt 4.
It is important to note that while all Thunderbolt 3 and Thunderbolt 4 connections are USB-C, not all USB-C connections can be used with Thunderbolt 3 or Thunderbolt 4 devices.
More details regarding physical USB connections can be found on Wikipedia . The graphics depicted here are adapted from Wikimedia Commons by various artists under the Creative Commons Attribution-Share Alike 3.0 Unported license.
Is my ethernet adapter compatible with iPhone?
Our Plugable ethernet adapters are compatible with USB-C iPhone 15 and 16 / Pro / Pro Max running iOS 17 or newer. Our ethernet adapters are plug-and-play on iPhone, and ethernet connection is identified in the iOS settings app.
These following ethernet adapters from Plugable have been tested and verified to work with iPhone:
Understanding and Troubleshooting Network Performance
Computer networking is a complex topic. In this article, we'll be taking a deep dive on the nuances of network performance for those who need some additional explanation while striving to be concise, and to educate users of various experience levels relating computer hardware and computer networking.
If you just need to know how to perform a network performance test/benchmark, jump down to configuring iPerf.
Core Network Concepts
LAN vs WAN
With regards to network performance, it is crucial to first separate whether an issue is with Wide Area Network (WAN) performance, or if the issue is with Local Area Network (LAN) performance.
Your LAN is essentially the network inside your home or business. Many homes use a combination modem/router device provided by their Internet Service Provider (ISP). In some cases, especially in businesses, you may have a separate modem and router, along with other equipment connecting to the router such as a network switch.
Your modem, and the connection it establishes to your ISP—whether through coaxial cable, fiber, phone lines, or long-range wireless—essentially marks the point between the WAN and the LAN. The connection your modem makes to your ISP is the WAN, and any devices you connect through your router behind that modem belong to the LAN.
Link Rate
Almost every type of connection your computer makes to any piece of hardware will have a link rate of some kind. The link rate establishes how fast data can possibly be transferred across any given connection, but it does not guarantee how fast the hardware on either end of the connection will actually transfer data.
The concept of link rates, and their related bottlenecks, is likely best conveyed by giving an example of what connections might be involved in transferring a file from one computer on your LAN to another.
- 800Mbps—The file source is a USB 3.0 thumb drive capable of 100MB/s (800Mbps) read/write.
- 480Mbps—The USB 3.0 thumb drive is plugged into a USB 2.0 port on the PC, which has a maximum throughput of 480Mbps
- 1000Mbps—PC1's Ethernet connection establishes 1Gbps (1000Mbps) link to the router via Ethernet
- 300Mbps—The router connects to a second PC (we'll refer to this as PC2) via Wi-Fi, and it has established a 300Mbps link to the Wi-Fi adapter on PC2
- 480Mbps—The Wi-Fi adapter on PC2 is connected via a USB 2.0 port. The link rate of the USB connection to PC2 is at 480Mbps
- 6000Mbps—PC2 is going to store the file on an internal hard drive with a link rate of 6Gbps
- 1600Mbps—File Destination: SATA hard drive capable of 200MB/s (1600Mbps) read/write.
Following this chain, we see that 300Mbps is the slowest link rate established. This means that, regardless of the link rates established elsewhere, the absolute maximum the data can possibly be transferred is 300Mbps.
if we were to change the Wi-Fi connection to a wired Ethernet connection capable of 1Gbps, our performance bottleneck would then become the USB 2.0 connection to the USB drive where the file is stored.
Ports and Interfaces
Interfaces
A network interface represents connections, whether wired or wireless, that are made to form a network between devices.
Ports
Some may refer to physical hardware connections as "ports". For the purposes of networking, ports are logical constructs that can also be referred to as "network ports". Each network interface has 65,535 of these logical ports. Each port on a network interface is a separate data connection.
Benchmarking Network Adapter Performance
To properly benchmark network adapter performance, we need to:
- Use a simple LAN configuration
- Eliminate bottlenecks, especially link rate bottlenecks
Websites like speedtest.net, fast.com, and other performance tools in your web browser are going to use your WAN connection, and are not appropriate for determining if a network adapter is working well.
Transferring files from one computer to another on your LAN is typically not the best way to benchmark a network adapter. File transfers are bottlenecked by a number of things, including performance limitations of the disk the data is on, and often times a lack of establishing parallel network connections to perform the task.
One of the most accurate ways to benchmark network performance on a LAN is by using iPerf . To more effectively benchmark network adapter performance, it is best to establish a point-to-point connection between two PCs, rather than connecting through a router or switch.
Configuring iPerf
To test a connection using iPerf, you'll need at least two network interfaces, and preferably two computers. You'll also need to know the IP (Internet Protocol) address assigned to each network interface . One network interface will function as an iPerf server, and the other network interface will function as an iPerf client. Lastly, you'll need to download the version of iPerf 3.x that's appropriate for your computer's operating system and extract/install it .
Windows
- Make sure the drivers for both network interfaces involved in the test are using up-to-date drivers. Drivers for Plugable products can be found here.
- Download and extract iPerf for Windows
- Open Command Prompt
- Press Windows Key + R or + R, then enter
cmdin the window that appears - Search the Start Menu for
Command Prompt, and open it
- Press Windows Key + R or + R, then enter
- Navigate Command Prompt to the directory the directory where iPerf is located
- The
cdcommand is for 'change directory'- If you have a folder named 'iperf' on your Windows desktop, you can reach it in command prompt with the command
cd %USERPROFILE%\Desktop\iperf
- If you have a folder named 'iperf' on your Windows desktop, you can reach it in command prompt with the command
- The
- Run iperf in server mode via Command Prompt
iperf3.exe -s
macOS
- Usually it is best to install iperf on macOS using brew in Terminal
- Make sure the drivers for both network interfaces involved in the test are using up-to-date drivers
- Open Terminal
- Run iPerf in server mode
iperf3 -s
Linux
- Usually it is best to install iperf using the package manager in your Linux distro. For example, in Ubuntu, use
apt: sudo apt install iperf3
- Make sure the drivers for both network interfaces involved in the test are using up-to-date Drivers
- Open Terminal
- Run iPerf in server mode
iperf3 -s
Next, you'll need to run iPerf in client mode, targeting the IP address of the server/interface where iPerf is running in server mode. Additionally, we'll run the test for 30 seconds using -t 30 and with four parallel connections using -P 4. Running 4 parallel connections is optimal for saturating a network link.
Windows
- Open Command Prompt
- Press Windows Key + R or + R, then enter
cmdin the window that appears - Search the Start Menu for
Command Prompt, and open it
- Press Windows Key + R or + R, then enter
- Navigate Command Prompt to the directory the directory where iPerf is located
- The
cdcommand is for 'change directory'- If you have a folder named 'iperf' on your Windows desktop, you can reach it in command prompt with the command
cd %USERPROFILE%\Desktop\iperf
- If you have a folder named 'iperf' on your Windows desktop, you can reach it in command prompt with the command
- The
- Run iperf in client mode via Command Prompt (replace 192.168.0.200 with the IP address of the server/interface where iPerf is running in server mode)
iperf3.exe -c 192.168.0.200 -t 30 -P 4
macOS / Linux
- Open Terminal
- Run iPerf in client mode (replace 192.168.0.200 with the IP address of the server/interface where iPerf is running in server mode)
iperf3 -c 192.168.0.200 -t 30 -P 4
iPerf should start performing a network performance test. If the test fails to start, make sure that iPerf is not being blocked by your PC's/Mac's firewall.
Why iPerf is Ideal for Benchmarking
Unlike a file transfer, iPerf runs in memory on the PC and generates data to send using the CPU directly. This alleviates potential bottlenecks generated by storage devices, and allows you to explicitly control how many parallel connections are being used to transfer data rather than being unsure if parallel network connections are being used by other means.
Conclusion
There's a lot more to networking that isn't covered in this article, but we hope this helps explain enough to get an accurate measure of your network performance.
If you need assistance with your Plugable product that features network connectivity, please contact us for further assistance.
Network Adapter Prioritization on Windows
There are various reasons and configurations that can benefit from having more than one network adapter present on a PC.
For users with newer networking products, featuring 2.5Gbps link rates or greater, it may be beneficial to prioritize that network connection over others on your PC that are still connected to your network/LAN.
To prioritize a network adapter on Windows 10, perform the following steps:
- Press Windows Key ( ) + X, or right-click the Start Menu button, then choose 'Network Connections' from the list that appears
- Select 'Change Adapter Options'
- Right-click the adapter you wish to have the highest priority, and choose 'Properties'
- Double-click the text of the item called 'Internet Protocol Version 4 (TCP/IPv4)
- This opens the Internet Protocol IP v4 properties
- You should be in the 'General' tab by default, click the 'Advanced' button
- Uncheck 'Automatic metric'
- Input a number
- The lower the number is, the higher the priority it will have
- Click OK on the windows you've opened thus far to accept the changes
Network Prioritization - How to Set Service Order on macOS
If you find that your Plugable Ethernet adapter or docking station is not connecting to the internet or is experiencing slower than expected speeds on your Mac, it may be related the macOS Network Service Order. This is a list of the network connections available to the computer setting the priority for network connections.
macOS attempts to connect to the internet using the network service at the top of your list first. If a wireless network is listed above your Plugable Ethernet adapter, this often leads to users unknowingly using a slower wireless connection when they intended to use a wired one.
To ensure you are getting the full speed and stability of your wired connection, you must prioritize the Plugable Ethernet adapter above Wi-Fi. Normally wired network connections take priority, however if priority has been modified in the past it can affect newly connected devices.
Set the order of network services
Navigate through these steps to Set Service Order:
- Click the Apple Menu in the top-left corner of your screen and select System Settings.
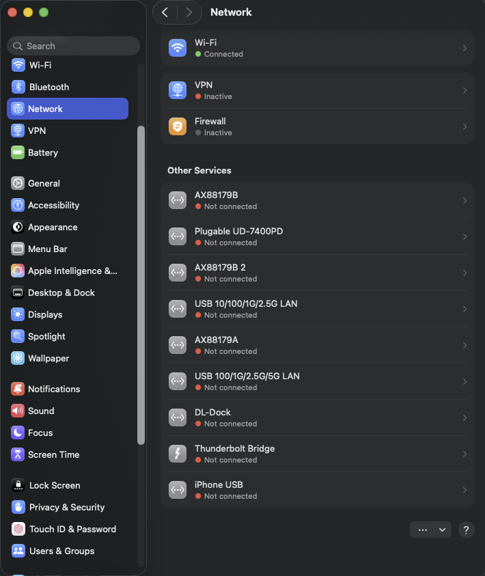
- In the sidebar, click Network.
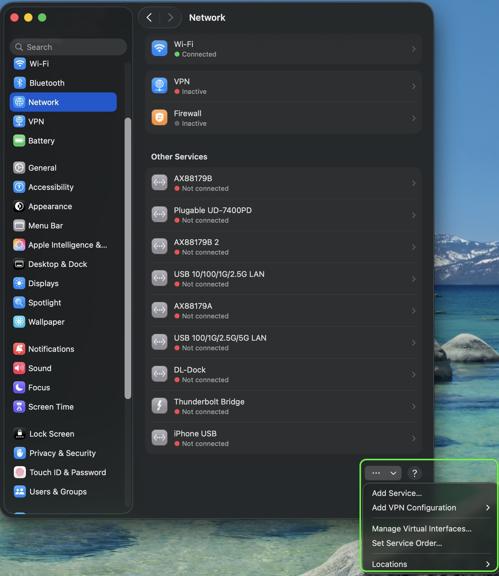
- Look for the Action Menu (a circle with three dots ...) located at the bottom right of the main window area.
- Click the three dots and select Set Service Order.…
- A list will appear showing all your network interfaces. Click and drag your Ethernet Adapter (often named "USB 10/100/1G/2.5G LAN" or “Plugable Docking Station”) to the very top of the list, above Wi-Fi.
- Click OK to save your changes.
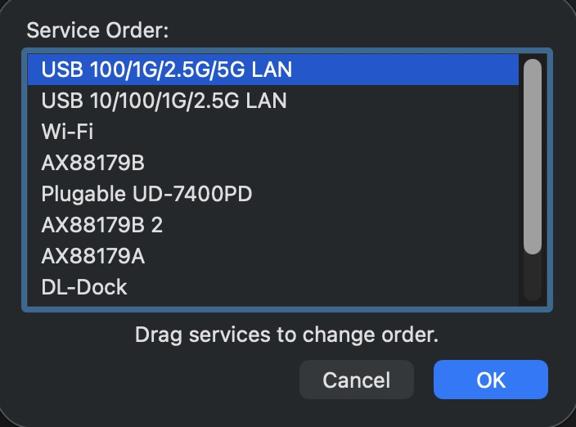
Your network traffic will now automatically prioritize the wired connection, ensuring you receive the best possible speeds and stability from your Plugable adapter.
If you have any questions please feel free to contact us at support@plugable.com and we'll be happy to help!
Do Plugable products support the Apple SuperDrive?
Unfortunately Plugable products do not support the Apple SuperDrive.
The Apple SuperDrive has stringent power requirements that can only be met by directly connecting the SuperDrive to your host laptop. As a result at this time Apple recommends only using their USB-C adapter cables. You can find more information on that here → How to connect the Apple USB SuperDrive
If you have purchased a Plugable product to use with your Apple SuperDrive, and would like some additional assistance please do not hesitate to reach out. You can do so by emailing support@plugable.com, or going to Plugable.com/Support.
My Plugable product with wired Ethernet is no longer working on macOS. What can I do?
Please Note
The below guide is an advanced troubleshooting step, and we do not recommend doing so unless you are comfortable manually altering files on your Apple product running macOS. You may not be able to perform the below troubleshooting step if you are unable to execute administrative credentials on your laptop. Please reach out to our support first if you do not wish to attempt the below instructions. You can do so at Plugable.com/Support
How to delete a specific Ethernet adapter from your Network devices on macOS
- Click on the Apple logo in the top left corner of your primary monitor, and select ‘System Preferences’
- Next select ‘Network’ in the ‘System Preferences' window.
- In the now visible list, please select the Plugable Ethernet, or Thunderbolt Ethernet device that may not be working as expected.
- Once selected click on the minus button in the bottom left of the network window.
- Click on Apply in the bottom right.
- Next click on the plus button in the bottom left of the network window, and add the previously removed device.
- Click on Apply in the bottom right.
- Test to see if this has resolved the unexpected behavior, and assure that your Ethernet is now working.
- If this does not resolve the problem, please proceed to the next section (As noted previously the next section is for advanced users only!)
Manually erase your macOS Network Settings to fully reset the Network configuration
(Advanced! Click to reveal)
- Open the ‘Finder’ app, then in the ‘Go’ menu at the top of your screen select ‘Computer’
- Click on ‘Macintosh HD’ then Library, Preferences, SystemConfiguration
- Copy the file named ‘NetworkInterfaces.plist’ to your desktop as a backup of your current configuration.
- Delete the original version of the ‘NetworkInterfaces.plist’ located in the SystemConfiguration directory.
- Restart your Mac
- Login to your Mac, and return to System Preferences → Network
- If the list is now empty, please re-add the Plugable or Thunderbolt network adapter by clicking on the plus button in the bottom left of the Network window. Once done click on 'Apply'.
- Test to see if this has resolved the unexpected network behavior
I am still unable to get my Ethernet connection working on my Mac
If this is the case please reach out to our support team. When you do please include a diagnostic log gathered using our PlugDebug tool (instructions are provided on the PlugDebug page). If you are not able to gather the PlugDebug diagnostics do not worry we are still here to help! Please reach out to our support team at support@plugable.com or Plugable.com/Support with a detailed description of your problem, and the model of Plugable product you are using.
Can I leave my notebook computer connected to a charging dock overnight, or should I discharge and recharge the notebook battery regularly?
We are often asked if it is okay to leave a notebook computer connected to one of our USB-C docking stations with Power Delivery for extended periods of time. The short answer is yes, it is no different from leaving the laptop connected to the manufacturer's original USB-C power supply for the same time. The long answer is yes for modern laptops, and maybe for older (1990s-early 2000s laptops) and involves going into the different battery technologies used in consumer electronics devices.
Another common question is if it is possible to use the docking station but to disable powering and charging the computer. When a modern notebook computer runs on battery power it will often set the system to a reduced power state which may impact performance, or connected devices and we recommend always powering the computer when using a desktop docking station. For all of our docking stations that provide power to the host computer this will not affect the lifespan of the computer's battery.
Modern Laptop Batteries: Lithium-Ion
Lithium-ion (li-ion) batteries are found in a wide range of consumer electronics from notebook computers and cell phones, to electric cars, power tools, and wearable electronics like wireless earbuds. Li-ion offers fast charging, high-current discharging, fairly long service live compared to other rechargeable battery technologies and are relatively inexpensive.
The life-span of a rechargeable battery depends on many factors including age, temperature history, charging patterns, the chemical composition of the specific battery, and usage. For example batteries stored at 100% charge will degrade faster than batteries stored at 50% charge, this is why most consumer electronics devices arrive from the manufacturer with between 25% to 75% charge.
Lithium-ion batteries are consumable components, however in most modern computers, cell phones, and tablets these are not user serviceable components. To help maintain the battery all modern computers and most consumer electronics will include battery charge and protection circuits. These can be fairly simple, charging up the battery at preset rates depending on the charge level to help maintain the battery life, or complex software controlled charging that monitors battery temperature, voltage and current draw to maintain the fastest charging while maintaining the battery longevity.
Modern notebook computers can be left connected to the original power cable or a docking station with charging capability for extended periods, and do not benefit from regular discharge/recharge cycles. Our docking stations with charging capability rely on USB Type-C Power Delivery to power and charge compatible computers. USB Type-C Power Delivery is a negotiated charging protocol between the host computer and the docking station or USB Type-C power supply, this allows the computer to draw only the power it requires, and even select the best voltage level for powering the computer. In combination with a computer's built-in battery charging controller the computer is capable of maintaining the battery's optimal state even when left connected to a power source for an extended period of time.
Legacy Laptop Batteries: NiCad and NiMH
Older laptops, from the 1990s and some early 2000s, as well as some consumer electronics, and most rechargeable AA or AAA battery replacements use Nickel-Cadmium (NiCad) or Nickel-Metal Hydride (NiMH) batteries. These batteries are slower to charge and discharge than li-ion batteries, and require very simple charge controllers, and in some cases can even be trickle-charged ( very low-current continuous charging ) if desired.
These batteries generally don't have smart charging controllers and to prolong the life of the battery required "training" or fully discharging and recharging the battery every so often. Many laptop manufacturers recommended fully charging and discharging a new laptop 2-3 times to train the battery, this is not necessary with modern laptops.
Conclusion
Modern notebook batteries are managed by the computer's built-in battery charging circuit, and require little to no user intervention to maintain optimal battery health. It does not harm the battery to leave the computer connected to an external power supply, so long as the computer is being used regularly. If the computer is to be stored for a prolonged period then discharging the battery to between 50-75% can help to maintain the battery life.
Batteries are consumable components and degrade over time, however modern notebook computers can extend the battery life generally to meet or exceed the life of the computer's other electronic components.
How To - Set a Network to Private or Public in Windows 10 & 11
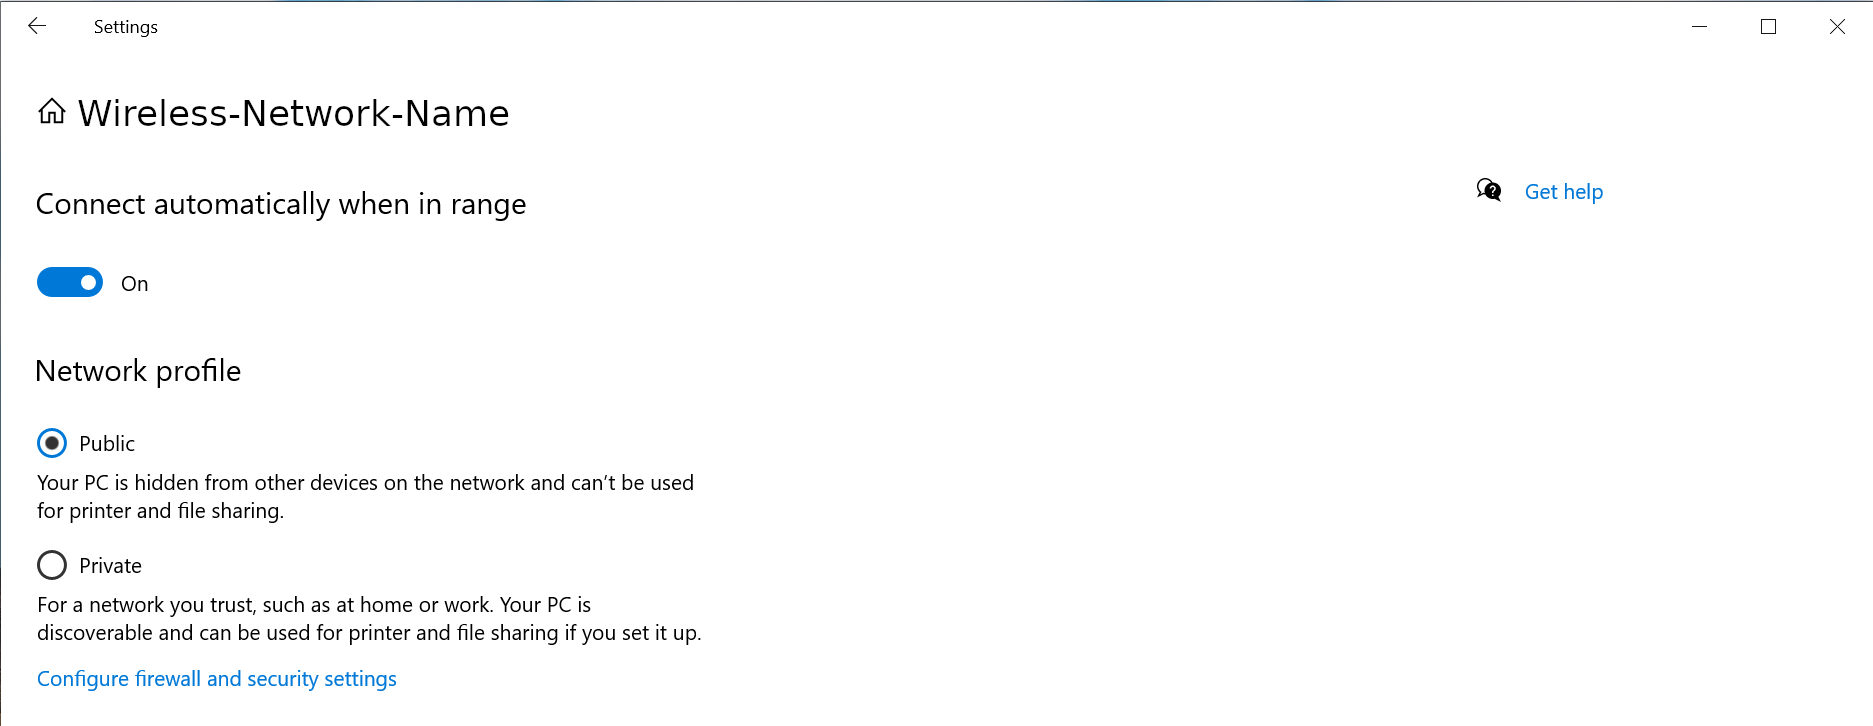
The Windows Firewall may block some networking features when the local network is not set to Private. This article will describe the process for setting the local network, either wired Ethernet or Wi-Fi to be a Private network.
Windows 11
1 - Connect the computer to the network, either wired or wireless
2 - Open the Windows Settings: right-click on the Start Menu and select Settings from the pop-up menu
3 - On the left column select Network & internet
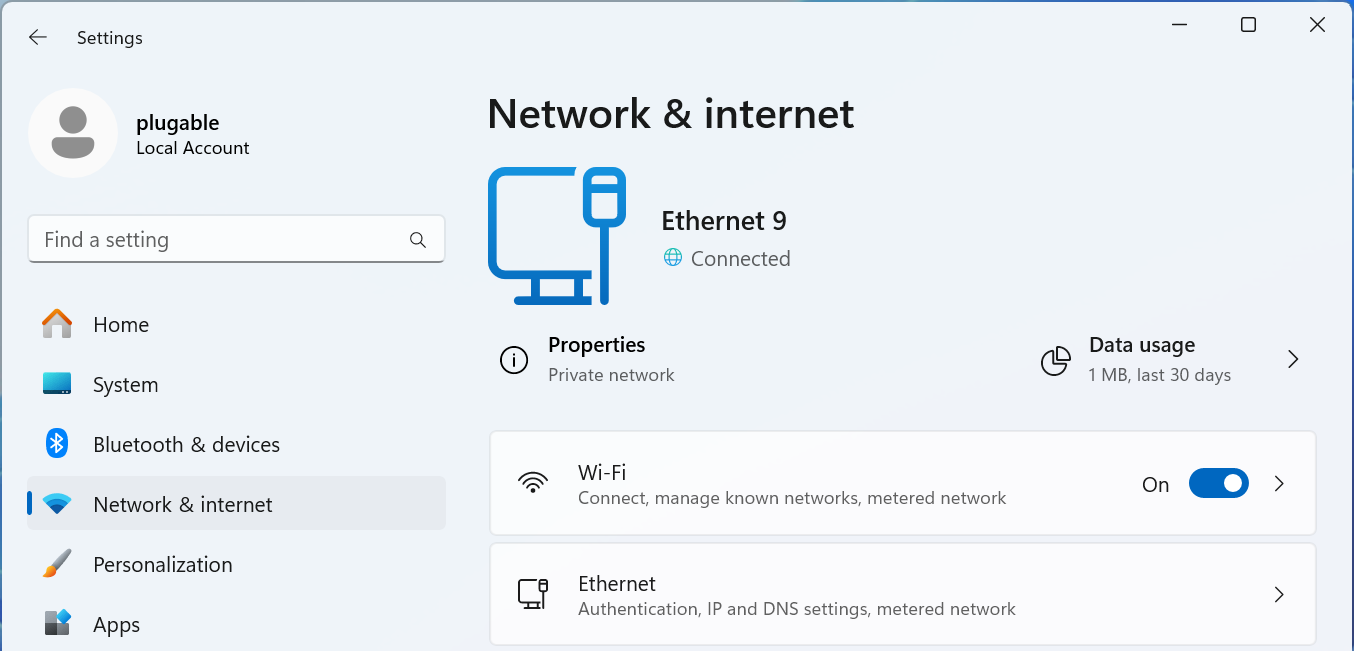
For Wired Networks
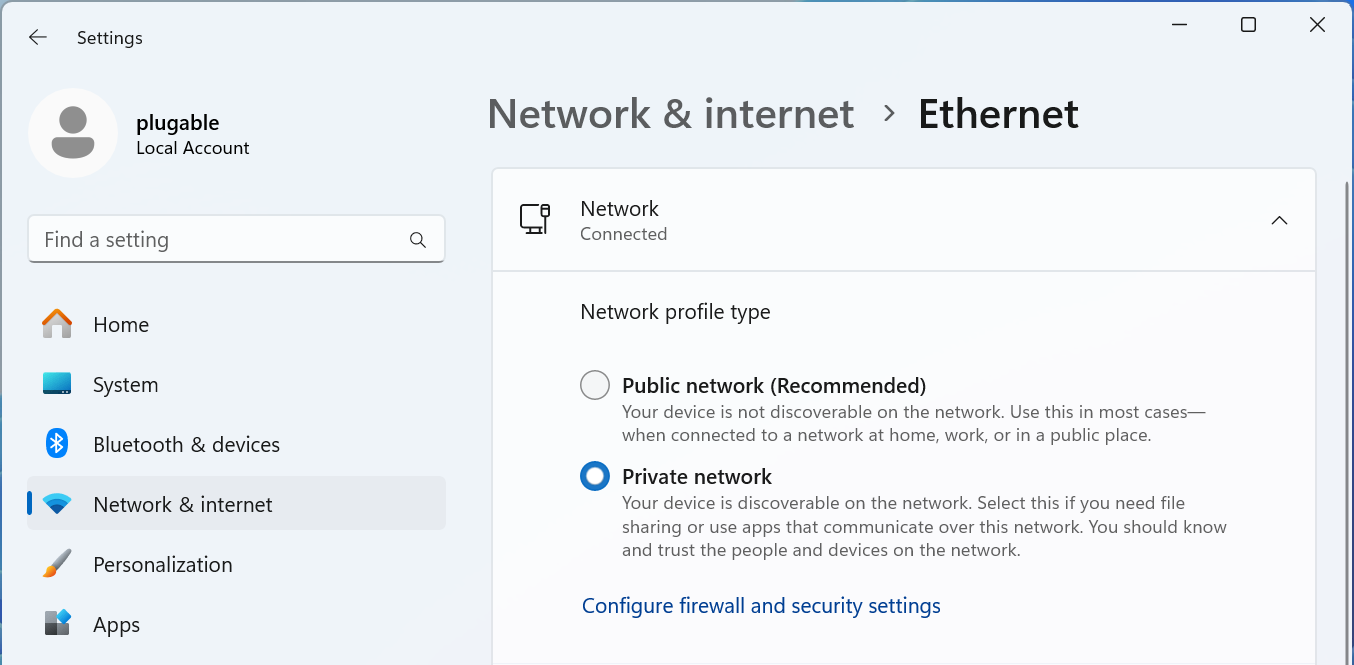
4 - Select the Ethernet option
5 - The connected network should be expanded, if not click on Network Connected to expand the section
6 - Select the Network profile type either Public network or Private network to suite your needs
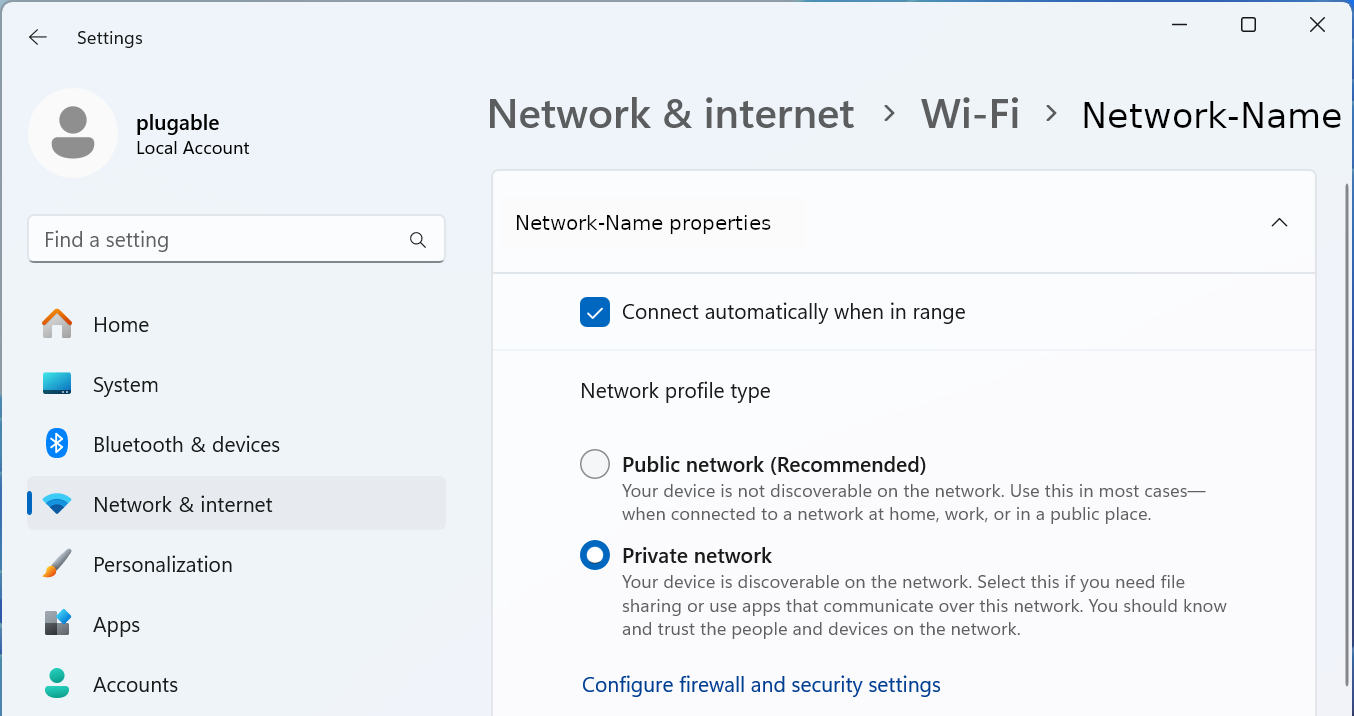
For Wi-Fi Networks
4 - Select the Wi-Fi option
5 - Select your Wi-Fi network name properties
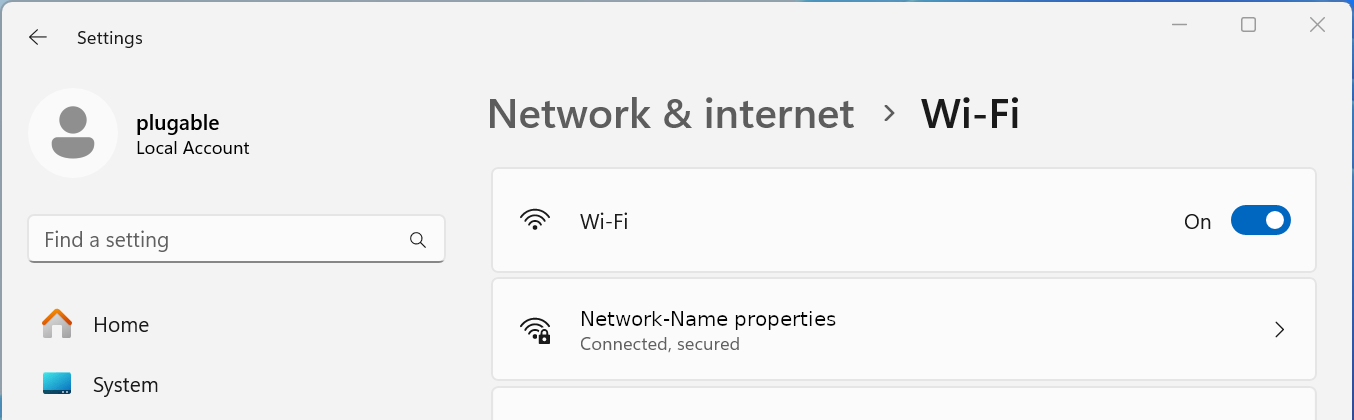
6 - Select the Network profile type either Public network or Private network to suite your needs
Windows 10
1 - Connect the computer to the network, either wired or wireless
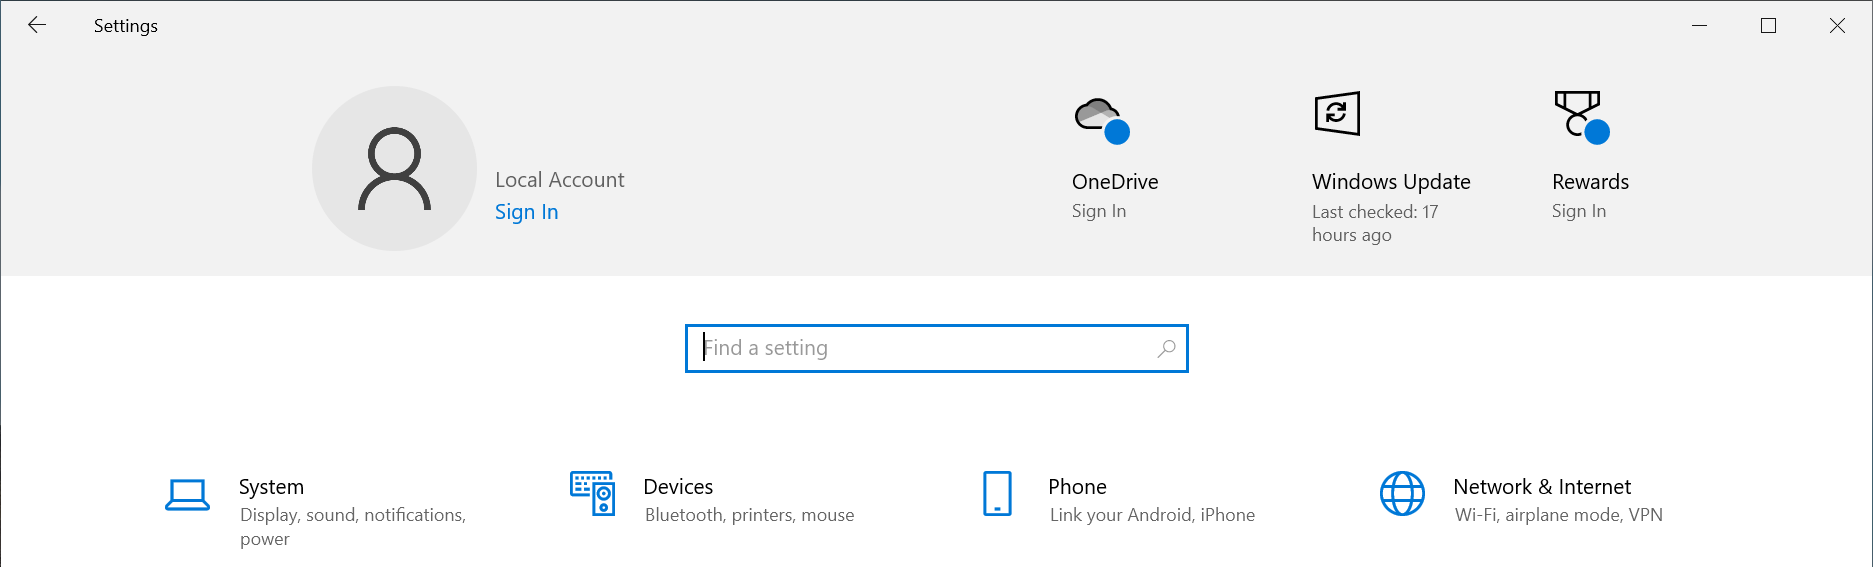
2 - Open the Windows Settings - right-click on the Start Menu and select Settings from the pop-up menu
3 - Select Network & Internet fro the bottom section
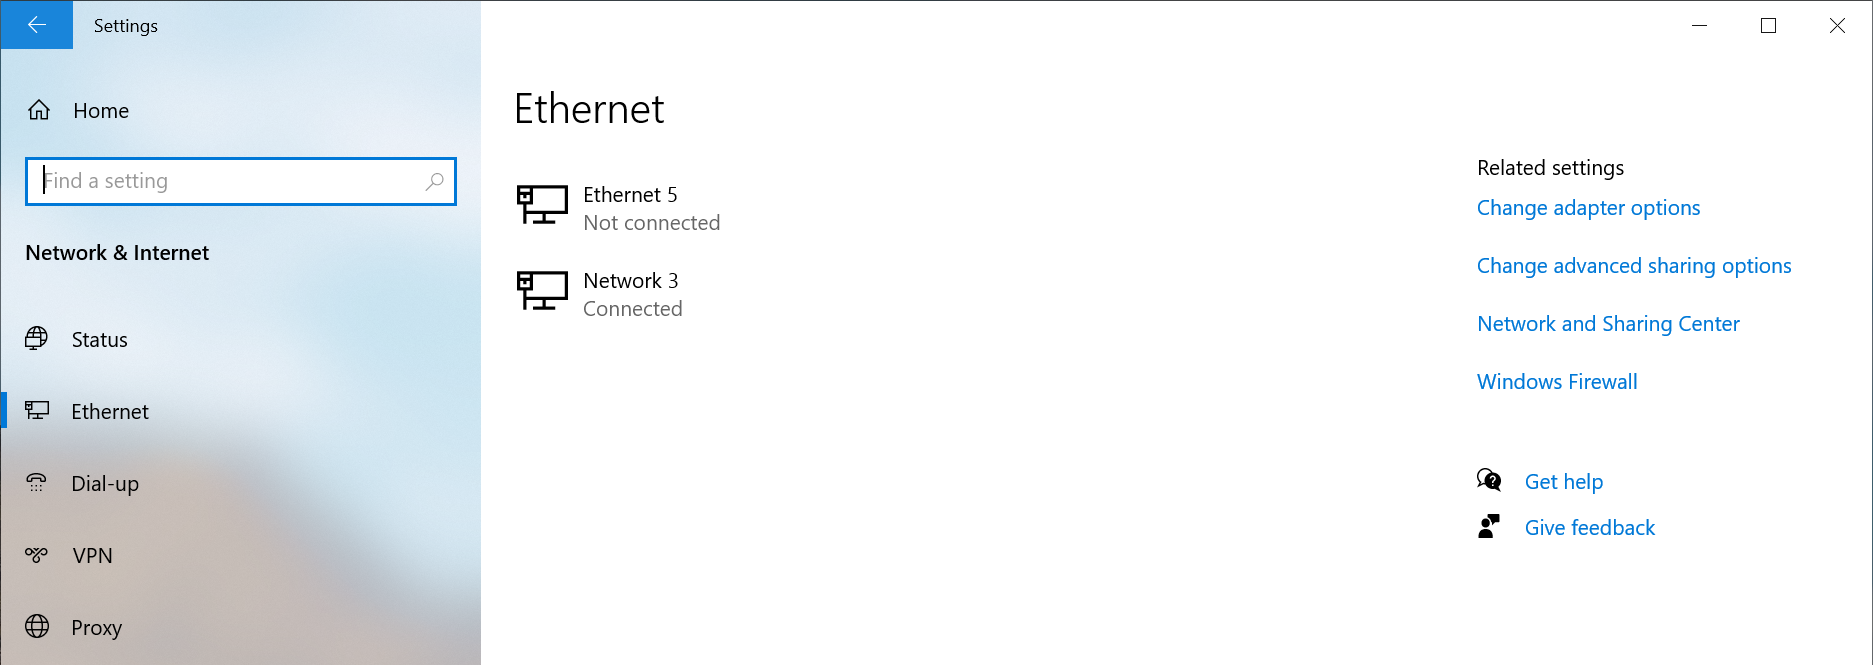
4 - Select the Ethernet option from the left pane
5 - Select the Connected network from the right pane
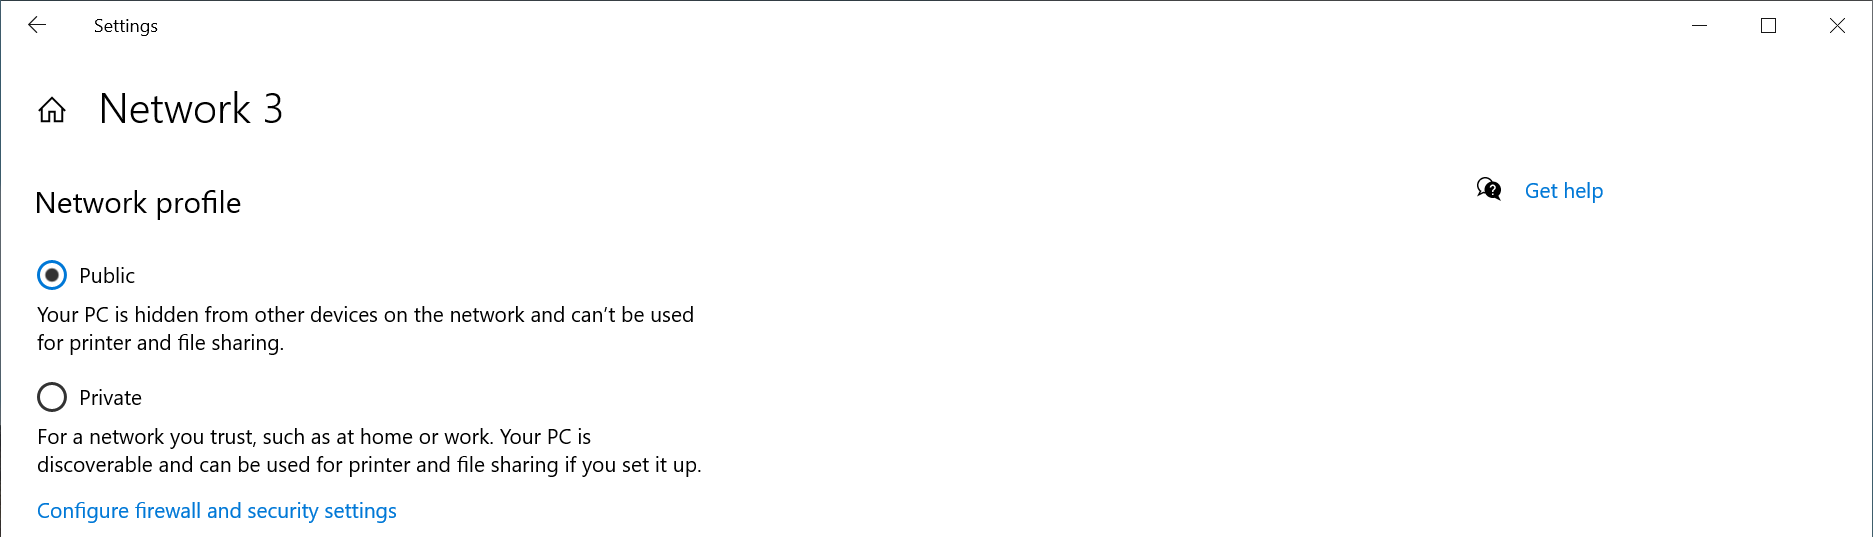
6 - Select the Network profile type either Public network or Private network to suite your needs
Windows PowerShell
If the option does not show up in the Windows Settings GUI, for example if the network is not connected to the internet, or if you prefer to use the terminal.
1 - Open a new terminal: Right-click on the Start Menu and select Terminal
2 - Run the following command to list the available networks
Get-NetConnectionProfile
PS C:\Users\plugable> Get-NetConnectionProfile
Name                     : Network
InterfaceAlias           : Ethernet Instance 0
InterfaceIndex           : 7
NetworkCategory          : Private
DomainAuthenticationKind : None
IPv4Connectivity         : Internet
IPv6Connectivity         : NoTraffic
3 - Run the following command to set the network to Private
Set-NetConnectionProfile -Name Network -NetworkCategory Private
Where Network is the network name from step #2 and Private can be either Public or Private
If you have any questions please feel free to contact us at support@plugable.com and we'll be happy to help!
Maximizing 2.5Gbps Ethernet Performance
Ethernet technology has come a long way since its inception in the late 1970s when early Ethernet operated at 10 Mbps, which was considered fast for its time. As digital demands increased, so did the need for faster data transfer speeds, leading to the introduction of Fast Ethernet (100 Mbps) and eventually Gigabit Ethernet ( 1 Gbps ), which has been the standard for home and office networking for over 20 years. Over these years, Ethernet continued to evolve, with standards being developed to handle even higher speeds but most often being isolated to the server room, and cloud computing. Today, technologies like 2.5 Gbps and 5 Gbps Ethernet have developed from 10 Gbps Ethernet, catering to modern high-bandwidth applications in both home and office environments. These advancements make it easier than ever for users to connect and transfer data at speeds that support the demands of video streaming, gaming, and extensive network tasks with higher reliability and lower latency than WiFi.
Upgrading a whole network from Gigabit to 2.5Gbps or faster can be costly and time consuming, but it doesn’t have to be done all at once. We have released both 2.5Gbps and soon 5Gbps USB Ethernet adapters that can be used with both notebook computers and desktops to provide up to five times faster Ethernet speeds than the built-in network controller, without having to install any new PCIe cards. Both of our high-speed Ethernet offerings are backwards compatible with current Gigabit Ethernet and in many cases can use the same network cables, however we do recommend replacing Category 5 and Category 5e cables with at least Category 6a or Category 7 cables to ensure future compatibility with both 5Gbps and 10Gbps Ethernet. Desktop 2.5Gbps and 5Gbps Ethernet switches are also coming down in price and can be used to quickly upgrade the network throughput between nearby computers.
As you make the upgrade process there are some steps that can be taken to ensure the network throughput is maximized between the 2.5Gbps or faster computers.
Maximizing 2.5Gbps Ethernet Performance
Maximizing the performance of a 2.5Gbps Ethernet network can enhance both speed and reliability, especially for power users who value efficiency and seamless connectivity in a busy IT environment or at home for the fastest home media center. Here are some best practices for small 2.5Gbps and 5Gbps network setups:
Upgrade Network Infrastructure for Compatibility
Switches and Routers: Ensure your network infrastructure, particularly switches and routers, supports 2.5Gbps or 5Gbps Ethernet. Many older devices are limited to 1Gbps, which will bottleneck the system.
This is most important between the computers that need the higher speed, if you have internet speed at or below 1Gbps then upgrading the router will not improve performance, so long as all computers that need faster local area network access are connected to the same 2.5Gbps or faster Ethernet switches.
Cable Quality: Use high-quality Cat 6a cables or better. While 2.5Gbps is designed to work with Cat 5e Ethernet cables, at least for short distances, for longer runs and to ensure the best performance Cat 6, 6a, or Cat 7 are recommended for 5Gbps networks.
Optimize Device Connections and Settings
NIC Configuration: Adjust your network interface card (NIC) settings to ensure optimal performance. This may involve tweaking parameters such as jumbo frames or flow control for maximum efficiency.
Ethernet data frames with more than 1500 bytes of data are called “jumbo frames”. Setting a larger frame size packs more data into each frame and can potentially reduce the CPU overhead, however to function it must be enabled on both endpoints and supported by all networking hardware in between. For most users there will be no noticeable difference in network performance, however in some specific cases like when a home server is transcoding and streaming video it can help to reduce the CPU overhead of the entire process. This can best be enabled on short point-to-point networks rather than sprawling networks, as packet loss with jumbo frames enabled causes significantly worse slowdowns than with standard frame sizes.
Flow control allows for the receiving system to transmit a pause request to the transmitting system to prevent data loss. This is necessary when multiple computers are communicating to the same server as there is generally not enough bandwidth to service all requests simultaneously, however it can be disabled in a point-to-point network setup where both computers are directly connected and both computers can handle full-speed data throughput. QoS - Quality of Service offers an alternative to Flow Control but requires significantly more setup often including managed switches and may not be an effective choice for the home and small office networks.
Driver and Firmware Updates: Keep all drivers and firmware updated for your network adapters, switches, and routers. This reduces potential compatibility issues and improves performance. Firmware updates are also important for maintaining network security, vulnerabilities in router firmware have been historically exploited to create network back doors, to exfiltrate data, as well as creating bot-nets for DDoS - Dedicated Denial of Service attacks on websites.
Drivers for Plugable devices can be found on our product pages, under the "Downloads" tab.
Consider Network Segmentation
For a network with mixed-speed devices (1Gb, 2.5Gbps, 5Gbps and 10Gbps), segmenting traffic can prevent slower devices from dragging down performance. This can be done physically by using gigabit Ethernet switches separate from 2.5Gbps or 5Gbps switches then bridging the switches together, or virtually by setting up virtual LANs (VLANs) with a managed Ethernet switch. VLANs can help allocate 2.5Gbps and 5Gbps connections exclusively for high-bandwidth tasks while lower speed devices can utilize secondary gigabit Ethernet ports on the server or client computers.
Leverage Multi-Gig Capable Devices for Key Applications
Identify the devices that will benefit the most from 2.5Gbps and faster connections, such as NAS - Network Attached Storage systems with integrated 2.5Gbps or 5Gbps Ethernet, high-performance workstations or desktop replacement notebooks with USB Ethernet adapters, or servers with multi-port bonded Ethernet controllers handling large data transfers. Connect these devices directly to a switch that can take advantage of the higher network throughput to ensure they receive the best performance possible.
Future-Proofing with 2.5Gbps-capable or faster Docking Stations and USB Ethernet Adapters
Many Plugable docking stations now support 2.5Gbps Ethernet, which could be ideal for enhancing productivity for hybrid work setups, at home, or in the classroom by enabling high-speed, wired connectivity. Plugable’s docks also simplify integration across Windows and Chrome OS devices, which can be especially helpful in mixed-device environments.
USB Ethernet Adapters
- 2.5Gbps USB 3 Ethernet Adapter ( https://plugable.com/products/usbc-e2500 )
- 5Gbps USB 10Gbps Ethernet Adapter ( https://plugable.com/products/usbc-e5000 )
- 1Gbps USB 3.0 Standard-A and Type-C Ethernet Adapter ( https://plugable.com/products/usb3-e1000 https://plugable.com/products/ubsc-e1000 )
Thunderbolt and USB4 docking stations
- USB4 Dual 4K Docking Station ( https://plugable.com/products/ud-4vpd )
- Thunderbolt 4 Quad Display Docking Station ( https://plugable.com/products/tbt4-udz )
- Thunderbolt 4 and USB4 HDMI Docking Station ( https://plugable.com/products/tbt4-udx1 )
Is this safe to use if my computer doesn't support USB-C Power Delivery?
USB-C Power Delivery (PD) is negotiated between the power-sourcing equipment (e.g., a dock or multiport hub) and the connected host device. During this negotiation, the device offering power communicates its capabilities, and the host determines whether it can accept the power. If the host does not support Power Delivery, no power will be sent to the computer over the USB-C connection. This will allow you to take advantage of other capabilities such as data transfer or video output without risking damage to the computer.
How Can I Check the Ethernet Adapter Link Rate on my Mac?
One helpful way to identify your ethernet link rate speed is through the System Settings app in macOS. This can help us identify if your Plugable ethernet adapter is negotiating either 1Gbps or 2.5Gbps network speeds. Some routers have a mix of 1Gbps or 2.5Gbps ports, and in the macOS System Settings this will be shown in the Speed field.
In this example, we will be analyzing our USBC-E2500, which is a 2.5Gbps ethernet adapter. This method applies to all of our ethernet adapters, such as:
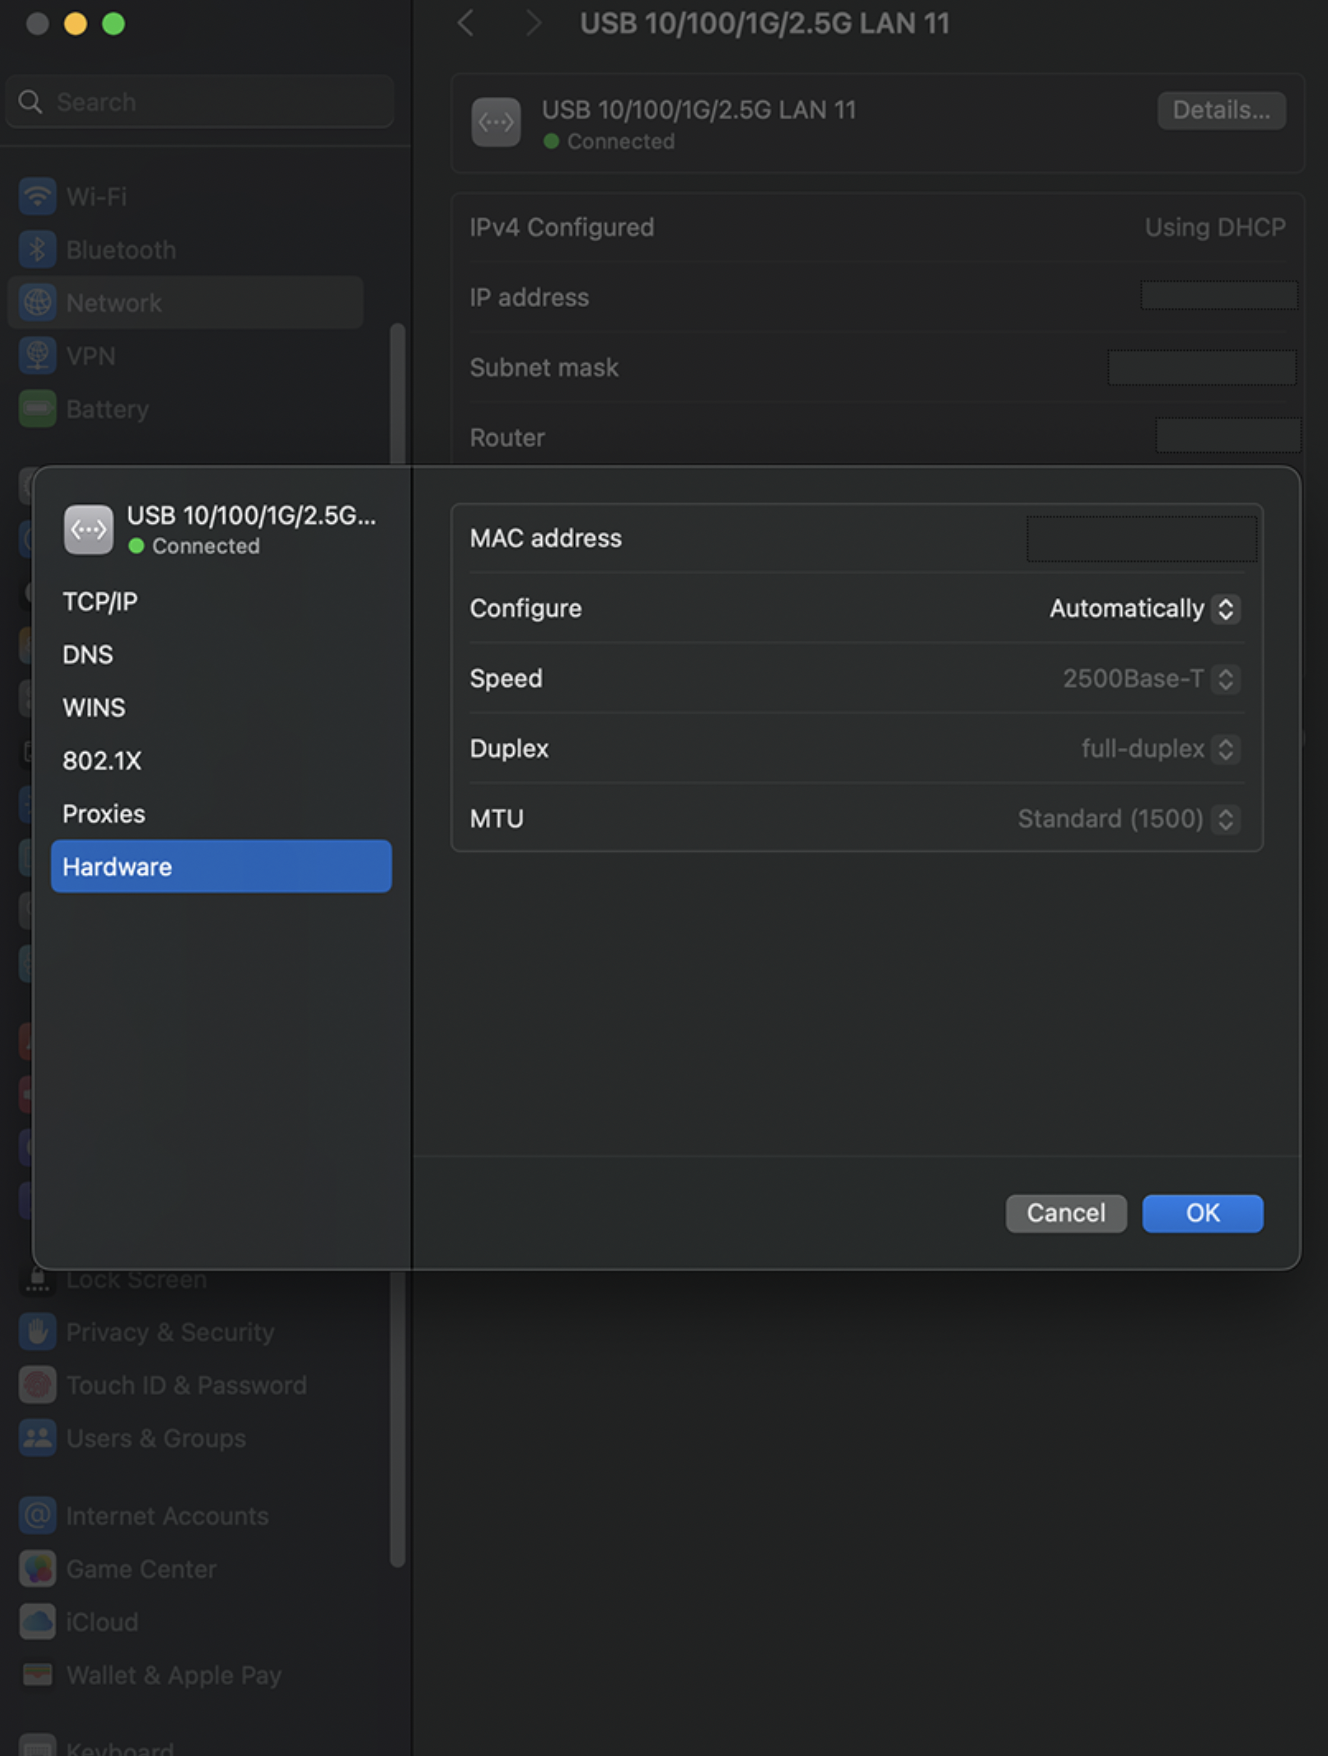
Navigate to the Network section, select the entry named “USB 10/100/1G/2.5G LAN” with the Green - Connected icon. Expand the Details button, and go to Hardware.
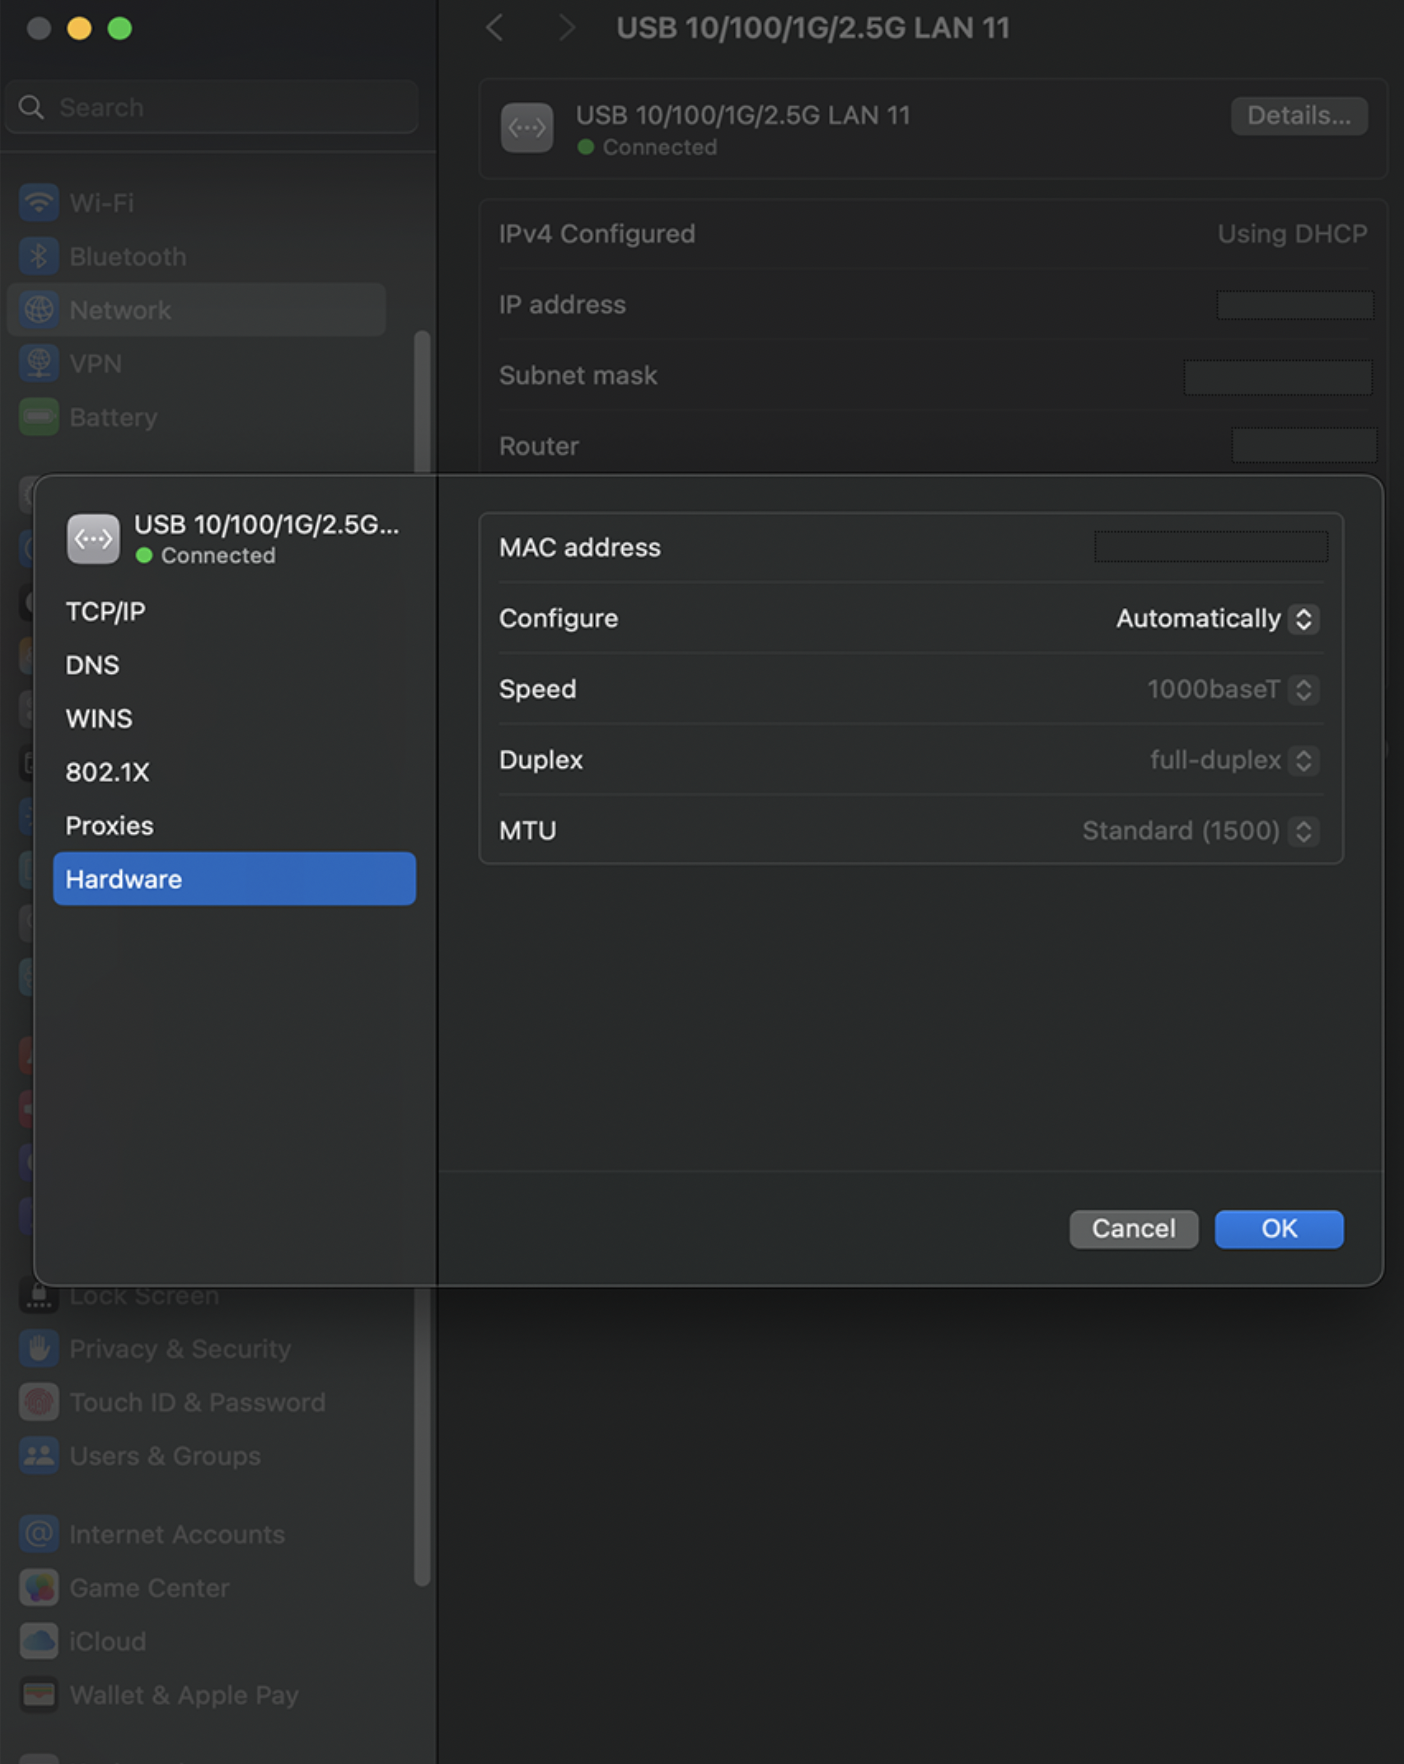
In the field that says Speed, you should see 2500Base-T if the ethernet adapter is connected to a 2.5G ethernet LAN port on your router. If you see 1000Base-T, this means the adapter is connected to a 1G ethernet LAN port. If you are expecting faster network speeds, please see your router's documentation on its multi-gig LAN port.
Can I Use a Thunderbolt 5 Cable to Connect to a Thunderbolt or USB-C Device Such as a Phone, iPad, or Docking Stations?
Yes, Thunderbolt 5 cables are compatible with any USB-C port for data transfer, charging, or video (capabilities will depend on peripheral used).
Do Thunderbolt 5 Cables Support USB-C Power Delivery for Host Charging?
Yes, Thunderbolt 5 cables can support up to 240W of power allowing you to keep your devices charged.
Are Thunderbolt 5 Cables Compatible With Thunderbolt 4 and Thunderbolt 3 Computers and Devices?
Yes, Thunderbolt 5 cables are backward compatible with Thunderbolt 4 and Thunderbolt 3 and USB-C devices.
Understanding Power Delivery vs. Pass-Through Power Delivery
When choosing a docking station or USB hub, it's important to understand the difference between Power Delivery (PD) and Pass-Through Power Delivery. While both terms refer to charging capabilities, they function differently and impact how power is distributed to connected devices.
What is Power Delivery (PD)?
USB Power Delivery (PD) is a fast-charging standard that allows devices to negotiate power levels dynamically. Key aspects include:
- Enables higher power transfer (up to 100W or more, depending on the device and cable).
- Ensures efficient charging by dynamically adjusting voltage and current.
- Commonly used in USB-C chargers, docking stations, and hubs that provide power directly to laptops, tablets, and smartphones.
Example: A USB-C docking station with PD output can charge a connected laptop while simultaneously powering other peripherals. Additionally, these tend to come with their own AC adapter.
What is Pass-Through Power Delivery?
Pass-Through Power Delivery refers to a hub or docking station that does not generate power itself but instead allows power to pass through from an external power adapter. Key aspects include:
- Requires a dedicated power adapter (e.g., a USB-C PD laptop charger) plugged into the docking station or hub.
- Typically, a portion of the incoming power is allocated to the dock’s functionality (such as data transfer and peripheral connections), and the remaining power is sent to the connected laptop or device.
- May reduce the total power available to the laptop compared to direct charging.
Example: A USB-C hub with pass-through PD allows a laptop's original USB-C PD charger to be connected to the hub, which then distributes power to the laptop while also supporting external peripherals.
Choosing the Right Option
- If you need a docking station that can directly charge your laptop, look for one with dedicated Power Delivery (PD) support.
- If your laptop already has a high-wattage charger and you want to maintain power while expanding connectivity, a pass-through PD hub may be a better choice.
- Be mindful of power limitations with pass-through charging, as some hubs may reserve power for their own operation, reducing the power available for the laptop.
Some examples of hubs with PD pass-through would be our USBC-9IN1E with 140w pass-through charging or our smaller USBC-4IN1 with 100w pass-through.
On the flip side, we have our docking stations that power your devices by themselves. Examples such as our UD-7400PD which is capable of 140w of charge and 5 displays.
Understanding these differences will help ensure you select the right docking station or USB-C hub for your setup. If you have any questions or would like a recommendation, feel free to reach out to our support at support@plugable.com
How To - Set a Custom MAC Address in Windows
What is the MAC address?
The MAC address (Medium Access Control address) is a unique network address for each Network Interface Controller to identify the hardware on the network segment. The address is generally expressed as six hexadecimal digits, sometimes separated by a '-', ':', or without a separator.
The MAC address is assigned by the hardware manufacturer during production, however many network controllers allow the operating system (via the drivers) to override the MAC address, this is handled at the operating system level and does not change the address stored in the adapter.
The first three octets (first three hexadecimal values, six characters) identify the network hardware manufacturer while the last three octets should be unique within each hardware manufacturer's product line. For example Plugable's MAC addresses all begin with "8CAE4C", with lower values typically representing older companies, "000000" belongs to Xerox for example, some companies have multiple ranges of MAC addresses.
Why it can be useful to override the manufacturer's address?
Setting a custom MAC address can provide anonymity when connecting to public networks. It can also be used by an IT Network Administrator to provide specific access rights to computers based on the connection.
It can also be useful for Network Administrators for testing, troubleshooting, and maintenance to simulate different devices without having access to that specific device.
Changing the Mac Address in Windows
The MAC address can be manually set from the Device Manager:
1. Right-click on the Start Menu and select Device Manager from the pop-up window
2. Expand the Network adapters section and double-click on the network adapter to be modified
3. From the network adapter properties pop-up window, select the Advanced tab
4. Under the Property: category, scroll down to and select "Network Address"
5. In the Value: field, enter the new MAC Address in hexadecimal format, the field has a maximum of 12 characters so do not use any separators between octets
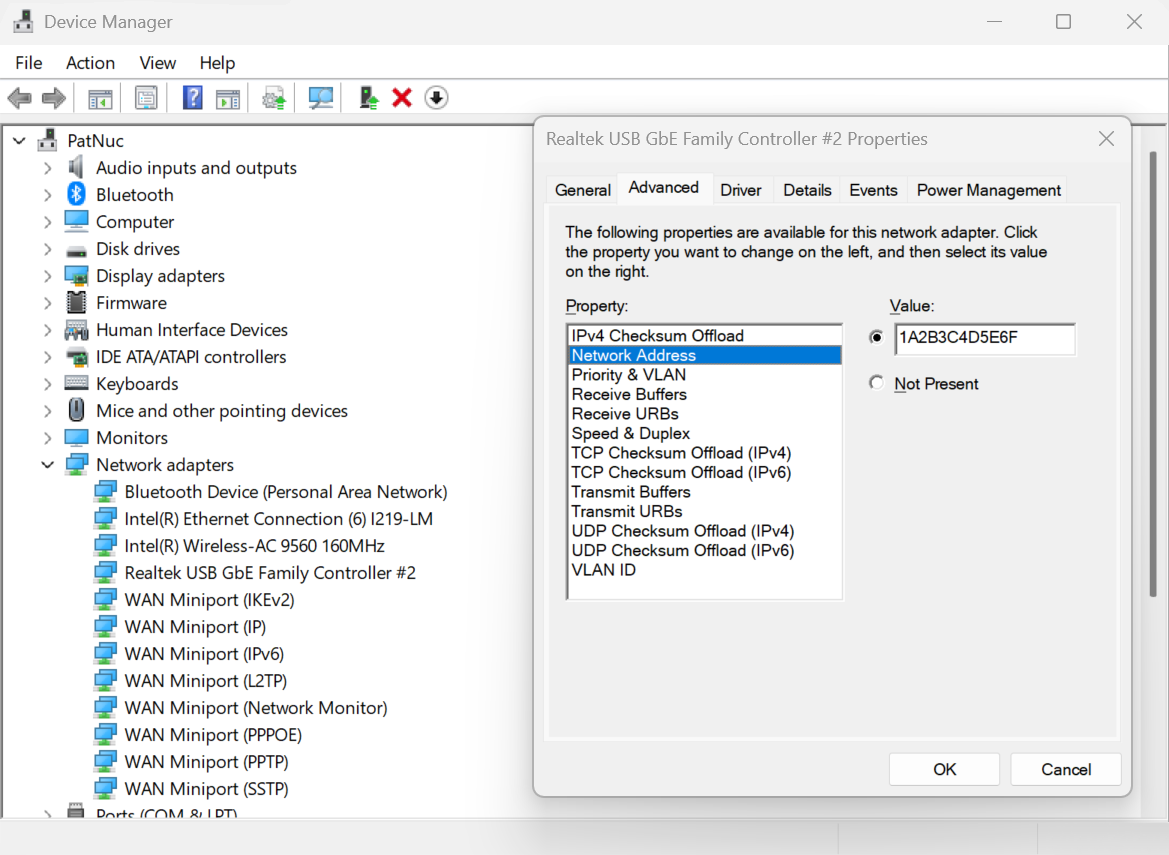
6. Select the OK button to proceed
You can also check the MAC Address from the command line
1. Right-click on the Start Menu and select Terminal or Windows PowerShell
2. Type in the following command ipconfig /all or ipconfig /all | findstr C:/"Physical Address" to filter just the Physical Address lines.
3. Scroll through the output to find the target network adapter and Physical Address
How To - Set a Custom MAC Address in Linux
What is the MAC address?
The MAC address (Medium Access Control address) is a unique network address for each Network Interface Controller to identify the hardware on the network segment. The address is generally expressed as six hexadecimal digits, sometimes separated by a '-', ':', or without a separator.
The MAC address is assigned by the hardware manufacturer during production, however many network controllers allow the operating system (via the drivers) to override the MAC address, this is handled at the operating system level and does not change the address stored in the adapter.
The first three octets (first three hexadecimal values, six characters) identify the network hardware manufacturer while the last three octets should be unique within each hardware manufacturer's product line. For example Plugable's MAC addresses all begin with "8CAE4C", with lower values typically representing older companies, "000000" belongs to Xerox for example, some companies have multiple ranges of MAC addresses.
Why it can be useful to override the manufacturer's address?
Setting a custom MAC address can provide anonymity when connecting to public networks. It can also be used by an IT Network Administrator to provide specific access rights to computers based on the connection.
It can also be useful for Network Administrators for testing, troubleshooting, and maintenance to simulate different devices without having access to that specific device.
Checking the MAC Address in Linux
The MAC Address can be checked from the terminal:
1. Open a bash shell
2. Read the address from the /sys directory:
cat /sys/class/net//address
or from the ip command to print out all of the hardware MAC Addresses
ip -o link | awk '$2 != "lo:" {print $2, $17}'Changing the MAC Address in Linux
Temporary change until system reboot
1. Open a bash shell
2. Run the following command to set the MAC Address for a specific network device.
sudo ip link set dev <devicename> down
sudo ip link set dev <devicename> address <mac address>
sudo ip link set dev <devicename> up
3. Confirm the new MAC address
Permanently change the MAC Address
This can depend on your distribution's specific network services and settings. This example will create a new systemd unit file to change the MAC Address on startup.
1. Open a bash shell
2. Create a new systemd unit file "/etc/systemd/system/changemac@.service with the following contents the mac address should be colon separated:
[Unit]
Description=Change MAC Address %i
Wants=network-pre.target
Before=network-pre.target

[Service]
Type=oneshot
ExecStart=/usr/bin/ip link set dev %i down
ExecStart=/usr/bin/ip link set dev %i address <mac address>
ExecStart=/usr/bin/ip link set dev %i up
RemainAfterExit=yes
User=root

[Install]
wantedBy=multi-user.target
3. Enable the service with the following command
sudo systemctl enable --now changemac@<interface_name>
4. Reboot the computer, the MAC address should be set to the new address
Foundry Local: Change Model Cache Storage Location
The Plugable Thunderbolt 5 AI eGPU Enclosure and Dock with Plugable Chat and Microsoft Foundry Local provides a framework for running local and secure LLM models. This is achieved by downloading the model to the local computer and running all LLM tasks locally.
However, both large models or many smaller models can take up a significant portion of the system's internal storage. Also, it may be beneficial to share cached models between multiple computers that use the TBT5-AI to minimize repeated downloads.
In this article we will discuss the pros and cons, and provide the steps to use an external drive for storing Foundry Model Cache files.
Pros
- External storage is easier to upgrade than a notebook's internal storage allowing for more dedicated storage space for models and RAG data sets
- External storage allows for easier sharing of models between multiple computers, when left connected to the TBT5-AI enclosure any computer also connected to the TBT5-AI will have access to the same models without requiring a separate download
- Models on external storage helps to quickly boot-strap new computers connected to the enclosure as they do not have to download the model again and allows for isolating the enclosure off the network or without internet access
Cons
- Requires connecting external SATA HDD or NVMe SSD to the TBT5-AI or directly to the host computer
- Reduced bandwidth compared to the computer’s internal drive may cause longer model load times This is most relevant for USB storage, Thunderbolt drives provide more similar performance to the computer's internal storage
- May require switching cache locations to run local models on the computer's NPU or iGPU (if desired) - for example if you intend to run a small 0.6b model on the system for code generation but also need a 12b model when connected to the enclosure you may need to have to manually switch between the local and external cache locations
Configuration
In this example we will describe setting up a Thunderbolt NVMe enclosure with the TBT5-AI, it is assumed that both the Plugable Chat software is installed and working and the Thunderbolt NVMe is partitioned and formatted, if you need help formatting the drive check out our step-by-step formatting video on YouTube linked at the bottom of this article.
- Connect the Thunderbolt NVMe enclosure to the downstream Thunderbolt port on the TBT5-AI and connect the host computer to the upstream "Host" port on the TBT5-AI with the provided Thunderbolt 5 data cable
- Open Windows File Manager and note the drive letter for the external enclosure ( from This PC on the left column ) - in my example this is the second drive and will be 'd:'
- Open a Windows Terminal (Right-click on the Start Menu and select Terminal from the pop-up menu).
- Select the external drive type the following into the terminal followed by the [Enter] key:
d: - Create a new top-level directory for the cache files, type the following into the terminal followed by the [Enter] key:
mkdir d:\foundry-cache - Change the Foundry Local cache file location, type the following into the terminal followed by the [Enter] key:
foundry cache cd d:\foundry-cache
Here is what the process looks like in terminal:
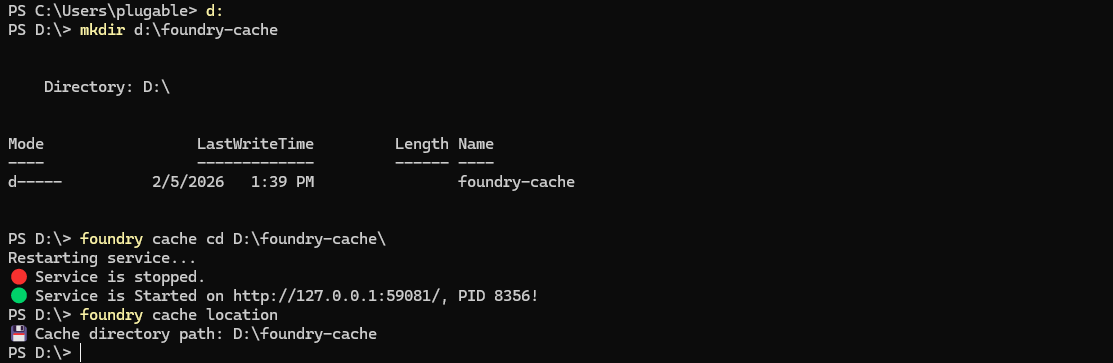
Foundry Cache Tool
The default file location is c:\Users\
The foundry cache tool provides the following commands
Commands:
    location            Print the directory path of the model cache
    list, ls            List models on the local cache (disk)
    remove, rm <model>  Delete model from the local cache (disk)
    cd <path>           Change directory path of the model cache
Other useful commands:
-
foundry service restart- restarts the foundry service -
foundry service status- displays the status of the foundry service -
foundry model ls- displays the models available for download - this may include models incompatible with the computer and graphics hardware and we recommend confirming compatibility through Microsoft’s website (https://www.foundrylocal.ai/)
Partition and Format an External Drive
Check out our step-by-step formatting video on YouTube (https://www.youtube.com/watch?v=1oI9qNn8mQQ) If you have any questions, or if there is anything else we can do to help, please contact our support team via email at support@plugable.com and we will be happy to help!

