Plugable Thunderbolt™ 3 シングルディスプレイ・ドッキングステーション、60W ホスト充電可能
$259.00 USD
SKU: TBT3-UDVAmazon Rating : (363 Reviews)
機能
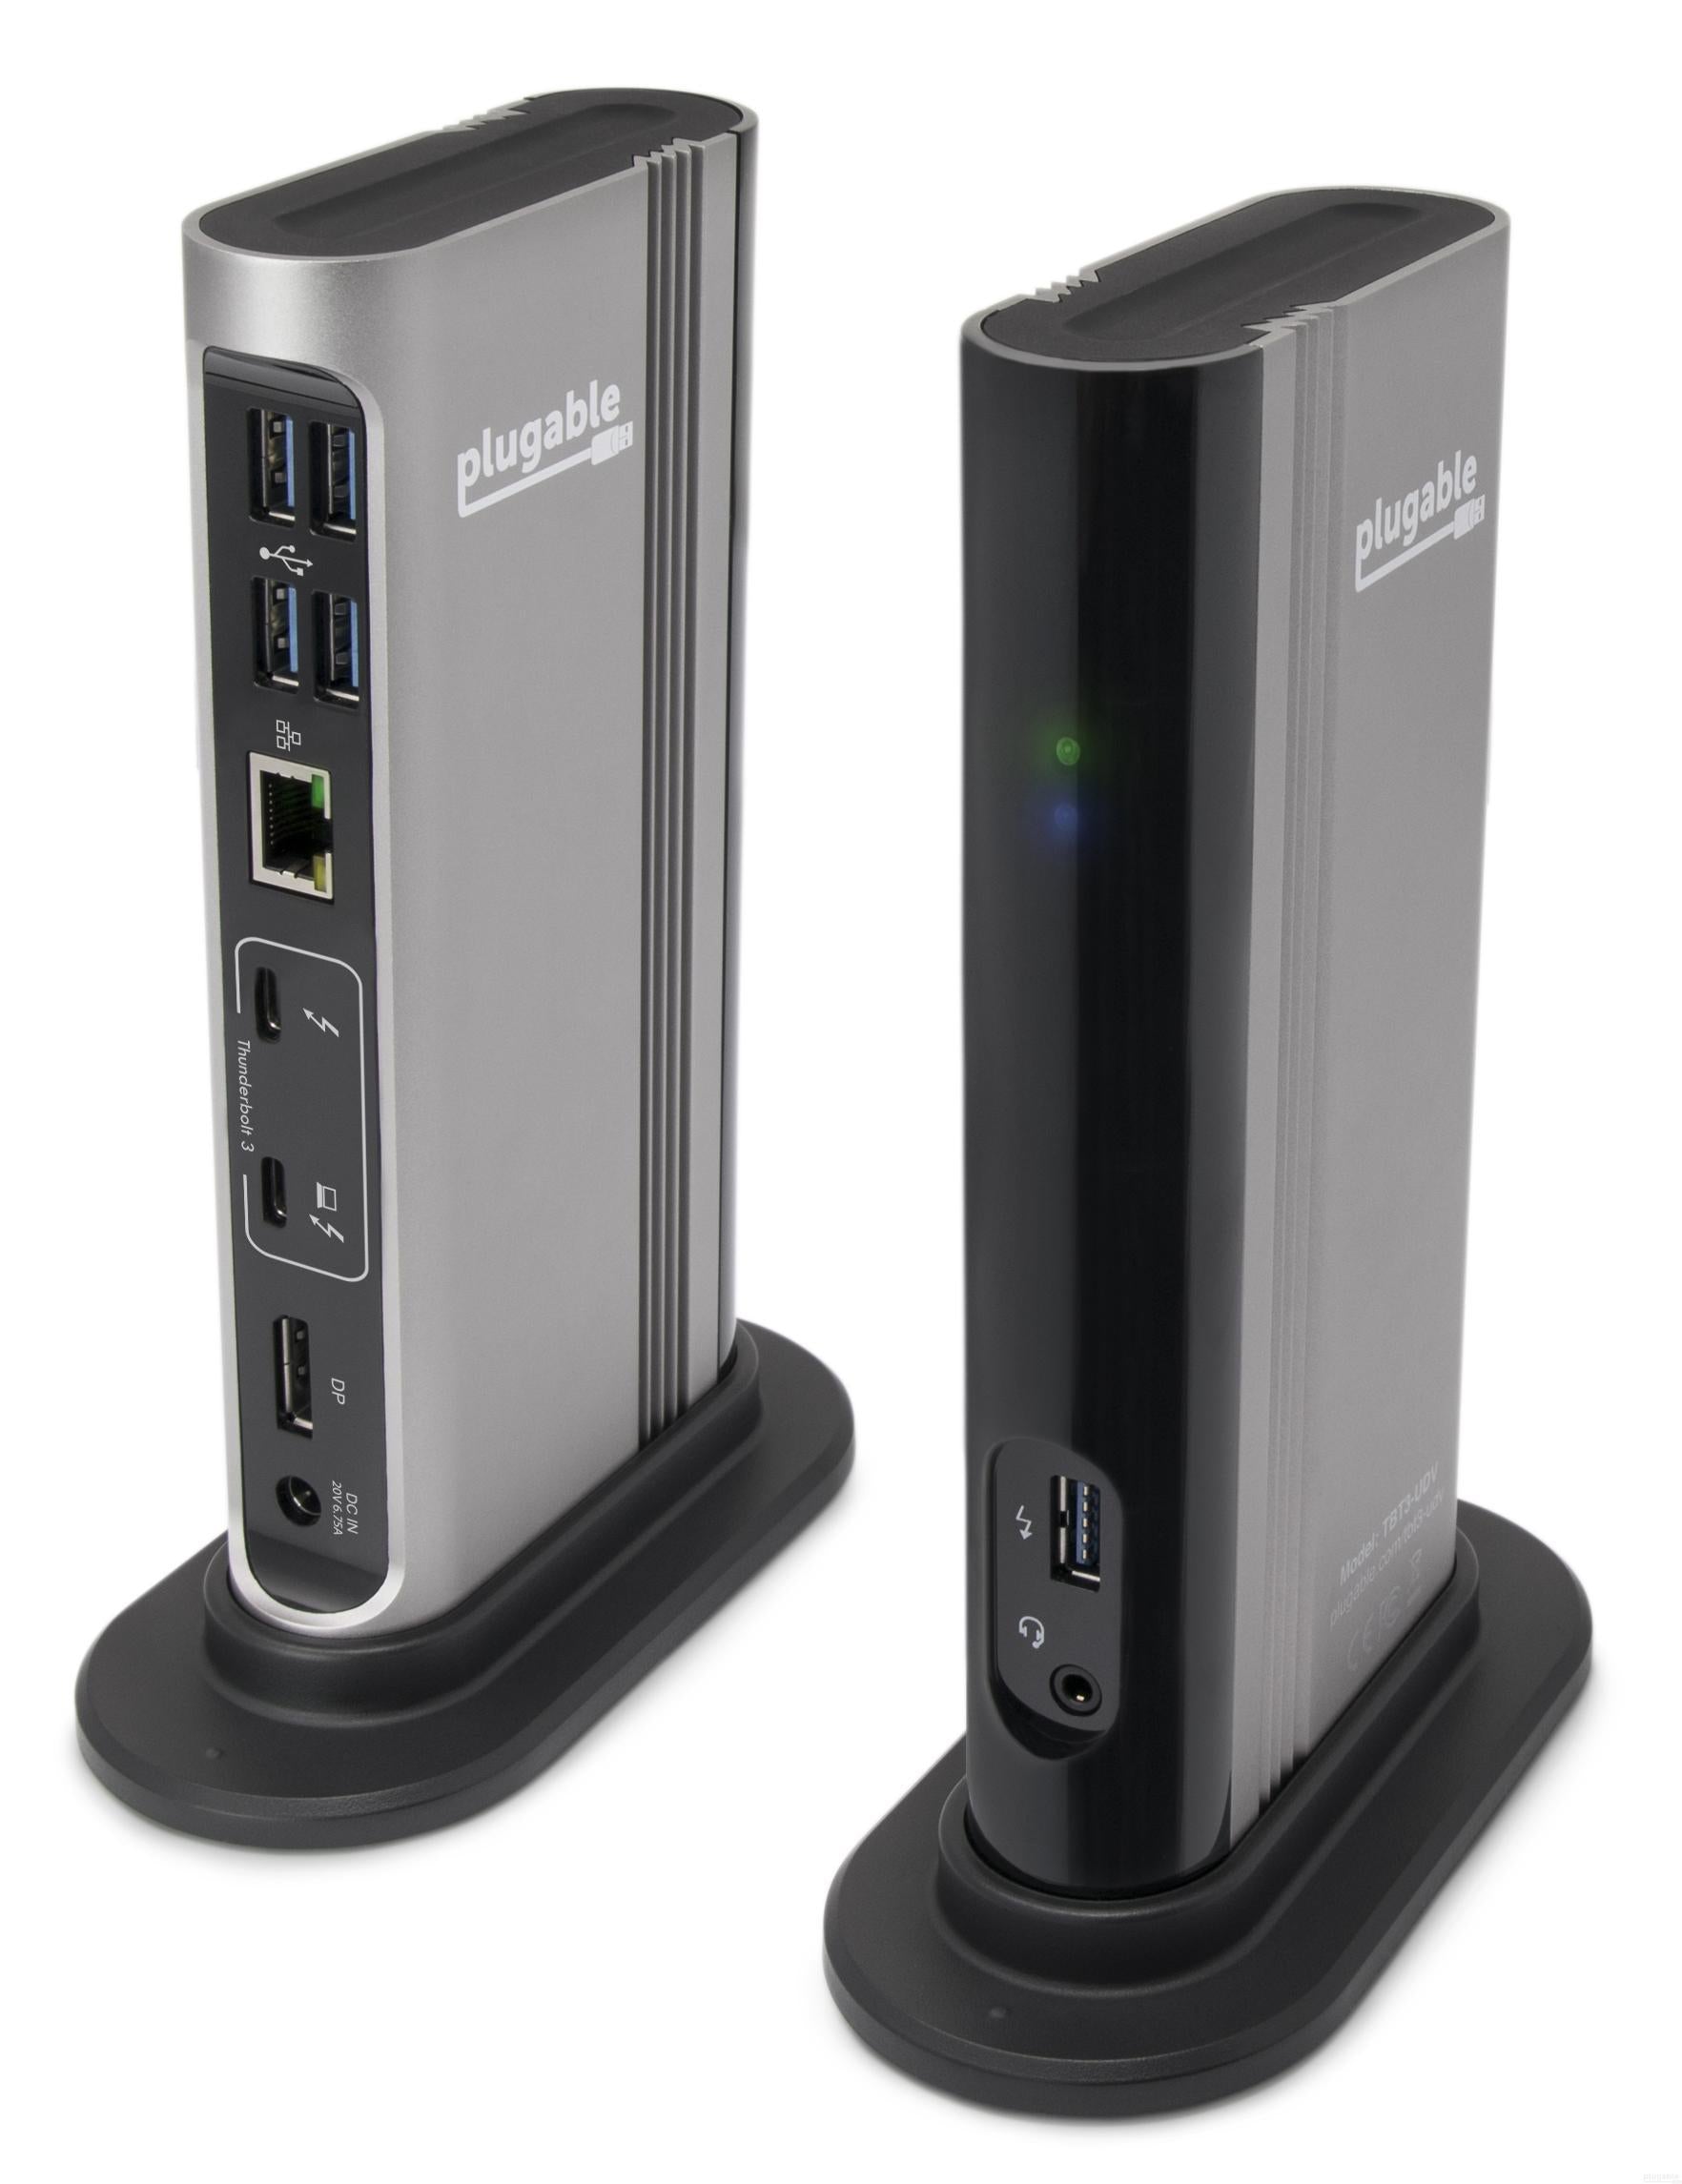
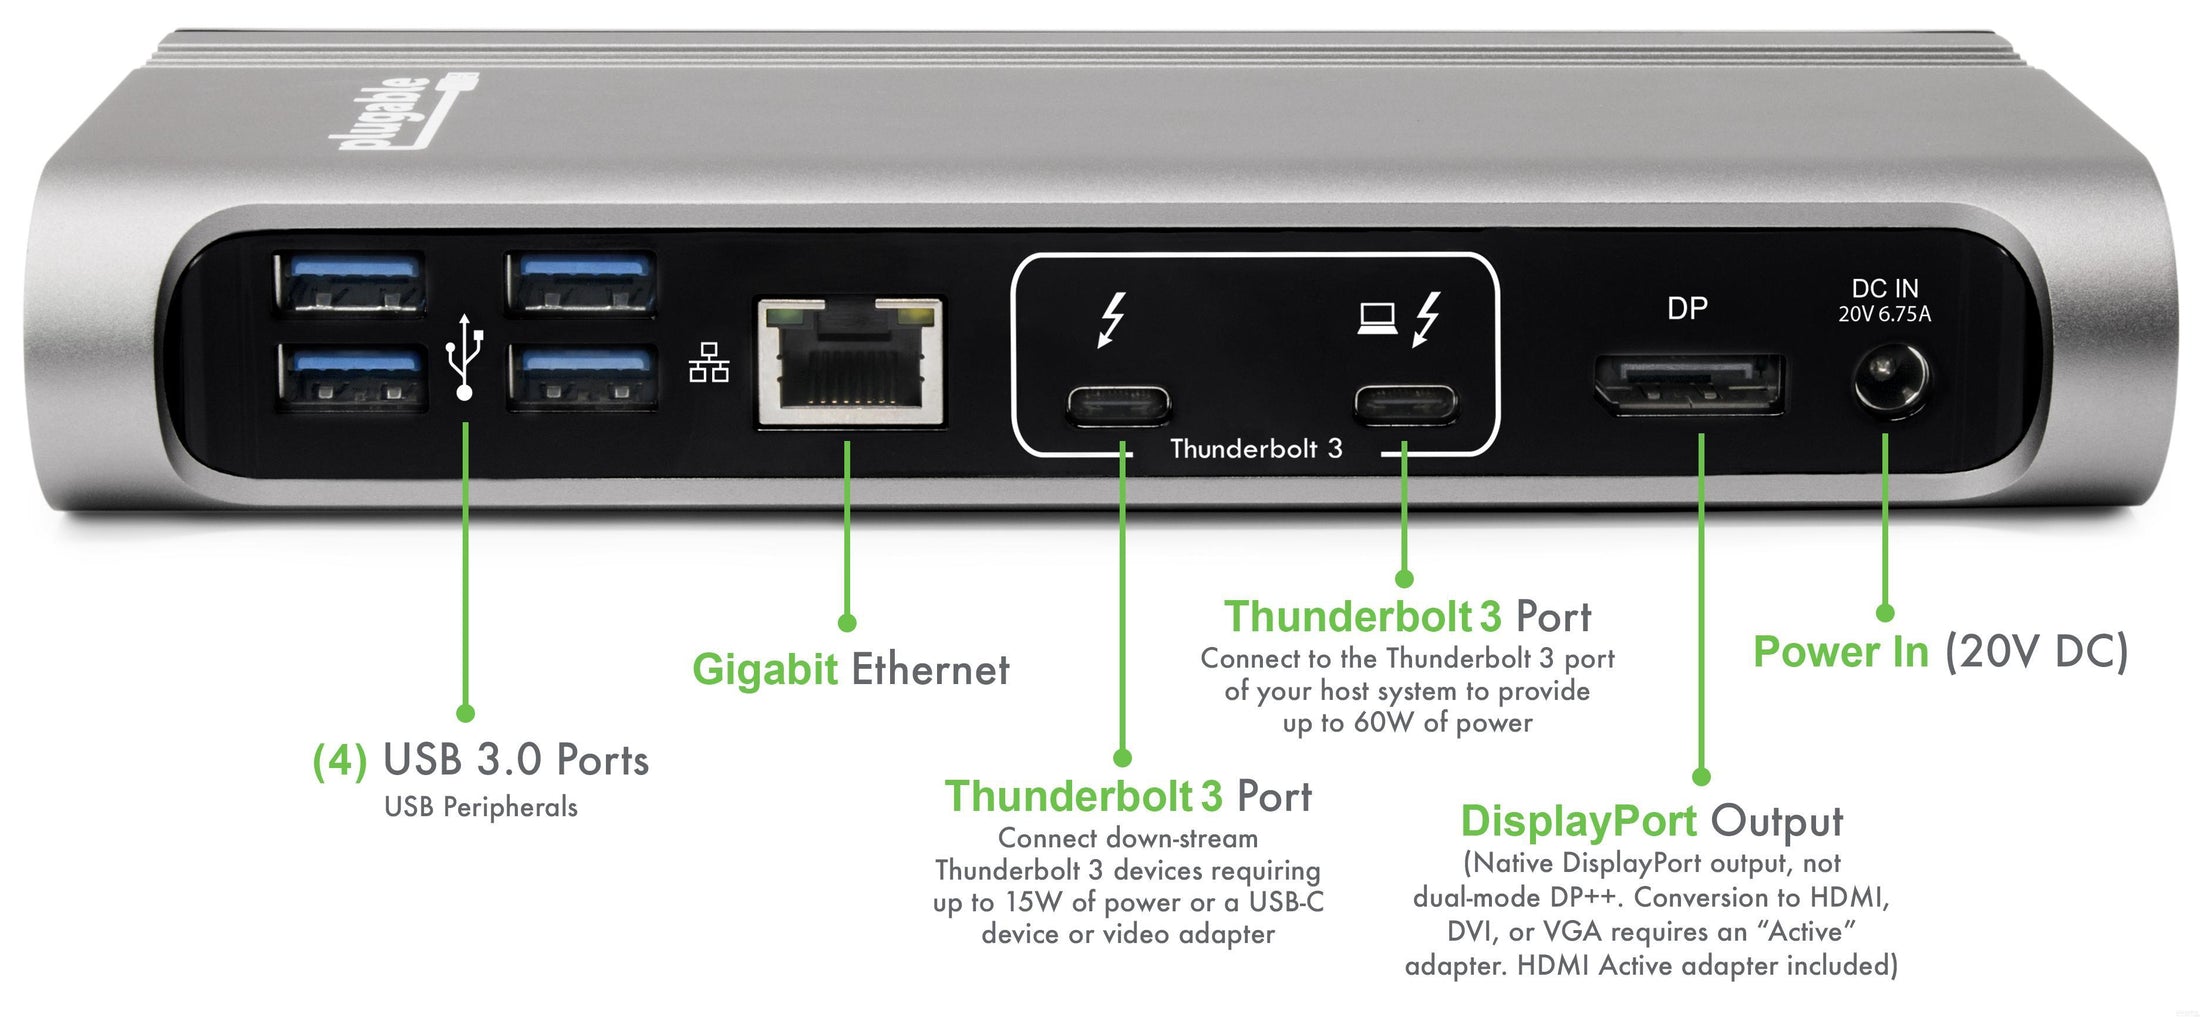
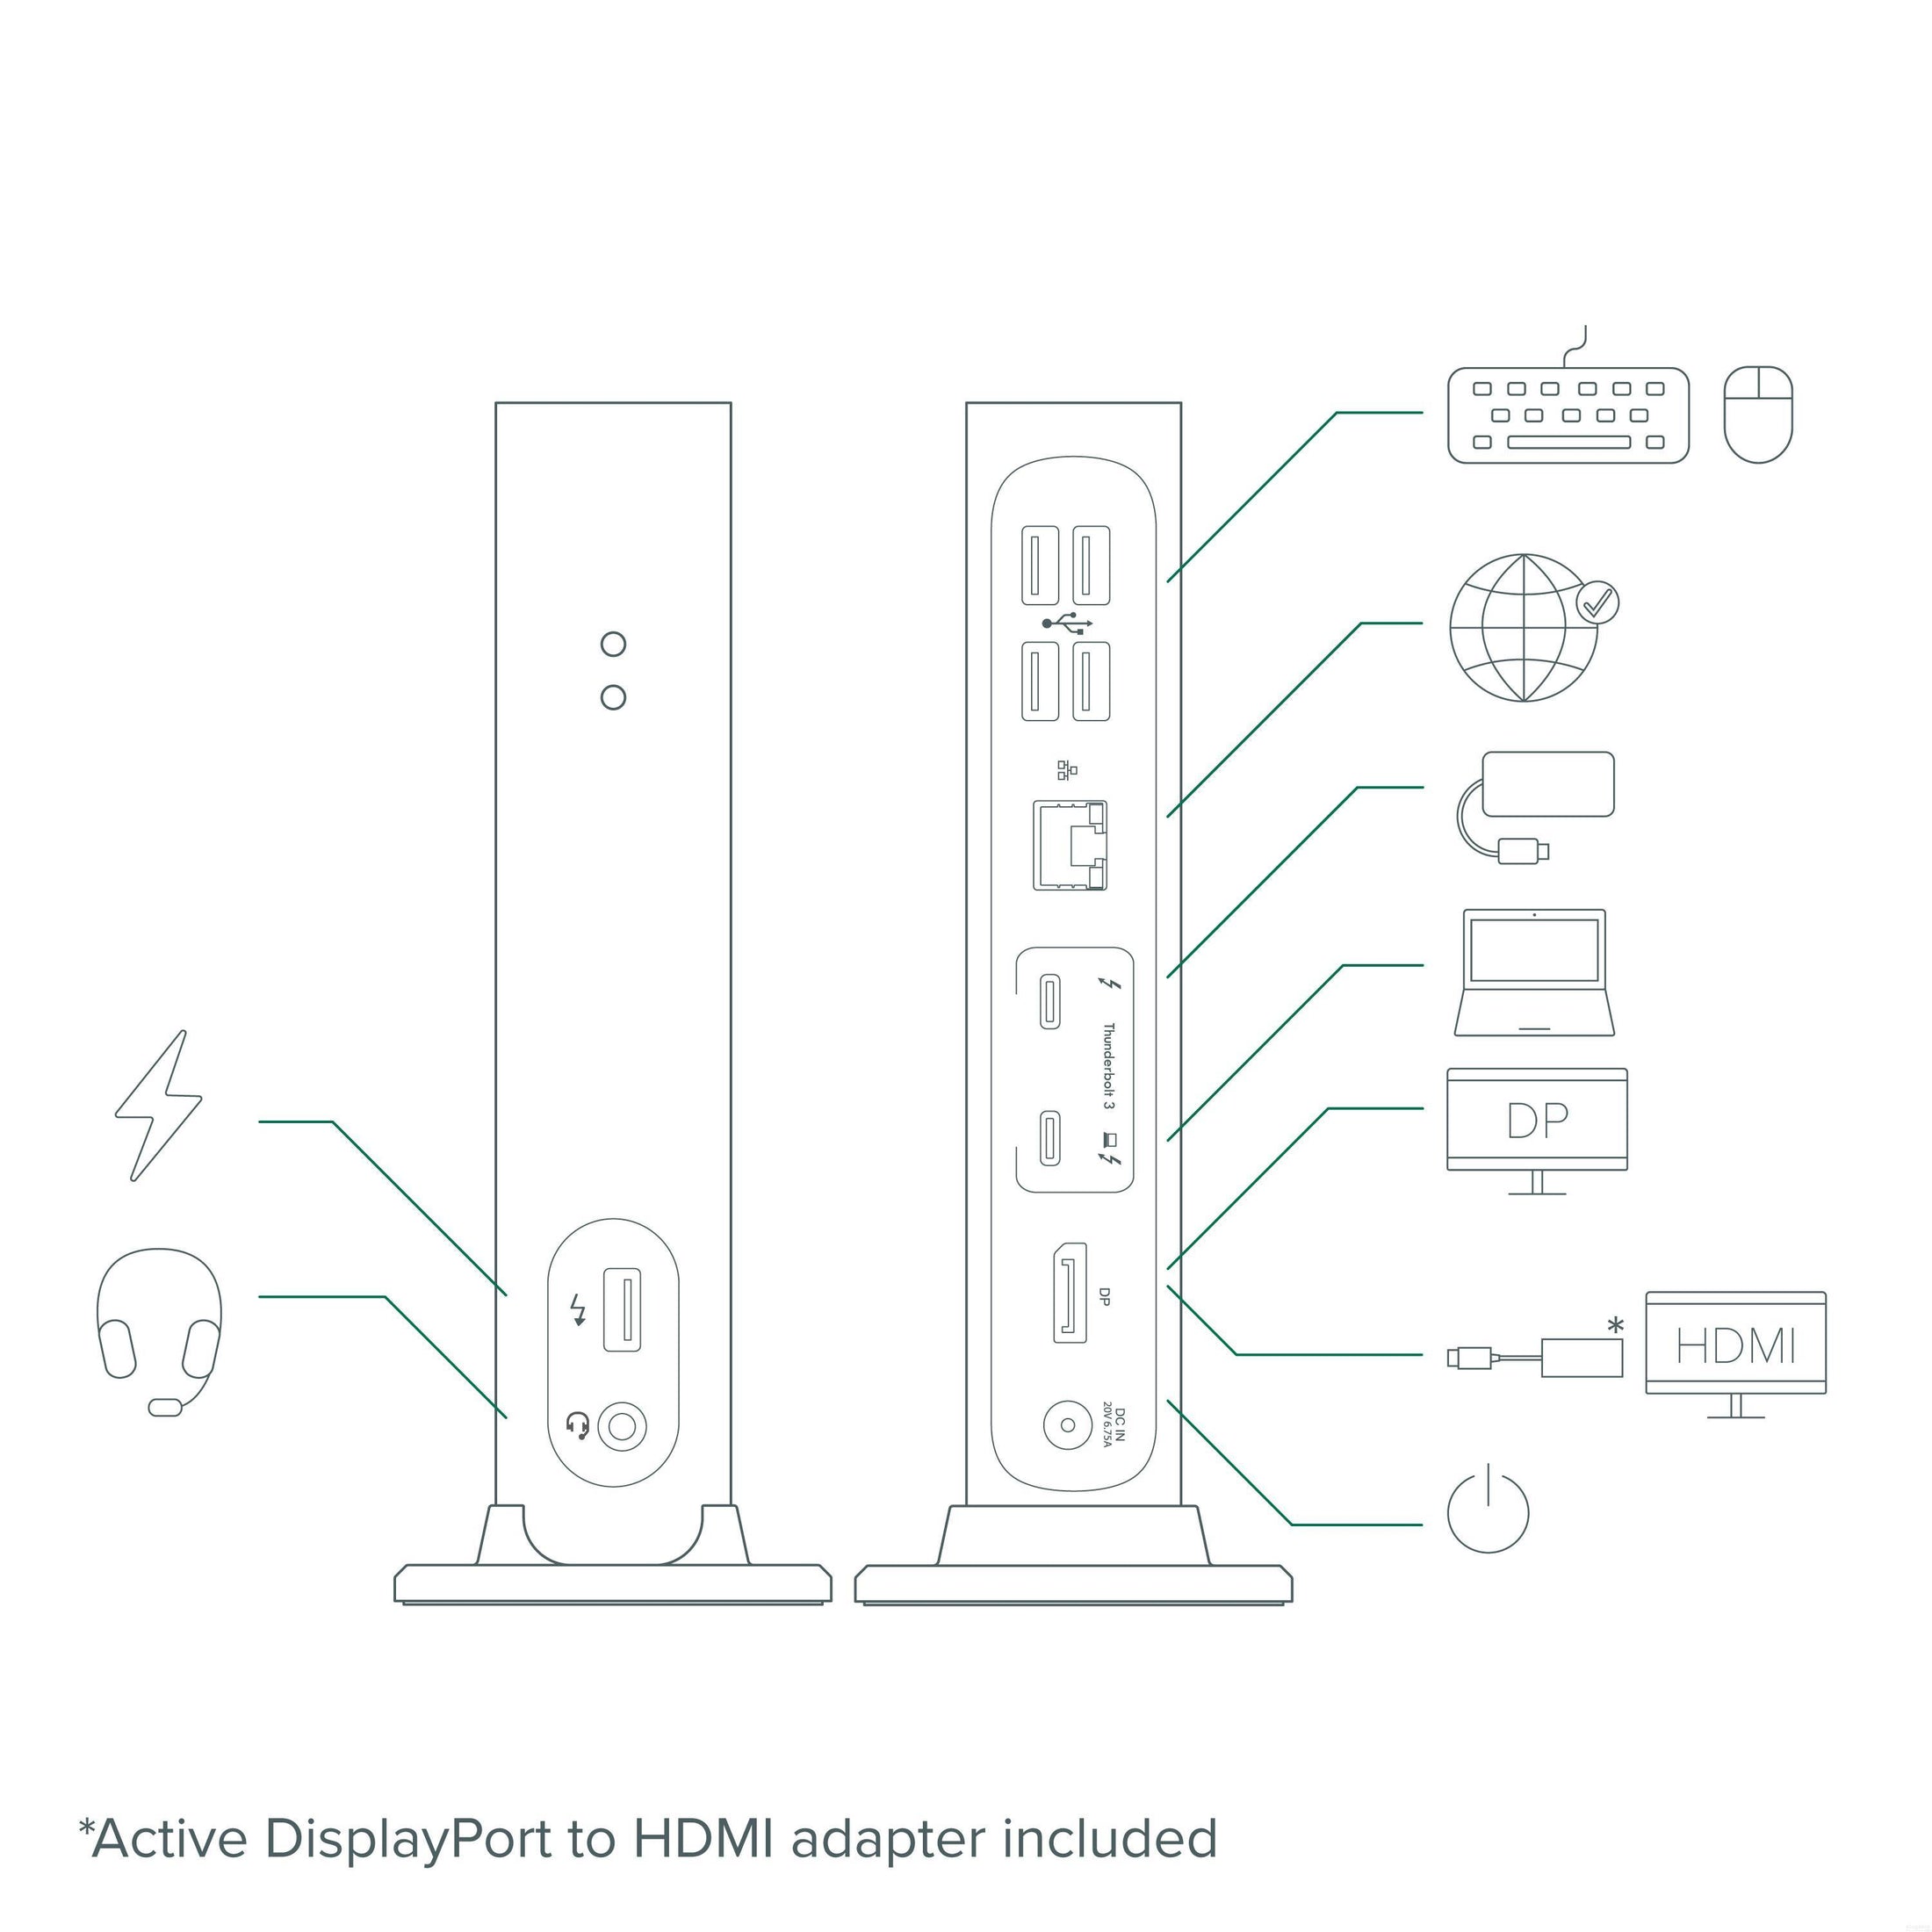
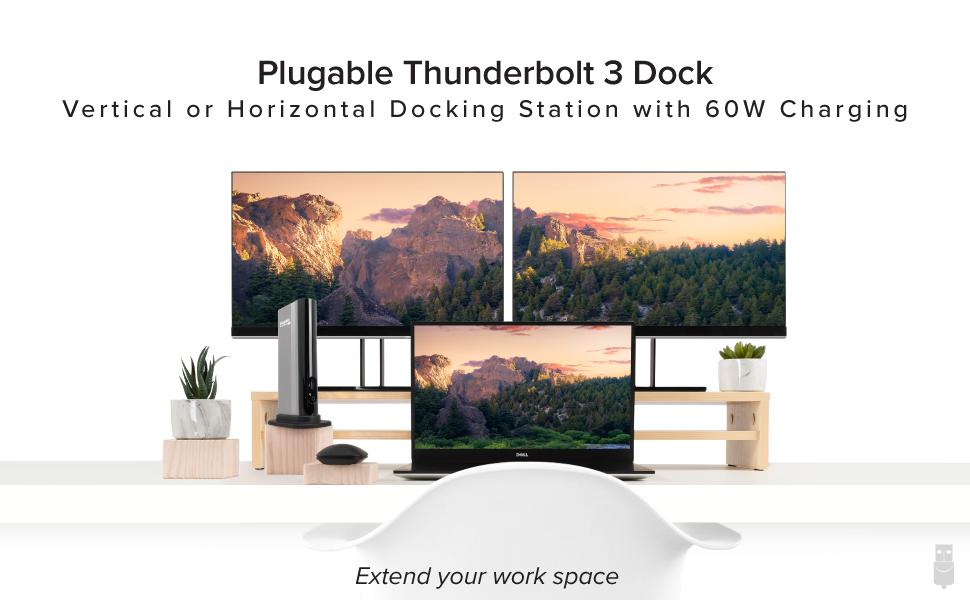
- 機能 - 当 Thunderbolt 3 ユニバーサル ドッキングステーションは、Thunderbolt 3 ポート経由で充電が可能なホストシステムを最大 60W で充電できます。外部モニタ用ポートが1 つ、ギガビットイーサネットポート、オーディオポート、および Thunderbolt 3 ポート(10Gbps)が 1 つ、USB 3.0 ポート(5Gbps)が 5 つがついています。また、Plugable 社からのご購入の場合日本用 2 ピン・プラグが入っています。取り外しの可能なスタンド付きで、縦置きにも横置きにもできます。
- 外部モニタ接続 - DisplayPort 経由、あるいは同梱された DisplayPort - HDMI 2.0 変換アダプタを使って、最大解像度 4K(4096x2160)@60Hz までのモニタが接続できます。3440x1440、2560x1600、2560x1440、2560x1080、1920x1080(1080p)などの解像度でも使用できます。
- 拡張性 - 当ドッキングステーションの周辺機器用の Thunderbolt 3 ポートには、最大 5 台の Thunderbolt 3 周辺機器をデイジーチェーン接続できます。USB 3.1 Gen 2 (10Gbps)対応の機器も接続できますが、その場合は 1 台のみの接続です。一部の Thunderbolt 3 システムのように複数の代替モードモニタが接続できる PC であれば、追加(別売り)の「代替モード対応グラフィックス・アダプタやケーブル」を使用して、このドッキングステーション経由でもう 1 台モニタを追加することもできます。
- 互換性 - このドッキングステーションの DisplayPort を他のグラフィックスタイプに変換するには「アクティブ」タイプの変換アダプタが必要です。「パッシブ」タイプ、「レベルシフター」と呼ばれるようなアダプタは使用できません。デュアルリンク DVI のモニタとは接続できません。また、Thunderbolt 1 や 2 ポートを搭載した古い Mac システムでは使用できません。詳細については下記の互換性欄や製品情報をご参照ください。
- 2 年の品質保証 - Plugable は 2 年間の品質保証およびメールでのサポートをご提供いたします。正規販売元の Plugable Japan よりご購入ください。製品について質問がございましたら、Plugable Japan サポート nihongo@plugable.com までお気軽にご連絡ください。

製品説明
Plugable Thunderbolt 3 充電機能付きシングル・ディスプレイ・ドッキングステーション(TBT3-UDV)は、Thunderbolt 3 対応の Mac または Windows システムに様々な周辺機器を接続できるようにするだけでなく、最大 60W の電源をホスト・システムに供給します。 最高解像度 DCI 4K@60Hz(4096×2160@60Hz)までの 1 台の DisplayPort モニタを接続できます。また、同梱の DisplayPort – HDMI アクティブ変換アダプタを使用すれば、DisplayPort モニタの代わりに HDMI モニタを接続できます。Thunderbolt 3 は USB 3.0(5Gbps)の 8 倍にあたる 40Gbps のデータ転送帯域幅を持っており、システム内蔵の GPU の能力を最大に発揮する表示パフォーマンスを提供できます。グラフィックス・ポート以外には、有線 LAN ポート、音声入出力ポートおよび複数の USB ポートがあり、様々な周辺機器を接続できます。
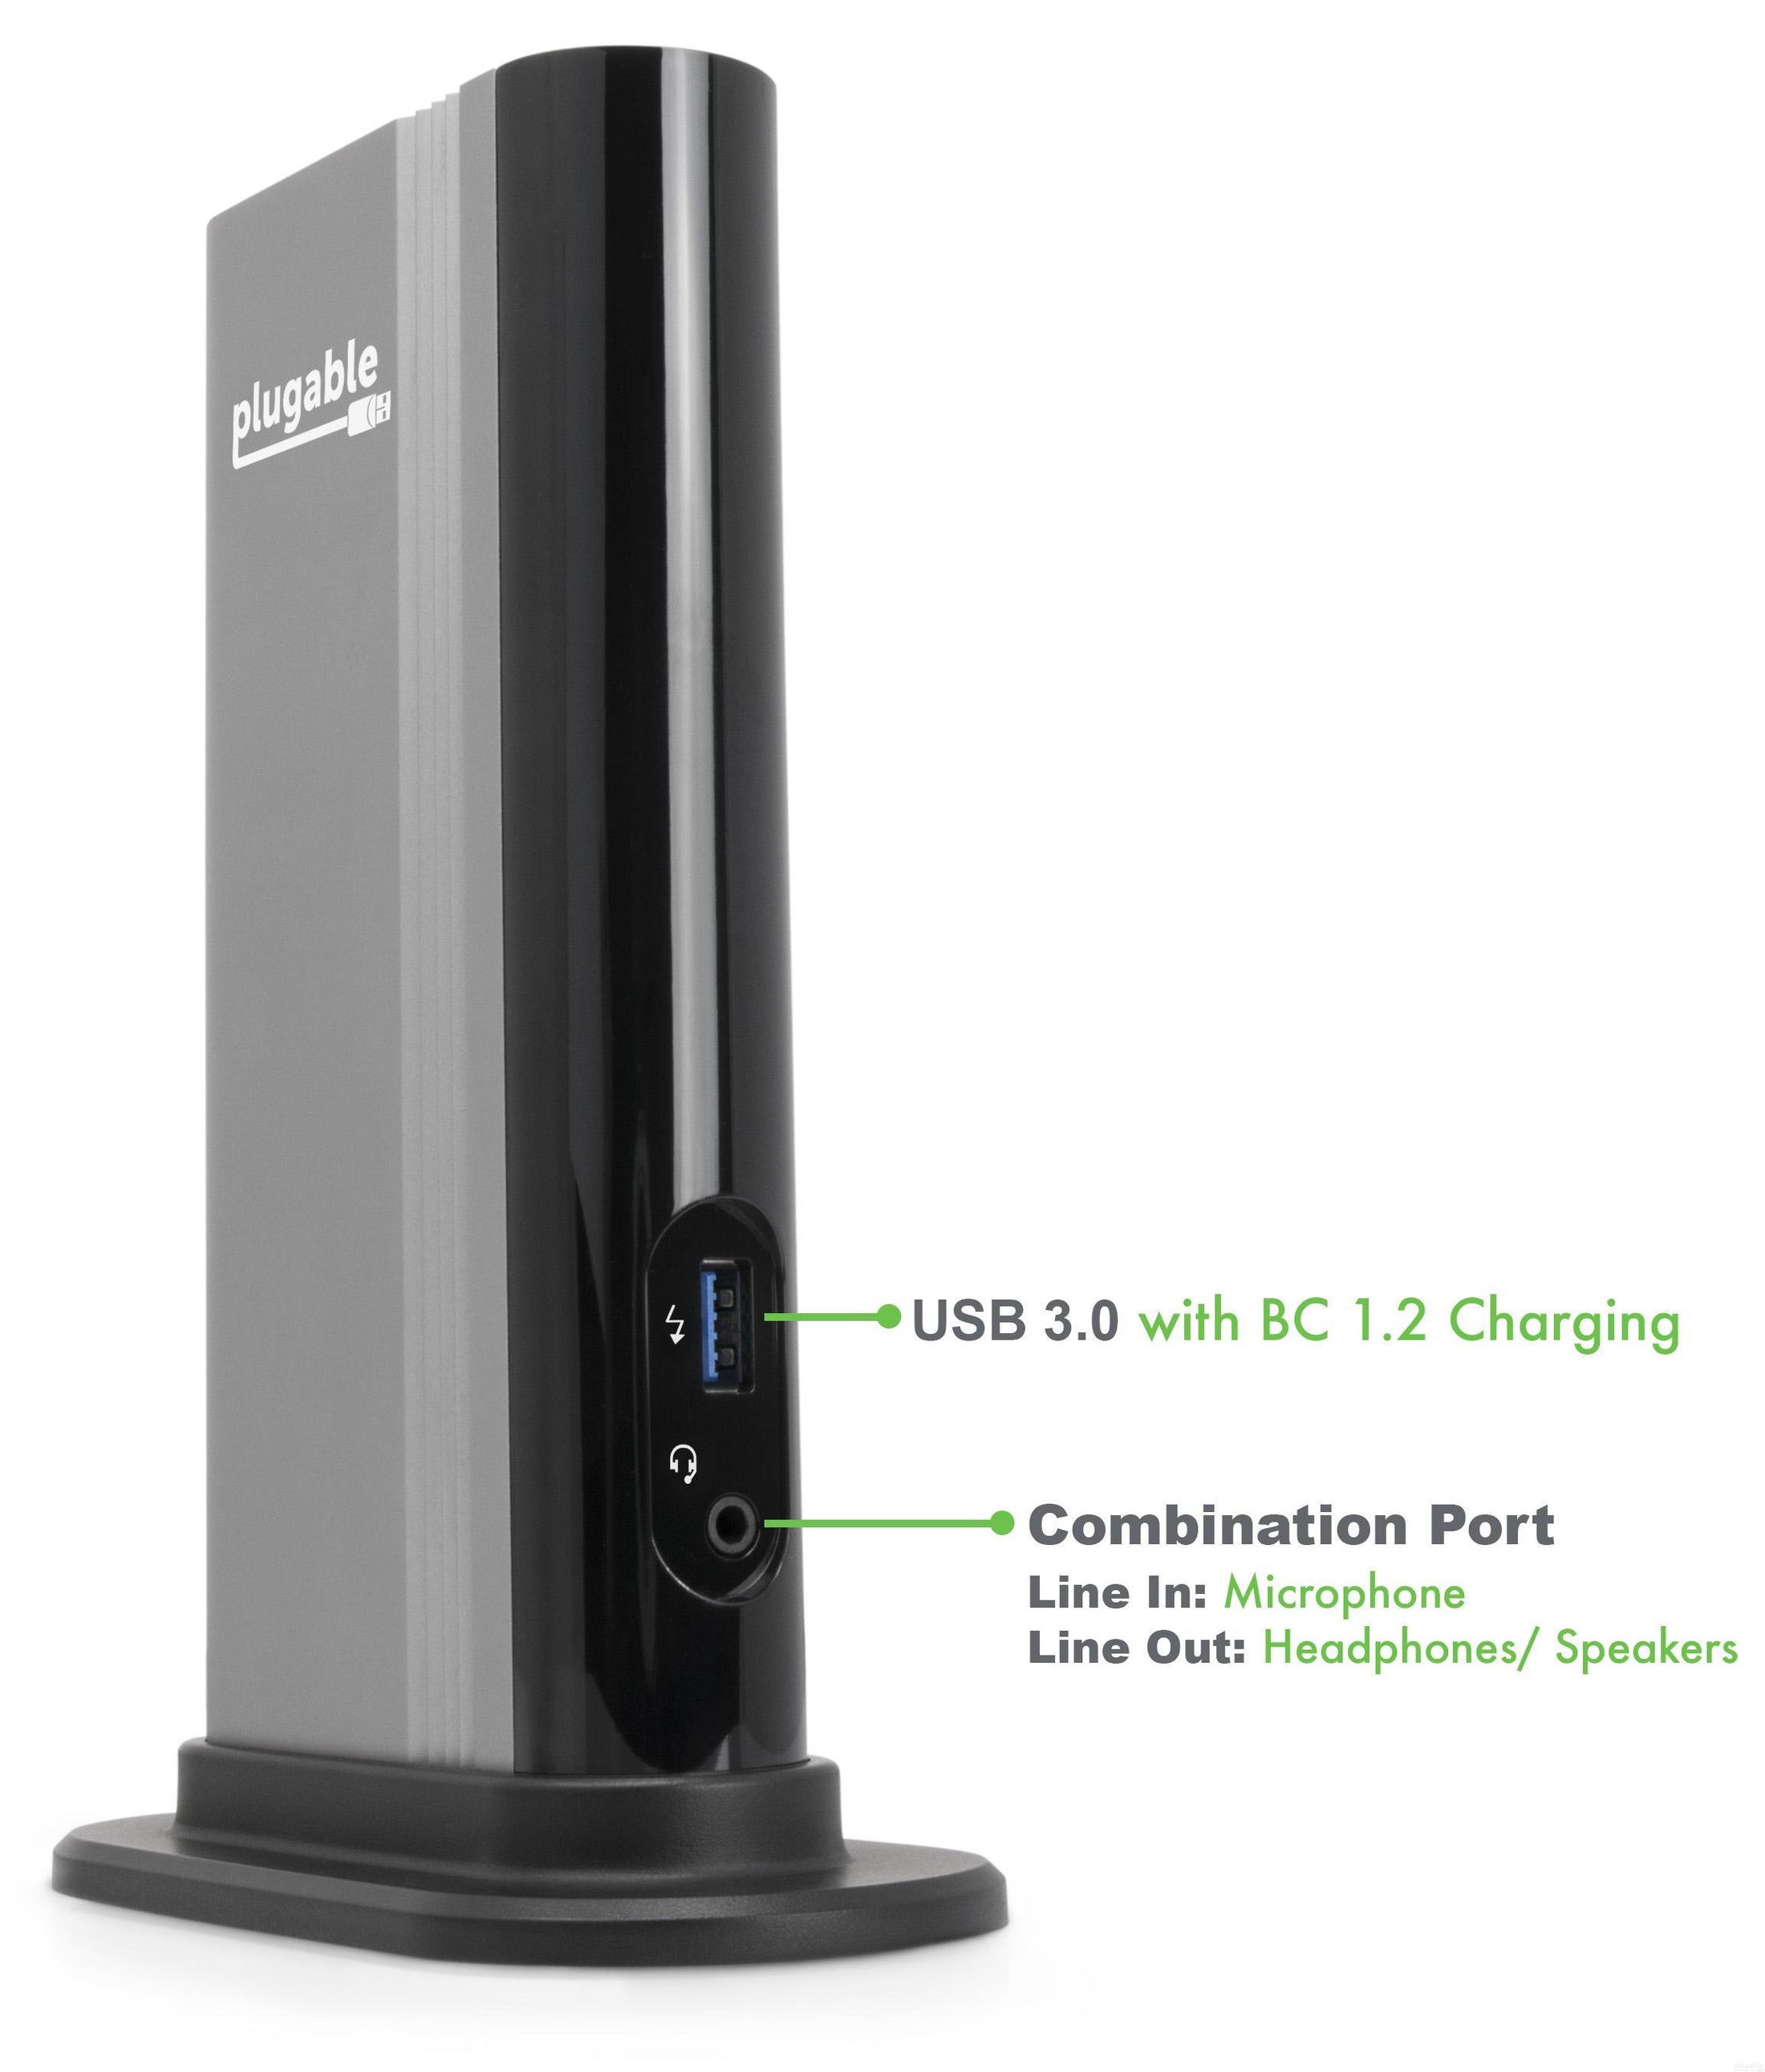
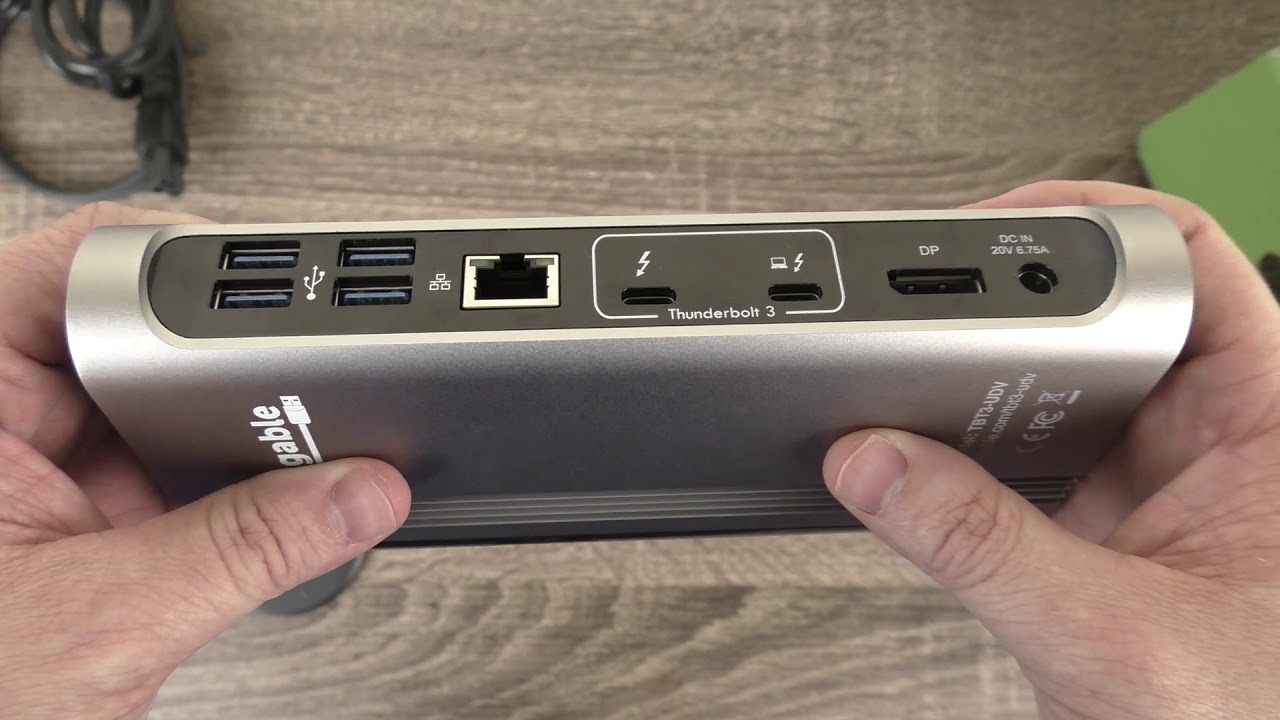
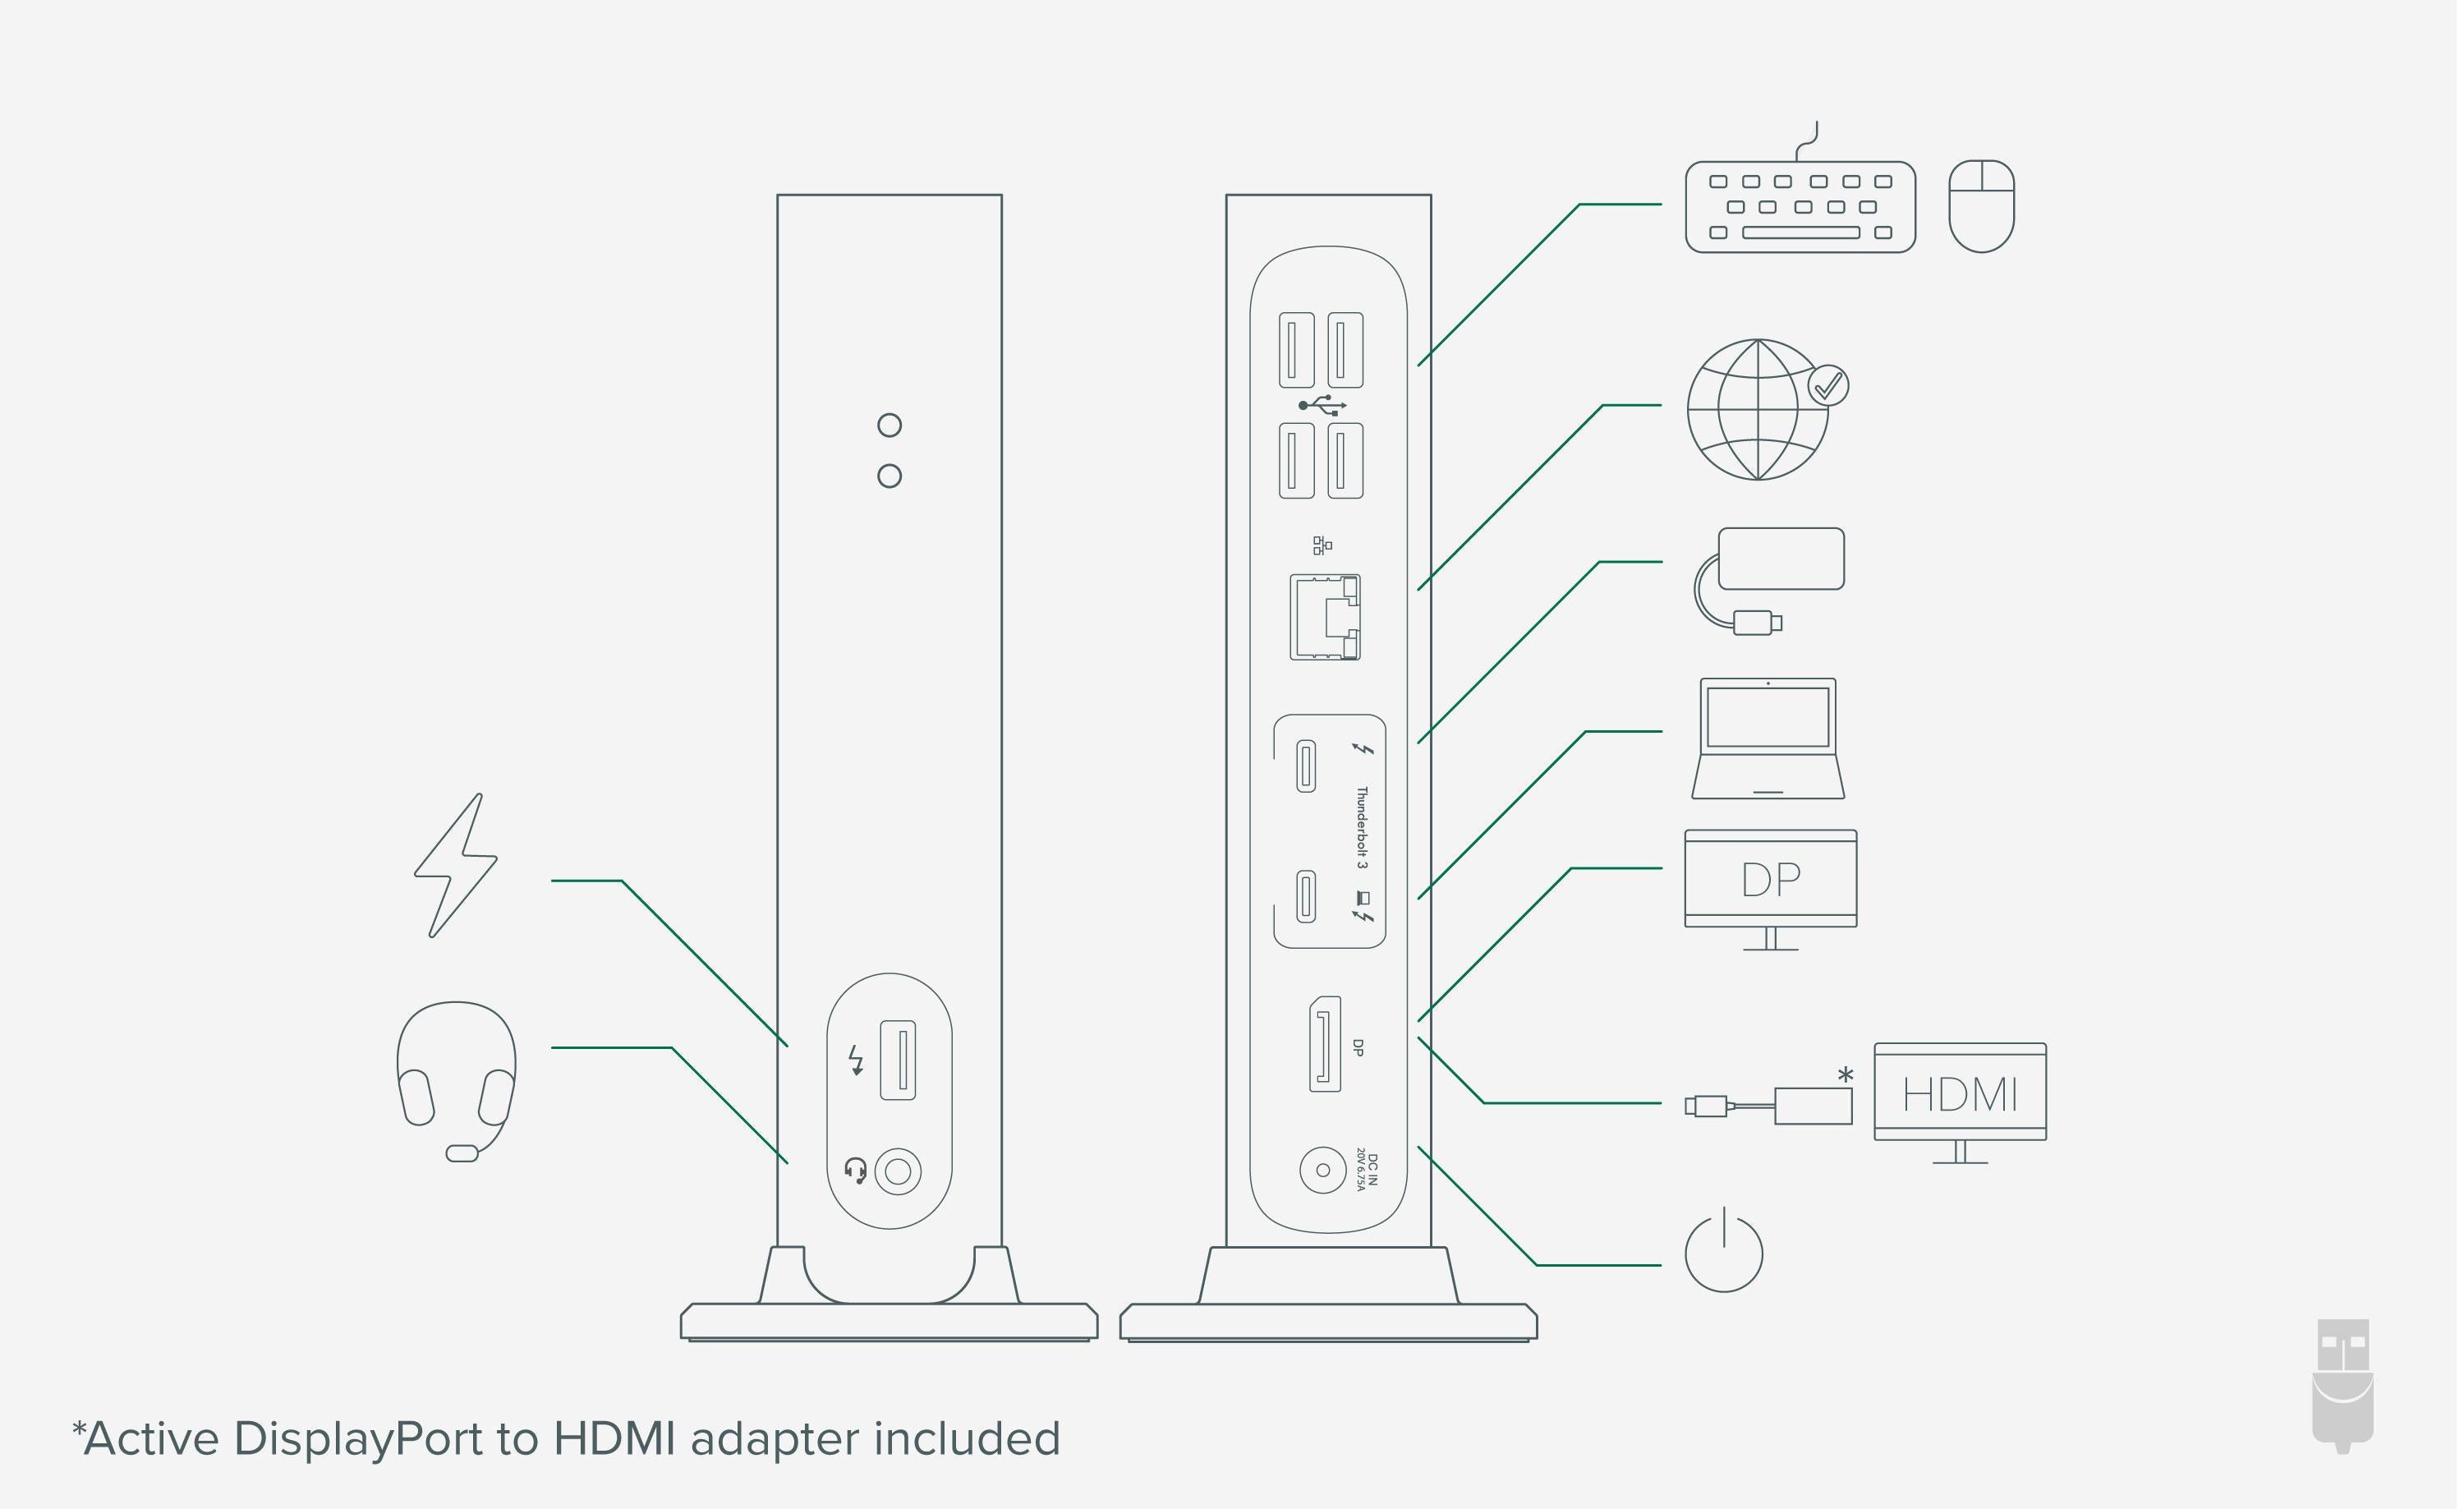
有線ギガビット・イーサネット接続には、本体に統合された 1.0 Gbps i210 Intel ネットワーク・アダプタを使用します。もし別の Thunderbolt 3 対応コンピュータと 1 対 1(ピア・ツー・ピア)接続をする場合には、最高転送速度は 10 Gbps です。 ステレオ・ヘッドフォンやマイクロフォンを接続するためのアナログ音声入出力ポート(入出力一体型)x 1、Thunderbolt 3 ポート(ホスト接続用)x 1、Thunderbolt 3 ポート(周辺機器用)x 1、USB 3.0 Type-A ポート x 5 がついています。USB 3.0 ポートのうち 1 つはドッキングステーションの前面にあり、BC 1.2 充電規格に準拠しています。この充電ポートに周辺機器(スマートフォンやタブレットなど)を接続すると。BC 1.2 準拠の高速充電(1.5A まで)ができます。 場所を取らないよう同梱のスタンドを使って立てて使うことも、スタンドを外して水平に置いて使うこともできます。
Thunderbolt 3 システムとその周辺機器との互換性は、様々な技術上の要因が介在するため非常に複雑といえます。また、このドッキングステーションが正しく機能するためには、システム側の BIOS や NVM(Thunderbolt 3 関連の不揮発性メモリ)に対して、コンピュータ製造元が提供する最新の更新を適用することが必須となります。このような観点から現時点では、このドッキングステーションを使用するのに最も適しているのは、比較的迅速に修正を提供し配布する Apple 社や Dell 社の Thunderbolt 3 対応 PC です。
このドッキングステーションを経由して複数外部モニタを接続する際の構成や、どんな追加コンポーネントが必要になるか、また Apple 社や Dell 社以外の Thunderbolt 3 ホスト・システムとの互換性などに関する詳細は、このページの「互換性」タブや「FAQ」タブ内の情報を参照してください。Plugable 社のナレッジベースにも、Thunderbolt 3/4 関連の情報が記載されており、検索もできます。もしもご質問がある場合は、製品ご購入の前に Plugable 社技術サポート nihongo@plugable.com までメールでお問合せください。

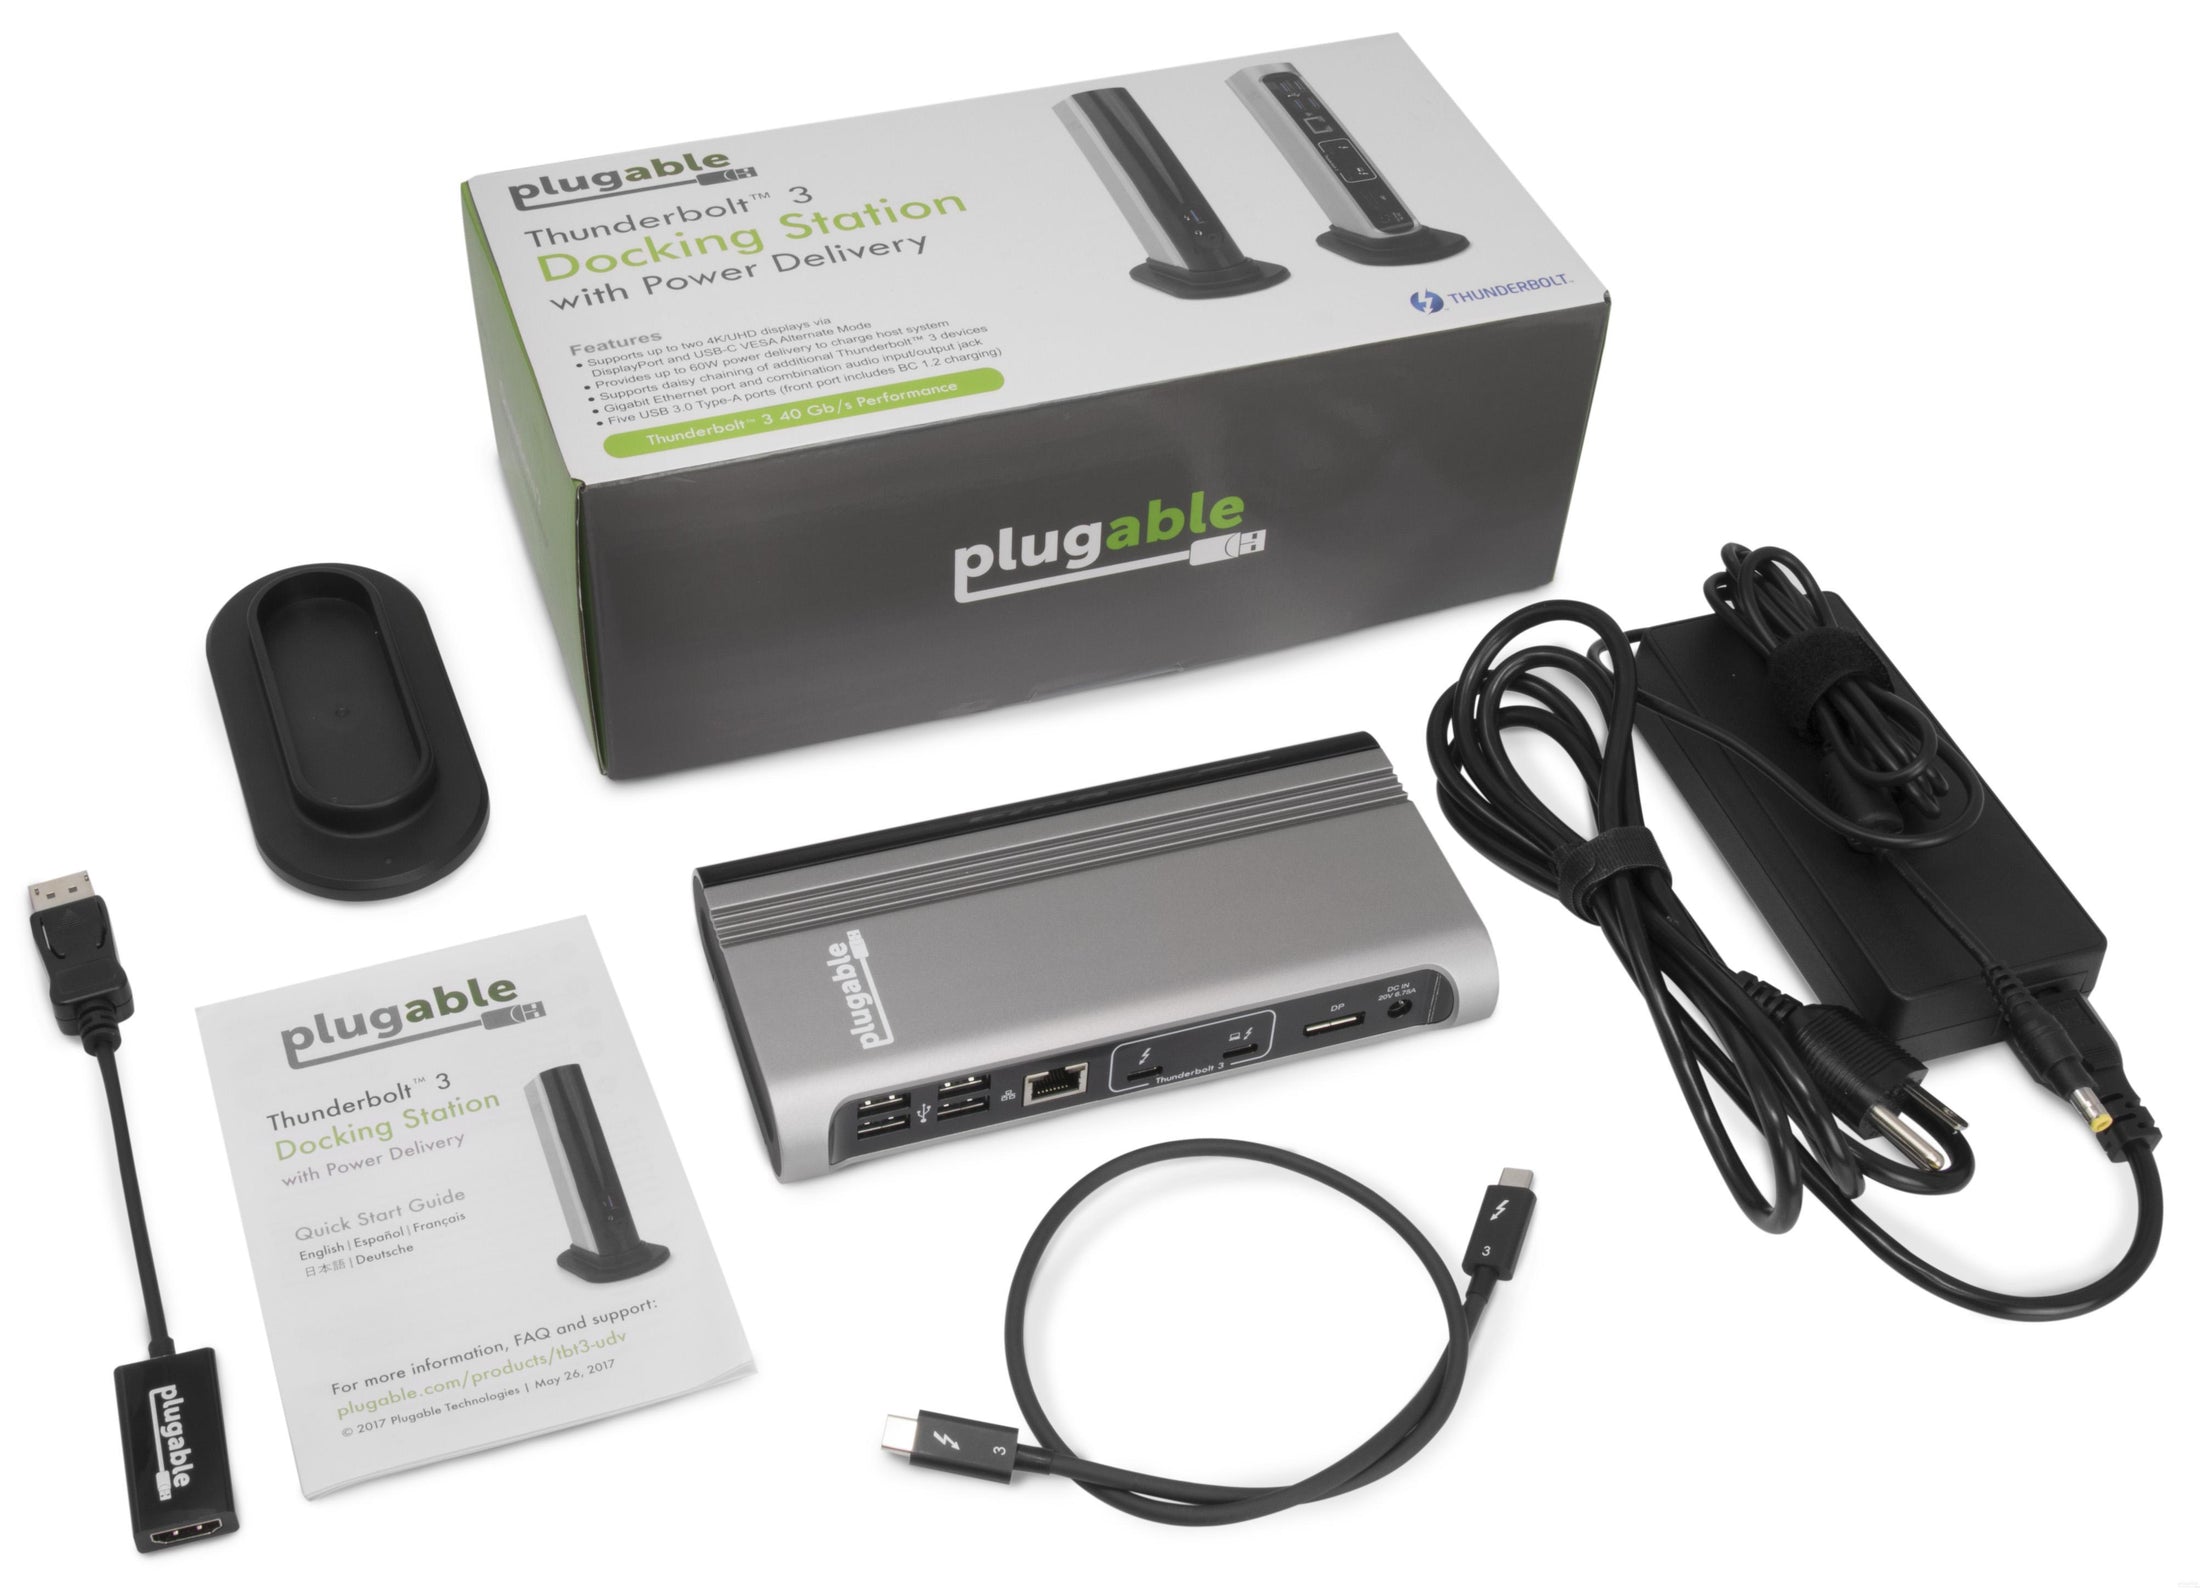
パッケージ内容
内容物と数量 | 注記 |
---|---|
1x Thunderbolt 3 ドッキングステーション 60W 充電 | |
1x クイックスタートガイド | |
1x 電源アダプター | |
1x 電源ケーブル | |
1x 縦置きスタンド | |
1x 40Gbps 対応 Thunderbolt 3 ケーブル(約 50cm) | |
1x DisplayPort - HDMI アクティブ変換アダプタ |
グラフィック
ポート | 場所 | 仕様 | 最大解像度とリフレッシュレート | HDCP | チップセット |
---|---|---|---|---|---|
1x Thunderbolt™ 3 (Output) |
背面 | DisplayPort 1.2 | 3840x2160 @ 30Hz 3840x2160 @ 60Hz3840x1600 @ 30Hz 3440x1440 @ 30Hz 2560x1440 @ 60Hz 1920x1200 @ 60Hz 1920x1080 @ 60Hz 1600x900 @ 60Hz 1280x1024 @ 60Hz 1280x800 @ 60Hz 1280x720 @ 60Hz 1152x864 @ 60Hz 1024x768 @ 60Hz 800x600 @ 60Hz 640x480 @ 60Hz |
対応 | |
1x DisplayPort(DP-HDMI アクティ変換アダプタ付き) (出力) |
背面 | DisplayPort 1.2 | 4096x2160 @ 60Hz 4096x2160 @ 60Hz3840x2160 @ 60Hz 3840x1600 @ 60Hz 3440x1440 @ 60Hz 2560x1440 @ 60Hz 1920x1080 @ 60Hz 1600x900 @ 60Hz 1280x1024 @ 60Hz 1280x800 @ 60Hz 1280x720 @ 60Hz 1152x864 @ 60Hz 1024x768 @ 60Hz 800x600 @ 60Hz 640x480 @ 60Hz |
対応 |
グラフィック出力モード
ホスト出力技術仕様 | システム側ポートタイプ | 接続可能ディスプレイ数 | ディスプレイ毎の最大解像度 |
---|---|---|---|
DisplayPort 1.2 | Thunderbolt™ 3 | 1 | 4096x2160 @ 60Hz 4096x2160 @ 60Hz3840x2160 @ 60Hz 3840x1600 @ 60Hz 3440x1440 @ 60Hz 2560x1440 @ 60Hz 1920x1080 @ 60Hz 1600x900 @ 60Hz 1280x1024 @ 60Hz 1280x800 @ 60Hz 1280x720 @ 60Hz 1152x864 @ 60Hz 1024x768 @ 60Hz 800x600 @ 60Hz 640x480 @ 60Hz |
オーディオ
ポート | 場所 | 接続方法 | 最大ビット深度とサンプルレート | 信号出力 | チャネル | チップセット |
---|---|---|---|---|---|---|
音声入出力ジャック (双方向) |
前面 | 3.5mm (TRRS) | 24-bit 96KHz | アナログ | 2 | CM6533 CMedia |
DisplayPort (出力) |
背面 | DisplayPort | PC により異なる | デジタル | PC により異なる |
電源
ポート | 場所 | 電源 ホスト/デバイス | 接続タイプ | 備考 | 電圧 | アンペア | ワット数 |
---|---|---|---|---|---|---|---|
電源 | 背面 | 周辺機器 | 電源アダプタ | UL 60950-1 認証 | 20.0V | 6.75A | 135.0W |
PC 接続用 Thunderbolt™ 3 | 背面 | ホスト PC | USB-C PD 充電 | 20.0V | 3.0A | 60.0W |
デバイス接続用 USB ポート
ポート | 場所 | バージョンとリンクレート | 機能 | 電圧 | アンペア | ワット数 |
---|---|---|---|---|---|---|
1x Thunderbolt™ 3 | 背面 | Thunderbolt™ 3 (40Gbps) | 4x PCIe 3.0レーン、または USB PD 充電、または 代替モードグラフィックポートとして使用 | 5V | 1500mA | 7.5W |
1x Thunderbolt™ 3 | 背面 | Thunderbolt™ 3 (40Gbps) | 4x PCIe 3.0レーン、または USB PD 充電、または 代替モードグラフィックポートとして使用 | 5V | 3A | 15W |
1x USB-A | 前面 | USB 3.0(5Gbps) | バッテリー充電規格 BC 1.2 | 5V | 1500mA | 7.5W |
2x USB-A | 背面 | USB 3.0(5Gbps) | 5V | 900mA | 4.5W | |
2x USB-A | 背面 | USB 3.0(5Gbps) | 5V | 900mA | 4.5W |
ホストへの接続
ポート | 場所 | バージョンとリンクレート | 機能 |
---|---|---|---|
1x Thunderbolt™ 3 | 背面 | Thunderbolt™ 3 (40Gbps) | 4x PCIe 3.0レーン、または USB 電源供給 |
有線 LAN ネットワーク
ポート | 場所 | バージョンとリンクレート | 機能 | チップセット |
---|---|---|---|---|
ギガビット・イーサネット | 背面 | 1000BASE-T | I210 Intel |
同梱ケーブル
ポートタイプ(側面 1 ) | ケーブル仕様 | ポートタイプ(側面 2 ) | ケーブル長 | ケーブル用外部電源 |
---|---|---|---|---|
1x USB-C(Thunderbolt™ 3)オス | Thunderbolt™ 3 (40Gbps) | 1x USB-C(Thunderbolt™ 3)オス | 0.5m | |
互換性情報
Thunderbolt 3 は非常に強力な最新技術ですが、その様々な技術要素をどう実装するかは、非常に多くの部分がコンピュータ・メーカー側の裁量下にあります。結果として、Thunderbolt 3 対応を謳うコンピュータ側の Thunderbolt 3 ポートには非常に多くの差異があるため、互換性情報は非常に複雑になり、システムによってはこのドッキングステーションが提供する機能の全てを使用できない場合があります。
一部の Thunderbolt 3 対応システムでは、代替モードによる 2 台目の外部モニタ接続にも対応しています(ただし、そのためのアダプタは別途必要です)。そのようなシステムへ、このドッキングステーションを介して 2 台目の外部モニタを接続する場合には、そのコンピュータの Thunderbolt 3 ポートに、物理的に 2 本の DisplayPort ラインが接続されていなければなりません。Intel チップ搭載 Apple 社製 Mac システムと Dell 社製 の Thunderbolt 3 対応コンピュータはこの要件を満たしています。ただし M1 チップ搭載の Mac システムは、外部モニタは1 台しか接続できません。
また、PC システムメーカーが提供する、最新のシステムBIOS、Thunderbolt 3 ドライバ、Thunderbolt 3 NVM ファームウェア、グラフィックス(GPU)用デバイスドライバの適用が必要です。
Thunderbolt 3 対応システムが 2 台の外部モニタをサポートしており、このドッキングステーションに 2 台のモニタを接続したい場合は、2 台目の接続のために別売りの変換アダプタを購入する必要があります。Plugable 社は、USBC-DP、USBC-HDMI、USBC-HDMI-CABLE、USBC-DVI、USBC-VGA-CABLE などのアダプタやケーブルを提供しています。
ホストシステム(PC)との互換性
使い方
TBT3-UDV ドッキングステーションには、ドッキングステーションを使い始めるための簡単なクイックスタートガイドが同梱されています。ここには、クイックスタートガイドを補足する説明が記載されています。
macOS Thunderbolt 3 対応ホストシステム、または Windows 10 のThunderbolt 3 対応ホストシステムで使用する場合、当ドッキングステーションを使用するに際して、個別のデバイス・ドライバをインストールする必要はありません。
そのため、まずはすべてを物理的に接続することから始めてください。
ドッキングステーションの箱の中には、電源アダプター本体、電源アダプターケーブル(電源コンセントに接続するプラグ付きの短いケーブル)、40Gbps 転送速度に対応した Thunderbolt 3 ケーブル(約 50cm)、そして DisplayPort - HDMI アクティブ変換アダプタが入っています。
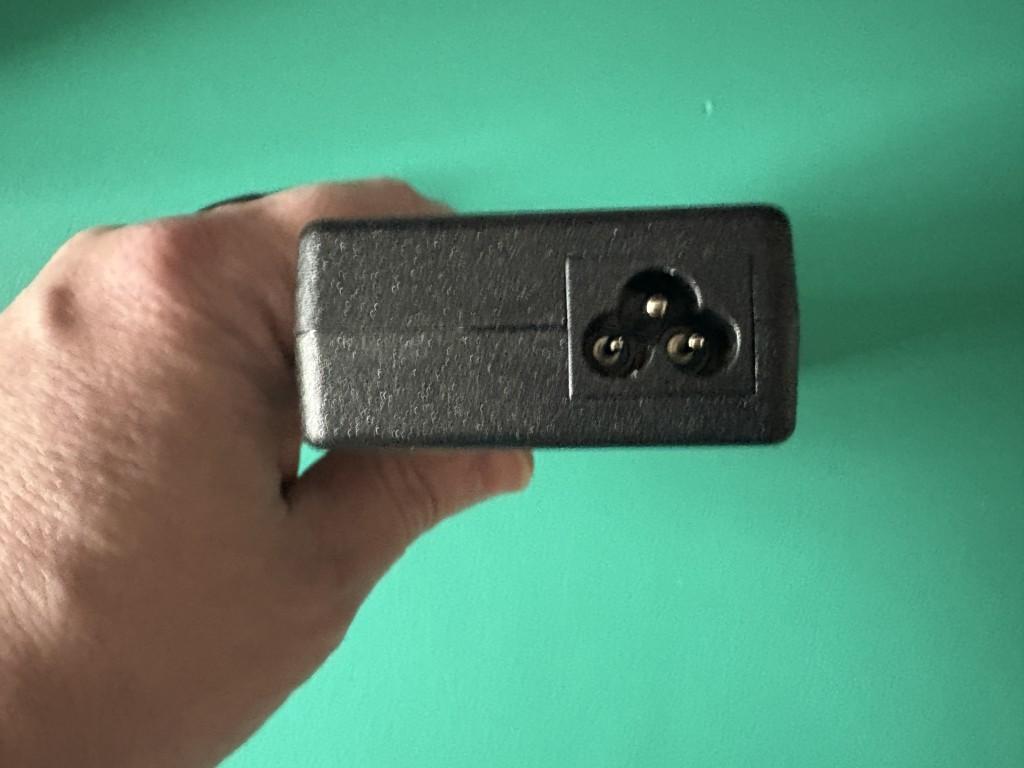
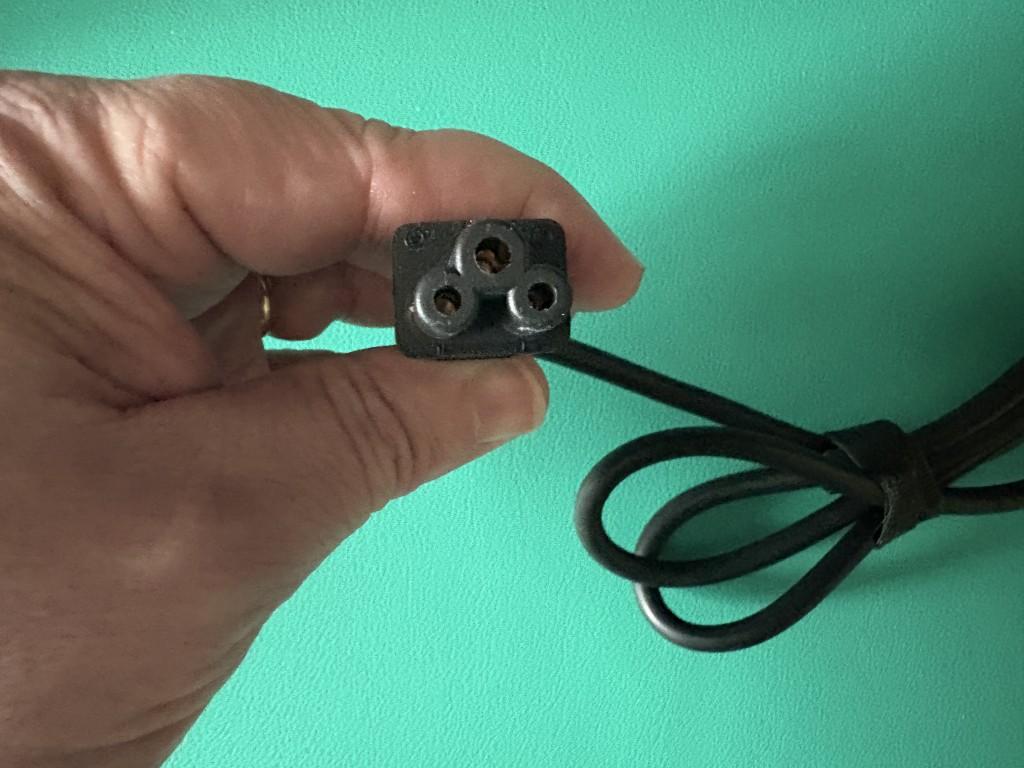
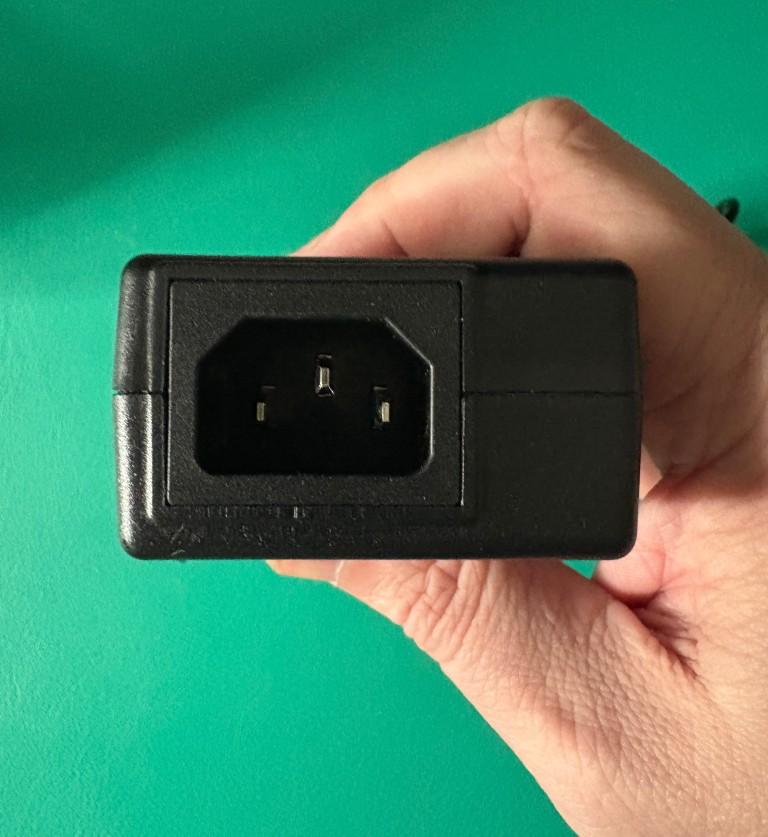
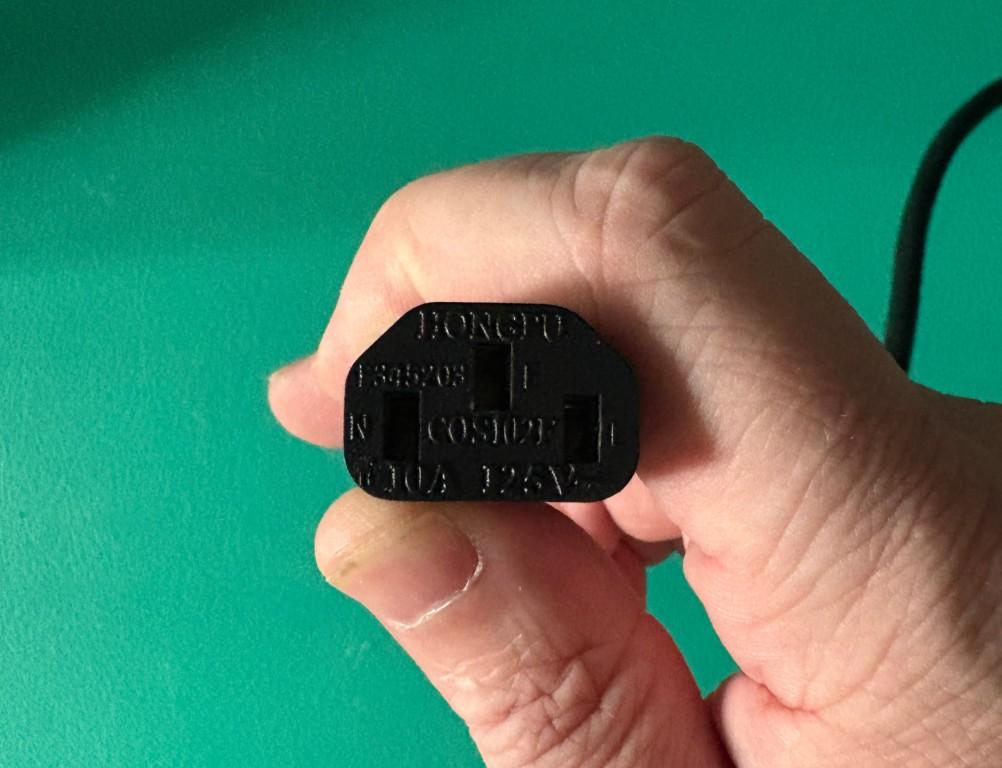
電源アダプター本体に、アダプター用ケーブルを接続します。
電源アダプタをドッキングステーションの背面にある樽型の電源ポートに接続し、電源ケーブルの反対側はコンセントに接続します。
同梱されている Thunderbolt 3 ケーブルの片方を、ドックの背面にある小さなラップトップのアイコンが付いた Thunderbolt 3 ポートに接続します。この Thunderbolt 3 ポートは、ホストシステムを充電するために最大60W までの電力を供給することができます(ただし、ホストシステムがThunderbolt 3 ポート経由での充電に対応していることが必要です)。
次に、Thunderbolt 3 ケーブルの反対側の端を、ラップトップまたはデスクトップシステム搭載の Thunderbolt 3 ポートに接続します。
Windows システムを使用している場合、 Intel Thunderbolt ソフトウェアまたは Intel Thunderbolt コントロールセンターアプリケーションにより、当ドッキングステーションを手動で「承認」または「認証」するようメッセージが表示されることがあります。そのような場合は、「承認」してください。
Mac システムをお使いの場合は、承認作業は必要ありません(macOS によって自動的に行われます)。
次に、ドッキングステーション搭載の様々なタイプのポートに、必要な周辺機器を接続します。
最大 4K 解像度、60Hz リフレッシュレートの DisplayPort モニタは、ドッキングステーションに搭載された DisplayPort ビデオ出力ポートから接続することができます。(DisplayPort グラフィックケーブルは、当製品には付属していません。)もしモニタに HDMI 入力ポートしかない場合は、同梱されている DisplayPort - HDMI アクティブ変換アダプタと、別売りの HDMI ケーブルを使用してください。
注意: 外部モニタを当ドッキングステーションに接続する際には、外部モニタのビデオ入力設定が、接続するビデオケーブルの種類に応じて正しく設定されていることを確認してください。入力ポートが複数あるモニターでは、手動でポートを選択しなければならないことがあります。
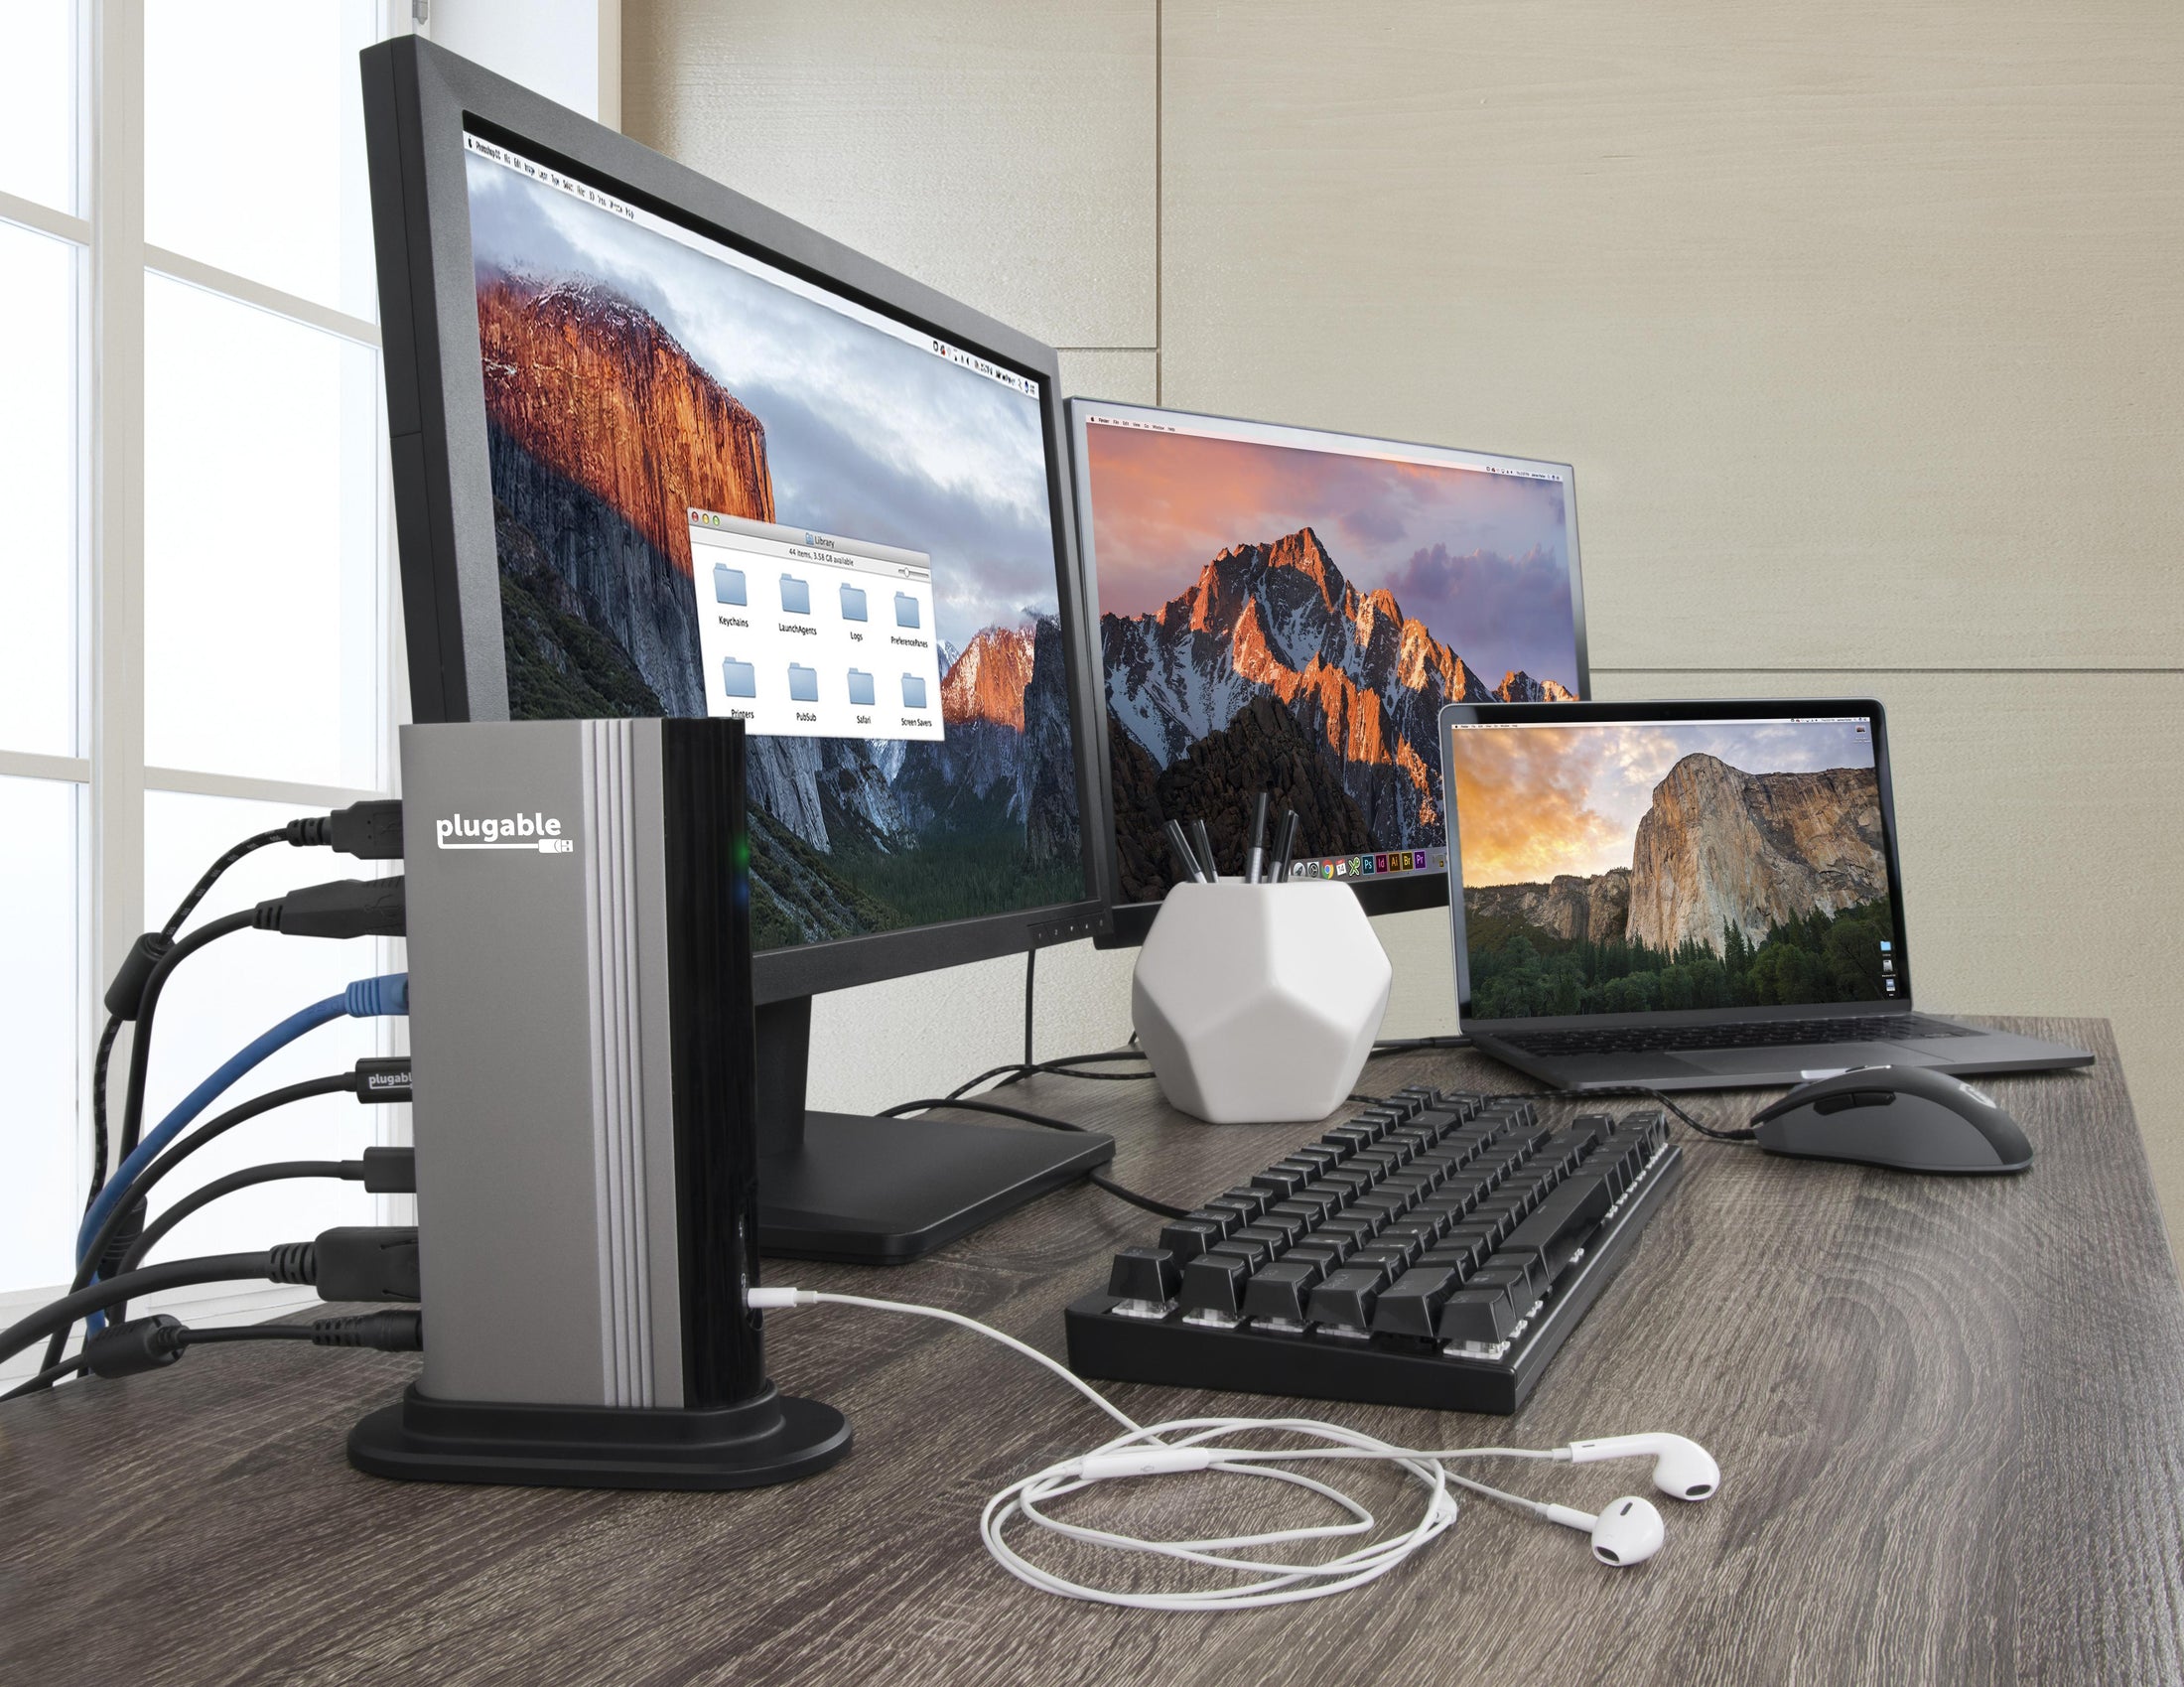
モニタの接続後は、その他の必要な機器、たとえばキーボードやマウスなどの他の USB 機器(USB 3.0 ポート)、イーサネット・ケーブル(イーサネットポート)、スピーカーやヘッドフォン、ヘッドセット(音声入出力ポート)を接続してください。
お使いのシステムが 2 台の外部モニタ接続に対応している場合、ドッキングステーションの 2 つ目(「ダウンストリーム」用)の USB-C ポートにビデオケーブルまたは変換アダプターを接続して、2 台目のモニタを追加することができます。例えば、Plugable 社の USB-C をHDMI アダプタ -->https://plugable.com/products/usbc-hdmi または USB-C toHDMI ケーブル>https://plugable.com/products/usbc-hdmi-cable/ を使用できます。
必要に応じて、モニタ以外の Thunderbolt 3 または USB-C デバイスを、当ドッキングステーションの 2 番目の Thunderbolt 3 ポートに接続することもできます。
Filter Help Articles and Frequent Questions by Category
Articles
Well how about that, it looks like we don't have any articles matching your filters! Try removing one of your choices or clear the filters to show all articles.
You can always contact support if you need help too!
USB Port Types
USB-A
pietz, CC BY-SA 3.0 , via Wikimedia Commons
This is the standard USB connection that most computers offered prior to the introduction of USB Type-C (USB-C). Even after the introduction of USB Type-C, this is still quite common.
It can provide data transfer rates up to the USB 3.1 Gen 2 (10 gbps) specification depending on the host and device, but does not directly support video in the way that USB-C Alternate Mode does. This limitation makes DisplayLink USB graphics adapters and docking stations ideal on systems that do not have USB-C, or in instances where more displays are needed beyond available video outputs of a PC.
USB-B
Fred the Oyster, CC BY-SA 4.0 , via Wikimedia Commons
IngenieroLoco, CC BY-SA 4.0, via Wikimedia Commons
This type of connection comes in a couple different styles depending on whether USB 3.0 and higher transfer rates are supported (bottom graphic). Usually this type of connection is used to plug into USB devices that do not have a fixed cable connected, such as USB docking stations, USB hubs, printers, and others.
USB Mini-B
Fred the Oyster, CC BY-SA 4.0 , via Wikimedia Commons
One of the first connectors for charging a smartphone, wireless game controller (such as the Sixaxis and DualShock 3), and other small devices such as external hard drives. Not commonly used today, but is still used in some cases. Most devices using USB Mini B are using USB 2.0, though a USB 3.0 variant does exist. This specification also added USB On-The-Go (OTG) functionality, though it is more commonly implemented with Micro USB.
USB Micro-B
Fred the Oyster, CC BY-SA 4.0, via Wikimedia Commons
IngenieroLoco, CC BY-SA 4.0 , via Wikimedia Commons
A smaller connector that serves many of the same uses as the Mini B connector, with added optional features such as Mobile High-Definition Link (MHL) to allow devices like smartphones to output video to larger displays without requiring a dedicated port for video output.
The larger variant of USB-B is most commonly used for external hard drives for higher 5Gbps transfer rates.
USB-C, Thunderbolt™ 3, and Thunderbolt™ 4
Niridya , CC0, via Wikimedia Commons
The most recent USB connection, USB Type-C (USB-C), represents a major change in what USB can do. The connector is smaller, can be connected in two orientations, is able to carry substantially more power and data, and can directly carry video signals of multiple types (HDMI, DisplayPort, etc.) Intel has also adapted the USB-C connector for use with Thunderbolt 3 and Thunderbolt 4.
It is important to note that while all Thunderbolt 3 and Thunderbolt 4 connections are USB-C, not all USB-C connections can be used with Thunderbolt 3 or Thunderbolt 4 devices.
More details regarding physical USB connections can be found on Wikipedia . The graphics depicted here are adapted from Wikimedia Commons by various artists under the Creative Commons Attribution-Share Alike 3.0 Unported license.
Understanding and Troubleshooting Network Performance
Computer networking is a complex topic. In this article, we'll be taking a deep dive on the nuances of network performance for those who need some additional explanation while striving to be concise, and to educate users of various experience levels relating computer hardware and computer networking.
If you just need to know how to perform a network performance test/benchmark, jump down to configuring iPerf.
Core Network Concepts
LAN vs WAN
With regards to network performance, it is crucial to first separate whether an issue is with Wide Area Network (WAN) performance, or if the issue is with Local Area Network (LAN) performance.
Your LAN is essentially the network inside your home or business. Many homes use a combination modem/router device provided by their Internet Service Provider (ISP). In some cases, especially in businesses, you may have a separate modem and router, along with other equipment connecting to the router such as a network switch.
Your modem, and the connection it establishes to your ISP—whether through coaxial cable, fiber, phone lines, or long-range wireless—essentially marks the point between the WAN and the LAN. The connection your modem makes to your ISP is the WAN, and any devices you connect through your router behind that modem belong to the LAN.
Link Rate
Almost every type of connection your computer makes to any piece of hardware will have a link rate of some kind. The link rate establishes how fast data can possibly be transferred across any given connection, but it does not guarantee how fast the hardware on either end of the connection will actually transfer data.
The concept of link rates, and their related bottlenecks, is likely best conveyed by giving an example of what connections might be involved in transferring a file from one computer on your LAN to another.
- 800Mbps—The file source is a USB 3.0 thumb drive capable of 100MB/s (800Mbps) read/write.
- 480Mbps—The USB 3.0 thumb drive is plugged into a USB 2.0 port on the PC, which has a maximum throughput of 480Mbps
- 1000Mbps—PC1's Ethernet connection establishes 1Gbps (1000Mbps) link to the router via Ethernet
- 300Mbps—The router connects to a second PC (we'll refer to this as PC2) via Wi-Fi, and it has established a 300Mbps link to the Wi-Fi adapter on PC2
- 480Mbps—The Wi-Fi adapter on PC2 is connected via a USB 2.0 port. The link rate of the USB connection to PC2 is at 480Mbps
- 6000Mbps—PC2 is going to store the file on an internal hard drive with a link rate of 6Gbps
- 1600Mbps—File Destination: SATA hard drive capable of 200MB/s (1600Mbps) read/write.
Following this chain, we see that 300Mbps is the slowest link rate established. This means that, regardless of the link rates established elsewhere, the absolute maximum the data can possibly be transferred is 300Mbps.
if we were to change the Wi-Fi connection to a wired Ethernet connection capable of 1Gbps, our performance bottleneck would then become the USB 2.0 connection to the USB drive where the file is stored.
Ports and Interfaces
Interfaces
A network interface represents connections, whether wired or wireless, that are made to form a network between devices.
Ports
Some may refer to physical hardware connections as "ports". For the purposes of networking, ports are logical constructs that can also be referred to as "network ports". Each network interface has 65,535 of these logical ports. Each port on a network interface is a separate data connection.
Benchmarking Network Adapter Performance
To properly benchmark network adapter performance, we need to:
- Use a simple LAN configuration
- Eliminate bottlenecks, especially link rate bottlenecks
Websites like speedtest.net, fast.com, and other performance tools in your web browser are going to use your WAN connection, and are not appropriate for determining if a network adapter is working well.
Transferring files from one computer to another on your LAN is typically not the best way to benchmark a network adapter. File transfers are bottlenecked by a number of things, including performance limitations of the disk the data is on, and often times a lack of establishing parallel network connections to perform the task.
One of the most accurate ways to benchmark network performance on a LAN is by using iPerf . To more effectively benchmark network adapter performance, it is best to establish a point-to-point connection between two PCs, rather than connecting through a router or switch.
Configuring iPerf
To test a connection using iPerf, you'll need at least two network interfaces, and preferably two computers. You'll also need to know the IP (Internet Protocol) address assigned to each network interface . One network interface will function as an iPerf server, and the other network interface will function as an iPerf client. Lastly, you'll need to download the version of iPerf 3.x that's appropriate for your computer's operating system and extract/install it .
Windows
- Make sure the drivers for both network interfaces involved in the test are using up-to-date drivers. Drivers for Plugable products can be found here.
- Download and extract iPerf for Windows
- Open Command Prompt
- Press Windows Key + R or + R, then enter
cmd
in the window that appears - Search the Start Menu for
Command Prompt
, and open it
- Press Windows Key + R or + R, then enter
- Navigate Command Prompt to the directory the directory where iPerf is located
- The
cd
command is for 'change directory'- If you have a folder named 'iperf' on your Windows desktop, you can reach it in command prompt with the command
cd %USERPROFILE%\Desktop\iperf
- If you have a folder named 'iperf' on your Windows desktop, you can reach it in command prompt with the command
- The
- Run iperf in server mode via Command Prompt
iperf3.exe -s
macOS
- Usually it is best to install iperf on macOS using brew in Terminal
- Make sure the drivers for both network interfaces involved in the test are using up-to-date drivers
- Open Terminal
- Run iPerf in server mode
iperf3 -s
Linux
- Usually it is best to install iperf using the package manager in your Linux distro. For example, in Ubuntu, use
apt
: sudo apt install iperf3
- Make sure the drivers for both network interfaces involved in the test are using up-to-date Drivers
- Open Terminal
- Run iPerf in server mode
iperf3 -s
Next, you'll need to run iPerf in client mode, targeting the IP address of the server/interface where iPerf is running in server mode. Additionally, we'll run the test for 30 seconds using -t 30
and with four parallel connections using -P 4
. Running 4 parallel connections is optimal for saturating a network link.
Windows
- Open Command Prompt
- Press Windows Key + R or + R, then enter
cmd
in the window that appears - Search the Start Menu for
Command Prompt
, and open it
- Press Windows Key + R or + R, then enter
- Navigate Command Prompt to the directory the directory where iPerf is located
- The
cd
command is for 'change directory'- If you have a folder named 'iperf' on your Windows desktop, you can reach it in command prompt with the command
cd %USERPROFILE%\Desktop\iperf
- If you have a folder named 'iperf' on your Windows desktop, you can reach it in command prompt with the command
- The
- Run iperf in client mode via Command Prompt (replace 192.168.0.200 with the IP address of the server/interface where iPerf is running in server mode)
iperf3.exe -c 192.168.0.200 -t 30 -P 4
macOS / Linux
- Open Terminal
- Run iPerf in client mode (replace 192.168.0.200 with the IP address of the server/interface where iPerf is running in server mode)
iperf3 -c 192.168.0.200 -t 30 -P 4
iPerf should start performing a network performance test. If the test fails to start, make sure that iPerf is not being blocked by your PC's/Mac's firewall.
Why iPerf is Ideal for Benchmarking
Unlike a file transfer, iPerf runs in memory on the PC and generates data to send using the CPU directly. This alleviates potential bottlenecks generated by storage devices, and allows you to explicitly control how many parallel connections are being used to transfer data rather than being unsure if parallel network connections are being used by other means.
Conclusion
There's a lot more to networking that isn't covered in this article, but we hope this helps explain enough to get an accurate measure of your network performance.
If you need assistance with your Plugable product that features network connectivity, please contact us for further assistance.
No Sound? How to Change Your Default Audio Device to Your Plugable Product
Whether you're on Windows, macOS, or Linux, it's common to add new audio devices to your computer.
Some examples of additional audio devices you may want to switch to include:
- Bluetooth headsets, headphones, and speakers
- Speakers built into a display, such as a TV or monitor
- A USB sound card, digital audio converter (DAC), or analog to digital converter (ADC)
- USB microphones
- Audio jacks on a docking station
These steps don't apply to the Plugable Performance NIX HDMI Capture Card (USBC-CAP60).
Here are the steps that you need to set a new default audio recording or output device on different operating systems.
Set Audio Output Device
Set Audio Recording Device
Set Default Playback Device in Windows
- Check that your device is properly connected, and that any necessary drivers are installed
- It is also a good idea to make sure that your sound device is turned on, and that the device's volume control is not at the absolute minimum setting
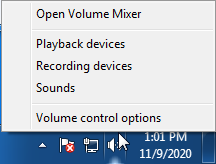
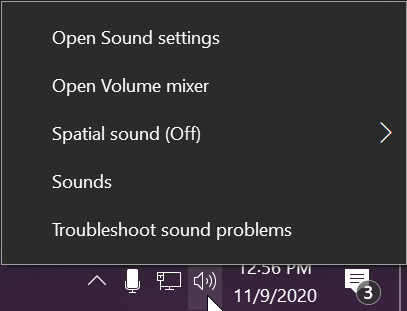
- Right-click on the speaker symbol in the Windows taskbar/system tray
-
Windows 7/8.x—Select Playback Devices. The Sound window will open with the Playback tab highlighted
-
Windows 10/11—Select Open Sound Settings then click the link under 'Related Settings' for Sound Control Panel, then click the Playback tab
- Alternatively, after selecting Open Sound Settings, use the dropdowns under the Output header
-
Windows 7/8.x—Select Playback Devices. The Sound window will open with the Playback tab highlighted
- Find your device in the window
- A Plugable USB 3.0 docking station or sound-enabled display adapter will appear as Plugable Audio
- A Plugable USB 3.0 Silicon Motion docking station or sound-enabled display adapter will appear as SMI USB Audio
- A Plugable USB 2.0 docking station will appear as USB Multimedia Audio Device
- A Plugable USB Audio adapter will appear as USB Audio Device
- Right-click on the device you found in step 3 and select Set as Default Device. A check mark should appear next to your device, and sound should now play through it
- Click OK to exit the window
Additional Configuration for Bluetooth
Please see our pairing and configuration guide for Bluetooth devices.
Set Default Playback Device in macOS
- Open System Preferences
- Click Sound
- Select Output
- Select the most appropriate device
- A Plugable USB Audio adapter will appear as USB Audio Device
Set Default Playback Device in Linux
- Ensure that you audio device is connected to the PC
- If the audio device is self-powered, it is a good idea to make sure that it is powered on, and that the device's volume control is not at the absolute minimum setting
- Launch the 'Settings' application in your distro
- Go to the 'Sound' option
- Find the dropdown for your 'Output Device', and change it to your preferred output device
- For additional sound device controls, you may want to consider using Pulseaudio Volume Controls (package name pavucontrol)
Set Default Recording Device in Windows
- Check that your device is properly connected, and that any necessary drivers are installed
- It is also a good idea to make sure that your sound device is turned on, and that the device's volume control is not at the absolute minimum setting
- Right-click on the speaker symbol in the Windows taskbar/system tray
-
Windows 7/8.x—Select Recording Devices. The Sound window will open with the Recording tab highlighted
-
Windows 10/11—Select Open Sound Settings then click the link under 'Related Settings' for Sound Control Panel, then click the Recording tab
- Alternatively, after selecting Open Sound Settings, use the dropdowns under the Input header
-
Windows 7/8.x—Select Recording Devices. The Sound window will open with the Recording tab highlighted
- Find your device in the window
- A Plugable USB 3.0 DisplayLink docking station or sound-enabled display adapter will appear as Plugable Audio
- A Plugable USB 2.0 docking station will appear as USB Multimedia Audio Device
- A Plugable USB Audio adapter will appear as USB Audio Device
- Right-click on the device you found in step 3 and select Set as Default Device. A check mark should appear next to your device, and sound should now play through it
- Click OK to exit the window
Additional Configuration for Bluetooth
Please see our pairing and configuration guide for Bluetooth devices.
Set Default Recording Device in macOS
- Open System Preferences
- Click Sound
- Select Input
- Select the most appropriate device
- A Plugable USB Audio adapter will appear as USB Audio Device
Set Default Recording Device in Linux
- Ensure that you audio device is connected to the PC
- If the audio device is self-powered, it is a good idea to make sure that it is powered on, and that the device's volume control is not at the absolute minimum setting
- Launch the 'Settings' application in your distro
- Go to the 'Sound' option
- Find the dropdown for your 'Input Device', and change it to your preferred input device
- For additional sound device controls, you may want to consider using Pulseaudio Volume Controls (package name pavucontrol)
My Docking Station/Adapter Works Well With My Windows Laptop, but When I Close the Lid the Displays and Laptop Turn Off or Sleep. How Do I Fix This?
Most Windows notebook computers power management settings will default to putting the computer to sleep with the lid closed, regardless of any external displays, keyboard, or mouse connected to the computer. If this is happening but you would prefer the system to remain active with the lid closed utilizing the external display or displays, these settings can be changed by performing the following:
For Windows 10:
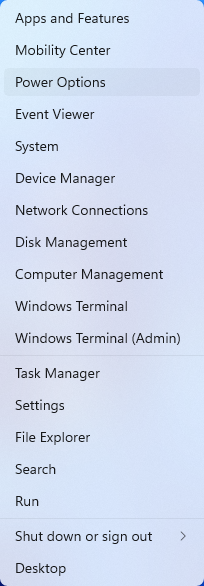
- Start by right-clicking on the Start button and select Power Options from the menu.
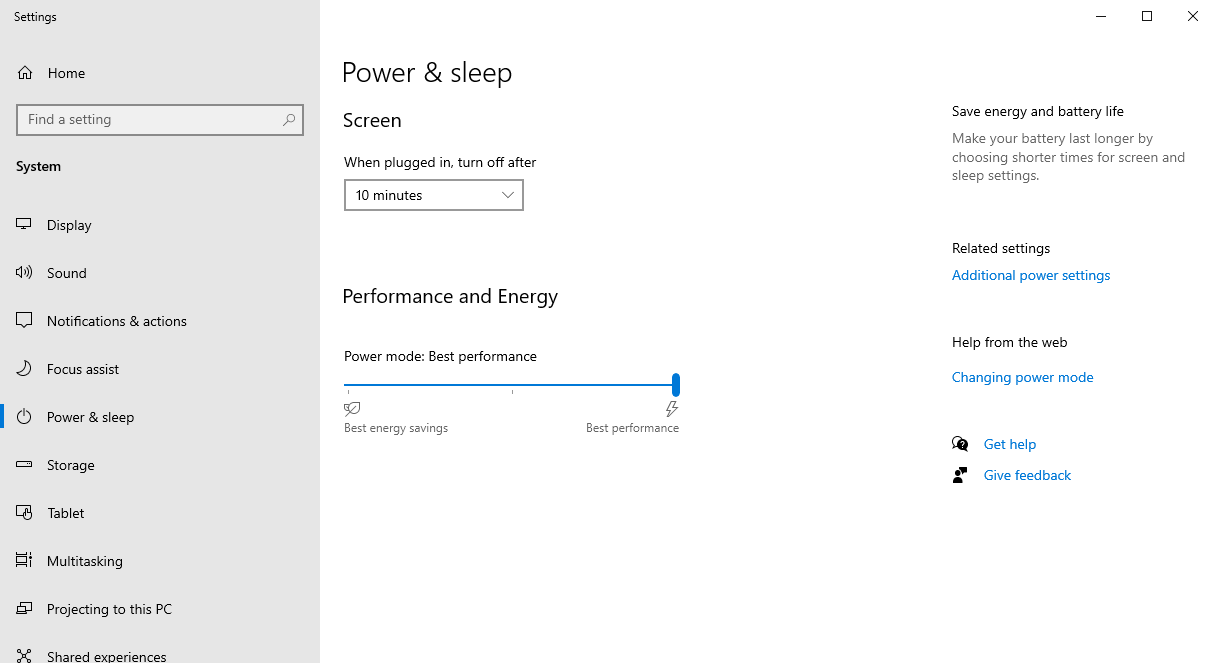
- From the right side of the Power Options settings page, select the blue link for Additional power settings
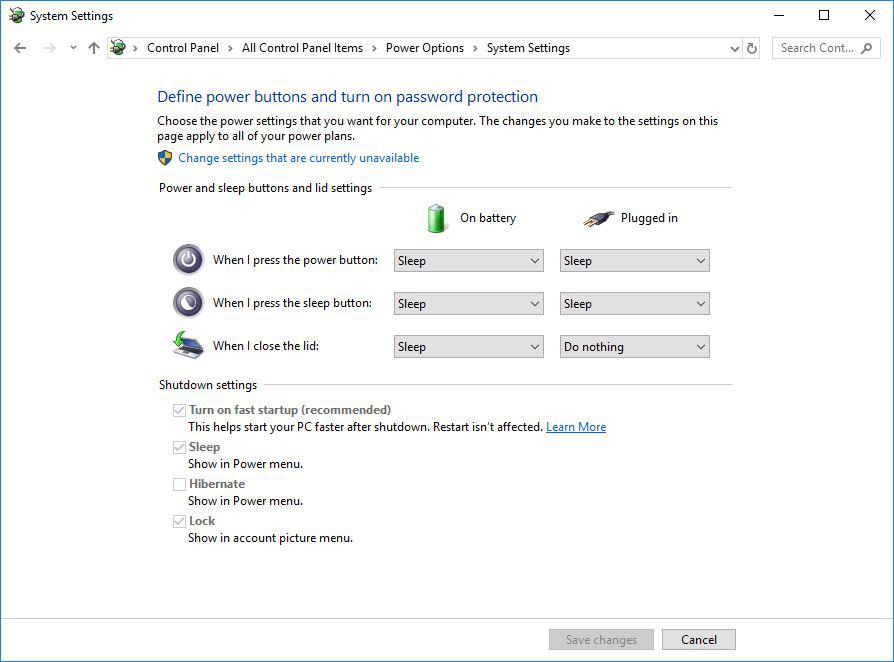
- From the choices present on the left-hand side of the Power Options window, please click on Choose what closing the lid does
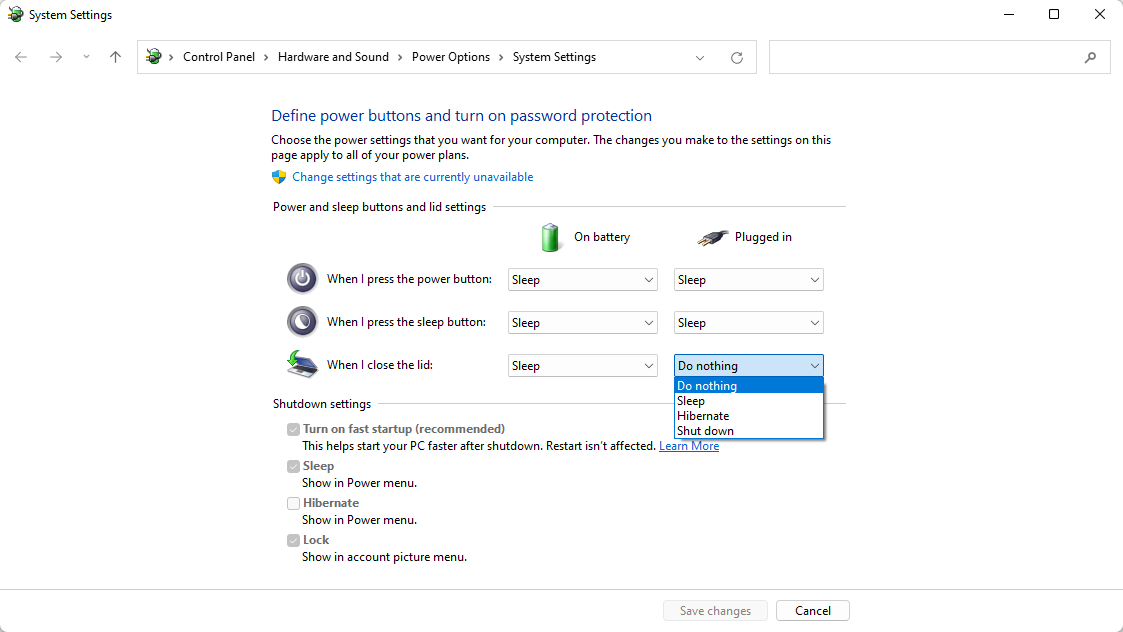
- Make sure the setting for When I close the lid under the Plugged In column is set to Do Nothing
- Click the Save Changes button and restart the system (making sure that the laptop’s power adapter is also connected) and test the behavior again.
For Windows 11:
- Start by right-clicking on the Start button and select Power Options from the menu.
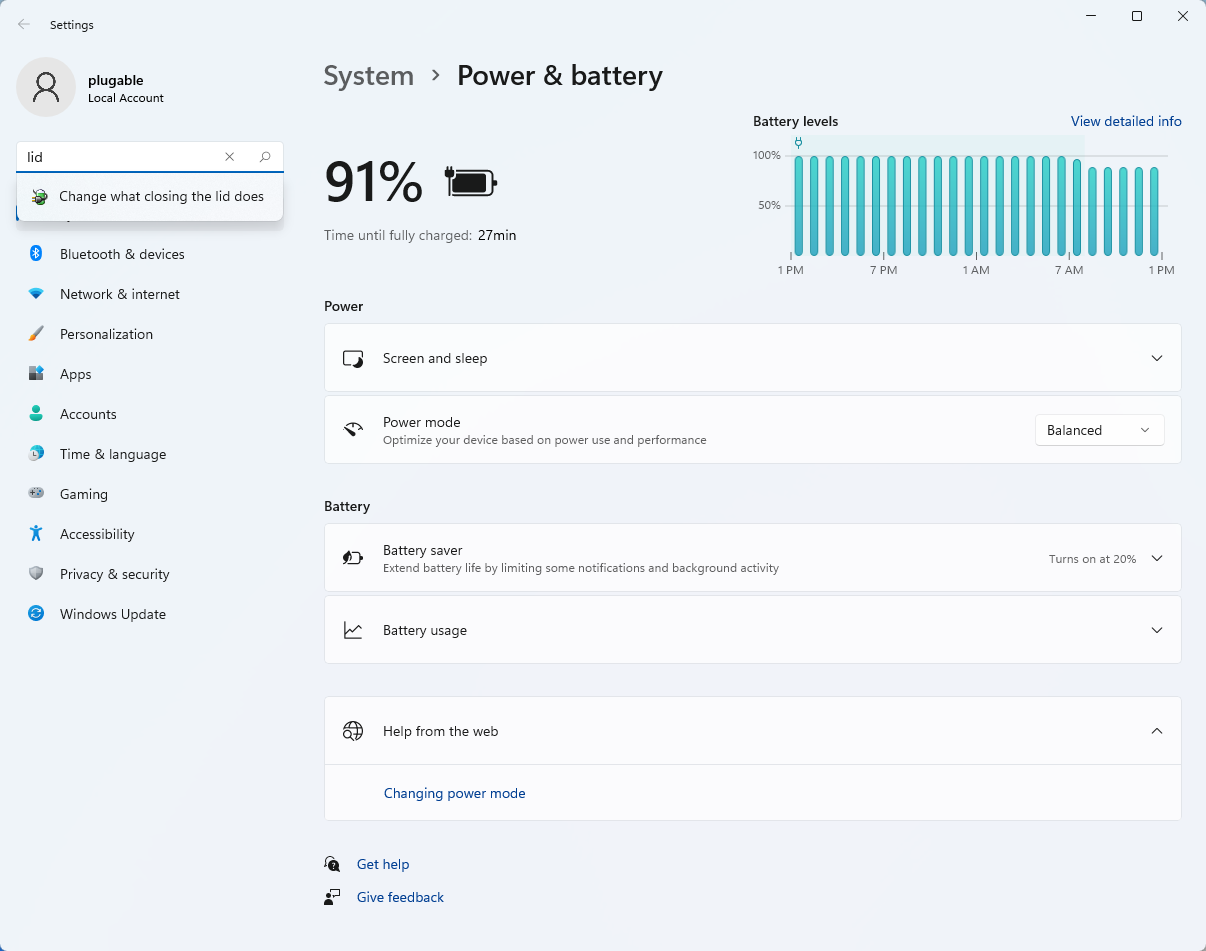
- In the upper left corner of the settings window, in the search box, type "lid" then select Change what closing the lid does from the search results
- Make sure the setting for When I close the lid under the Plugged In column is set to Do Nothing
- Click the Save Changes button to apply the new settings.
Closing the lid should no longer put the computer into sleep mode when an external display and power source is connected, instead one of the external displays should now become the Primary display with the desktop icons instead of the laptop's built-in display.
The lid may still need to be opened to perform the following tasks:
- To power on the computer from a fully powered off state
- To log into the computer if logged out or if the computer is restarted with the lid closed
- To wake the computer from a deep sleep state ( hibernation, or Windows hybrid sleep states )
Two USB 3.0 Ports on the Back of the Dock Are Not Working. Why?
When the TBT3-UDV is used with certain Windows 10 or Windows 11 systems, there is a possibility that two of the USB 3.0 ports located on the back of the dock (closest to the Ethernet port) may not be recognized properly by the operating system. This issue is not present when the TBT3-UDV if used with an Apple Mac system running macOS.
Should this occur, while the dock is connected to the host PC (this is important) please download and install an updated Asmedia USB 3.0 Host controller driver from here and reboot the system and test the behavior again.
If that does not resolve the issue, please reach out to us directly via support@plugable.com and we will be happy to help.
Does the TBT3-UDV Charge/Power My System?
Not all Thunderbolt 3 systems support charging via their Thunderbolt 3 port. But for systems that do support charging via Thunderbolt 3, yes, the dock can provide up to 60W of power to charge the host system.
In order for the system to charge, the system must be connected to the Thunderbolt 3 port on the back of the dock with the small ‘Computer’ icon above it. This port can provide up to 60W of power to charge the host system.
If your system is able to be charged via Thunderbolt 3 and is not charging, please ensure you have the system connected to the proper port within the dock.
How Much Power Is Provided via the Two Thunderbolt 3 Ports on the Back of the TBT3-UDV Dock?
The Thunderbolt 3 port labeled with the ‘Computer’ icon can provide up to 60W of power. The other Thunderbolt 3 port can provide up to 15W of power.
What Do the Two Lights on the Front of the TBT3-UDV Dock Indicate?
The solid green light indicates that the dock is receiving power from its power adapter. The solid blue light indicates an active connection to a Thunderbolt 3 host.
Do Any of the TBT3-UDV’s USB 3.0 Ports Offer Any Special Charging Capabilities? Can Any of the USB Ports Provide Power to Charge Devices When the Dock Is Not Connected to a Host Laptop?
Only the single front-mounted USB 3.0 port of the TBT3-UDV dock supports BC 1.2 charging.
For example, a mobile phone that supports BC 1.2 charging will charge when connected to the front USB 3.0 port of the dock, even if the dock is not connected to a laptop.
The remaining four USB 3.0 ports on the back of the dock will only provide standard USB power to USB devices (up to 900mA) when the dock is connected to a host laptop. They do not provide any special charging capabilities, and they will not provide power if the dock is not connected to a host laptop.
Is the TBT3-UDV Supported Within Operating Systems Running in a Boot Camp Environment?
The TBT3-UDV is not supported within the Apple Boot Camp environment.
When I Connect the TBT3-UDV Dock to My Apple Mac System, I Receive a Warning That States, “Cannot Use Thunderbolt Accessory: Connect Accessory to a Thunderbolt Port on This Mac.” How Do I Fix This?
This typically occurs because the cable being used to connect the dock to the system is not a Thunderbolt 3 cable, but rather a USB-C cable (the white cable included with MacBook Pro laptops for charging is a USB-C cable, not Thunderbolt 3).
Please use only the Thunderbolt 3 cable we include in the box with the dock to connect it to your system. For additional information about this issue, please see this demonstration video -> https://youtu.be/YJKKOjFc6zE
The Ethernet Port in the TBT3-UDV Dock Is Not Working When Connected to a Mac. In the ‘System Report’ Application (Apple Menu, About This Mac, System Report) and There Is No Ethernet Device Listed Under ‘Ethernet Cards’. How Do I Fix This?
Typically this is caused by the system not correctly detecting the Ethernet device within the dock. In most cases, completely resetting the dock and ‘cold booting’ the system by following this procedure can help:
- Disconnect the dock’s Thunderbolt 3 cable from both the dock and the system, and disconnect the dock’s power cable so it turns off completely.
- Shutdown the Mac system completely (do NOT just restart).
- Power on the Mac system and login.
- Reconnect the power cable to the dock, and then reconnect the Thunderbolt 3 cable to both the dock and the system.
- Test the previously non-working Ethernet port.
The Ethernet Port in the TBT3-UDV Dock Is Not Working When Connected to a Mac. In the ‘System Report’ Application There Is an Ethernet Device Listed Under ‘Ethernet Cards’, but It Is Still Not Working. How Do I Fix This?
The symptoms described above most often indicate that the Ethernet port device is being detected, however macOS is not automatically creating a new network service for the device. In most cases manually adding the service by following this procedure can help:
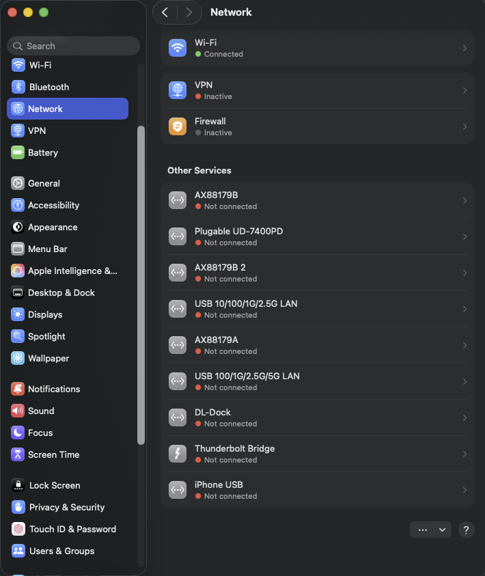
- Click on ‘System Preferences’ (gear icon in the macOS 'Dock').
- Click on the ‘Network’ Application (globe icon).
- In the bottom left-hand corner of the ‘Network’ application, click on the “+” (plus) sign to add a new service.
- Click on the ‘Interface’ drop down and select ‘Thunderbolt Ethernet Slot 1’.
- Leave the ‘Service Name’ populated with the default name and then click the ‘Create’ button.
- Click the ‘Apply’ button in the lower right-hand corner of the application to apply the changes.
- Wait a few moments to see if the Ethernet adapter in the dock starts working.
I Have Been Using the Dock for a While on My Windows System and Everything Was Working Properly. Spontaneously, the USB Ports, Audio Port or Ethernet Port in the Dock Stopped Working but My Video Outputs Still Work. Why Is This?
In most cases, this type of behavior is caused by the dock to not being properly Authenticated/Approved as a Thunderbolt 3 device (Apple systems do this automatically, and as such do not apply here).
If not approved, the USB ports, Ethernet port and audio port within the dock will not work (video outputs always work regardless of Approval status). In most cases, this is caused by the Intel Thunderbolt software that handles the authentication process not working properly.
Should this occur, the best practice is to remove and reinstall the Intel Thunderbolt software to ensure it is in a good state and reset the dock, the procedure for doing so is below:
- Disconnect the Plugable Thunderbolt 3 dock from the system and remove its power cable so it turns off completely. Please keep it disconnected until prompted.
- Uninstall the Intel ‘Thunderbolt Software’ present on your system via the Control Panel -> Programs and Features.
- Restart the system, even if not prompted.
- Download and install the latest version of the Intel Thunderbolt Software published by your system manufacturer.
- Restart the system once again, even if not prompted.
- Reconnect the power cable to the Plugable Thunderbolt 3 dock, and then reconnect the Thunderbolt 3 cable from the dock to your system.
- You should be prompted to authenticate/approve the dock by the Intel Thunderbolt Software. Please approve the device using the ‘Always Connect’ option. * There is a chance the approval prompt will not pop-up automatically. If that is the case please just proceed with the next step for now. *
- Please test any non-functioning ports in the dock again.
In rarer cases, this can be caused by an incorrect setting within the Thunderbolt options within the system’s BIOS. System manufacturers typically enable ‘User Authorization’ or ‘No security’ Thunderbolt options in the BIOS by default. As their names imply, the respective options indicate that a Thunderbolt device must be authorized in order to work, or no authorization is needed. If other options such as ‘DisplayPort Only’ (Dell terminology) or ‘DisplayPort and USB only’ (Lenovo terminology) are selected, no Thunderbolt 3 devices will work. These options turn the port into a USB-C only port. Please ensure that the BIOS options are set as intended using your system manual as a guide.
Do I Need to Install Any Drivers to Use the TBT3-UDV Docking Station?
With macOS, Windows 11, and Windows 10 the operating system will download and install the necessary drivers when the dock is connected.
When using Windows 7 64-bit (32-bit systems are not supported), you will need to install a separate Intel Network Adapter driver and a driver for the Asmedia USB 3.0 Host Controller.
What Type of USB Host Controller Chipsets Are in the TBT3-UDV Dock, and How Are These Routed to the Dock’s Five USB Ports?
The TBT3-UDV dock includes both a Fresco FL1100EX USB 3.0 Host Controller and an Asmedia ASM1042A USB 3.0 Host Controller. In terms of routing, when the dock is in the vertical position the two USB 3.0 ports on the top of the back of the dock and the single USB port on the front of the dock are connected to the Fresco controller. The lower two USB 3.0 ports (closest to the dock's Ethernet port) are connected to the Asmedia controller.
What Type of Audio Chipset Is Built-In to the TBT3-UDV Dock, and What Are Its Specifications?
The TBT3-UDV has a CMedia CM6533 Audio chipset. For detailed specifications, please see the Cmedia website here
Does the TBT3-UDV Docking Station Pass Object-Based Multi-Channel Audio Formats Such As Dolby Atmos and DTS:X Through the Included DisplayPort to HDMI Adapter?
The Active DisplayPort to HDMI active adapter included in the box with the docking station is based on the Parade PS176 chip. This chip does not support bit-streaming/pass-through of Dolby or DTS. However, it does support up to 8 channel audio via LPCM output.
I Have My Headphones/Speakers Connected to the Analog Audio Output on the Front of the TBT3-UDV Dock, but I Do Not Hear Any Sound. Why Is This?
Please check to ensure that the default audio playback device within your operating system is set to ‘Plugable TBT3-UDV Dock Audio’
Please see this knowledge base article for detailed instructions --> Link
I Connected a Standard Analog Microphone (One Without Headphones) to the Combination Audio Port on the Front of the TBT3-UDV Dock and It Is Not Working. Why Is This?
The TRRS combination audio input and output jack located on the front of the TBT3-UDV docking station is not compatible with a standard analog microphone.
Can the TBT3-UDV Dock Be Used in Conjunction With Kvm Switches?
Using the dock in combination with a physical KVM switch is not supported, as we have found that their performance varies widely and cannot be guaranteed.
Can I Connect a Second Display to the Second Thunderbolt 3 Port Within My Thunderbolt 3 Docking Station?
The ability to connect a second display to the Thunderbolt 3 docking station's second (also known as 'downstream') Thunderbolt 3 port is ultimately determined by the design internal decisions made by the host system's manufacturer.
To expand further, system manufacturers have discretion when designing their Thunderbolt 3 systems in regard to how may displays are supported via a single Thunderbolt 3 connection to the host. Some manufacturer's support two displays via a single Thunderbolt 3 connection, while others may only support one display via a single Thunderbolt 3 connection. We have produced a video that provides for more information on this topic for those who are curious here --> Link
Unfortunately, system manufacturer's specifications often do not include this level of detail. The best practice is to check directly with your system manufacturer to determine the host system's capabilities.
Which Plugable USB-C Alt Mode Adapters or DisplayPort Adapters Are Compatible With the TBT3-UDV Dock?
To convert the dock’s built-in DisplayPort output to HDMI: Please use the included Active DisplayPort to HDMI adapter (maximum resolution of 4K@60Hz refresh).
To convert the DisplayPort output to DVI or VGA, please purchase separately an Active DisplayPort to DVI or VGA adapter. The adapter MUST be of the 'active' type, 'passive' adapters will not work.
For systems which support a second display output through the docking station via its second (also known as 'downstream') Thunderbolt 3 port, please make a separate purchase of one of the following:
USB-C to DisplayPort (6′ cable): Plugable USBC-DP Alt Mode Adapter Cable
USB-C to HDMI (6′ cable): Plugable USBC-HDMI-CABLE Alt Mode Adapter Cable
USB-C to VGA (6′ cable): Plugable USBC-VGA-CABLE Alt Mode Adapter Cable
or
USB-C to HDMI (dongle): Plugable USBC-HDMI Adapter Dongle
USB-C to DVI (dongle): Plugable USBC-DVI Alt Mode Adapter Dongle
USB-C to VGA (dongle): Plugable USBC-VGA Alt Mode Adapter Dongle
My Windows Laptop Will Not Boot Properly When My Docking Station Is Connected
If your Windows laptop will not boot properly when a docking station is connected to the laptop, most often the cause is an external device connected to the docking station (for example an external USB storage drive) as opposed to the dock itself.
If you are affected by this condition, please follow these steps in order to isolate the behavior further:
- Disconnect all USB devices from the docking station and put them aside for the moment.
- Disconnect any displays connected to the dock's video outputs.
- Disconnect any audio devices connected to the dock's audio ports (if present).
- Disconnect the Ethernet network cable from the dock's Ethernet port (if present).
- The only remaining connections should be the dock's power adapter cable and the USB cable used to connect it to the laptop. No other external devices should be connected to the dock.
- While in this state, reboot the laptop to test the behavior.
- Assuming the laptop boots as expected, please reconnect each device back to the dock one at a time and reboot after each one to test the behavior again. Please reconnect the displays first, then the audio devices, then the Ethernet cable. Please reconnect any USB devices to the dock last, again rebooting after each one is added to test the behavior.
In our experience helping others, the most common cause of this behavior is an external USB storage drive connected to one of the dock's USB ports. In some cases, a laptop may try to boot from an external storage drive by mistake as opposed to the laptop's built-in storage drive. Since most external USB storage drives are not 'bootable', this can interrupt the boot process.
If this behavior occurs, the most common way to mitigate the behavior is to access the laptop's System BIOS (also known as UEFI firmware) to change the 'boot order' settings to ensure that the laptop's internal storage drive is the first boot option. Doing so helps ensure that the laptop will not try to boot from an external USB storage device.
Every laptop system is different, so the best resource for accessing the System BIOS and changing the settings is the manual for the laptop provided by the laptop manufacturer.
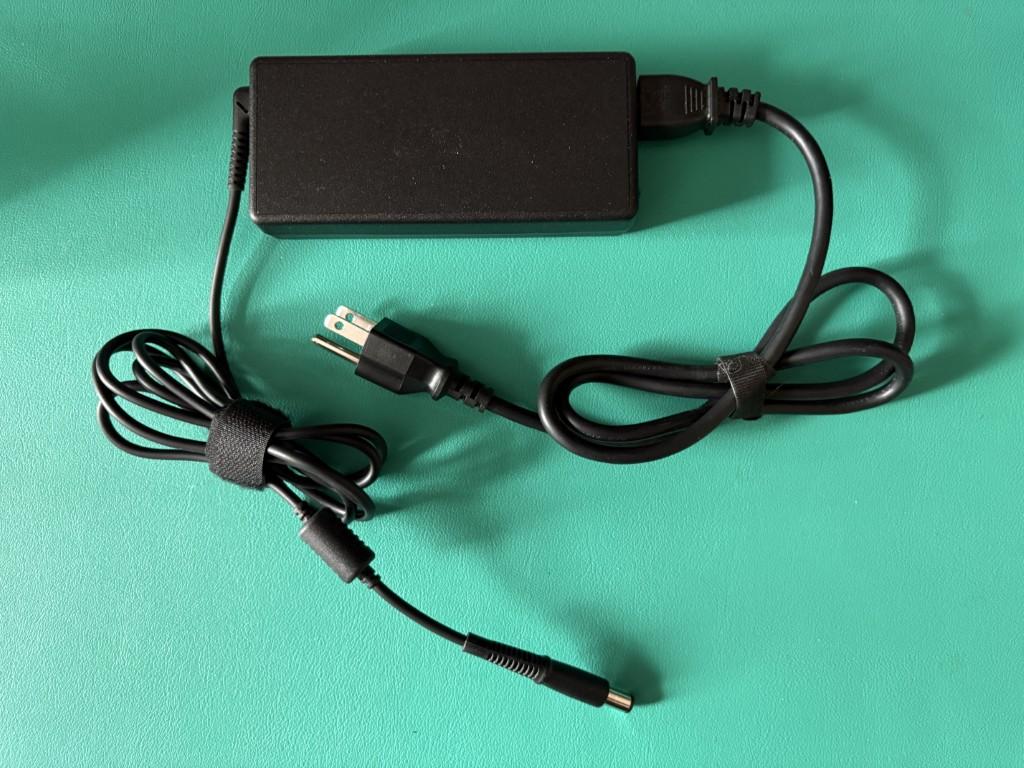
How Do I Obtain a Replacement Power Adapter for My TBT3-UDV Docking Station?
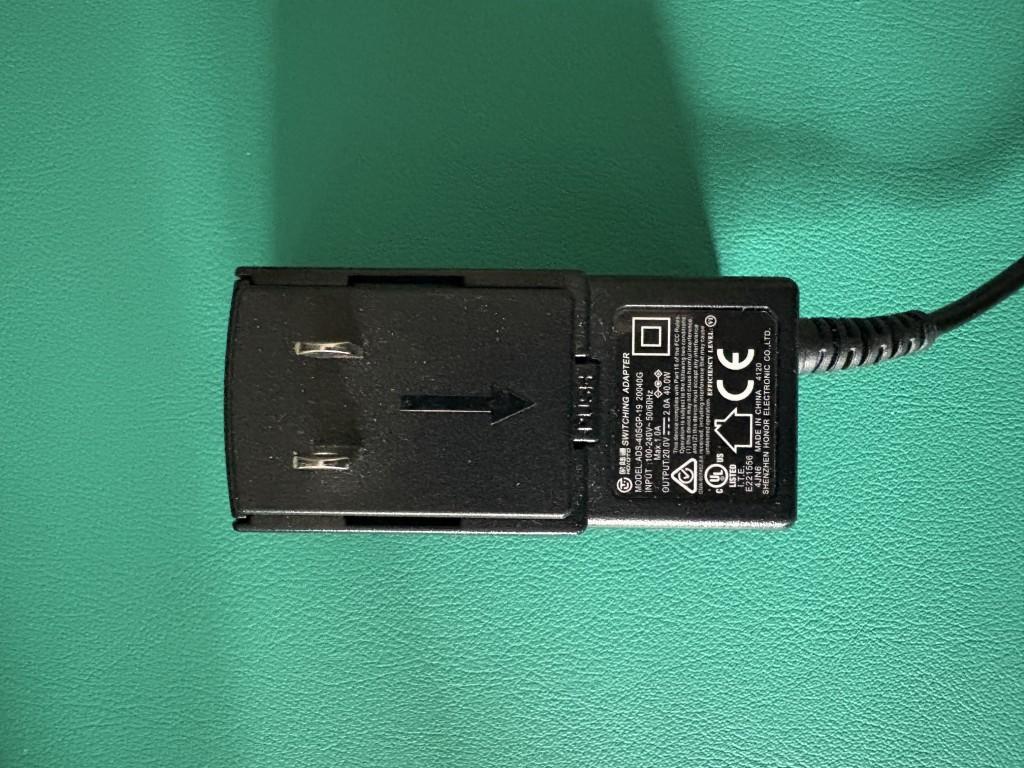
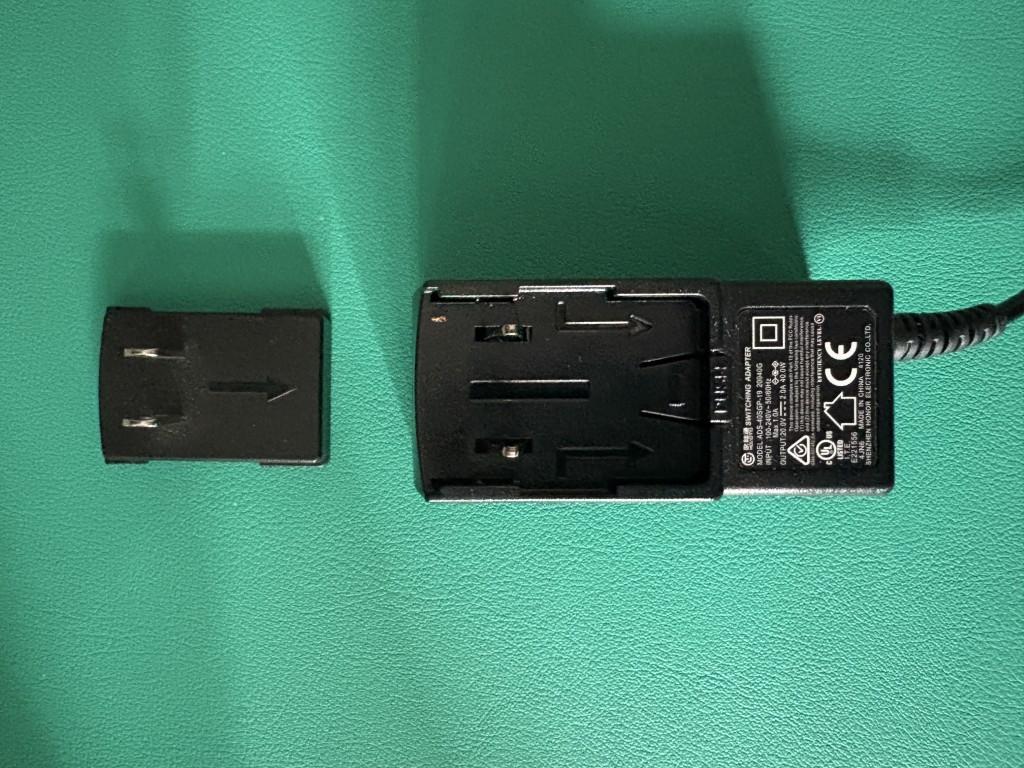
Replacement U.S. style power adapters for the Plugable TBT3-UDV docking station are available to purchase via our official Plugable eBay storefront
A direct link to the TBT3-UDV power adapter product listing is https://www.ebay.com/itm/255242945051
Replacement Docking Station Power Adapters
Below is a list of pre-tested power adapters and corresponding power prongs/cables for Plugable docking stations that can be purchased on eBay if a replacement is needed.
If the power adapter for your docking station or region is not listed or if it out of stock on eBay please contact us at support@plugable.com and we will be happy to assist further.
We offer a 30-day return period for our replacement power adapters listed on eBay.
Dock Models | Power Supplies |
---|---|
USB Products | |
UD-3900 UD-3000 UD-5900 UD-PRO8 |
|
UD-3900H | |
UD-3900PDZ | |
UD-3900Z | |
UD-6950 | |
UD-6950H | |
UD-6950Z | |
UD-CA1 UD-CA1A |
|
UD-ULTCDL (MK1 original and MK2 updated version) |
|
UD-ULTC4K (MK1 original and MK2 updated version) | |
USB4-HUB3A | |
Thunderbolt Products | |
TBT4-UDZ |
North America plug |
TBT3-UDC1 | |
TBT3-UDV | |
TBT3-UDZ | |
TBT3-UDC3 | |
TBT4-HUB3C |
My Plugable Dock Is Missing a Component Such As the Power Supply, USB Cable, or Other Adapter.
If your package is missing one or more of the items that should be included with your Plugable dock (included items are listed on a chart on the side of the box), start by double checking if the part is still in the packaging. Pieces can occasionally get stuck in the corners under the main insert in the box.
If you are still unable to locate the piece, please contact support@plugable.com with the following information:
1. Amazon Order ID (or other proof of purchase) associated with your Plugable device.
2. A description of the parts that are missing from your order.
3. Your preferred shipping address (and a phone number associated with that address).
4. The serial number of your Plugable Dock.
Can I Connect My High Refresh Rate Monitor (e.g. 120Hz, 144Hz) to a Plugable Dock?
Most Plugable docks do not officially support monitors over 60Hz including 120Hz or 144Hz refresh rate unless otherwise specified on the Plugable product page or listing.
DisplayLink USB Graphics technology and Silicon Motion based docking stations and graphics adapters, like our USB 3.0 dual display and USB Type-C triple display docking stations, are limited to 60Hz fresh rate by the USB graphics controller hardware.
USB Type-C DisplayPort Alternate Mode docking station and ports on our USB Type-C Triple Display Docking Stations can support higher refresh rates, but may be limited by the computer's capability and available bandwidth to the docking station. Additionally, when paired with DisplayLink or Silicon Motion USB graphics, having displays at different refresh rates may reduce overall system performance. Due to this we normally recommend limiting all connected displays to 60Hz refresh rate when using DisplayLink and Silicon Motion graphics technology with directly connected, or USB Type-C DisplayPort Alternate Mode controlled displays.
Monitors with refresh rates higher then 60Hz may be connected to a docking station operating at up to 60Hz, or connected directly on the computer's HDMI or DisplayPort to ensure the display is powered by the system's native GPU.
Do Plugable products support the Apple SuperDrive?
Unfortunately Plugable products do not support the Apple SuperDrive.
The Apple SuperDrive has stringent power requirements that can only be met by directly connecting the SuperDrive to your host laptop. As a result at this time Apple recommends only using their USB-C adapter cables. You can find more information on that here -→ How to connect the Apple USB SuperDrive
If you have purchased a Plugable product to use with your Apple SuperDrive, and would like some additional assistance please do not hesitate to reach out. You can do so by emailing support@plugable.com, or going to Plugable.com/Support.
My Plugable product with wired Ethernet is no longer working on macOS. What can I do?
Please Note
The below guide is an advanced troubleshooting step, and we do not recommend doing so unless you are comfortable manually altering files on your Apple product running macOS. You may not be able to perform the below troubleshooting step if you are unable to execute administrative credentials on your laptop. Please reach out to our support first if you do not wish to attempt the below instructions. You can do so at Plugable.com/Support
How to delete a specific Ethernet adapter from your Network devices on macOS
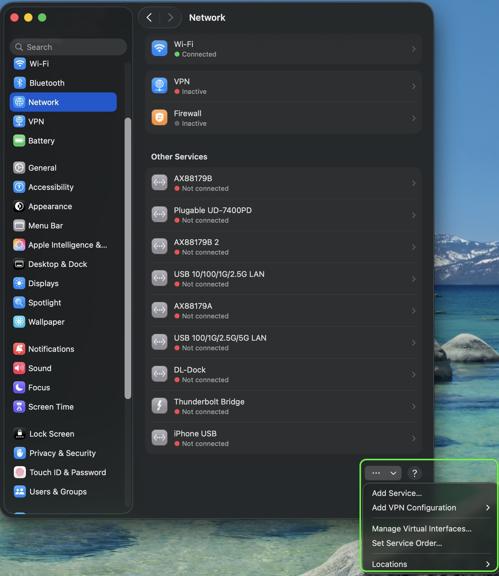
- Click on the Apple logo in the top left corner of your primary monitor, and select ‘System Preferences’
- Next select ‘Network’ in the ‘System Preferences' window.
- In the now visible list, please select the Plugable Ethernet, or Thunderbolt Ethernet device that may not be working as expected.
- Once selected click on the minus button in the bottom left of the network window.
- Click on Apply in the bottom right.
- Next click on the plus button in the bottom left of the network window, and add the previously removed device.
- Click on Apply in the bottom right.
- Test to see if this has resolved the unexpected behavior, and assure that your Ethernet is now working.
- If this does not resolve the problem, please proceed to the next section (As noted previously the next section is for advanced users only!)
Manually erase your macOS Network Settings to fully reset the Network configuration
(Advanced! Click to reveal)
Warning!
This will fully erase all of your Network configuration! Do not skip any steps, and proceed only if you are comfortable with each step!
- Open the ‘Finder’ app, then in the ‘Go’ menu at the top of your screen select ‘Computer’
- Click on ‘Macintosh HD’ then Library, Preferences, SystemConfiguration
- Copy the file named ‘NetworkInterfaces.plist’ to your desktop as a backup of your current configuration.
- Delete the original version of the ‘NetworkInterfaces.plist’ located in the SystemConfiguration directory.
- Restart your Mac
- Login to your Mac, and return to System Preferences → Network
- If the list is now empty, please re-add the Plugable or Thunderbolt network adapter by clicking on the plus button in the bottom left of the Network window. Once done click on 'Apply'.
- Test to see if this has resolved the unexpected network behavior
I am still unable to get my Ethernet connection working on my Mac
If this is the case please reach out to our support team. When you do please include a diagnostic log gathered using our PlugDebug tool (instructions are provided on the PlugDebug page). If you are not able to gather the PlugDebug diagnostics do not worry we are still here to help! Please reach out to our support team at support@plugable.com or Plugable.com/Support with a detailed description of your problem, and the model of Plugable product you are using.
Fixing "This Thunderbolt Application Is Not in Use Anymore and Can Be Safely Uninstalled" Error Message
Synopsis – If your Thunderbolt 3 driver or utility version types are mismatched within a Windows host system, you may receive an error message stating, “Application Cannot run – This Thunderbolt application is not in use anymore and can be safely uninstalled” when attempting to run the Intel Thunderbolt Software management utility or the Intel Thunderbolt Control Center utility. This prevents proper management of Thunderbolt devices on the host system. (This problem does not occur on Apple Mac systems.)
Before proceeding with this or any other procedure that makes changes to your system, please ensure you have a full system backup of any and all important data and create a fresh System Restore Point as a precaution. Plugable will not be able to help restore any data or return a system to a working state should things not work as expected. If you do not wish to take this risk, please do not follow this procedure
You will have to be logged on to the system as a User with ‘Administrator’ permissions in order to perform these steps
1. Disconnect any Thunderbolt 3 devices from the host system (this is done to prevent Windows Update from automatically loading any Thunderbolt drivers).
2. Right-click on the Windows Start button and select ‘Device Manager’.
3. Click on ‘View’ from the application menu bar, and click the option ‘Show hidden devices’ (this is necessary because the Thunderbolt controller will not be active if no Thunderbolt devices are connected).
4. Expand the ‘System Devices’ category. Scroll down until you find the entry for the ‘Thunderbolt Controller’.
5. Right-click on the ‘Thunderbolt Controller’ entry and select ‘Uninstall device’ from the context menu that appears.
6. From the ‘Uninstall Device’ window that appears, click to place a check mark within the ‘Delete the driver software for this device’ option.
7. Click the ‘Uninstall’ button.
8. Close Device Manager.
9. Click the search button on the taskbar (looks like a ‘O’) and search for the letters ‘cmd’.
10. Right-click on the ‘Command Prompt’ search result and select ‘Run as Administrator’ from the context menu. If prompted, enter your Administrator password.
11. From the Administrative Command Prompt window, enter ‘sc delete nhi’ (without the quotes) and press enter. You should receive a ‘SUCCESS’ indicator. ** Be very careful to type this command correctly **
This command deletes the ‘nhi’ Windows service presently installed on the system.
Thunderbolt 3 Support and Troubleshooting on Windows PCs
Overview and Drivers
In general, Plugable Thunderbolt 3 Docking Stations and Thunderbolt 3 Dual Display Adapters do not require the installation of any drivers when used with macOS or Windows. When connecting a Thunderbolt 3 device, the host operating system should install all the necessary drivers automatically.
However, there are certain instances with Windows systems where additional driver installation may be necessary when using our Thunderbolt 3 docking stations (these are NOT required on macOS systems):
TBT3-UDV Docking Station:
- Windows 10 – In general, no driver installations are required when using Windows 10. After initial connection if all functions of the dock are working as expected, then no additional action is required. However, when the TBT3-UDV is used with certain eighth generation Intel processor-based Windows 10 systems an updated USB 3.0 driver may need to be installed to ensure the best performance of USB peripherals attached to the TBT3-UDV. We recommend installing the updated Asmedia USB 3.0 drivers here. For additional details, please see our TBT3-UDV product page.
- Windows 7 – When using Windows 7 64-bit (32-bit systems are not supported), you will need to install a separate Intel Network Adapter driver and a driver for the Asmedia USB 3.0 Host Controller.
TBT3-UD1-83 / TBT3-UD1-85 Docking Stations:
- Windows 7 – When using Windows 7 64-bit (32-bit systems are not supported), you will need to install a separate Fresco USB 3.0 Host Controller driver and an Intel Network Adapter driver.
General Thunderbolt 3 Information
Before purchasing or using a new Thunderbolt™ 3 docking station or video adapter for use with your personal computer running Windows, you will want to make sure that your computer can support it and be aware of differences from basic USB devices:
Note: The following does not apply to Apple Thunderbolt 3 systems.
- Many early Thunderbolt 3 PCs require firmware and software updates before all adapters and docks will work.
- Dual display support is optional for Thunderbolt 3 PCs. How many displays are supported over Thunderbolt 3 depends on how the USB-C port has been wired on the system motherboard (up to a max of two), and is not changeable in software or by the Thunderbolt 3 graphics device.
- Support for PC charging (USB Power Delivery) on Thunderbolt 3 systems is optional. Many Thunderbolt 3-enabled PCs do not accept a charge over USB-C, and some PCs only will charge with their own branded power adapters.
- Unlike USB devices, Thunderbolt 3 devices must be manually authenticated (approved) for use by the user before the system will recognize them.
Additional detail
- Host computers equipped with Thunderbolt 3 have the ability to install various updates including NVM (Thunderbolt 3 related Non-volatile memory) and PD (Power Delivery) firmware, UEFI BIOS, supplemental Thunderbolt 3 software utilities (for authentication) and various drivers to resolve potential issues and increase compatibility with new Thunderbolt 3 products as they are released.
- System manufacturers have substantial discretion in how they implement various technical elements and features. As a result, compatibility information is complex. As a result many currently available Thunderbolt 3 systems are not fully compatible with our Thunderbolt 3 dual graphics adapters (we do our best to maintain compatibility tables of the individual product pages). Some systems may only be equipped with a single DisplayPort (DP) Alternate Mode (Alt Mode) line to the Thunderbolt 3 port which limits the port to a single display output. Due to this limitation some systems won’t be able to take advantage of our dual port Thunderbolt 3 graphics adapters regardless of firmware/software updates. This is a physical hardware limitation.
- Many system manufacturers ship systems with older firmware and may or may not have updated versions available for download at this time. The latest Thunderbolt 3 firmware for a specific system cannot be downloaded from Intel directly, as it first it has to be customized by the original system manufacturer. Intel has a Thunderbolt updates page with some update information, but as of this writing the list if fairly small. Currently our TBT3-HDMI2X-83 and TBT3-DP2X-83 adapters require the host system to have a Thunderbolt 3 firmware update with NVM version 14 or higher in order to work properly. The latest UEFI BIOS update from your system manufacturer must be installed before updating the NVM firmware.
Operating System Compatibility
Thunderbolt 3 technology is supported by any operating system which has driver support for Thunderbolt 3. Currently, Plugable supports Windows 10, 8.1, and 7 (64-bit only) and macOS 10.13 or later. Although support for Thunderbolt 3 devices under Linux is steadily evolving, Plugable does not support Thunderbolt 3 devices within a Linux environment at this time.
Authenticating a Newly Attached Device
Click here for this process.
General Thunderbolt 3 FAQ
Q: Can a Thunderbolt 3 dock or adapter work in any system with any USB-C (USB Type C) port?
A: It depends.
- Early Thunderbolt 3 docks and adapters will only work with Thunderbolt 3 USB-C computers and ports and connecting to a USB-C port without Thunderbolt 3 capability will not work. Note that computers and docks may have a mix of Thunderbolt 3 and other USB-C ports that look very similar. Look for the Thunderbolt icon on both sides of the connection to ensure compatibility:
- Current Titan Ridge based docking stations like our TBT3-UDC1 and TBT3-UDZ are backwards compatible with USB-C systems in most cases (with limitations).
Q: How can I identify the NVM version on my system?
A: See “Identifying the NVM” section below.
Q: What if a newer compatible NVM is not available from my system manufacturer?
A: Unfortunately the only option is to contact your system manufacturer and ask when a newer version will be available, and to let them know that until it is, certain accessories you are looking to use will not work.
Q: How can I identify if my system has the necessary two DisplayPort lines to provide dual display output through the Thunderbolt 3 port?
A: Unfortunately in many cases this information is very hard to discern based on the manufacturers published specifications. If your system is not among those listed in our compatibility table above, please contact your system manufacturer for confirmation of how many DisplayPort lines are routed to your Thunderbolt 3 port.
Q: I connected my Thunderbolt 3 dual display adapter and my monitor configuration changed by itself.
A: This may occur and is considered normal. You can change the main display back to your desired screen through the “Display settings” control panel.
Q: I connected my Thunderbolt 3 dual display adapter and am only getting a single output.
A: Depending on what Thunderbolt 3 equipped system you have, it may only support a single output because of the DP Alt Mode line configuration. See above “Known Host NVM Versions & DP Lines” to find out if your system has one or two lines.
Q: I connected my Thunderbolt 3 dual display adapter for the first time and my system crashed (hard lock).
A: Check to see if your system is running the latest Thunderbolt 3 software, NVM, UEFI BIOS, and all other updates from your system manufacturer. If everything is updated, unplug the adapter, reboot the system, and then reconnect.
Q: I connected my Thunderbolt 3 dual display adapter and am not getting any output to either display.
A: If your system has hybrid graphics (combination of built-in Intel GPU and AMD or NVIDIA discreet graphics) make sure the Intel GPU is set to be the primary GPU in the UEFI BIOS.
Support
If you have any questions feel free to contact our support team, we’re more than happy to help!
Thunderbolt and the Thunderbolt logo are trademarks of Intel Corporation in the U.S. and/or other countries.
Thunderbolt 3 Authentication
Windows systems need to have newly attached Thunderbolt 3 devices authenticated before they can be used. For most computers this process needs to be performed manually through the Legacy Thunderbolt utility installed on your computer. Newer Windows host systems (around November 2018 and newer) may be using an updated driver model, Declarative C
Below we will cover both methods of authentication as well as how to check NVM on older systems to see if an update is required. These processes may vary depending on how the host system Thunderbolt security level is configured in the UEFI BIOS, however, most systems will be set for user authorization or secure connect.
Thunderbolt 3 DCH and Legacy Driver:
Legacy Thunderbolt 3 Authentication (non DCH Thunderbolt 3 drivers & Thunderbolt Utility):
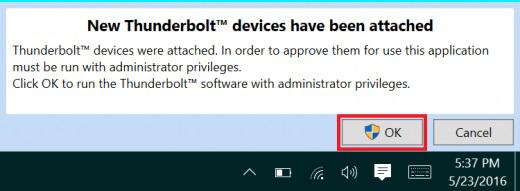
When first connecting a Thunderbolt 3 device to a Windows system, the device must first be authenticated through Intel’s Thunderbolt 3 software. After connecting a Thunderbolt 3 device the first thing that you should see (assuming that the system NVM, UEFI BIOS, drivers, etc are up to date and compatible) is an automatic notification above the system tray notifying you that a new device has been attached. You will want to click OK:
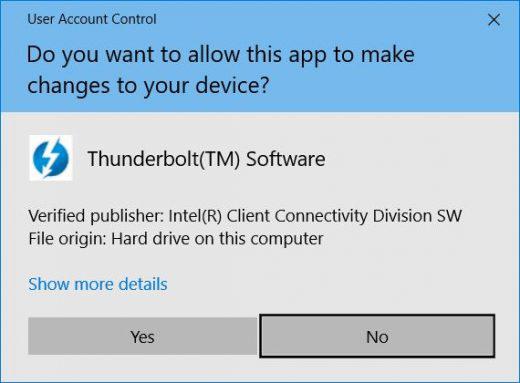
After clicking OK, you may get a Windows User Account Control (UAC) popup asking if you “want to allow this app to make changes to your PC?”. Click Yes:
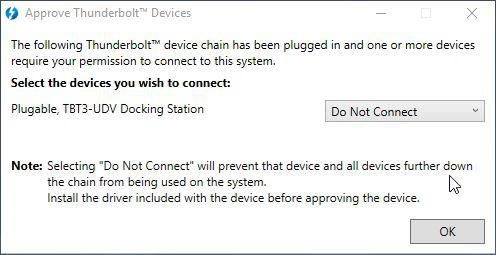
After clicking yes you should see an application window appear where you will approve the Thunderbolt 3 device that was just attached:
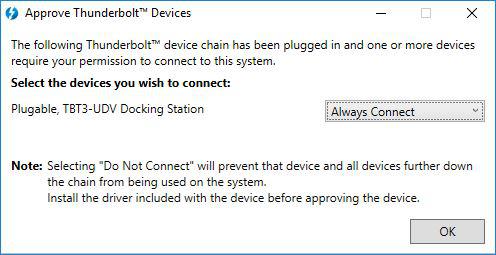
Click on the drop down menu where it says “Do Not Connect” and select “Always Connect”. Then click OK:
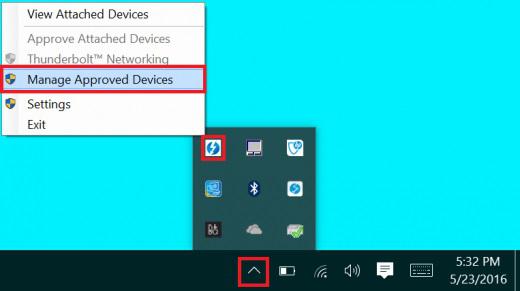
To view and manage the approved devices you can find the program sitting in the system tray. You may need to click the caret (up arrow icon) to show all of the running programs then right click on the Thunderbolt icon it and select Manage Approved Devices:
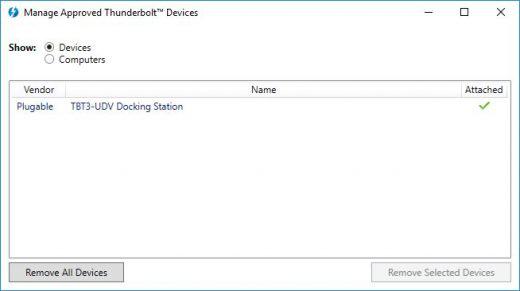
You may again get a Windows UAC prompt, click yes. After clicking yes the below window will open and you can see any approved devices and remove them if you choose.
Thunderbolt 3 Authentication (DCH Thunderbolt 3 drivers & Windows App Store Thunderbolt Utility):
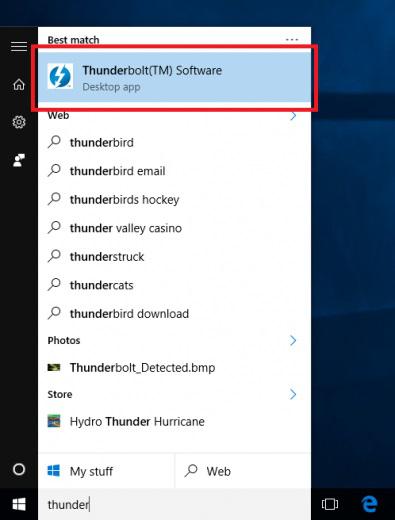
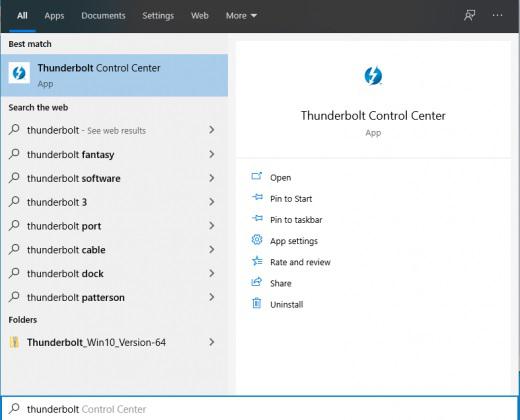
For systems running the DCH version of the Thunderbolt 3 drivers and the Windows Store Thunderbolt Control Center app, many newer hosts will automatically authenticate the attached device using secure connect. For systems where your attached Thunderbolt 3 device is not authenticated automatically via secure connect you can authenticate the device manually. Start by searching the start menu for Thunderbolt and selecting the Thunderbolt Control Center:
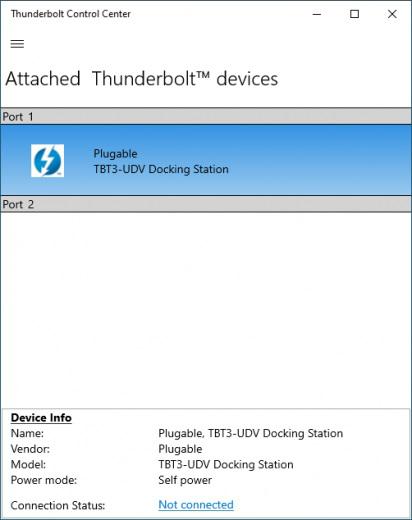
Here you should see your attached device:
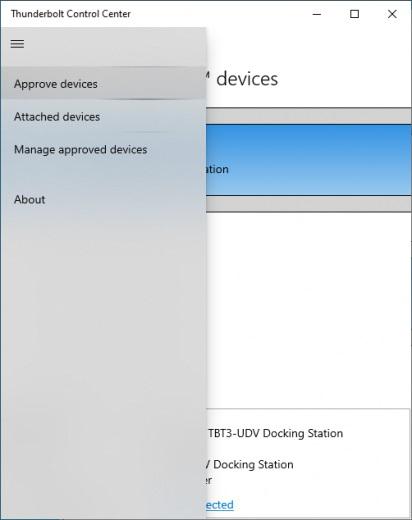
To approve the device click on the menu button (three horizontal lines) and then click “Approve devices”:
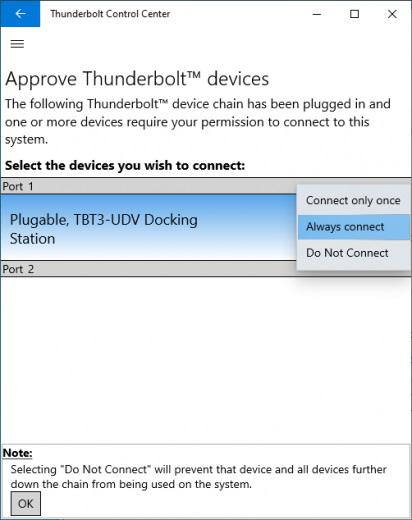
Next you can select “Always connect” and then press “OK” at the bottom of the application:
Your device should then automatically be approved the next time it is attached.
Checking NVM Version (Legacy)
How do I check which version of Thunderbolt 3 software and NVM firmware I am running in Windows?
To determine what version of NVM firmware your system has, the first step is to ensure you have the latest Thunderbolt software version which varies depending on the system manufacturer. You should be able to download it from your system manufacturer’s website.
Once installed you can open the software by searching the start menu for Thunderbolt:
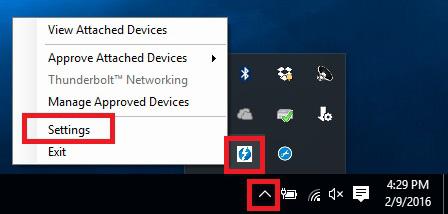
Once open you can find the program sitting in the system tray. You may need to click the caret (up arrow icon) to show all of the running programs then right click on the Thunderbolt icon and select Settings:
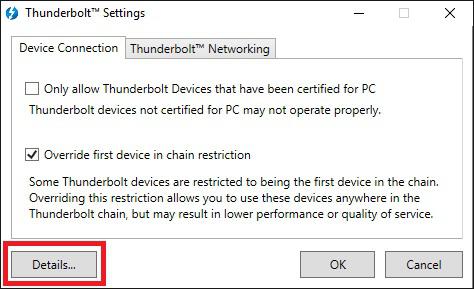
Now you should see the settings window. Click on Details to find out all of the Thunderbolt software and controller information:
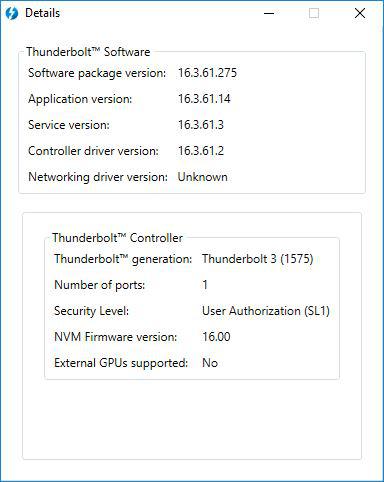
If a Thunderbolt 3 device has been connected to the system the Thunderbolt software will show you information about the controller. Below you can see the details from our Dell XPS 13 9350 system:
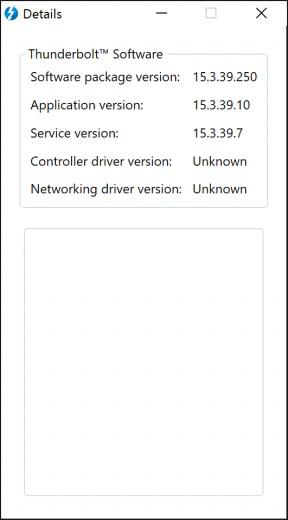
Unfortunately if a Thunderbolt device has not yet been connected to the system, the information about the NVM firmware may not be available within the utility:
Support
If you have any questions feel free to contact our support team, we’re more than happy to help!
Thunderbolt and the Thunderbolt logo are trademarks of Intel Corporation in the U.S. and/or other countries.
Can I leave my notebook computer connected to a charging dock overnight, or should I discharge and recharge the notebook battery regularly?
We are often asked if it is okay to leave a notebook computer connected to one of our USB-C docking stations with Power Delivery for extended periods of time. The short answer is yes, it is no different from leaving the laptop connected to the manufacturer's original USB-C power supply for the same time. The long answer is yes for modern laptops, and maybe for older (1990s-early 2000s laptops) and involves going into the different battery technologies used in consumer electronics devices.
Another common question is if it is possible to use the docking station but to disable powering and charging the computer. When a modern notebook computer runs on battery power it will often set the system to a reduced power state which may impact performance, or connected devices and we recommend always powering the computer when using a desktop docking station. For all of our docking stations that provide power to the host computer this will not affect the lifespan of the computer's battery.
Modern Laptop Batteries: Lithium-Ion
Lithium-ion (li-ion) batteries are found in a wide range of consumer electronics from notebook computers and cell phones, to electric cars, power tools, and wearable electronics like wireless earbuds. Li-ion offers fast charging, high-current discharging, fairly long service live compared to other rechargeable battery technologies and are relatively inexpensive.
The life-span of a rechargeable battery depends on many factors including age, temperature history, charging patterns, the chemical composition of the specific battery, and usage. For example batteries stored at 100% charge will degrade faster than batteries stored at 50% charge, this is why most consumer electronics devices arrive from the manufacturer with between 25% to 75% charge.
Lithium-ion batteries are consumable components, however in most modern computers, cell phones, and tablets these are not user serviceable components. To help maintain the battery all modern computers and most consumer electronics will include battery charge and protection circuits. These can be fairly simple, charging up the battery at preset rates depending on the charge level to help maintain the battery life, or complex software controlled charging that monitors battery temperature, voltage and current draw to maintain the fastest charging while maintaining the battery longevity.
Modern notebook computers can be left connected to the original power cable or a docking station with charging capability for extended periods, and do not benefit from regular discharge/recharge cycles. Our docking stations with charging capability rely on USB Type-C Power Delivery to power and charge compatible computers. USB Type-C Power Delivery is a negotiated charging protocol between the host computer and the docking station or USB Type-C power supply, this allows the computer to draw only the power it requires, and even select the best voltage level for powering the computer. In combination with a computer's built-in battery charging controller the computer is capable of maintaining the battery's optimal state even when left connected to a power source for an extended period of time.
Legacy Laptop Batteries: NiCad and NiMH
Older laptops, from the 1990s and some early 2000s, as well as some consumer electronics, and most rechargeable AA or AAA battery replacements use Nickel-Cadmium (NiCad) or Nickel-Metal Hydride (NiMH) batteries. These batteries are slower to charge and discharge than li-ion batteries, and require very simple charge controllers, and in some cases can even be trickle-charged ( very low-current continuous charging ) if desired.
These batteries generally don't have smart charging controllers and to prolong the life of the battery required "training" or fully discharging and recharging the battery every so often. Many laptop manufacturers recommended fully charging and discharging a new laptop 2-3 times to train the battery, this is not necessary with modern laptops.
Conclusion
Modern notebook batteries are managed by the computer's built-in battery charging circuit, and require little to no user intervention to maintain optimal battery health. It does not harm the battery to leave the computer connected to an external power supply, so long as the computer is being used regularly. If the computer is to be stored for a prolonged period then discharging the battery to between 50-75% can help to maintain the battery life.
Batteries are consumable components and degrade over time, however modern notebook computers can extend the battery life generally to meet or exceed the life of the computer's other electronic components.