





Hassle free, 2-Year Warranty
Fast, Free Shipping on Orders $35+
Lifetime Technical Support
30-Day Money Back Guarantee
Plugable USB 2.0 Wi-Fi 6 Wireless Adapter
$29.95 USD
SKU: USB-WIFINTAmazon Rating : (1138 Reviews)
Features
- Plug-and-Play for Windows 10/11— Automatically installs in Windows 10 and 11 with another active network connection; an offline driver is also provided for managed PCs. Windows 7/8.x, macOS, Linux/ChromeOS, TVs/consoles, and Windows on ARM are not supported.
- Wi-Fi 6 Upgrade for Older PCs— Add fast, reliable Wi-Fi to a desktop or laptop with this USB Wi-Fi adapter, a simple way to replace a broken internal card or modernize an older system. Great as a Wi-Fi adapter for desktop PC. TAA compliant for government and enterprise deployments.
- Dual-Band 2.4 GHz / 5 GHz— Choose 2.4 GHz for range or 5 GHz for speed. Works with modern routers and helps reduce congestion versus single-band wifi adapters.
- Compact USB WiFi Dongle— Low-profile Wi-Fi adapter that can stay inserted without blocking adjacent ports, an easy solution for everyday browsing, meetings, and streaming.
- Real World Speeds on USB 2.0— Expect ~200-350 Mbps speeds USB 2.0 bus is 480 Mb/s theoretical). For best results use 5 GHz for speed (2.4 GHz for range).
This product is TAA compliant
For volume orders or business inquiries contact sales@plugable.com
Free 3-Day Continental U.S. Shipping on Orders Over $35!





Plugable USB WiFi Adapter for Desktop PC and Laptop

Perfect for upgrading old systems
Fix Broken or Missing Wi-Fi in Minutes

No Wi-Fi? No problem. This compact USB adapter restores or adds wireless connectivity in minutes. Great for work, school, browsing, and video calls.
The Simple Upgrade Path

Compact, Port-Friendly Design

Get Online in 3 Steps

A: Faster, more stable wireless performance and smoother multitasking even on crowded networks
A: Expect stability and latency improvements, with real-world throughput commonly ~280–350 Mbps due to the bandwidth limit of the USB 2.0 interface
A: This adapter supports 20 MHz, 40 MHz and 80 MHz channel widths and it will automatically adjust width based on signal quality and interference levels.
Filter Help Articles and Frequent Questions by Category
Choose one or more filters within each category to narrow down the articles. Each selection will result in only displaying articles that include all of your choices.
Articles
Well how about that, it looks like we don't have any articles matching your filters! Try removing one of your choices or clear the filters to show all articles.
You can always contact support if you need help too!
Understanding and Troubleshooting Network Performance
How Do I Benchmark and Troubleshoot Network Adapter Performance Using iPerf?
Problem Summary
Network adapter performance issues or unexpected speed throttling are commonly caused by local network bottlenecks, driver configurations, VPN services, or Wi-Fi priority settings rather than adapter hardware defects. Establishing a direct point-to-point connection and running an iPerf benchmark isolates network bottlenecks and confirms whether the adapter is achieving its rated throughput.
Isolating the Issue
We recommend starting by isolating the issue to the lowest OSI layer and working up. The Open Systems Interconnection (OSI) model is a framework for understanding network communications and is divided into seven layers:
- Physical - This is the physical adapters, wires between two points. It can be thought of as each discrete component for example a USB to Ethernet adapter, or Ethernet cable.
- Data Link Layer - This layer handles the direct communications between devices, using the hardware MAC Address. Communications at this layer are blocked by a router. (MAC address) hardware: Ethernet switch
- Network Layer - This layer includes the IP address and allows for transmitting data between routed networks. (IPv4, IPv6) hardware: Router.
- Transport Layer - This layer handles the end-to-end message delivery, and optionally error recovery and flow control, and operates in software. (TCP, UDP). For our purposes this as high as Plugable products really interact, the three next layers are independent of our products.
- Session Layer - Opens, manages, and closes sessions between applications.
- Presentation Layer - This includes SSL/TLS encryption, data formats like JPEG or PNG
- Application Layer - This is the interaction layer for most users and applications, including web pages: HTML, JavaScript etc content.
Physical
When you receive no network connection at all, try a different Ethernet cable, Ethernet switch port, or bypass any devices and connections between the computer's network port and the Ethernet switch. Intermediary devices and connections (like keystone wall sockets, IP telephony systems, etc) can cause reduced network reliability. Check for the Ethernet port Link and Activity LEDs on both the computer's Ethernet adapter, and the switch port.
Data Link and Network
For simplicity these can be combined for testing, check to see if the system is receiving an IP address with terminal commands like ipconfig /all in Windows, or ip -a -br -4 in Linux. We can also check for local network connectivity by "pinging" a local resource like the router ping 192.168.1.1 where "192.168.1.1" is the IP address of the router - this will depend on your specific network configuration.
For performance related issues testing the local network, that is devices connected by one or more Ethernet switches, or even directly connected Ethernet port to Ethernet port is the first step in narrowing down an internet slowdown, to determine if the issue is between the computer and router, or between the router and internet service provider.
Local network performance testing can take a couple of forms, the most common is a utility like iPerf3 that is specifically designed for testing or benchmark a network connection. iPerf3 is designed specifically for Linux and Unix-like operating systems, it has been ported by 3rd parties to both Windows and macOS but has some limitations.
iPerf 3 Basic Benchmark
Testing with iPerf3 requires two computers - a server and a client. Generally we recommend a Linux system for the server, this will be more stable and provide more testing options, however a Windows or macOS server may also be used for basic testing. The client computer can also be Linux, Windows, or macOS, again with some limitations for non-Linux clients that shouldn't impact this this testing.
Installing iPerf3
For Linux install iPerf3 from your package manager: for Fedora (Redhat based distributions): sudo dnf -y install iperf3, or for Ubuntu (Debian based): sudo apt update && sudo apt install iperf3.
For Windows iPerf3 has been maintained by a 3rd party on GitHub and can be downloaded by selecting the Releases on the right column.
For macOS the easiest installation is through homebrew: brew install iperf3.
Configure the Server
Connect the computer to the network - or directly to the client computer - direct connections are not covered here but you can look up how to manually set IP addresses on both computers. Then look up the IP address assigned to the server open a terminal and run the following command
- Windows:
ipconfig /all - Linux:
ip -br -4 addr - Mac: You will need to look up the IP address through the macOS Apple Menu > System Settings > Network settings menu
The server simply needs to run iPerf3 with the -s argument. Open a terminal and navigate to the iPerf3 executable (Windows - for Linux and macOS after installation iPerf3 will be in the PATH), and run the program
- Windows:
iperf3.exe -s - Linux/mac:
iperf3 -s
Running a test
The most basic tests iPerf3 offers are 10-second upload or download tests, however there are many configuration options available to us. Open a terminal and navigate to the iPerf3 executable (Windows - for Linux and macOS after installation iPerf3 will be in the PATH), and run the program:
- Windows:
iperf3.exe -c Server_IP - Linux/mac:
iperf3 -c Server_IP
This will start an upload test to the server and print the result after each second, and a summary result to the terminal.
We can similarly start a download test by adding the -R reverse direction flag with the following:
- Windows:
iperf3.exe -c Server_IP -R - Linux/mac:
iperf3 -c Server_IP -R
Here is the example output of a download test from a local server at 192.168.1.250.
Connecting to host 192.168.1.250, port 5201
Reverse mode, remote host 192.168.1.250 is sending
[  5] local 192.168.1.90 port 39982 connected to 192.168.1.250 port 5201
[ ID] Interval           Transfer     Bitrate
[  5]   0.00-1.00   sec   112 MBytes   935 Mbits/sec
[  5]   1.00-2.00   sec   112 MBytes   936 Mbits/sec
[  5]   2.00-3.00   sec   112 MBytes   937 Mbits/sec
[  5]   3.00-4.00   sec   112 MBytes   936 Mbits/sec
[  5]   4.00-5.00   sec   112 MBytes   936 Mbits/sec
[  5]   5.00-6.00   sec   112 MBytes   936 Mbits/sec
[  5]   6.00-7.00   sec   112 MBytes   937 Mbits/sec
[  5]   7.00-8.00   sec   112 MBytes   936 Mbits/sec
[  5]   8.00-9.00   sec   112 MBytes   936 Mbits/sec
[  5]   9.00-10.00  sec   112 MBytes   936 Mbits/sec
- - - - - - - - - - - - - - - - - - - - - - - - -
[ ID] Interval           Transfer     Bitrate         Retr
[  5]   0.00-10.04  sec  1.09 GBytes   935 Mbits/sec    0             sender
[  5]   0.00-10.00  sec  1.09 GBytes   936 Mbits/sec                  receiver

iperf Done.
Each line shows the amount of data and average speed within a 1-second interval, this is great for catching intermittent issues, brief or transient slowdowns etc.
The summary (below the dashed lines) shows the Bitrate at 935 or 936 Mbits/second - measured by the client and serve respectively, with zero Retr (Re-transmits) from the client. This is pretty typical for a gigabit Ethernet connection (1000Mbps) through a home network (in this case two Ethernet switches).
Longer tests can be run by specifying the number of seconds: -t SECONDS where SECONDS is the time in seconds, for example 600 for 10 minutes. Additional settings and options can be found in the iPerf3 documentation and manual.
What does iPerf3 tell us?
iPerf3 tests the network bandwidth between two computers, by default this uses TCP (up to OSI Layer 4), for a local network segment. If the network performance between the client and server meets the expected bandwidth then performance issues are most likely outside of this scope. Internet speed testing can test the performance from the local network to the internet resource, however internet speeds will generally be less stable than local network speeds, many ISPs (Internet Service Providers) use shared bandwidth for multiple customers which can create slow times of day (for example when people start getting home from school/work), and may have asynchronous upload and download speeds. When comparing internet speed test results we recommend keeping your internet service expectations in mind.
For internet speed tests there are many options from different providers, these generally all operate through the web browser, introducing potential slowdowns from browser extensions and configuration, VPN (Virtual Private Network) connections and more. Here are some of the more common internet-based speed tests we see.
If benchmark speeds remain significantly lower than expected or the test fails to run, verify that both host computers support the targeted Ethernet link rates, test with a Cat 6a or better Ethernet cable, and temporarily disable security software that may filter local network traffic. If performance issues continue, contact Plugable support at support@plugable.com with your product model, host system specifications, and iPerf test results or PlugDebug diagnostic logs.
Applicable To
- Plugable products with Ethernet ports, or Plugable Ethernet adapters
- Systems running Windows, macOS, or Linux
If you have any questions please feel free to contact us at support@plugable.com and we'll be happy to help!
USB-WIFINT New vs Old version and their feature differences
Differences Between the Plugable USB Wi-Fi 4 and Wi-Fi 6 Adapter
The Plugable USB-WIFINT adapter has been upgraded from a legacy Wi-Fi 4 standard to modern Wi-Fi 6. It offers improved connectivity and security while maintaining a compact USB design. The following table outlines the technical specifications and key differences between the original Wi-Fi 4 version and the updated Wi-Fi 6 model.
| Feature | Wi-Fi 4 Adapter (Legacy) | Wi-Fi 6 Adapter (Current) |
|---|---|---|
| Wi-Fi Generation | Wi-Fi 4 (802.11n) | Wi-Fi 6 (802.11ax) |
| Wireless Frequencies | Single Band (2.4GHz only) | Dual Band (2.4GHz & 5GHz) |
| Security Standards | WPA / WPA2 | WPA2 / WPA3 |
| MIMO Technology | SU-MIMO (Internal PiFa Antenna 1x1) | MU-MIMO / OFDMA (Internal PiFa Antennas 2T2R) |
| Channel Bandwidth | 20MHz / 40MHz | 20MHz / 40MHz / 80MHz |
| Chipset | Realtek RTL8188EUS | Realtek RTL8832BU |
| OS Compatibility | Windows 11, 10, 8.x, 7, macOS 10.6 to 10.14 | Windows 10, and 11 |
| Interface | USB 2.0 | USB 2.0 |
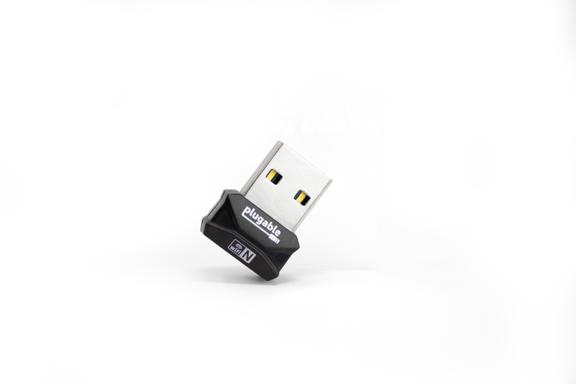
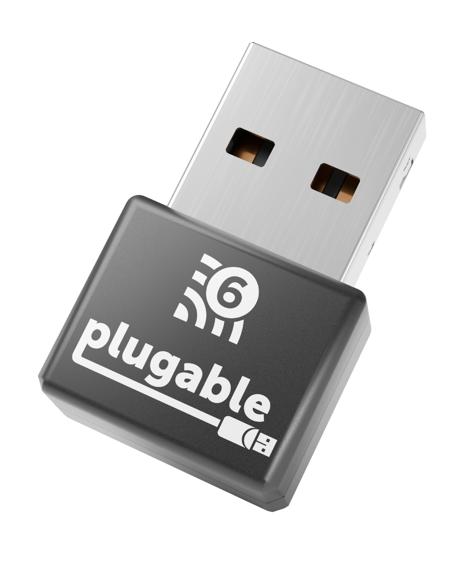
Why does my USB-WIFINT appear to be different than what is currently pictured?
The original USB-WIFINT Wi-Fi adapter was released in 2015 and was sold until 2025. The newer version of the USB-WIFINT is now available and is using a newer Realtek Wi-Fi 6 RTL8832BU chipset with an updated physical design.
Pictured is the previous version of the USB-WIFINT that is based on Wi-Fi 4.
Pictured is the new version of the USB-WIFINT that is based on Wi-Fi 6.
How to install drivers for the original USB-WIFINT
The original USB-WIFINT Wi-Fi 4 adapter was sold up until early 2026 and featured a Realtek RTL8188EUS chipset. On Windows 11 and 10 systems, drivers are fully built into the operating system—no installation is needed.
For Windows 8.x or 7, if you have an active network connection, the driver should install automatically via Windows Update once the adapter is plugged in.
If no internet connection is available, you can perform a manual installation. Follow the steps below for your specific version:
USB-WIFINT (RTL8188EUS) - Windows XP to Windows 10
- Download the drivers: USB-WIFINT (Wi-Fi 4) Windows Driver
- Connect the USB-WIFINT to your computer.
- Extract the downloaded ZIP folder (Right-click and select "Extract All...").
- Run setup.exe from the extracted files with administrator privileges.
- Follow the installation prompts and restart your computer once complete.
Legacy macOS (10.6 to 10.14)
- Download the drivers: USB-WIFINT macOS Driver (10.6-10.12)
- Double-click the downloaded file to extract it.
- Run the installer and follow the prompts.
- Restart your computer to complete the connection setup.
Legacy RTL8188CUS Revision (Sold before 2017)
- Download the drivers: Windows XP to Windows 10 Legacy Driver
- Run the downloaded executable file.
- Follow the installation process.
- Restart your computer to connect to a wireless network.
If you encounter errors or issues, please contact Plugable Support for further assistance.
How to install the drivers for USB-WIFINT Wi-Fi 6 adapter
The drivers for the USB-WIFINT Wi-Fi 6 adapter will install automatically through Windows Update as long as there is an existing internet connection such as ethernet.
Drivers are available for manual driver installation as well. Here is how to install the drivers for the USB-WIFINT:
- Download the following drivers: 5001.15.134.3_Plugable
- Connect the USB-WIFINT to your computer.
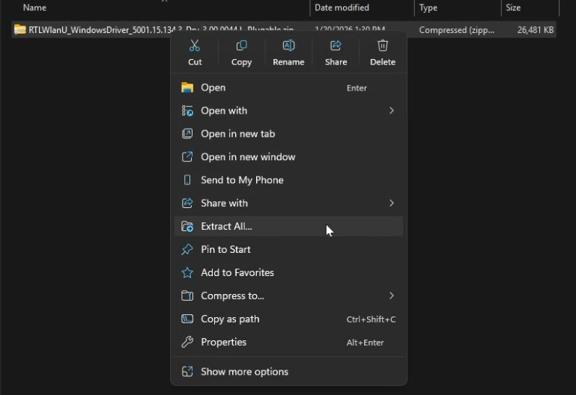
- Extract the compressed folder (you can Right Click then select the "Extract All..." option)
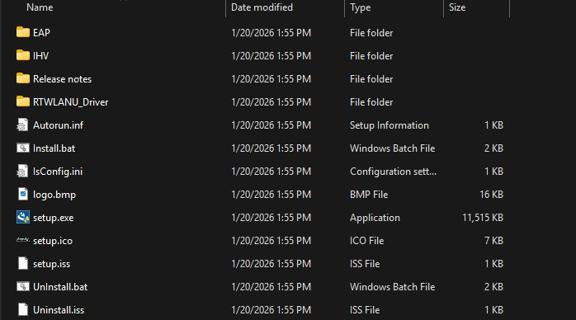
- Find the setup.exe in the files that were extracted, and run it with administrator privileges.
- Continue through the install process of setup.exe.
-
- Once driver installation is complete, you will need to restart your computer to connect to a wireless network.
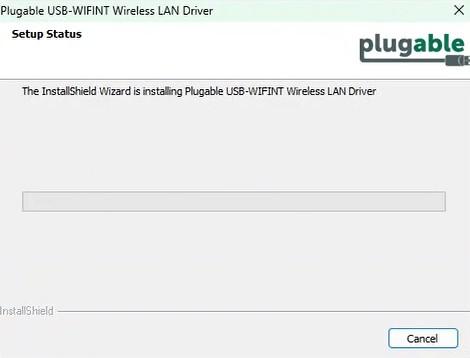
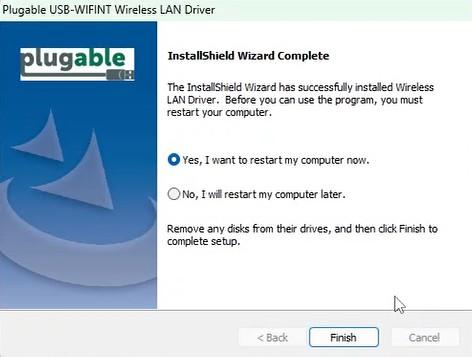
If you get an error, please contact Plugable Support. If there are still issues, please contact us so we can help
If USB 3.x Is Newer and Faster, Why Does Plugable Recommend Using a USB 2.0 Port Instead of a USB 3.0 Port With USB 2.0 Wireless Adapters?
In part, because the higher speed of the USB 3.0 port (also known as USB 3.1 Gen 1 and USB 3.2 Gen 1) offers no advantage if the device itself is USB 2.0. For Plugable's USB 2.0 Bluetooth and Wi-Fi adapters, the performance is far below even the throughput of USB 2.0.
Also, the adapter itself is a USB 2.0 device and there is a critical issue that was overlooked in the design of USB 3.0 specifications. Many USB 3.0 ports leak broad-spectrum radio interference in the 2.4GHz to 2.5GHz range, which is the same radio band used by Bluetooth and Wi-Fi
While this interference can be reduced through heavy shielding, it cannot be entirely avoided as it is inherent to the core design of USB 3.0. USB 2.0 ports do not have this issue. However, a USB 2.0 port that is in close proximity to an in-use USB 3.0 port may also be affected by radio noise leaked by it.
Why Shouldn’t I Plug Wireless Adapters In at the Back of My Computer? I Don’t Really Have Any Ports on the Front. Given That, What Am I Supposed to Do?
Components inside a tower-style computer case are largely exposed, and there is very little shielding to reduce the radio interference they produce. This is particularly true at the rear input/output panel of a PC. This is why cables that are designed to plug into the back of a computer often have a ferrite bead attached to them, to reduce radio interference. Also, the wireless signal weakens as it travels through the metal and plastic computer case and goes past the noise-producing components.
If you don’t have a port available on the front your PC, consider using a USB 2.0 hub to add ports located away from the back of your PC, or use a USB 2.0 extension cable to move the adapter to a location in line-of-sight with your receiving device.
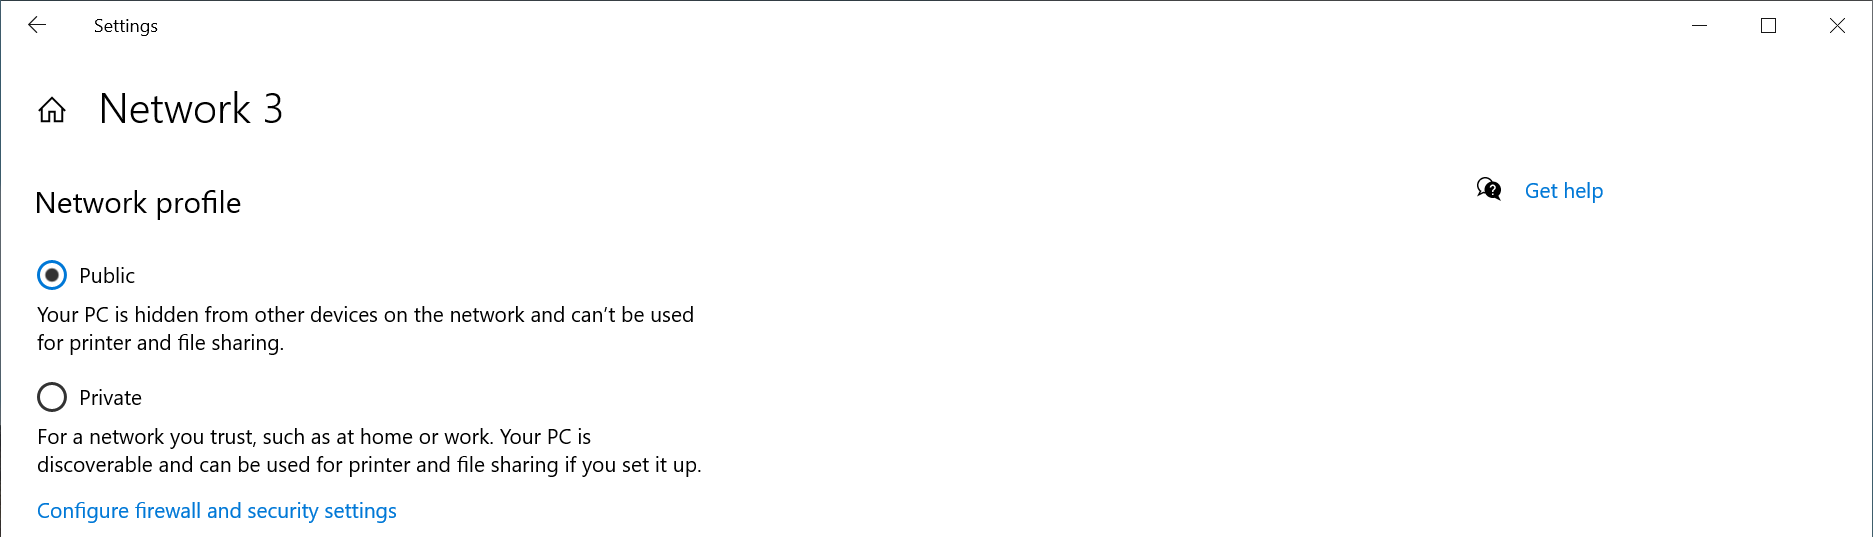
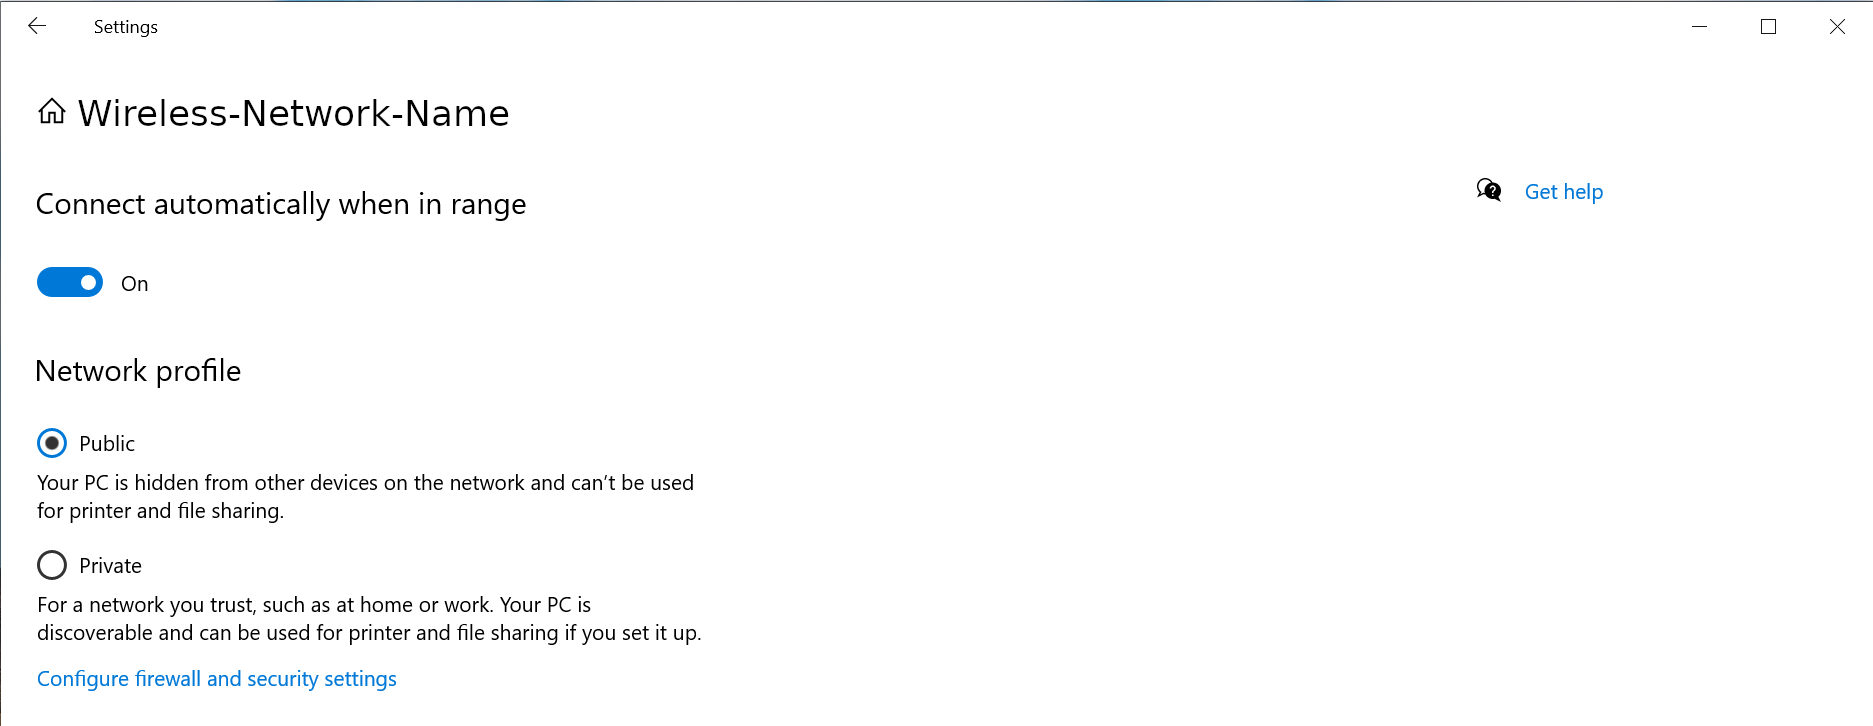
How To - Set a Network to Private or Public in Windows 10 & 11
The Windows Firewall may block some networking features when the local network is not set to Private. This article will describe the process for setting the local network, either wired Ethernet or Wi-Fi to be a Private network.
Windows 11
1 - Connect the computer to the network, either wired or wireless
2 - Open the Windows Settings: right-click on the Start Menu and select Settings from the pop-up menu
3 - On the left column select Network & internet
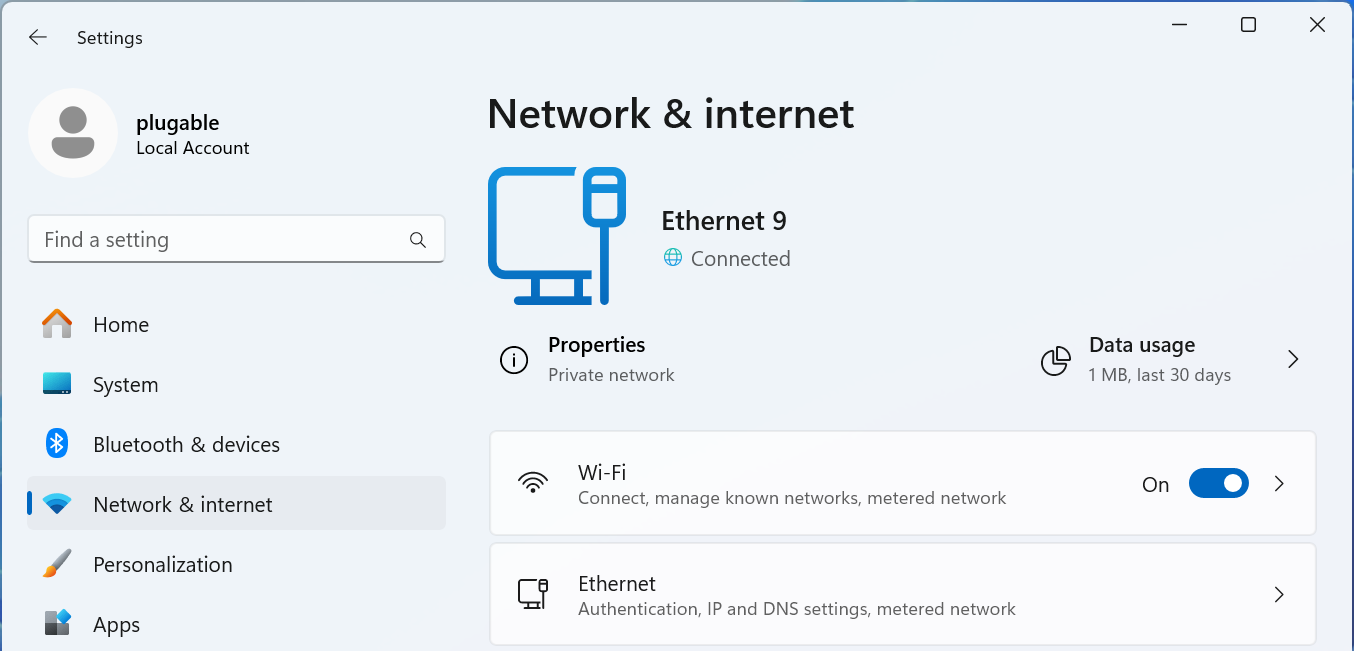
For Wired Networks
4 - Select the Ethernet option
5 - The connected network should be expanded, if not click on Network Connected to expand the section
6 - Select the Network profile type either Public network or Private network to suite your needs
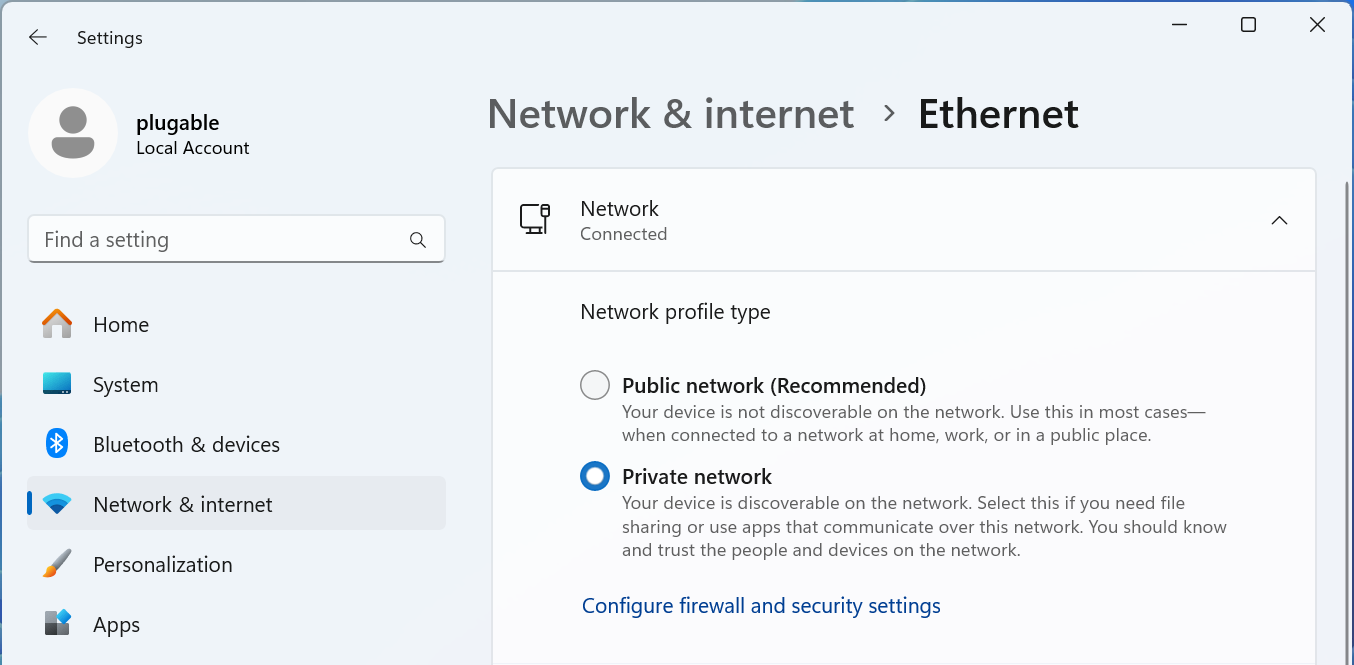
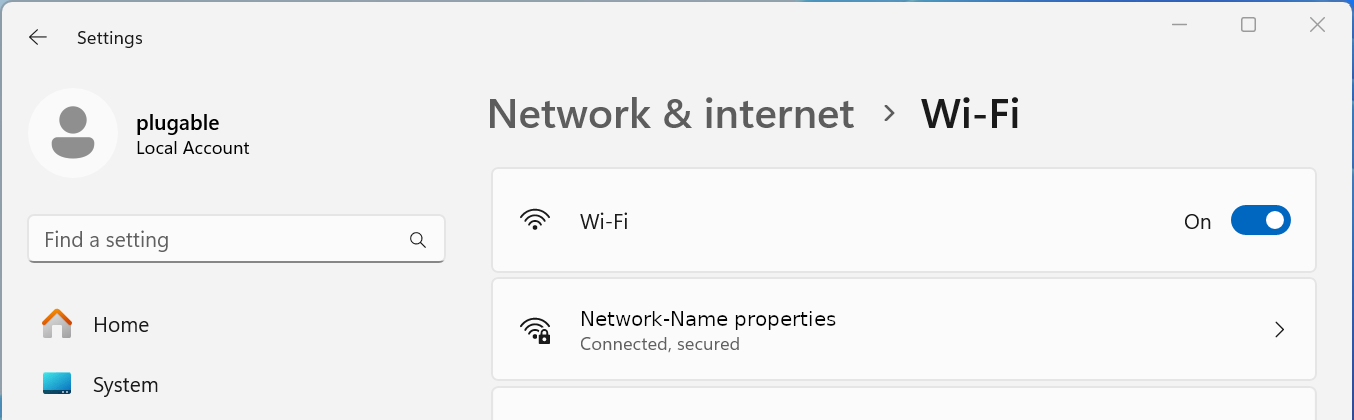
For Wi-Fi Networks
4 - Select the Wi-Fi option
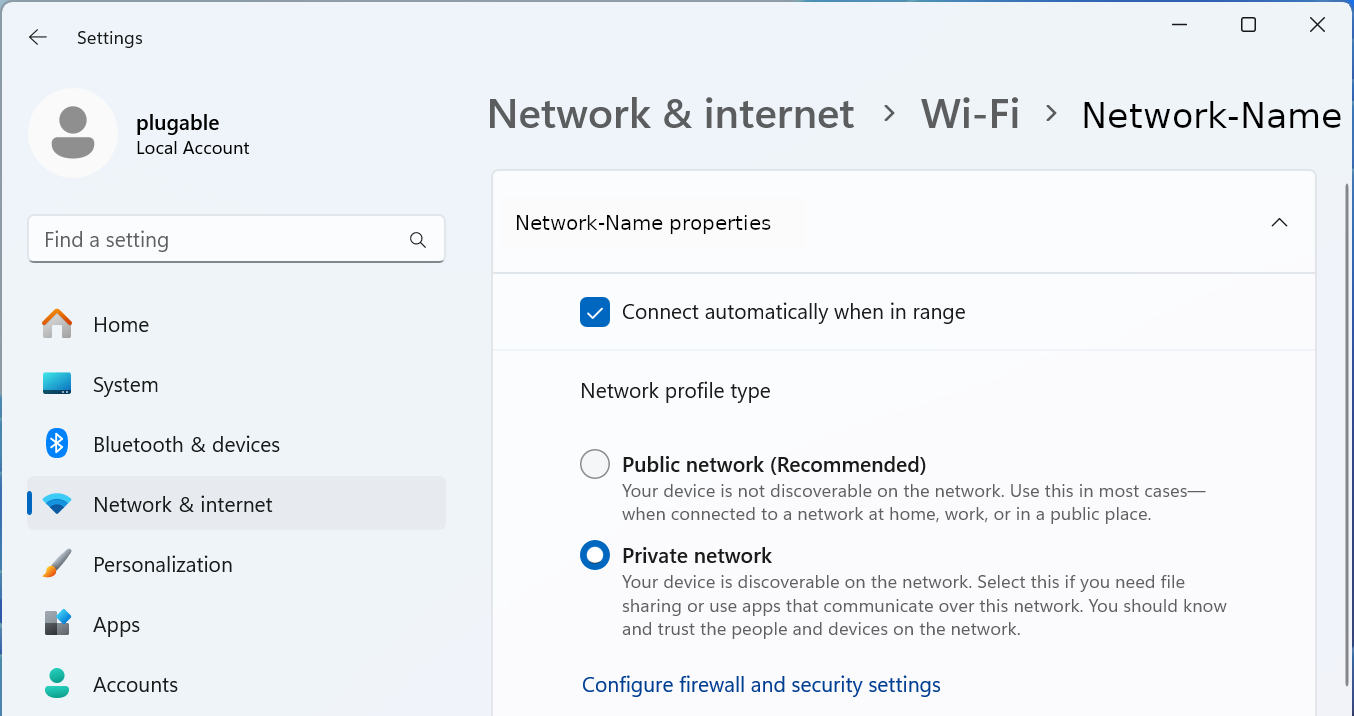
5 - Select your Wi-Fi network name properties
6 - Select the Network profile type either Public network or Private network to suite your needs
Windows 10
1 - Connect the computer to the network, either wired or wireless
2 - Open the Windows Settings - right-click on the Start Menu and select Settings from the pop-up menu
3 - Select Network & Internet fro the bottom section
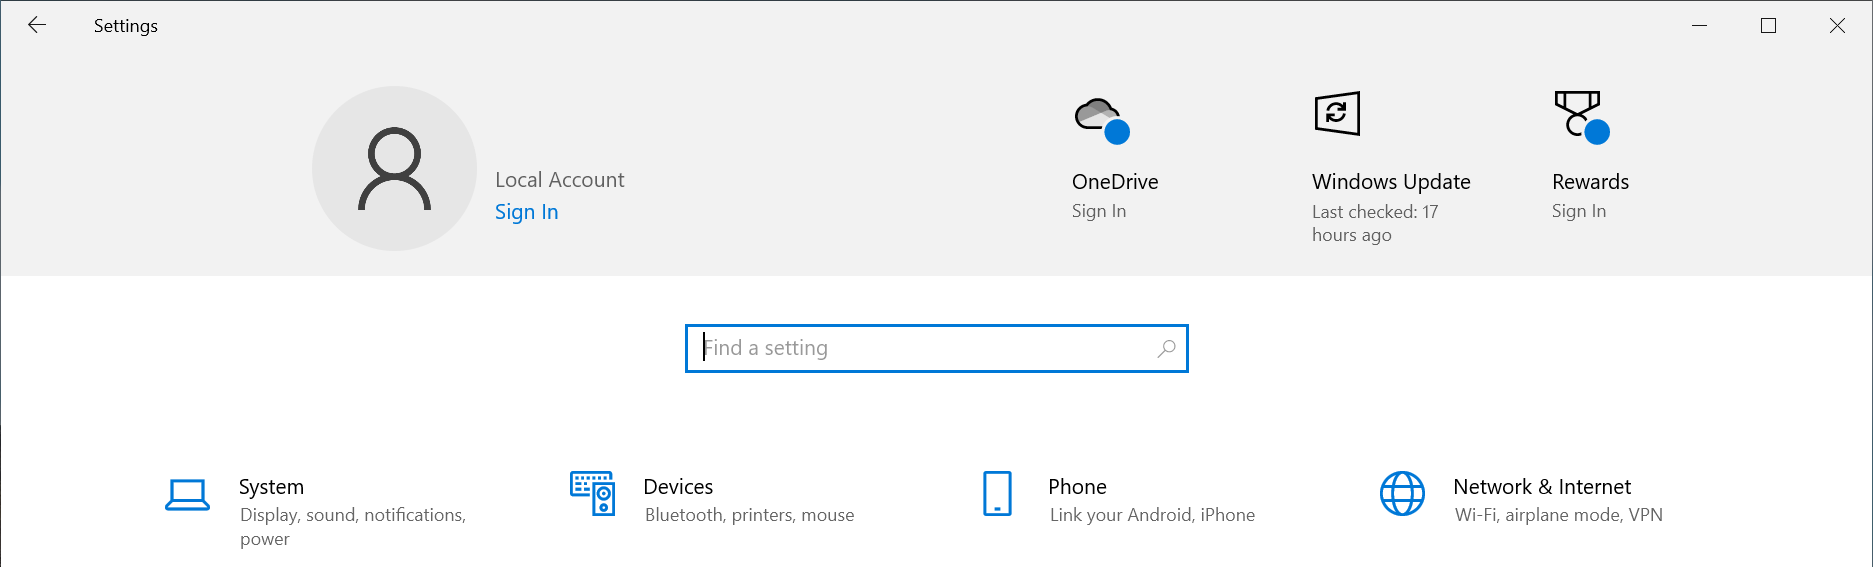
4 - Select the Ethernet option from the left pane
5 - Select the Connected network from the right pane
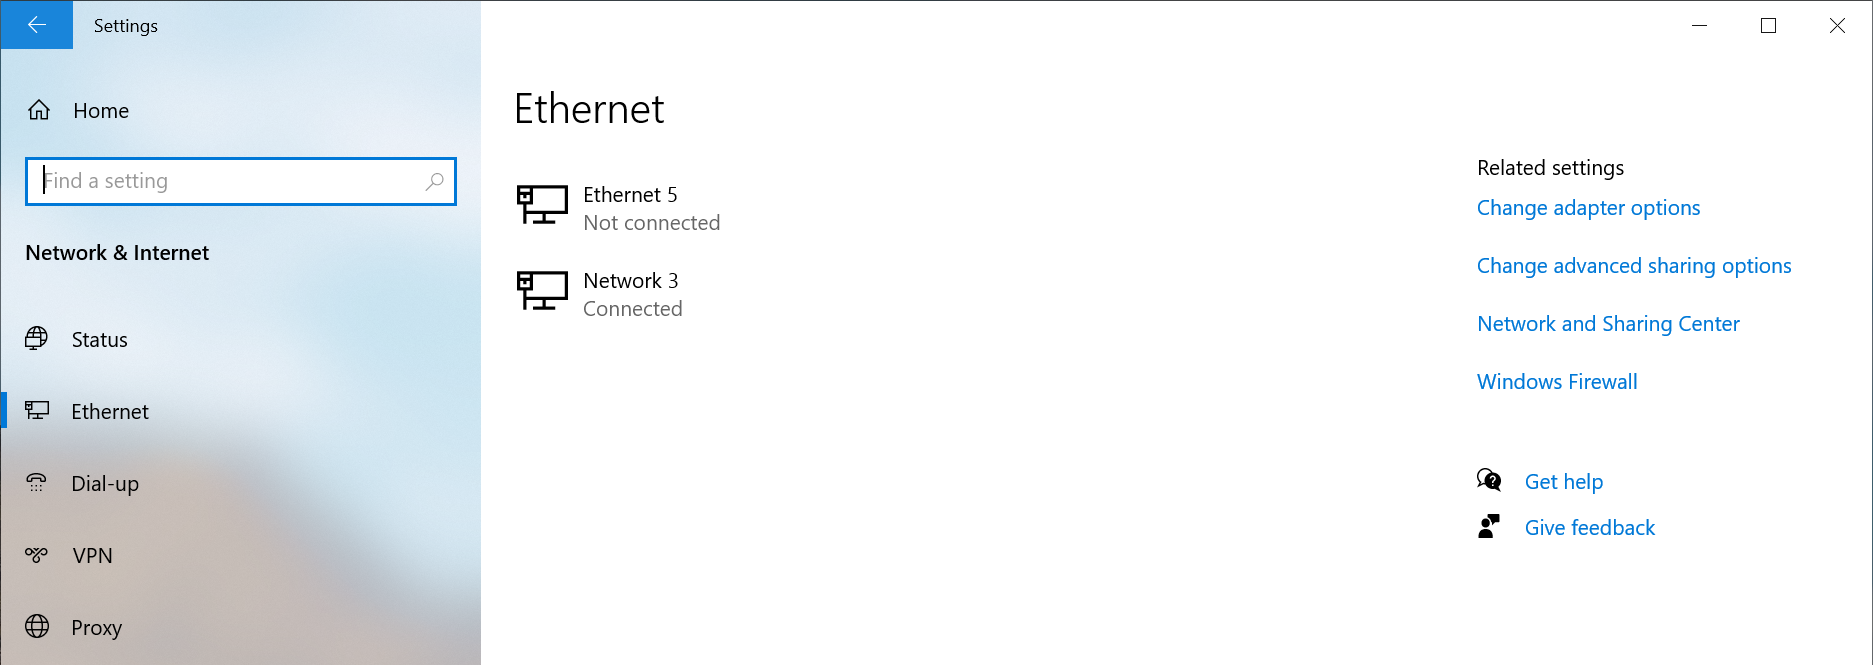
6 - Select the Network profile type either Public network or Private network to suite your needs
Windows PowerShell
If the option does not show up in the Windows Settings GUI, for example if the network is not connected to the internet, or if you prefer to use the terminal.
1 - Open a new terminal: Right-click on the Start Menu and select Terminal
2 - Run the following command to list the available networks
Get-NetConnectionProfile
PS C:\Users\plugable> Get-NetConnectionProfile
Name                     : Network
InterfaceAlias           : Ethernet Instance 0
InterfaceIndex           : 7
NetworkCategory          : Private
DomainAuthenticationKind : None
IPv4Connectivity         : Internet
IPv6Connectivity         : NoTraffic
3 - Run the following command to set the network to Private
Set-NetConnectionProfile -Name Network -NetworkCategory Private
Where Network is the network name from step #2 and Private can be either Public or Private
If you have any questions please feel free to contact us at support@plugable.com and we'll be happy to help!
Choosing the Best Network Adapter for Your Needs
If you're looking to upgrade your wired or wireless network speed and internet connection with a Plugable USB network adapter, you’ll want to make sure you pick the right one for your setup. The three key factors to consider are:
- The type of network you are connecting to: Wired or Wireless (Wi-Fi)
- The type of USB port on your computer (USB-A, USB-C, or Thunderbolt)
- The Ethernet speed you need (Gigabit, 2.5 Gigabit, 5Gbps, or Wi-Fi)
This guide will help you quickly determine which Plugable adapter best fits your needs.
Step 1: Identify Your USB Port Type
Different Plugable adapters are designed for different USB connections. Here's how to find out what type of USB port your computer has:
- USB-A Port (Rectangular Shape) – Found on most older and some newer PCs and laptops. If your device has standard USB ports, you'll want an adapter with a USB-A connector.
- USB-C Port (Small, Oval Shape) – Found on modern laptops, tablets, and some desktops. If your computer has a USB-C or Thunderbolt 3/4 port, a USB-C adapter is a better choice.
- Thunderbolt 3 or 4 – Thunderbolt ports support USB-C accessories, so any Plugable USB-C Ethernet adapter will work.
💡 Not sure which ports your computer has? Check the manufacturer's website or look for an icon next to the port: a Lightning bolt indicates Thunderbolt ( or charging ) while a USB logo will indicate the USB version.
Step 2: Determine the Ethernet Speed You Need
Your network speed is influenced by both your internet plan and the devices on your network. Choose an adapter based on the speed you want to achieve:
| Network Speed | Best Use Cases | Recommended Plugable Adapter |
|---|---|---|
| 100Mbps (Fast Ethernet) | Basic browsing, emails, and light streaming | USB2-E (USB-A, 100Mbps) |
| 1Gbps (Gigabit Ethernet) | Streaming, gaming, and large file transfers |
USB3-E1000 (USB-A, 1Gbps) or USBC-E1000 (USB-C, 1Gbps) |
| 2.5Gbps and 5Gbps (Multi-Gig Ethernet) | High-speed networks, NAS, 4K+ streaming |
USBC-E2500 (USB-C, 2.5Gbps) or USBC-E5000 (USB-C, 5Gbps) |
| Wi-Fi (802.11N or Wi-Fi 4) | Adding Wi-Fi 4 to older notebook and desktop computers | USB-WIFINT (USB-A Wi-Fi 4 150Mbps) |
💡 Check your router’s specifications to see if it supports higher speeds like 2.5Gbps before choosing a multi-gig adapter.
Step 3: Choose the Right Adapter for Your System
Now that you know your USB port type and Ethernet speed requirements, here’s a quick guide to help you select the right Plugable adapter. The best bet is to meet or exceed the internet service provider’s rated speed, or for local file transfers the speed of the other systems on the network. For example, say your ISP provides a 2Gbps internet connection, then a 2.5Gbps or 5Gbps Ethernet adapter will be a good fit, while a 1Gbps adapter will still enable internet connectivity, the maximum data rate would be limited to 50% that of the rated internet speed.
For USB-A Computers
✅ Need basic 100Mbps Ethernet? → Choose the USB2-E100
✅ Need Gigabit speeds? → Choose the USB3-E1000
✅ Need Wireless Connectivity → Choose the USB-WIFINT
For USB-C or Thunderbolt 3/4 Computers
✅ Need Gigabit speeds? → Choose the USBC-E1000
✅ Need 2.5Gbps speeds? → Choose the USBC-E2500
✅ Need 5Gbps speeds? → Choose the USBC-E5000
Frequently Asked Questions (FAQs)
Q: Can I use a USB 3.0 Ethernet adapter in a USB 2.0 port?
A: Yes, but it will be limited to USB 2.0 speeds, which may affect performance.
Q: Will these adapters work with macOS, Windows, and Linux?
A: For the most part yes, except for our USB-WIFINT relies on proprietary drivers and is not recommended for macOS, Linux, or ChromeOS systems
Q: Does a faster Ethernet adapter make my internet speed faster?
A: Only if your internet service provider (ISP) plan supports higher speeds. A 2.5Gbps adapter won’t improve speeds on a 1Gbps internet connection.
Q: Can I use a USB-C adapter with a USB-A computer using an adapter?
A: It depends. Some USB-C to USB-A adapters may work, but some are limited to USB 2.0 data rates and can affect the network performance. When possible we recommend using a native USB-A Ethernet adapter for most reliable performance.
Conclusion
Picking the right Plugable USB to Ethernet adapter comes down to knowing your USB port type and the speed you need. Whether you’re looking for a basic 100Mbps connection or blazing-fast 5Gbps speeds, Plugable has an adapter to keep you connected.
Still have questions? Reach out to Plugable’s support team via email at support@plugable.com for help choosing the best adapter for your setup!


